Creda CLR5C Handleiding


Lees hieronder de 📖 handleiding in het Nederlandse voor Creda CLR5C (4 pagina's) in de categorie Niet gecategoriseerd. Deze handleiding was nuttig voor 24 personen en werd door 2 gebruikers gemiddeld met 4.5 sterren beoordeeld

Pagina 1/4
CAUTION: Some parts of this product can
become very hot and cause burns. Particular
attention has to be given where children and
vulnerable people are present.
Precautions should be taken to ensure that
prolonged contact with the towel rail cannot
occur. Particular care should be taken in
conîš¿ned areas where accidental prolonged
contact with the rail could be more likely to
occur.
This appliance should only be used to dry
fabrics washed in water using commonly
available detergents.
A means for disconnection must be
incorporated in the îš¿xed wiring in accordance
with the wiring rules. The supply circuit to
the heater must incorporate a double pole
isolating switch having a contact separation
of at least 3mm.
If the supply cord is damaged, it must be
replaced by the manufacturer, its service
agent or similarly qualiîš¿ed persons in order
to avoid a hazard.
IMPORTANT - If the towel rail is to be installed
in a place used by the public, a warning notice
should be placed adjacent to the rail advising
that the surface can be hot.
WARNING - the towel rail is a sealed unit
and is filled and sealed under controlled
conditions. Under no circumstances should
the seal of the unit be compromised
WARNING - In order to avoid a hazard for
very young children, this appliance should
be installed so that the lowest heated rail is
at least 600mm above the oor.
Important Safety Advice
WARNING - THE SURFACE OF THIS
RADIATOR CAN BE HOT.
In order to be effective the towel rail will get
hot, however momentary contact with any
part of it should not cause injury.
The heater is to be installed so that switches
and other controls cannot be touched by a
person in the bath or shower
CAUTION - This appliance can be used by
children aged from 8 years and above and
persons with reduced physical, sensory or
mental capabilities or lack of experience
and knowledge if they have been given
supervision or instruction concerning use of
the appliance in a safe way and understand
the hazards involved. Children shall not
play with the appliance. Cleaning and user
maintenance shall not be made by children
without supervision.
Children of less than 3 years should be
kept away unless continuously supervised.
Children aged from 3 years and less than 8
years shall only switch on/off the appliance
provided that it has been placed or installed
in its intended normal operating position
and they have been given supervision
or instruction concerning the use of the
appliance in a safe way and understand
the hazards involved. Children aged from 3
years and less than 8 years shall not plug in,
regulate and clean the appliance or perform
user maintenance.
IMPORTANT : THESE INSTRUCTIONS SHOULD BE READ CAREFULLY AND RETAINED FOR FUTURE REFERENCE
Installation and Operating Instructions
Ladder Towel Rail
Model : CLR5C, CLR5W, CLR7C, CLR7W, CLR10C, CLR10W, CLR12C & CLR12W
08/53052/0 (UK) Issue 1
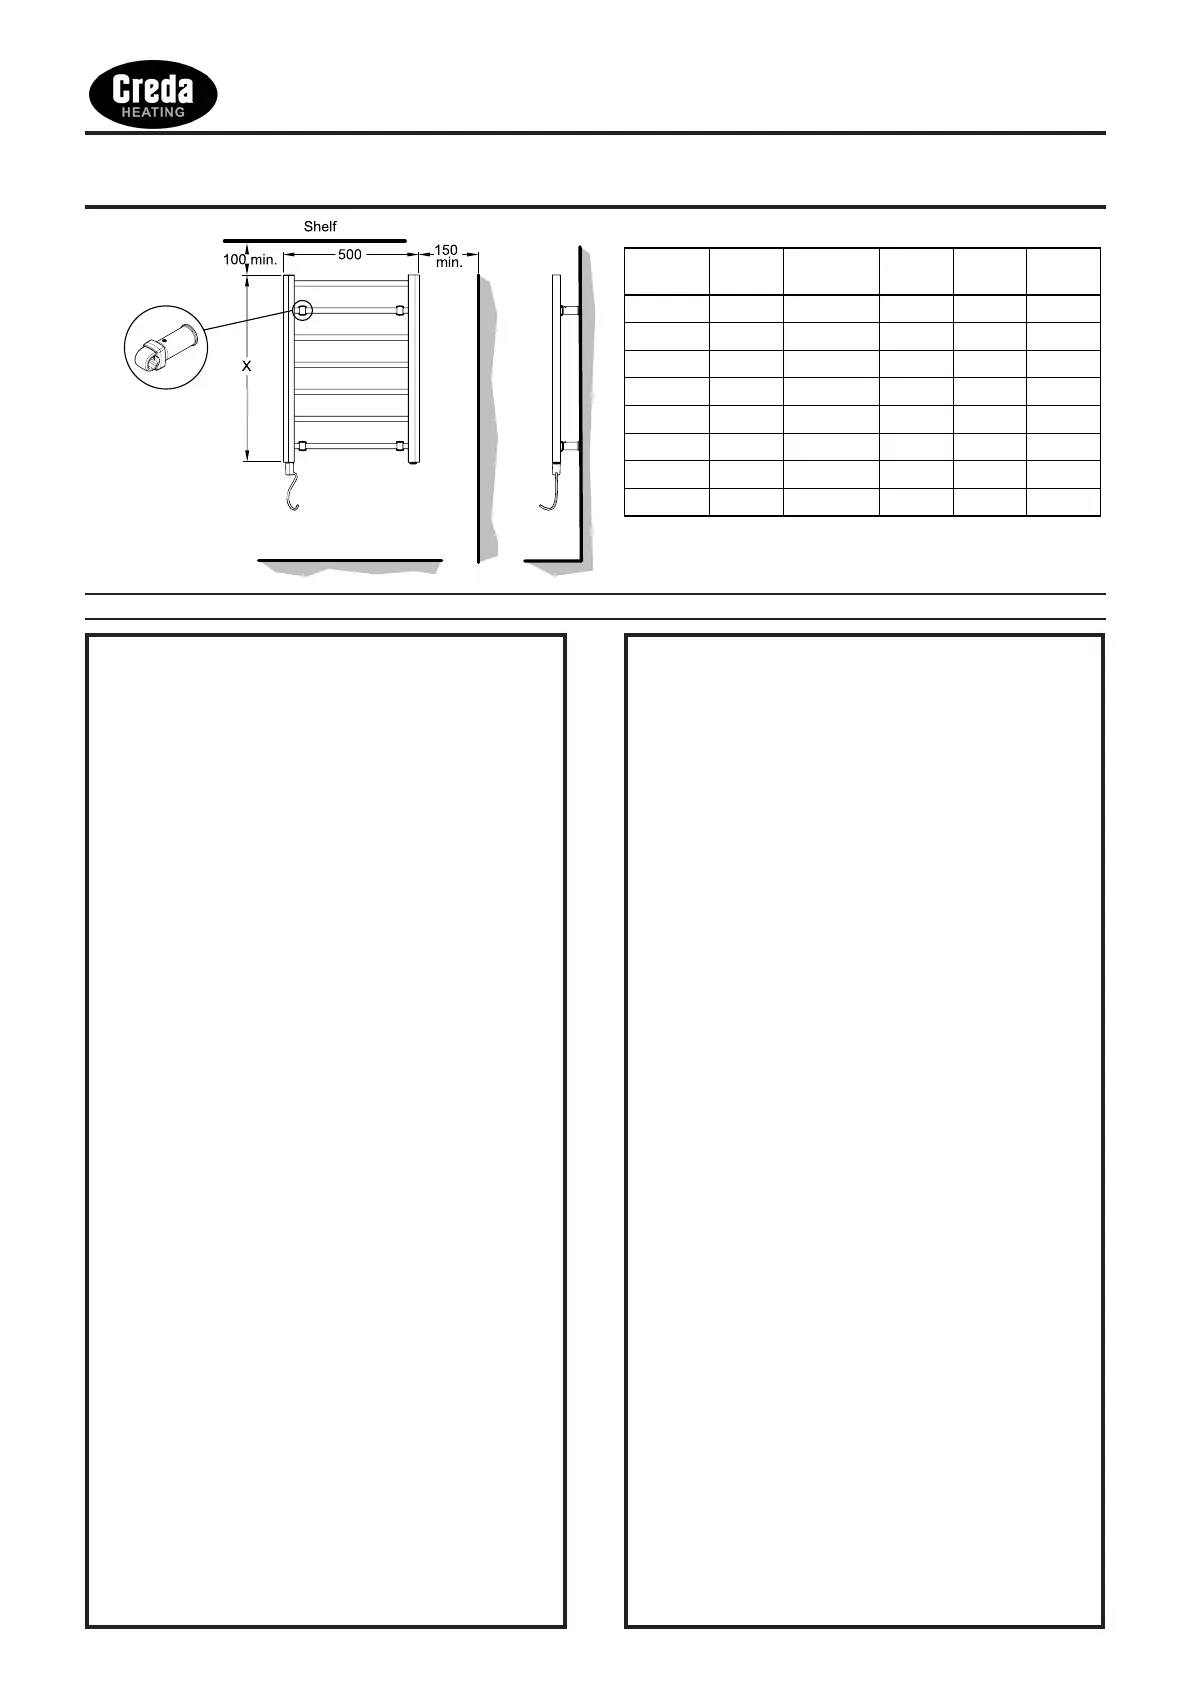
Model Rails Height (X)
(mm) îš¿g.1
Power
(W)
Weight
(kg) Finish
CLR5C 5 492 60 4.0 Chrome
CLR5W 5 492 100 4.0 White
CLR7C 7 692 80 5.4 Chrome
CLR7W 7 692 120 5.4 White
CLR10C 10 992 120 7.6 Chrome
CLR10W 10 992 175 7.6 White
CLR12C 12 1192 175 9.2 Chrome
CLR12W 12 1192 250 9.2 White
Dimensions
(millimetres)
Fig. 1
(A) 4 Mounting collars,
(B) 4 Rail seats,
(C) 4 Inner wall bracket sleeve,
(D) 4 Outer wall bracket sleeve,
(E) 4 Position locking screws,
(F) 4 Wall plugs,
(G) 4 Wall mounting screws,
Procedure for wall mounting
Wall mounting dimensions:
mm
Step 1
Mark suitable mounting hole positions for the îš¿xing brackets (ensuring
they are horizontal) - see , ensure to allow enough room above Fig. 3
and below to maintain the minimum clearance stated in . Fig. 1
Step 2
Drill and plug (F) the wall to suit. Fix the outer wall bracket sleeve (D) to
the wall using the screws provided (G). Ensure to align the bracket so
that the îš¿xing hole is accessable once the towel rail is îš¿tted - see Fig. 4.
Note: we recommend that the îš¿xing hole is positioned horizontally,
towards the side of the towel rail. This will allow easy access with a
screw driver when îš¿xing the rail in its îš¿nal position.
Step 3
Carefully assemble the four mounting collars (A) and rail seats (B) to
the towel rail and secure in the positions by inserting and turning the
inner bracket sleeve (C) through 90 degrees as shown in Fig. 5. The
brackets should be placed on the bottom and second from top rails and
separated by a distance of 360mm. Ensure the inner bracket sleeves
are facing directly backwards.
Fig. 3
Model Y (mm)
CLR5 300
CLR7 500
CLR10 800
CLR12 1000
Fig. 4
General
The towel rail is designed to provide an all year round service for
airing towels and articles of clothing. It is not intended to provide a
sole heating service, but will take the chill off a small size bathroom,
lavatory or en suite.
No routine maintenance is necessary apart from occasional cleaning.
The unit is splashproof to IPX5 standard.
Electrical
WARNING - This appliance must be earthed
The electrical installation of this towel rail must be carried out by a
competent electrician in accordance with the current I.E.E Regulations.
The towel rail is suitable for use on an A.C.~ electrical supply. Before
installation check that the supply voltage corresponds with that marked
on the rail.
IMPORTANT - The wires in the mains lead are coloured in
accordance with the following code:
BLUE - NEUTRAL
BROWN - LIVE
GREEN/ YELLOW - EARTH
As the colo urs of t h e wi r es i n t h e ma i ns lead of t his
appliance may not correspond with the coloured markings identifying
the terminals in your plug, proceed as follows:
The wire which is coloured GREEN and YELLOW must be
connected to the terminal in the plug which is marked with the letter
E or by the earth symbol or coloured green or green and yellow.
The wire which is coloured BLUE must be connected to the terminal
which is marked with the letter or coloured black.N
The wire which is coloured BROWN must be connected to the terminal
which is marked with the letter or coloured red.L
This appliance must only be used on A.C. mains supply of 230/240
Volts~.
Installation
If îš¿tted in a room containing a bath or shower, to comply with the current
I.E.E. Regulations, a cable outlet will be necessary with the supply
to the heater controlled by a double-pole pull-cord switch having a
contact separation of 3mm in each pole. The body of the switch should
be situated as to be normally inaccessible to a person using a bath or
shower. Alternatively the switch can be located outside of the bathroom.
IMPORTANT - Protect the electrical connection whilst
handling the towel rail.
The towel rail must be permanently îš¿xed to the wall using the wall
brackets supplied.
WARNING - to ensure safe, correct operation the rail must only
be mounted vertically as shown in Fig. 1, observing the minimum
clearances stated.
WARNING - The towel rail is heavy. Care must be taken when
lifting and îš¿tting the towel rail.
Wall mounting
The wall mounting accessory pack contains the following:
Fig. 2
Fig. 5
Step 4
Lift the towel rail complete with the bracket assemblies and align with
the outer bracket sleeves which were previously îš¿xed to the wall.
Insert the inner sleeve brackets into the outer sleeve brackets and îš¿x
in place using the position locking screws (E). The rail is then locked
in place by rotating the pins a quarter turn - see .Fig. 6
Drying and airing towels
It is recommended that for efîš¿cient drying, no more than two layers of
towels or similar fabric should be draped over the rail. Items should
be placed evenly over the whole surface of the rail where possible.
It is not advisable to leave very damp towels or clothes on the towel
rail when not in use, as this may in time, affect the paint îš¿nish.
The rail, although hot to the touch is not hot enough to scorch or burn
fabrics. However, soap and detergents remaining in articles after
washing can cause discoloration. Therefore care should be taken to
thoroughly rinse articles before airing.
Operation (Electrical)
Heat will be distributed along each of the rails.
Some variation in the temperature across the surface of the rail is
normal. When the appliance is covered the heating pattern of the
rails may alter, and generally temperatures at the upper part of that
rail will rise.
The towel rail may be switched on and off at the isolating wall switch
which must be positioned outside the bathroom, or operated by means
of a pull cord switch.
A further means of control would be to link the towel rail to
a room th ermostat and/o r timer. A room th ermostat will
ensure that the rail automatically switches off in warmer weather. A
timer will allow for short periods of use.
N o t e : I f t h e to we l r a i l i s l o c at ed i n a b at hr oo m t he
adjustment for these controls must be located outside the bathroom.
Fig. 6
Maintenance
There are no user serviceable parts on the towel rail.
The rail is îš¿lled with a precise quantity of speciîš¿ed liquid and should
never need draining or reîš¿lling. Repairs requiring the opening of the
liquid-tight seal must only be made by the manufacturer’s Service
Agent. Any leakage must be reported to the manufacturer’s Service
Agent.
The element and cable are a single unit and any maintenance
must be carried out by the manufacturers Service Agent using the
recommended parts.
Cleaning
The îš¿nish on your towel rail can be maintained by occasionally wiping
over with a damp cloth and lightly îš¿nishing with a soft dry cloth. This
should only be carried out when the rail is cold. Do not use abrasive
cleaning powders as this could damage the surface îš¿nish.
Recycling
For electrical products sold within the European Community.
At the end of the electrical products useful life it should not
be disposed of with household waste. Please recycle where
facilities exist. Check with your Local Authority or retailer for
recycling advice in your country.


Product specificaties

Merk: Creda
Categorie: Niet gecategoriseerd
Model: CLR5C

Heb je hulp nodig?

Als je hulp nodig hebt met Creda CLR5C stel dan hieronder een vraag en andere gebruikers zullen je antwoorden


Handleiding Niet gecategoriseerd Creda

Creda

Creda CLR5C Handleiding

5 Januari 2024
Creda

Creda CLR12C Handleiding

5 Januari 2024
Creda

Creda CLR7C Handleiding

4 Januari 2024
Creda

Creda CLR10C Handleiding

4 Januari 2024
Creda

Creda CLR10W Handleiding

4 Januari 2024
Creda

Creda CLR12W Handleiding

4 Januari 2024
Creda

Creda CLR5W Handleiding

4 Januari 2024

Handleiding Niet gecategoriseerd

Nieuwste handleidingen voor Niet gecategoriseerd