Canon Pixma iP7220 Handleiding
Bekijk gratis de handleiding van Canon Pixma iP7220 (4 pagina’s), behorend tot de categorie Printer. Deze gids werd als nuttig beoordeeld door 18 mensen en kreeg gemiddeld 5.0 sterren uit 8 reviews. Heb je een vraag over Canon Pixma iP7220 of wil je andere gebruikers van dit product iets vragen? Stel een vraag
Pagina 1/4
1
XXXXXXXX© CANON INC. 2012
5
1
3
4
2
6
1
2
3
series
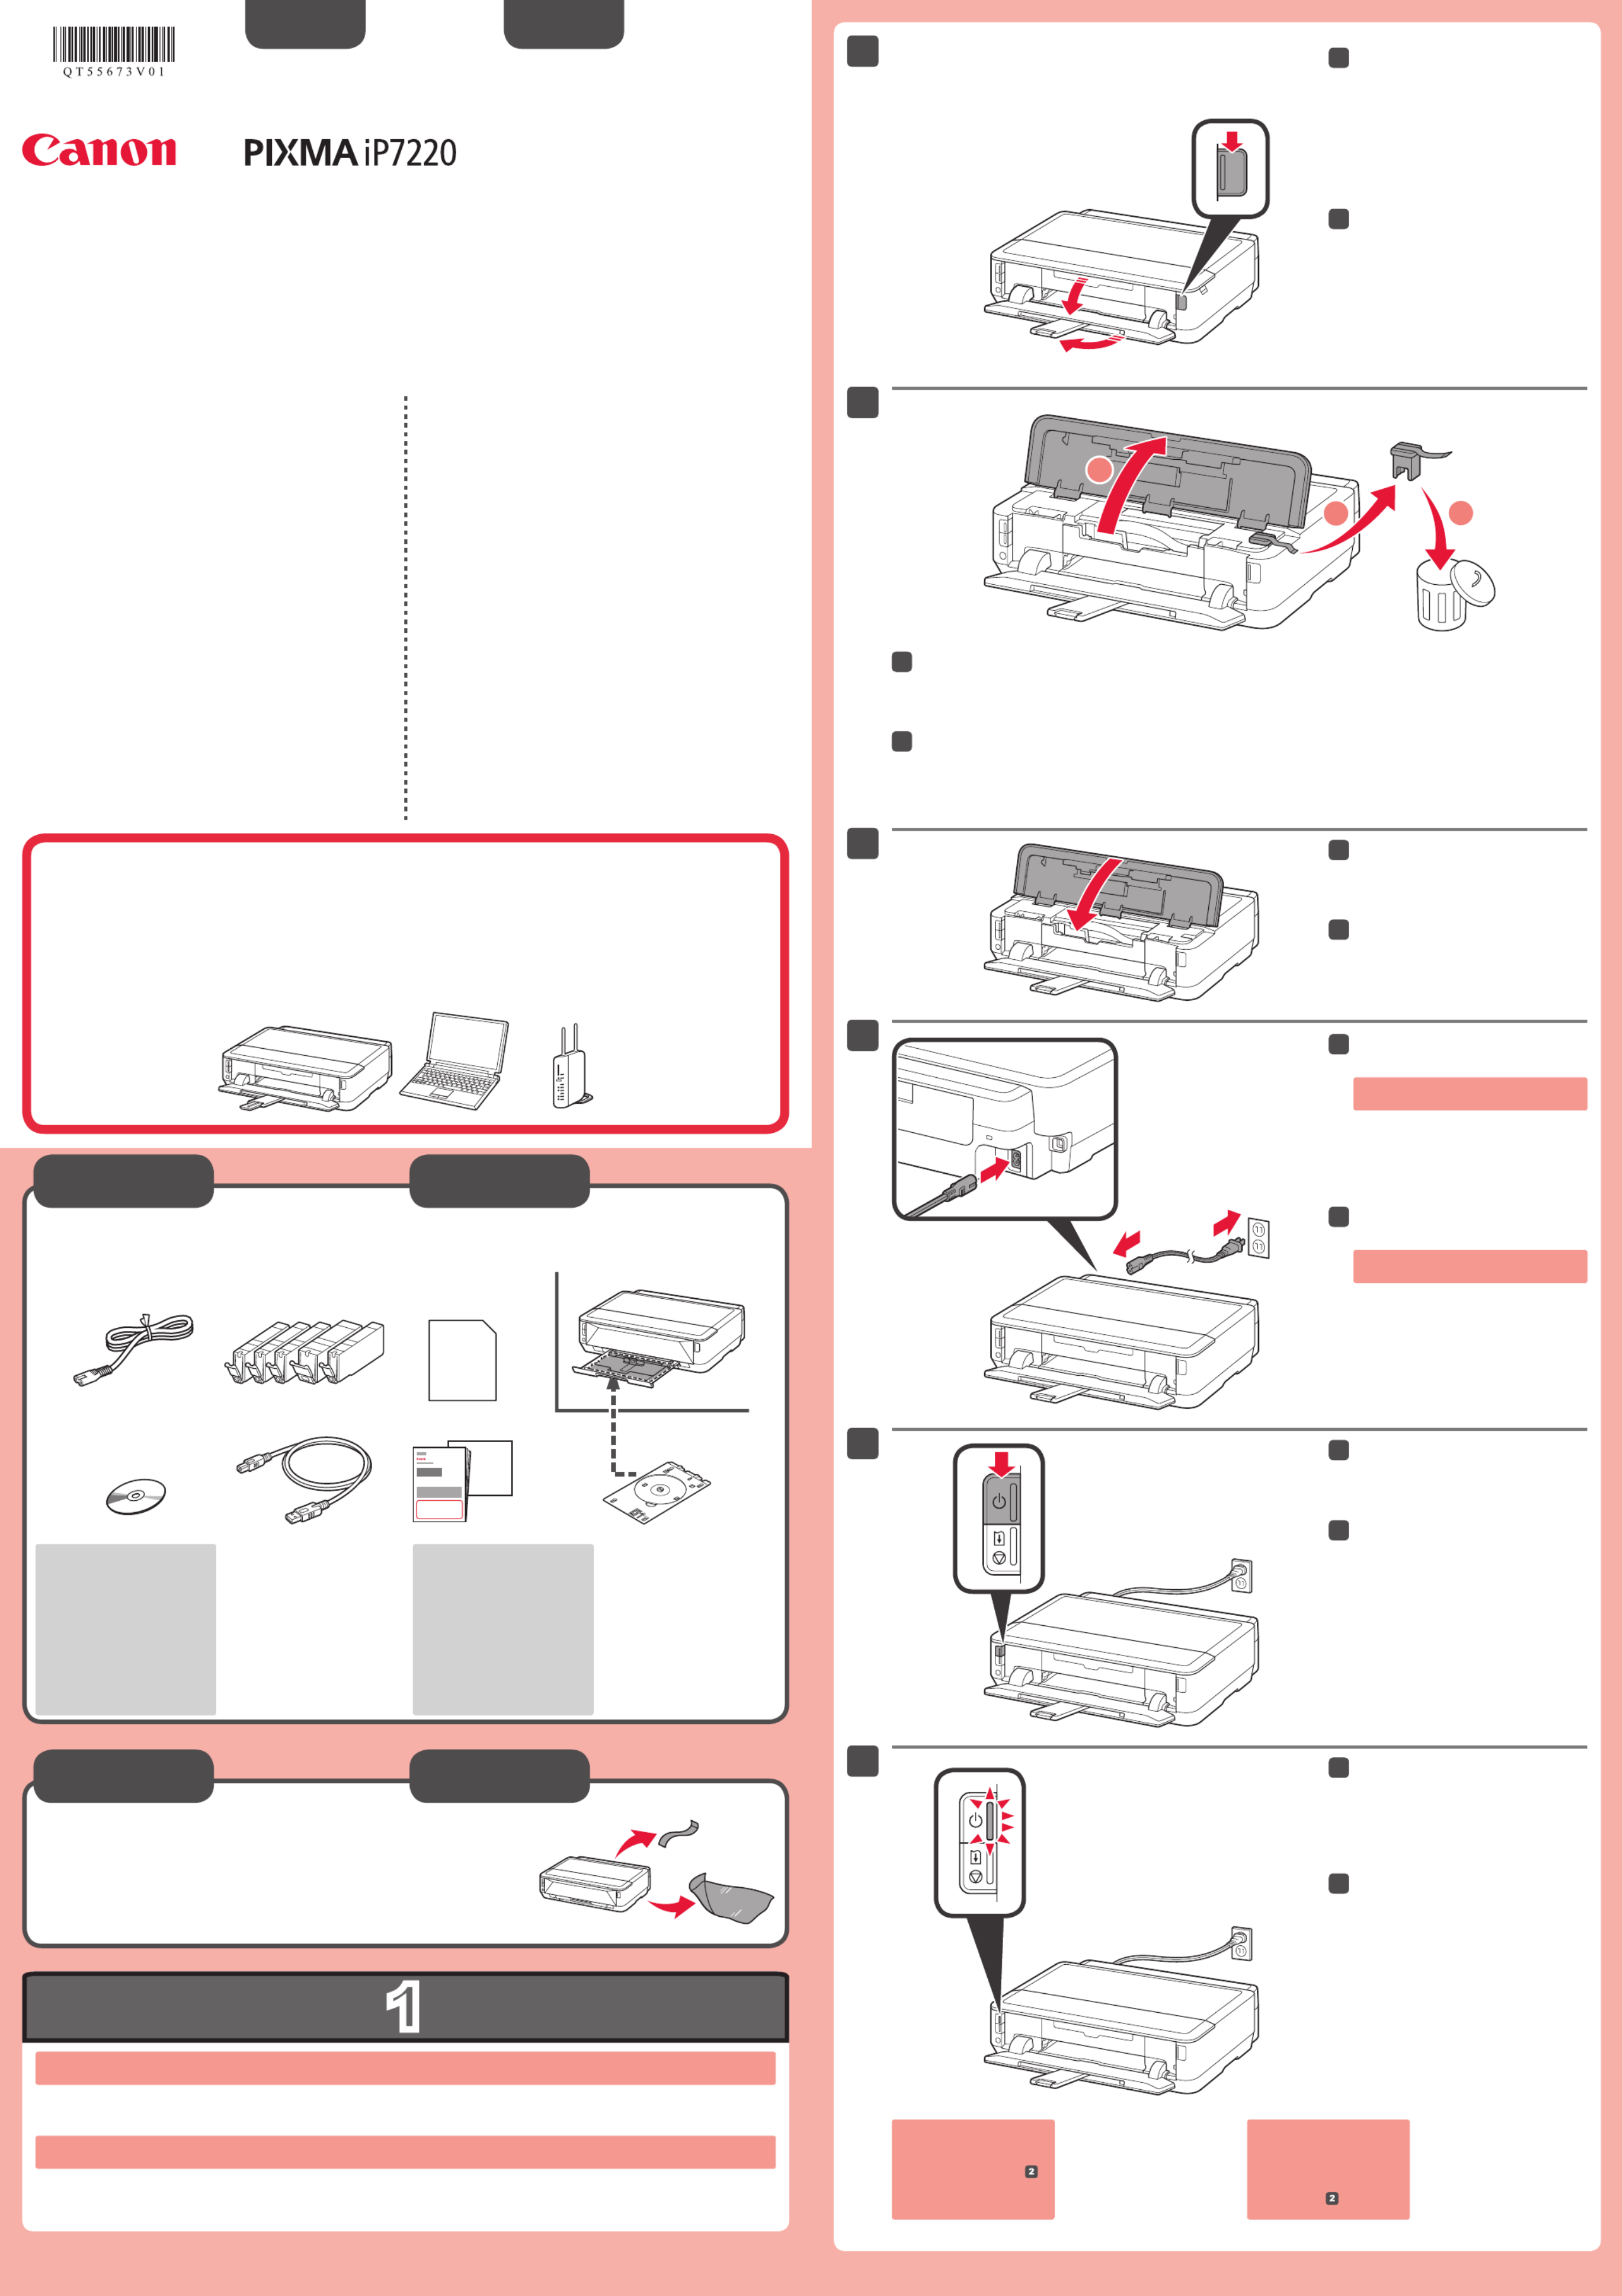
Retire las hojas protectoras y la cinta.
Compruebe que se le han suministrado los siguientes elementos.
Conexión de red:
Prepare los dispositivos de
red, como el router o el punto
de acceso, según convenga.
La bandeja de salida del papel se abre automáticamente al comenzar la impresión. Mantenga la parte frontal de la impresora libre
de obstáculos.
No conecte aún el cable USB.
Conecte el cable de alimentación.
44
Pulse el botón ACTIVADO (ON).
55
ESPAÑOL
Compruebe que la luz de
ENCENDIDO (POWER) se ilumina
en blanco.
66
Si la luz de Alarma
(Alarm) parpadea en
naranja, pulse el botón
ACTIVADO (ON) para
apagar la impresora y
repita desde.
Pulse el botón Abrir.
La bandeja de salida del papel y la
extensión de la bandeja de salida se
abren automáticamente.
11
Cierre la tapa superior.
33
Preparativos
Elementos
suministrados
Abra la tapa superior. Retire la cinta naranja y el material de protección.
22
¡Léame en primer lugar!
Consérvelo a mano para utilizarlo
como referencia en el futuro.
Windows es una marca comercial o una marca comercial registrada de Microsoft
Corporation en EE. UU. y/u otros países.
Windows Vista es una marca comercial o una marca comercial registrada de Microsoft
Corporation en EE. UU. y/u otros países.
Mac, Mac OS, AirPort y Bonjour son marcas comerciales de Apple Inc., registradas en
EE. UU. y en otros países.
•
•
•
Número de modelo: K10383
Para llevar a cabo la instalación, coloque la impresora cerca del punto de acceso*
y del ordenador.
(* necesario para LAN inalámbrica)
Guía de inicio
Impresora fotográca Canon Inkjet
Ayuda de Canon
Asistencia técnica por correo electrónico:
www.usa.canon.com/support
Asistencia técnica gratuita: 1-800-OK-CANON
Esta opción proporciona asistencia telefónica técnica personal, sin
cargo por servicio, de lunes a viernes (excepto festivos), durante
el periodo de garantía.
Se dispone de un dispositivo telefónico auxiliar para sordos (TDD) en
1-866-251-3752.
Remove the protective sheets and tape.
Check the included items.
Network connection:
Prepare network devices
such as a router or an access
point as necessary.
The Paper Output Tray opens automatically as printing starts. Keep the front of the printer clear of any obstacles.
Do not connect the USB cable yet.
Connect the power cord.
44
Press the button.ON
55
ENGLISH
Check that the POWER lamp lights
white.
66
If the Alarm lamp ashes
orange, press the ON
button to turn OFF the
printer, then redo from.
Press the Open Button.
The Paper Output Tray and the Output
Tray Extension open automatically.
11
Close the Top Cover.
33
Preparation
Included Items
Open the Top Cover. Remove the orange tape and protective material.
22
Getting StartedRead me rst!
Keep me handy for future reference.
Windows is a trademark or registered trademark of Microsoft Corporation in the U.S.
and/or other countries.
Windows Vista is a trademark or registered trademark of Microsoft Corporation in the
U.S. and/or other countries.
Mac, Mac OS, AirPort and Bonjour are trademarks of Apple Inc., registered in the U.S.
and other countries.
•
•
•
Model Number: K10383
To perform setup, place the printer near the access point* and computer.
(* Required for wireless LAN)
Canon Inkjet Photo Printer
Getting Help from Canon
Email Tech Support — www.usa.canon.com/support
Toll-Free Tech Support— 1-800-OK-CANON
This option provides live telephone technical support, free of
service charges, Monday-Friday (excluding holidays), during the
warranty period.
Telephone Device for the Deaf (TDD) support is available at
1-866-251-3752.
QT5-5673-V01PRINTED IN XXXXXXXX
Product specificaties
| Merk: | Canon |
| Categorie: | Printer |
| Model: | Pixma iP7220 |
| Kleur van het product: | Zwart |
| Ingebouwd display: | Nee |
| Gewicht: | 6532 g |
| Breedte: | 452.1 mm |
| Diepte: | 368.3 mm |
| Hoogte: | 129.5 mm |
| USB-poort: | Ja |
| Geïntegreerde geheugenkaartlezer: | Nee |
| Markt positionering: | Thuis & kantoor |
| Aantal USB 2.0-poorten: | 1 |
| Stroomverbruik (in standby): | 2.1 W |
| Duurzaamheidscertificaten: | ENERGY STAR |
| Ondersteunt Mac-besturingssysteem: | Mac OS X 10.5 Leopard, Mac OS X 10.6 Snow Leopard, Mac OS X 10.7 Lion |
| Mac-compatibiliteit: | Ja |
| Maximale resolutie: | 9600 x 2400 DPI |
| Printtechnologie: | Inkjet |
| Printsnelheid (zwart, concept, A4/US Letter): | 15 ppm |
| Duplex printen: | Ja |
| Direct printen: | Ja |
| Printsnelheid (kleur, concept, A4/US Letter): | 10 ppm |
| Gemiddeld stroomverbruik tijdens printen: | 24 W |
| Geluidsdrukniveau (afdrukken): | 44 dB |
| Maximale printafmetingen: | A4 (210 x 297 mm) |
| Afmetingen enveloppen: | 10 |
| Spuitmondjes: | 5120 |
| Compatibele inkttypen, supplies: | PGI-250PGBK XL, CLI-251CXL, CLI-251MXL, CLI-251YXL, CLI-251BKXL, PGI-250PGBK, CLI-251C, CLI-251M, CLI-251Y, CLI-251BK |
| Printen zonder witranden: | Ja |
| Media-afmetingen voor afdrukken zonder witrand: | 4x6, 5x7, 8x10, Legal, Letter |
| Wifi: | Ja |
| DVD's/CD's bedrukken: | Ja |
Heb je hulp nodig?
Als je hulp nodig hebt met Canon Pixma iP7220 stel dan hieronder een vraag en andere gebruikers zullen je antwoorden
Handleiding Printer Canon

5 April 2026
27 Februari 2026
23 Februari 2026
6 Februari 2026
6 Februari 2026
5 Februari 2026
2 Februari 2026
4 December 2025
4 December 2025
3 December 2025
Handleiding Printer
Nieuwste handleidingen voor Printer
31 Mei 2026
27 Mei 2026
27 Mei 2026
20 Mei 2026
13 Mei 2026
12 Mei 2026
12 Mei 2026
7 Mei 2026
6 Mei 2026
5 Mei 2026