Canon DR-5020 Handleiding
Bekijk gratis de handleiding van Canon DR-5020 (5 pagina’s), behorend tot de categorie Scanner. Deze gids werd als nuttig beoordeeld door 68 mensen en kreeg gemiddeld 4.5 sterren uit 34.5 reviews. Heb je een vraag over Canon DR-5020 of wil je andere gebruikers van dit product iets vragen? Stel een vraag
Pagina 1/5

Setup Instructions for the Canon DR-5020 and DR-5080C
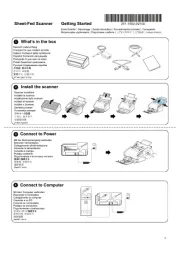
A. Set Up the Scanner and Driver
The following steps need only be performed once. These steps simply set up the
scanner for use. If the scanner is already installed and working properly, you may skip
this section.
1. Prepare your Canon DR-5020 (black and white model) or DR-5080C (color scanning
model) scanner for use by following the directions in Chapters 1 and 2 of the DR-
5020/5080C Instructions booklet. You will need to provide your own SCSI card and
cable, since these items are not included with the scanner.
2. Turn on the scanner. The power button is located in the lower front left of your
scanner. Note: You must always turn on this scanner before you turn on your
computer, or the computer will not find the scanner.
3. Follow the directions in chapters 1 and 2 of the ISIS/TWAIN Driver Instructions
booklet. This will show you how to install the necessary software drivers for your
Canon DR-5020 or DR-5080C. For updated drivers (in case of problems), please go
to the Canon homepage located at: http://www.usa.canon.com. Under Support,
select Drivers and Downloads. Download and install the appropriate TWAIN driver.
B. Set Up WYNN
The following steps need only be performed once. These steps set up WYNN for you to
use with the Canon DR-5020 or DR-5080C scanner.
1. With the scanner and computer on, launch WYNN.
2. Choose Scanner Selection from the Advanced menu. Verify that the correct
scanner is selected. If not, select it from the list.
• For DR-5020: There should be an entry for "Canon DR-5020." Select that. If it
is not listed, select “Unknown Twain using: Canon DR-5020 TWAIN" or download
the latest Twainscn.ini file from the Freedom Scientific Website
(ftp://ftp.freedomscientific.com/users/hj/private/twainscn.ini).
• For DR-5080C: Select the entry for “Unknown Twain using: Canon DR-5080C
TWAIN."
3. Still in the Scanner Selection dialog, in the TWAIN Properties area, verify that none
of the three check boxes is selected. Then click OK to exit this dialog and save
changes.
4. Choose Scanning Settings from the Settings menu. You will do two things here.
a. Change the Scanning Contrast to “Normal Contrast."
b. Specify whether you are scanning color documents.

• For DR-5020: Verify that the Color Scanning check box is not selected, then
click OK.
• For DR-5080C: If you want to retain color in color pages, select the Color
Scanning checkbox, then click OK. Otherwise, uncheck this item. Note that
color scanning takes significantly longer than black-and-white scanning, so it
is better to leave this item unchecked unless you need color.
5. Save these settings. You must save these scanning settings to make them
available for future sessions. If this will be your primary scanner, you should make
these settings part of the Default settings file. To do this, choose Save Settings
from the Settings menu and choose Default as the settings file name. Answer Yes
when asked whether you want to overwrite the existing file.
Note: If this will not be your primary scanner, you should create a different settings
file that you will load each time you want to use the scanner. In that case, type a
new name, such as Canon DR5020 Scanner, for the settings file. When you are
ready to use the scanner, select Retrieve Settings from the Settings menu and
select that settings file.
C. Activate the Front Panel of the Scanner
If you will always be using WYNN or TestTalker with this scanner, the following steps
need only be performed once. They will activate the front panel of your scanner so you
can use the buttons. If you will be using more than one kind of scanning software with
your Canon high-speed scanner, you may need to follow the steps below when you
switch scanning applications.
1. Turn on the scanner, then the computer, then launch WYNN.
2. Place one page in the document feeder.
3. In WYNN, press the Scan button on the WYNN toolbar. WYNN will scan the front
side of the page, then bring up a dialog box asking what to do next. Choose "Done
Scanning," then let WYNN process the page. Wait until this processing is done
before proceeding to the next step.
4. This first scan creates a file in your Windows directory called Setscan.ini. The file
will be in the C:\WINDOWS directory (in Windows 95, 98, XP, or Me operating
systems) or C:\WINNT directory (in Windows NT or 2000 operating systems). You
can use Windows Explorer to find that file.
If you are unfamiliar with using Windows Explorer to locate files, you can right-click
on the Windows directory and choose Find or Search, then type the filename:
Setscan.ini. When you have found the file, double-click on it to open it with
Notepad, then proceed to the next step.

Note: Depending on your particular Windows settings, the file extension (or even the
entire file) may be hidden. To change this, open Windows Explorer and
choose Folder Options from the Tools menu. Click the View tab and select
Show Hidden Files and Folders (this item might be worded slightly
differently depending on your operating system). In addition, uncheck the
Hide Extensions for Known File Types checkbox (this also might be
worded differently). Click Apply to All Folders and then click OK. Now you
will be able to locate the file following the directions in Step 4.
5. Change the line near the bottom of the file that says "FrontPanel=0" to
"FrontPanel=1", and save the file, then exit Notepad.
D. Configure the Front Panel Buttons
If you are scanning two-sided documents, you can take advantage of the Duplex feature
included in the Canon DR-5020. To do this, you will need to set up the
Simplex/Duplex feature by changing some items on the scanner's front panel.
Note: If you are using the Canon DR-5080C, you cannot use the scanner's Duplex
feature. Instead, you will use WYNN's built-in Duplex feature. Follow the instructions
below only if you have the Canon DR-5020 (the black-and-white model).
1. Press the Simplex/Duplex button to select single-sided scanning (Simplex) or
double-sided scanning (Duplex).
2. Set the other front panel buttons as follows: All other lights on the front panel should
be OFF except for Text, the lights around and immediately below the contrast
adjustment scale, the illuminated page-counting numbers, and the red light in the
middle of the large green button.
Note: On the front panel of your DR-5020, do not use any other buttons except the
ones listed above. If any other lights are on, it is very important to press their
associated buttons until they are off before scanning with WYNN.
Note: Do not change the contrast using the front panel contrast buttons, as this will
be overridden by the scanning contrast specified in WYNN.
Your Canon DR-5020 should now be ready for use!
E. How to Do a Batch Scan Using WYNN
When you do batch scanning, you scan all the pages first, then WYNN processes the
pages in a single operation. This processing may take some time, but it is entirely
automated. This is the ideal way to use WYNN with the Canon DR-5020 and 5080C
scanner.
Product specificaties
| Merk: | Canon |
| Categorie: | Scanner |
| Model: | DR-5020 |
Heb je hulp nodig?
Als je hulp nodig hebt met Canon DR-5020 stel dan hieronder een vraag en andere gebruikers zullen je antwoorden
Handleiding Scanner Canon

1 December 2024


3 April 2024

6 Juli 2023

23 December 2022

1 Juli 2023

12 Juni 2023

9 Juni 2023

21 Mei 2023

16 Mei 2023
Handleiding Scanner
- Reflecta
- RadioShack
- ICarsoft
- Nedis
- CDVI
- 3DMAKERPRO
- Creality
- Dyka
- Jay-tech
- Steren
- Medion
- Doxie
- Panasonic
- Neat
- Kensington
Nieuwste handleidingen voor Scanner

16 September 2025
1 September 2025

9 Augustus 2025
7 Augustus 2025
4 Augustus 2025

4 Augustus 2025
4 Augustus 2025

30 Juli 2025
29 Juli 2025
29 Juli 2025