Canon CR-N100 Handleiding
Canon Bewakingscamera CR-N100
Bekijk gratis de handleiding van Canon CR-N100 (5 pagina’s), behorend tot de categorie Bewakingscamera. Deze gids werd als nuttig beoordeeld door 92 mensen en kreeg gemiddeld 4.9 sterren uit 3 reviews. Heb je een vraag over Canon CR-N100 of wil je andere gebruikers van dit product iets vragen? Stel een vraag
Pagina 1/5
This "Installation Guide/Important Information" is comprised of pages [1/2] and [2/2].
Please be sure to read the "Safety Precautions" section for correct use. After
reading this
"
Installation Guide/Important Information
"
, keep it in a readily
accessible location for future reference. This camera is for indoor use only.
• The camera described in this document may not be available in your
country and/or region.
• The terms HDMI, HDMI High-Definition Multimedia Interface, HDMI Trade
dress and the HDMI Logos are trademarks or registered trademarks of
HDMI Licensing Administrator, Inc.
• All other company or product names used in this document are
trademarks or registered trademarks of their respective holders.
• The contents of this document are subject to change without any prior
notice.
The latest user manuals and software, etc. for this product can be
downloaded from the following website. The user manuals explain the
camera settings and operations. Read them carefully before using the
camera to ensure correct use.
global.canon/ncsp
Check Included Items
Camera
Ceiling Plate
Camera-to-Mount Safety Wire 10 cm (3.94 in.)
M3 Screw x 4L (2) (for camera-to-mount safety wire, and camera mounting)
Safety Wire 3 m (9.8 ft.)
Wire Stopper (for safety wire)
M3 Screw x 6L (4) (for wire stopper)
Compact Power Adapter
Power Cable
IR Remote Controller
Size AAA Battery (2) (for IR remote controller)
Printed Materials
Symbols used in this manual
Parts indicated in the
"
Installation Guide/Important Information
"
[2/2]
with this icon are not included with the camera, and should be
prepared by the user.
M: Outer diameter of the screw shaft (mm)
L: Length (mm)
Safety Precautions
Warning
Failure to follow the instructions may result
in death or serious injury.
Do not install in the following places:
• Places in direct sunlight, near heat-generating objects, or locations subject to high
temperatures.
• Places near fire sources or flammable solvents (alcohol, thinner, fuel, etc.).
• Humid or dusty places.
• Places subject to oily smoke or steam.
• Confined or enclosed places.
Failure to do so may result in fire or electric shock.
Notes on installation at high places
• For installation or inspection of this camera, consult the dealer where you
purchased the product.
• Install the camera in a way that ensures sufficient holding strength
according to the mounting place such as the wall, ceiling, etc. Also, make
sure that the mounting place can sufficiently support the total weight
including the mounting parts and reinforce it if necessary.
• Prepare fixing screws suitable for the location and type of surface the
camera is to be installed.
• Periodically check the mounting brackets and screws for rust and
loosening.
• Do not install in unstable places, places subject to significant vibration or
impact, or places subject to salt damage or corrosive gas.
• Be sure to attach the safety wire when installing the camera.
• Use the included ceiling plate to install the camera. Do not install it with
only the tripod screws.
Failure to do so may result in the camera falling or other accidents.
General notes on the camera
• If any defective conditions such as smoke, strange sounds, heat,
strange odors, damage or cracks on the external case are discovered,
immediately stop using the camera, unplug the power cable from the
outlet (or the LAN cable for PoE+ power supply), and contact your
nearest dealer. Place the compact power adapter near the power outlet
and avoid placing objects around the power plug so that the power can
be turned off immediately in the event of an emergency.
• Do not touch the camera or the connecting cables during a thunderstorm.
• Do not disassemble or modify the camera.
• Do not scratch, pull, or forcefully bend the cables, or put a load on their
connections.
• Do not spray the camera with water, or otherwise make it wet.
• Do not touch the camera, the compact power adapter, cable connectors,
power plugs, or power outlets with wet hands.
• Do not allow water, metal or other foreign objects to enter the camera.
• Do not use flammable sprays near the camera.
• Do not leave the compact power adapter (or the LAN cable for PoE+
power supply) connected when the camera is not in use for long periods.
• Do not use flammable solvents such as alcohol, paint thinner or benzine
when cleaning the camera.
• Do not block the air exit vents.
Failure to do so may result in fire or electric shock.
Notes on Power Supply
• Use only the included compact power adapter when using an AC
adapter.
• The included compact power adapter and power cable are for this
product only. They cannot be used for other devices.
• Do not place heavy objects on the power cable (or the LAN cable for
PoE+ power supply) or pull, forcibly bend, scratch or modify it.
• Do not allow metal pins or debris to touch the power plug or terminals.
• Wipe any dust off of the power plug. Also, if the connection is made to
the power outlet in a dusty area, take measures to prevent tracking.
• Make sure the power plug (or the LAN cable for PoE+ power supply) is
seated all the way, and do not use it when the insertion is insufficient.
• Do not use a damaged power plug or a loose power outlet, or use it in a
manner that exceeds the rating of the wiring device such as connecting
multiple plugs to an outlet.
Failure to do so may result in fire or electric shock.
Notes on batteries
• Do not put batteries in the fire, or do not heat, short circuit or disassemble
them.
• Do not charge the included batteries.
• Do not use batteries other than those specified.
Failure to do so may result in fire or electric shock.
Do not use the product at:
• Places where the use is prohibited, such as in hospitals and on airplanes.
• Places within reach of babies and toddlers.
Use at such places can cause equipment to malfunction due to radio
waves and lead to accidents, or cause electric shock and injuries.
Caution
Failure to follow the instructions may result
in injuries or property damages.
Notes on installation
• Installation must be carried out safely and securely in accordance with
the relevant regulations for technical standards of electrical installation.
Failure to do so may result in accidents.
ENGLISH
Installation Guide
Important Information
1
2
DIE-0580-A
©CANONINC.2023 PrintedinJapan•ImpriméauJapon
Notes on installation
• Take care not to damage wiring or piping.
Failure to do so may result in damage to surrounding items.
General notes on the camera
• Do not touch the edges of metal parts with bare hands.
• Be careful not to get your fingers caught when installing.
Failure to do so may result in injuries.
Notes on batteries
• Remove the batteries when they have been used up or will not be used
for a long time.
• When replacing the batteries, replace both batteries at the same time.
Also, do not use different types of batteries together.
• Make sure + and - of the battery are oriented correctly.
• If any liquid from inside the battery gets on your body due to leakage,
rinse it off thoroughly with water.
Failure to do so may result in injuries and malfunctions.
Important
• Do not install the camera in places where radiation, X-rays, strong radio
waves or strong magnetism are generated. It may cause video and
audio disturbance, noise, or malfunctions.
• We recommend the installation of a lightning arrester (a surge protection
device) as a measure against failures caused by lightning strikes.
• Take measures to remove static electricity before performing any
procedures.
• Do not connect the PoE cable to the RS-422 terminal.
• Do not connect the compact power adapter to a transformer.
• If there is condensation, please wait to power on, until the condensation
dissipates.
• Do not hold the device by the camera head.
• Do not turn the camera rotator by hand.
• After turning off the power, do not turn the power on again for at least
five seconds.
• Do not point the camera at strong light sources (such as the sun on a
clear day or strong artificial light sources). Internal components such as
the image sensor could be damaged.
• Do not carry the camera on a tripod.
Precautions for Use (Disclaimer)
Compliance with Applicable Laws/intellectual Property Rights: Please note
that your use of this product may subject you to certain laws, rules and
regulations, including but not limited to, privacy, wiretapping and intellectual
property and publicity laws. Please be sure your use of this product and/or
any resulting recordings or footage complies with applicable laws, rules and
regulations.
Canon Inc. and its affiliates shall have absolutely no liability with respect
to any claims made by third parties that your use of this product does not
comply with applicable laws, rules and regulations and any resulting claims
brought against you by third parties alleging non-compliance with such laws,
or otherwise violates any third party's intellectual property, personal, privacy
or proprietary rights as a result of your use of the product. We are also not
responsible to you for any liability whatsoever resulting from your use, and/or
installation of this product, and/or any loss of any recordings or footage.
Limited Warranty: Please check the in-box materials for more information
about the limited warranty that pertains to your product.
Installation: This product should NOT be installed outdoors. You are solely
responsible for the proper installation of this product.
To the extent permitted
by law, Canon Inc. and its affiliates shall have absolutely no liability to you with
respect to any damages or liabilities associated with the improper use of, or
the installation of this product, or for any personal injuries sustained by you
or any third parties as a result of any such improper use or installation of this
product, whether or not the installation of this product was by you, or by any
third party.
Privacy:
• Do not install this product in areas where people have a reasonable
expectation of privacy, including but not limited to, bedrooms, dressing
rooms, locker rooms and rest room facilities.
• Some jurisdictions require signage disclosing the existence of camera
equipment. Please check your own area's laws for requirements.
• Making audio recordings is heavily regulated and can vary significantly
by area. Please check laws in your jurisdiction before making any audio
recordings.
OTHER IMPORTANT INFORMATION: Please see other important information
pertaining to the use of this product by reading our Settings Guide, which
can also be found at global.canon/ncsp, prior to using this product.
About lamp
POWER lampSTATUS lampStatus
Green light
BLINKING OFF Initializing (Starting and
restarting)
Green light ONOFFPOWER ON
Green light
BLINKING (twice) OFF Signal received from IR remote
controller
Orange light ONOrange light ONStandby
Green light
BLINKING OFFChanging to or from standby
OFFOrange light ONInsufficient power
OFF Orange light
BLINKING
Pan/Tilt position error,
firmware being updated
Green light
BLINKING
Orange light
BLINKING Device failure
Tally lampStatus
Red light ONStreaming
Green light ONPreparing
streaming
For details on the location of each lamp, refer to the "
Installation Guide/
Important Information" [2/2].
Before using the camera
Initial settings
Be sure to make the initial settings before use. If the initial settings are not
made, HDMI output and IP streaming cannot be executed. Also, when using
as a USB camera, change the Service switch after the initial settings.
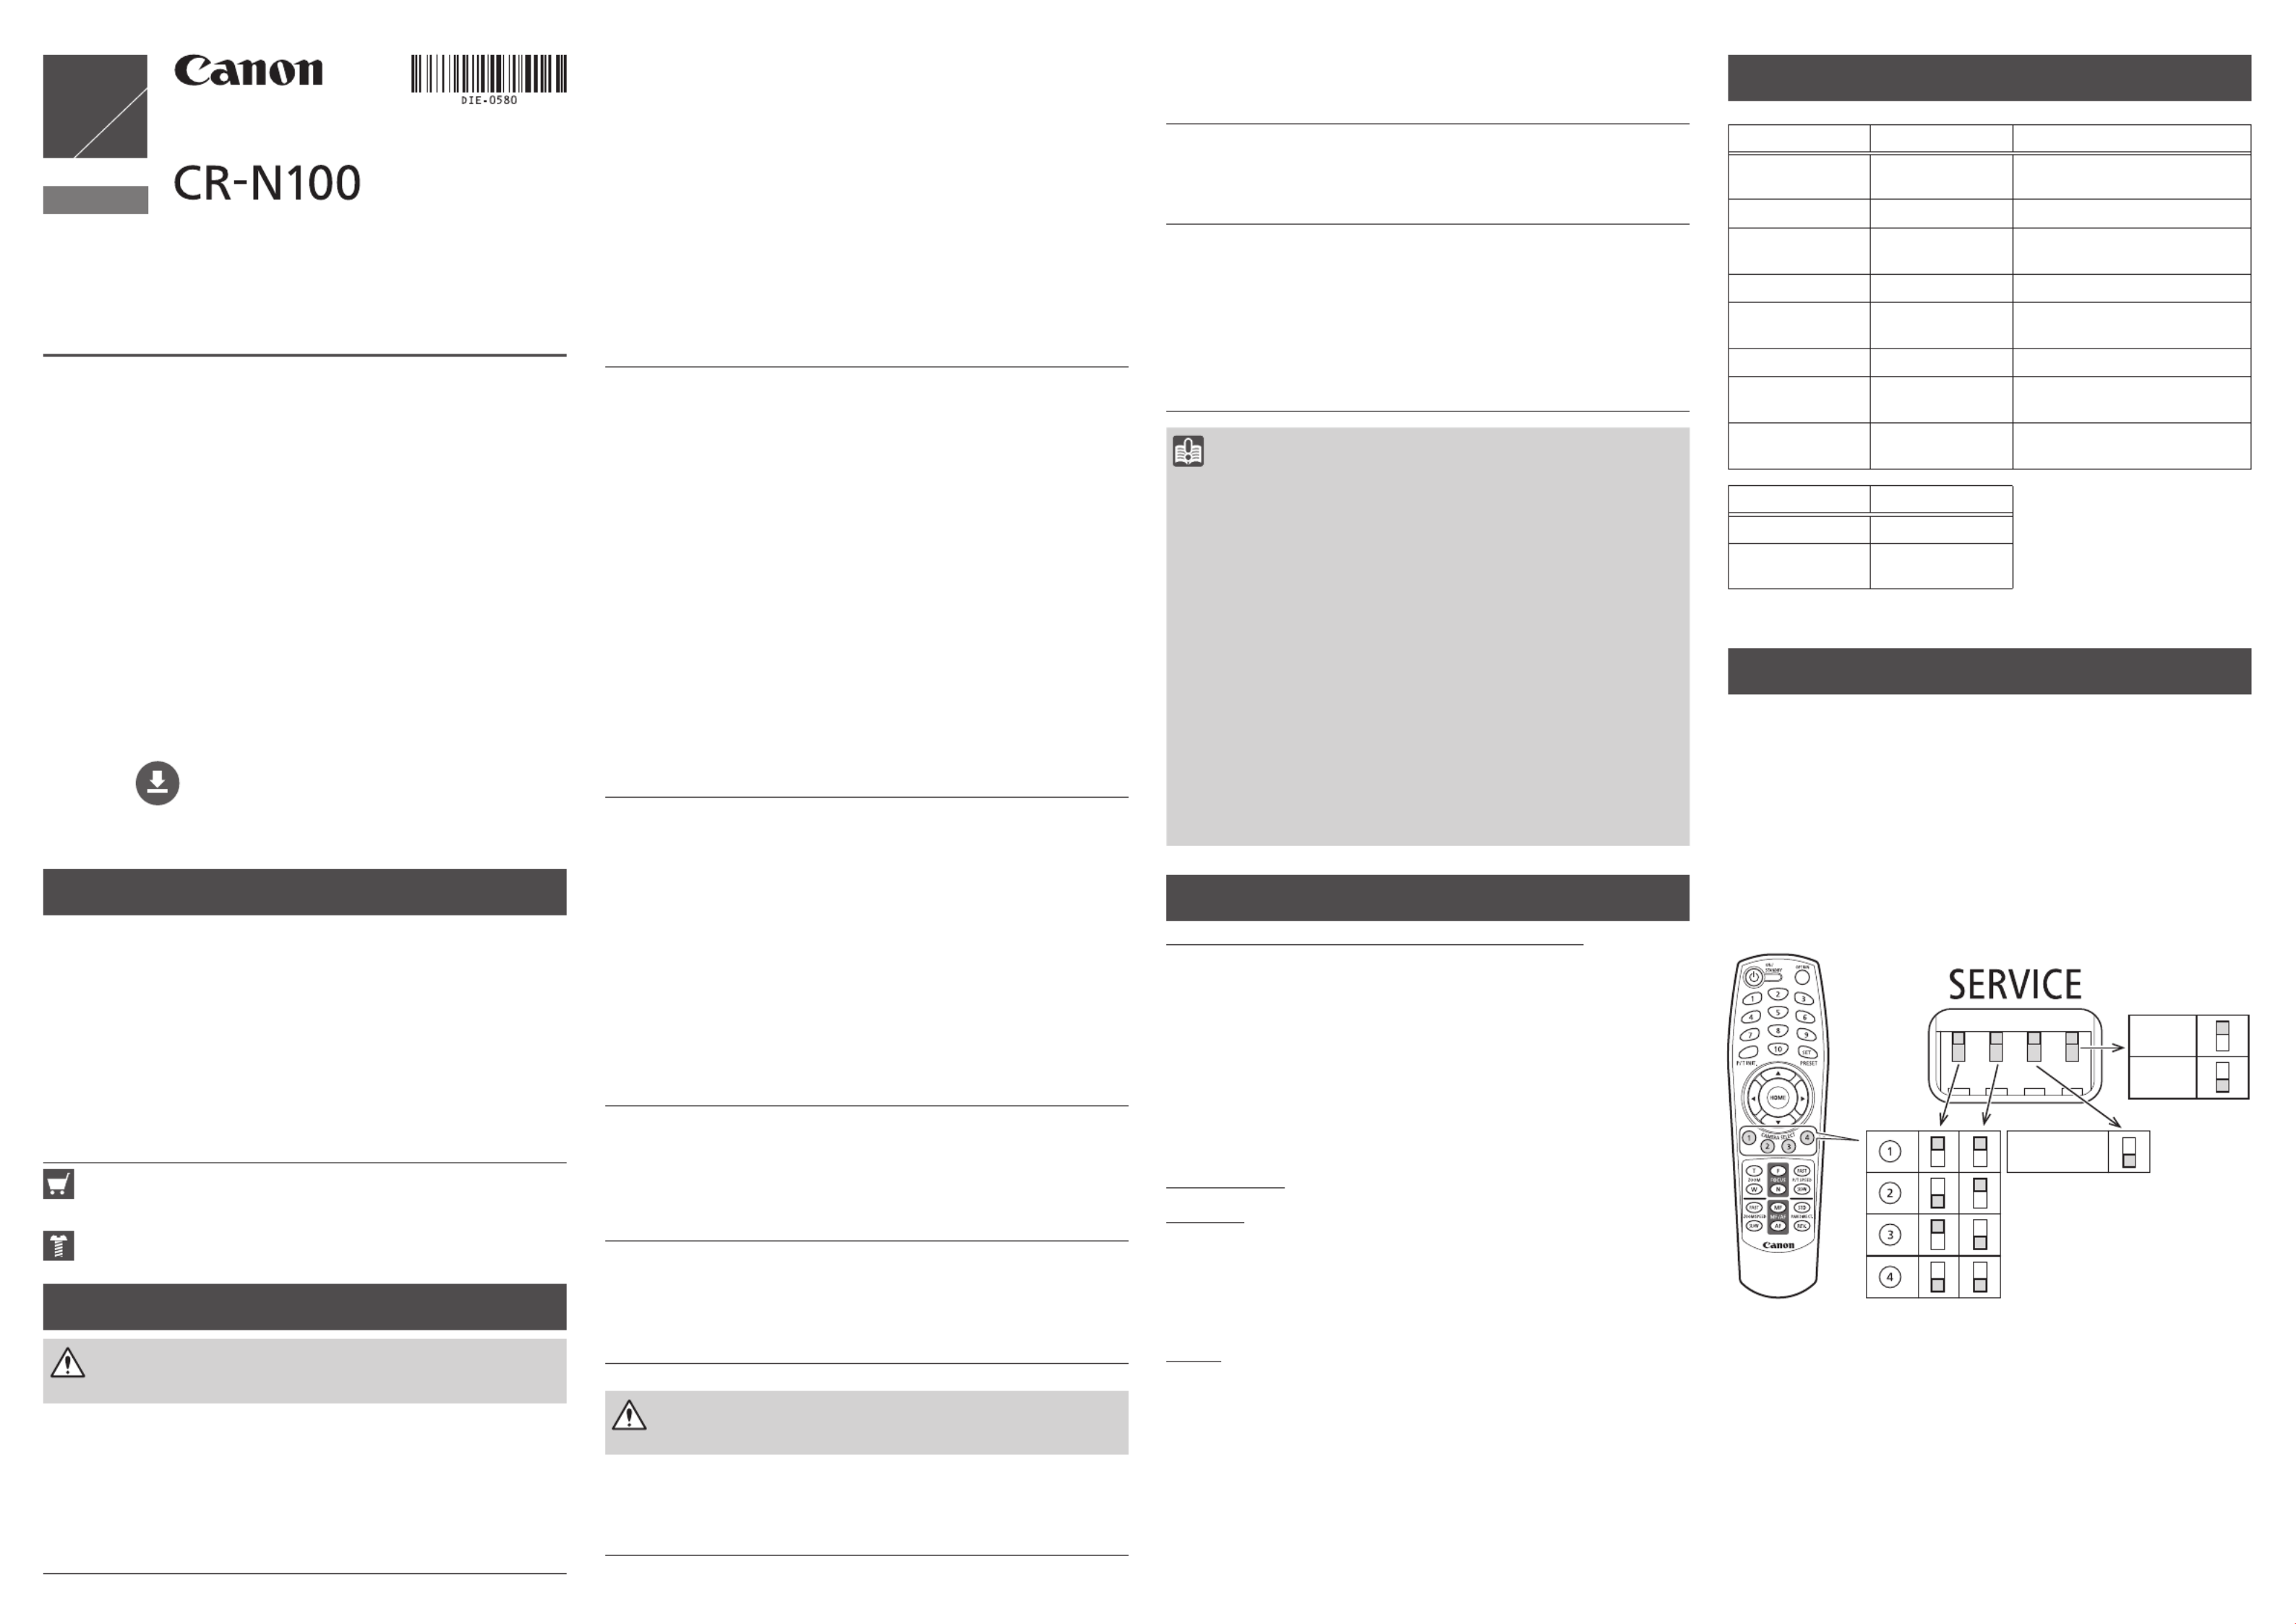
SERVICE switch settings
Set the camera number to be operated by the IR remote controller with the
two switches on the left.
When using as a USB camera, the 3rd switch from the left is to be switched
to the bottom.
Frame frequency of the output video is changed using the 4th switch from
the left.
Switches should be set before turning on the power.
USB camera
59.94 Hz
50.00 Hz
Frame frequency
REMOTE CAMERA
Product specificaties
| Merk: | Canon |
| Categorie: | Bewakingscamera |
| Model: | CR-N100 |
Heb je hulp nodig?
Als je hulp nodig hebt met Canon CR-N100 stel dan hieronder een vraag en andere gebruikers zullen je antwoorden
Handleiding Bewakingscamera Canon

13 Maart 2026
12 Maart 2026
11 Maart 2026
31 December 2026
29 December 2026
20 November 2024
29 Januari 2024
12 December 2023
13 November 2023
13 November 2023
Handleiding Bewakingscamera
Nieuwste handleidingen voor Bewakingscamera
15 Maart 2026
15 Maart 2026
14 Maart 2026
13 Maart 2026
13 Maart 2026
13 Maart 2026
13 Maart 2026
13 Maart 2026
13 Maart 2026
12 Maart 2026