Brother P-touch PT-D220 Handleiding
Bekijk gratis de handleiding van Brother P-touch PT-D220 (8 pagina’s), behorend tot de categorie Printer. Deze gids werd als nuttig beoordeeld door 57 mensen en kreeg gemiddeld 4.7 sterren uit 6 reviews. Heb je een vraag over Brother P-touch PT-D220 of wil je andere gebruikers van dit product iets vragen? Stel een vraag
Pagina 1/8
Safety Precautions
Be sure to read this section before using the product. It contains
important safety instructions. We recommend that you keep this
document nearby for future reference.
Follow these guidelines to avoid the risk of fire, burns,
injury, electric shocks, rupture, overheating, abnormal
odours or smoke.
• Always use the specified voltage and the suggested AC Adapter
(AD-24ES/AD-24ESA/AD-24ESAW/AD-24ESA-01/AD-24ESAW-01)
for the Label Maker to prevent any damage or failure.
• Do not touch the Label Maker during a lightning storm.
• Do not use the Label Maker/AC Adapter in places of high humidity
such as bathrooms.
• Do not overload the power cord.
• Do not place heavy objects on, or damage the power cord or plug.
Do not forcibly bend or pull the power cord. Always hold the
ACAdapter when disconnecting from the power outlet.
• Make sure that the plug is fully inserted to the power outlet. Do not
use an outlet that is loose.
• Do not allow the Label Maker/AC Adapter/Power Plug/Batteries to
get wet, for example, by handling them with wet hands or spilling
beverages on to them.
• Since loss of eyesight may result when leaked fluid from batteries
gets into your eyes, immediately rinse your eyes with a large amount
of clean water, and then seek medical attention.
• Do not disassemble or modify the Label Maker/AC Adapter/Batteries.
• Do not allow a metal object to contact both the plus and minus ends
of a battery.
• Do not use sharp objects, such as tweezers or a metallic pen, to
change the batteries.
• Do not throw the batteries into fire or expose to heat.
• Disconnect the AC Adapter and remove batteries immediately and
stop using the Label Maker if you notice abnormal odor, heat,
discoloration, deformation or anything unusual while using or storing it.
• Do not use a damaged or leaking battery as the fluid may get on your
hands.
• Do not use a deformed or leaking battery or one whose label is
damaged. There is a possibility of generating heat.
Follow these guidelines to avoid personal injury, liquid
leakage, burns or heat.
• When the Label Maker is not being used, store it out of the reach of
children. In addition, do not allow children to put the Label Maker parts
or labels in their mouths. If any object has been swallowed, seek
medical attention.
• Do not touch metal parts around the print head immediately after printing.
• Do not touch the Cutter Blade.
• If leaked fluid from batteries gets on your skin or clothes, immediately
rinse them with clean water.
• Remove the batteries and disconnect the AC Adapter if you do not
intend to use the Label Maker.
• Do not use a battery other than that specified. Do not use combinations
of old and new batteries or combinations of different types, different
charging levels, different manufacturers or different models. Do not
insert a battery with its plus and minus ends reversed.
• Do not drop or hit the Label Maker/AC Adapter.
• Do not press on the LCD display.
• Do not put your finger inside the Label Maker when you close the
Cassette Cover.
• Before using Ni-MH rechargeable batteries, carefully read the instructions
for the batteries and battery charger, and be sure to use them correctly.
• When using Ni-MH rechargeable batteries, charge the batteries with a
specialized battery charger before using the batteries.
• Depending on the location, material, and environmental conditions, the
label may unpeel or become irremovable, the color of the label may
change or be transferred to other objects. Before applying the label,
check the environmental conditions and the material.
• Do not use the Label Maker in any way or for any purpose not
described in this guide. Doing so may result in accidents or damage
the Label Maker.
• Use only Brother TZe tapes with the Label Maker. Do not use tapes
that do not have the mark.
• Only use a soft, dry cloth to clean the Label Maker; never use alcohol
or other organic solvents.
• Use a soft, lint free cloth to clean the Print Head. Never touch the Print
Head directly with your hands.
• Do not put any foreign objects into the Tape Exit Slot, AC Adapter
Connector, Battery Compartment, etc.
• Do not place Label Maker/Batteries/AC Adapter in direct sunlight or rain,
near heaters or other hot appliances, in any location exposed to extremely
high or low temperatures (e.g.,on the dashboard or in the back of your car)
or high humidity, or in dusty locations.
• Do not apply excessive pressure to the Cutter Lever.
• Do not try to print if the cassette is empty; it will damage the Print Head.
• Do not pull the tape while printing or feeding; it will damage the tape and the
Label Maker.
• Any data stored in memory will be lost due to failure, repair of the Label
Maker, or if the battery expires.
• The Label Maker is not equipped with a charging feature for
rechargeable batteries.
• The printed text may differ from the text that appears in the LCD.
• The length of the printed label may differ from the displayed label
length.
• A protective clear plastic sticker is placed over the display during
manufacturing and shipping. This sticker should be removed prior to
use.
• When the power has been disconnected for more than three minutes,
all text, format settings and any text files stored in the memory will be
cleared.
Product Safety Guide
Indicates a potentially hazard-
ous situation which, if not
avoided, could result in death
or serious injuries.
WARNING
Indicates a potentially hazardous
situation which, if not avoided, may
result in minor or moderate injuries.
CAUTION
General Precautions
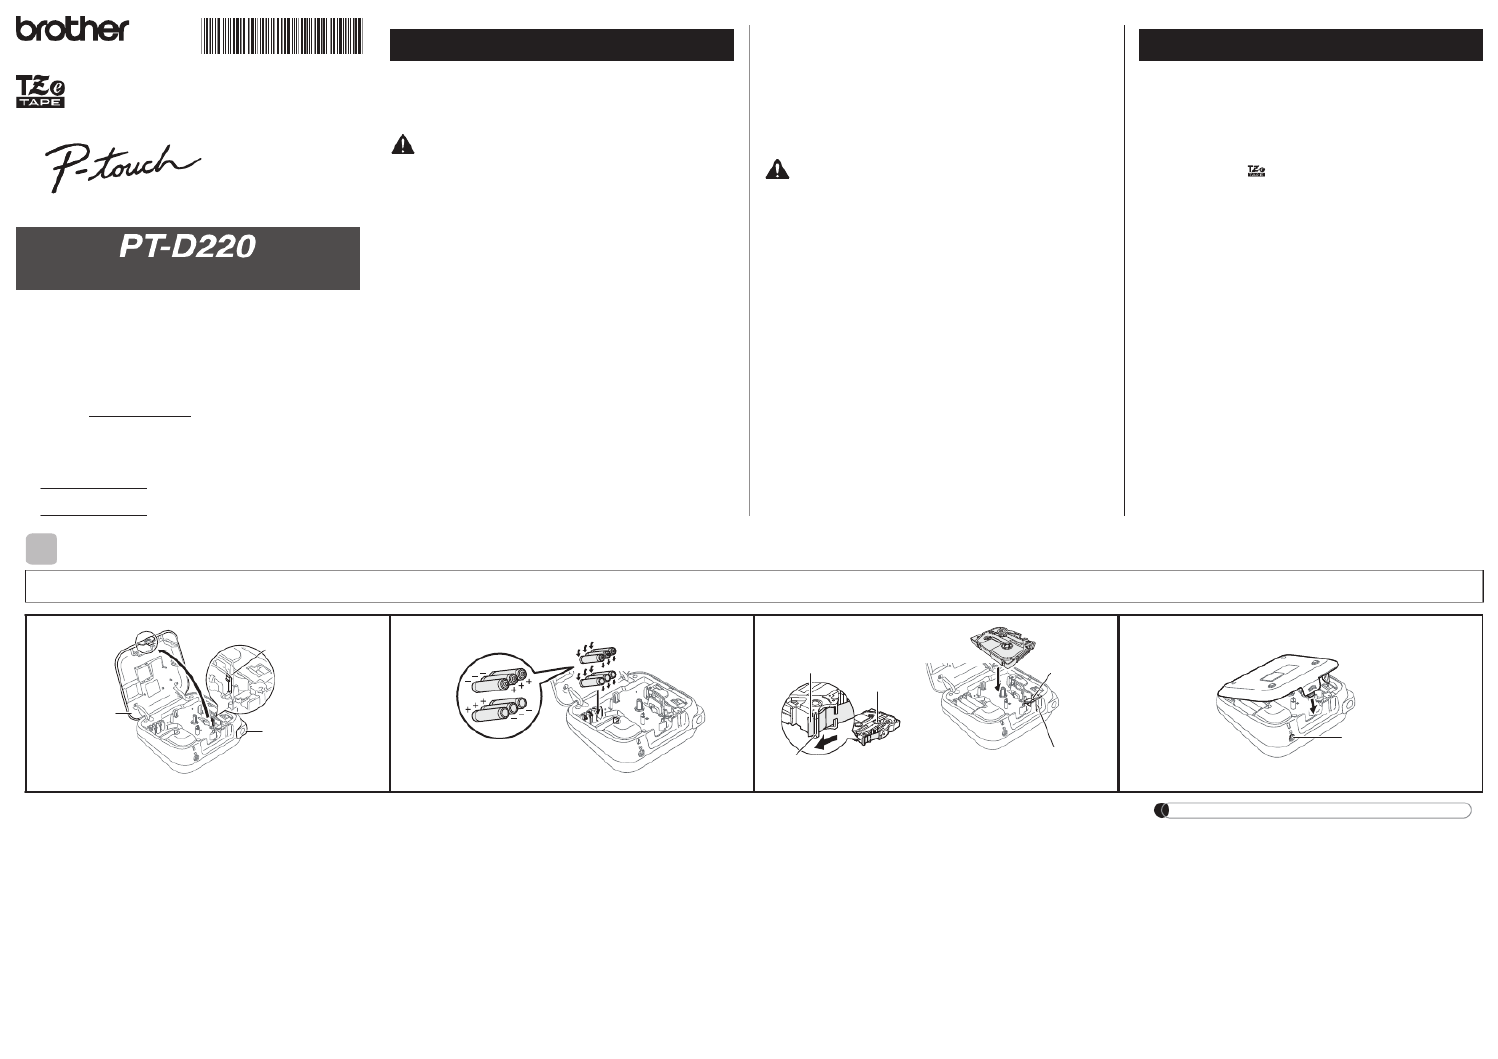
GETTING STARTED
Power Supply and Tape Cassette
Open the Cassette Cover by pressing the
above indicated area at the top end of the
machine.
If a Tape Cassette is already installed, remove it by
pulling it straight up. Also, if batteries are already
installed, remove them.
•Make sure that the power is turned off when
replacing batteries or tape cassettes.
Insert six new AAA alkaline batteries
(LR03) or fully charged Ni-MH batteries
(HR03), making sure that their poles
point in the correct directions.
Users of alkaline batteries:
Always replace all six batteries at the
same time with brand new ones.
Users of Ni-MH batteries:
Always replace all six batteries at the
same time with fully charged ones.
Insert a Tape Cassette into the Label
Maker until it locks into place and then
close the Tape Cassette Compartment
Cover.
•Make sure that the end of the tape feeds under
the tape guides.
•Use only Brother TZe tapes with this machine.
NOTE
When using optional AC Adapter
1.
Insert the Adapter cord plug into the
ACAdapter Jack on the top end of the machine.
2. Insert the plug into the nearest standard
electrical outlet.
For memory back up, we recommend
using AAA alkaline batteries (LR03) or
Ni-MH batteries (HR03) together with the
AC Adapter.
1
1Print Head
Tape Cutter
Lever
Cassette
Cover
2 3
Toothed
Wheel
Cutter's
Edge
End of Tape
Tape Exit
Slot
Tape Guide
4
AC Adapter Jack
Thank you for purchasing the PT-D220 (hereafter referred to as
“the Label Maker”).
With your new Brother P-touch Label Maker, you can create a
wide variety of custom, self-adhesive labels. This Label Maker
uses Brother "TZe" tapes from 0.13" (3.5mm) to 0.47" (12mm)
widths. "TZe" tape cassettes are available in many colors and
sizes. Visit www.brother.com for a complete list of tapes
compatible with your machine.
Please read this guide before using this Label Maker. After
reading this guide, keep it in a safe place.
•Manuals in Spanish for this model are available at
support.brother.com.
•Manuales en Español para este modelo están disponibles en
support.brother.com.
D027JF001
English
User’s Guide
Product specificaties
| Merk: | Brother |
| Categorie: | Printer |
| Model: | P-touch PT-D220 |
Heb je hulp nodig?
Als je hulp nodig hebt met Brother P-touch PT-D220 stel dan hieronder een vraag en andere gebruikers zullen je antwoorden
Handleiding Printer Brother

1 Mei 2026
29 April 2026
28 April 2026
28 April 2026
23 Februari 2026
7 Januari 2026
6 Januari 2026
19 December 2025
18 December 2025
3 November 2025
Handleiding Printer
Nieuwste handleidingen voor Printer
31 Mei 2026
27 Mei 2026
27 Mei 2026
20 Mei 2026
13 Mei 2026
12 Mei 2026
12 Mei 2026
7 Mei 2026
6 Mei 2026
5 Mei 2026