Bogen ASM1 Handleiding
Bekijk gratis de handleiding van Bogen ASM1 (2 pagina’s), behorend tot de categorie Niet gecategoriseerd. Deze gids werd als nuttig beoordeeld door 10 mensen en kreeg gemiddeld 4.8 sterren uit 5 reviews. Heb je een vraag over Bogen ASM1 of wil je andere gebruikers van dit product iets vragen? Stel een vraag
Pagina 1/2
Easy Install
Amplified Speaker
Model ASM1
®
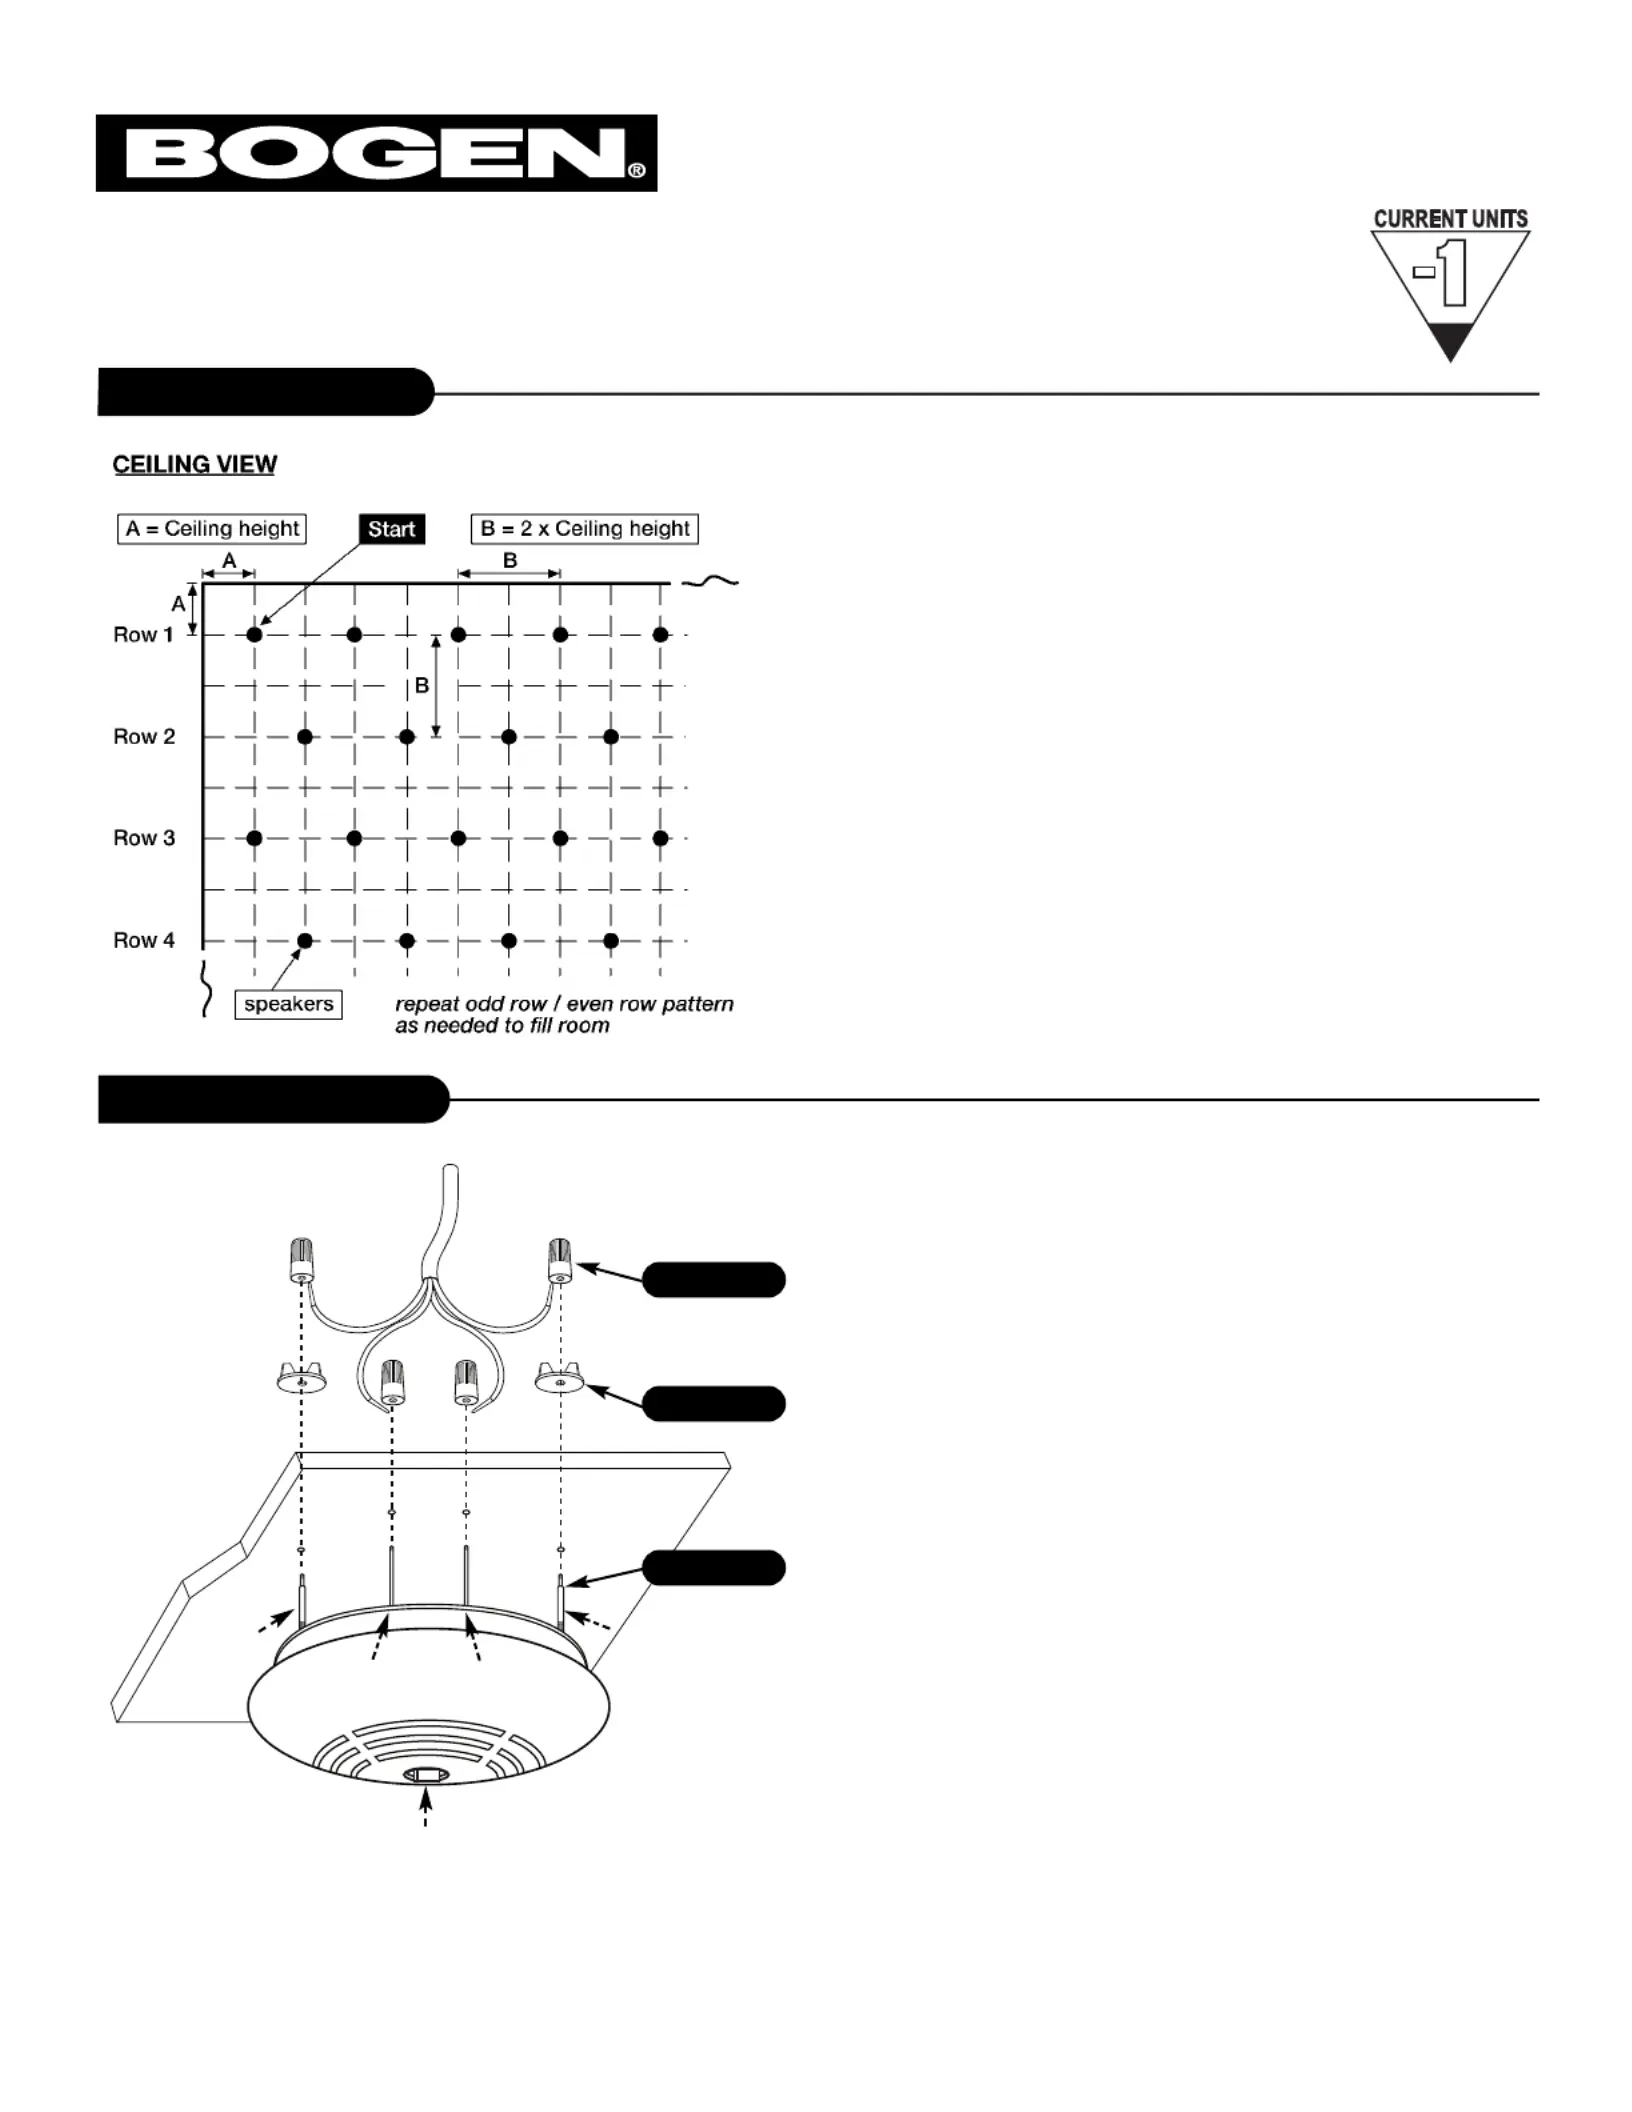
Speaker Layout
The layout of the speakers should be planned before installation
begins. Layout starts in one corner of the room. The first speaker
should be positioned from each wall a distance approximately
equal to the ceiling height of the room.
The next speaker in Row 1 should be spaced a distance approxi-
matelyequal to twice the height of the ceiling. Each additional
speaker in the row should use this same spacing.
Row 2 starts at twice the ceiling height distance from row 1 and
twice the ceiling height from the wall. The other speakers in this
row are also spaced at twice the ceiling height.
Row 3 is again spaced at twice the ceiling height from the previ-
ous row. The first speaker starting this row is positioned at one
ceiling height distance from the wall (similar to row 1).
Continue this pattern of alternating rows until the room is covered.
Because of the wide sound dispersion characteristic of the ASM1,
exact placement is not critical. The spacing of the speakers can
be adjusted so that the speakers are evenly spaced in a row.
Speaker Installation
Step 1
Step 2
Step 3
STEP 1 -Position the speaker on the ceiling tile and slowly push
the speaker, forcing the studs through the ceiling tile.
STEP 2 - Clean any loose debris or conductive foil from around the
studs. Spin the wide-based wing nuts (supplied) down
the threaded studs. Tighten the wing nuts until they are
very snug (finger tighten only - no tools required). Check
that the speaker is drawn tight to the ceiling tile.
Fiberglass sleeves (supplied) should be placed over the
studs at this point to insulate the exposed portion of the
studs as a safety precaution.
STEP 3 -The electrical connections are made to the studs with the
wire nuts (supplied). The studs are color-coded to indi-
cate polarity.
Amplifier connections are:
ThreadedCOPPERstud – AudioSignal (+)
ThreadedNICKEL stud – Audio Signal (-)
Smooth COPPERstud – 24V DC (+)
Smooth NICKEL stud – 24V DC (-)
Nylon wire ties (supplied) can be used to secure the speaker wires
to the studs if desired. (Nylon wire ties should wrap around the
fiberglass sleeve.)
54-2159-01B 1206
© 2006 Bogen Communications Inc. All rights reserved.
Specifications subject to change without notice.
Audio
Signal (+)
Audio
Signal (–)
24V DC (+)24V DC (–)
Volume Knob
Set volume to maximum (1) before
installation and adjust as needed
Product specificaties
| Merk: | Bogen |
| Categorie: | Niet gecategoriseerd |
| Model: | ASM1 |
| Kleur van het product: | Wit |
| Gewicht: | 907.18 g |
| Hoogte: | 76.2 mm |
| Gewicht verpakking: | 1360.78 g |
| Soort: | Inbouwluidsprekers |
| Materiaal behuizing: | ABS kunststof |
| Stroomvoorziening: | 12 - 30 VDC |
| Bluetooth: | Nee |
| Stroom: | 0.05 A |
| Connectiviteitstechnologie: | Bedraad |
| Diameter: | 241.3 mm |
| Type stroombron: | AC |
| Microfoon, line-in ingang: | Nee |
| Gemiddeld vermogen: | 1 W |
| Certificering: | NFPA NationalCode 160b\nUL-2043\n |
| Plug and play: | Ja |
| Equalizer-instellingen: | Nee |
| Impedantie: | 2000 Ohm |
| Audio-uitgangskanalen: | 1.0 kanalen |
| Speaker plaatsing: | Plafond-montage |
| Aantal drivers: | 1 |
| Woofer: | Nee |
| Diameter driver subwoofer (imperiaal): | 4 " |
| Frequentiebereik: | 125 - 15000 Hz |
| Gevoeligheid: | 90 dB |
| Op afstand bedienbaar: | Nee |
| Bass reflex: | Nee |
| Speaker omsluiting: | Gesloten |
| Versterker: | Ingebouwd |
| Regeling van bass-niveau: | Nee |
| Tweeter: | Nee |
| Wifi: | Nee |
| Aantal producten inbegrepen: | 1 stuk(s) |
Heb je hulp nodig?
Als je hulp nodig hebt met Bogen ASM1 stel dan hieronder een vraag en andere gebruikers zullen je antwoorden
Handleiding Niet gecategoriseerd Bogen

13 Maart 2026
13 Maart 2026
12 Maart 2026
7 November 2025
5 November 2025
4 November 2025
3 November 2025
5 Oktober 2025
30 September 2025
15 Juni 2025
Handleiding Niet gecategoriseerd
Nieuwste handleidingen voor Niet gecategoriseerd
19 Maart 2026
19 Maart 2026
19 Maart 2026
19 Maart 2026
18 Maart 2026
18 Maart 2026
18 Maart 2026
18 Maart 2026
18 Maart 2026
18 Maart 2026