Blebox shutterBox Handleiding
Blebox Niet gecategoriseerd shutterBox
Bekijk gratis de handleiding van Blebox shutterBox (2 pagina’s), behorend tot de categorie Niet gecategoriseerd. Deze gids werd als nuttig beoordeeld door 133 mensen en kreeg gemiddeld 4.9 sterren uit 2 reviews. Heb je een vraag over Blebox shutterBox of wil je andere gebruikers van dit product iets vragen? Stel een vraag
Pagina 1/2
SAFETY RULES
Connect only in accordance with the diagram presented in the
manual. Improper connections may be dangerous, it can damage
the controller, and loss of the warranty.
Do not connect the device to loads exceeding the permitted
values.
The installation of the device to a power mains that does not
meet the quality requirements dened by PN-EN 50160, will
result in the loss of the warranty
DANGER! Risk of electric shock! Even with the device turned o,
the outputs may be live. All assembly work should be ALWAYS
performed with the disconnected power circuit.
Test the controller’s work by clicking on the arrow near to the area showing
the window. If the electric shutter is moving in a dierent direction than you
suppose, go to Settings ("Settings" button at the top-right corner of the
screen) and select "Enable" in the "Move direction swap" option. Remember to
save your settings by clicking the "save" button, then go to the main panel by
clicking the arrow at the top-left corner of the screen. Check again whether
the shutter moves as expected.
If you have connected the wall push-button, check its work. Single pressing of
the "down" button / "up" button, will cause that the roller shutters moves in
the desired direction to the end position. If the electric shutter goes in the
opposite direction to the expected, select "enable" in the "Inputs swap"
option. When the electric shutter is moving, pressing any of the wall switches
causes that the shutter will stop immediately.
The next step is to select the type of electric shutter controlled - in settings,
in the "control type" select the option "roller shutter" when your shutter has
mechanical limit switches (manually adjustable with a key) or "without
positioning" when the electric shutter has electronic control system
(e.g. soft-start / overload protection / electronic limit switch, etc.). Specify also
the time the blind needs to move between the limit switches positions - this is
the time at which the controller provides voltage to the electric shutter motor
(it is not advisable to disable the move timeout).
If the controlled electric shutter have a mechanical limit switch, is possible the
control to a certain point. To use this feature, calibrate the controller by
clicking the "auto calibration" button. Once the procedure is conrmed, the
electric shutter will open to the upper limit switch position, then will close to
the lower limit switch position and then will open again to the upper limit
switch position. During the calibration, do not perform any action. To check
the work of the control to a certain point, go to the main panel by clicking the
arrow at the top-left corner and then by moving the nger several times over
the area showing the window in extreme and intermediate positions, verify if
the electric shutter moves to the selected position in the animation. You can
also set your electric shutter position - to do this, set the electric shutter in the
desired position and then hold the heart icon for about 5 seconds. Then verify
the functionality - moving the electric shutter to another position, then click
on the heart icon. The electric shutter should be placed in your favorite
position.
TAKE CARE ABOUT THE SAFETY AND COMFORT OF YOUR FAMILY – OPEN AND CLOSE
THE ELECTRIC SHUTTER STRAIGHTWAY FROM YOUR MOBILE PHONE
User manual
Disconnect theinstallation supply voltage before installing the controller.
Remember that any mounting works should be carried out when the mains
voltage is disconnected (switch o the mains fuse or disconnect the power
cord from the mains socket).
The controller should be installed in a place protected against adverse
environmental conditions, protected from third party access - in the ush box
or inside the enclosure of the controlled device. Remember that metallic
elements (wires, housing parts) have a negative inuence on the range of the
device, and consequently the comfort of use. It is recommended that the
device be mounted in a stable and xed position. Due to the operating
voltage of the device it is necessary that the connectors of the controller be
protected against accidental contacts or short circuits, which could cause
electric shock or damage to the device.
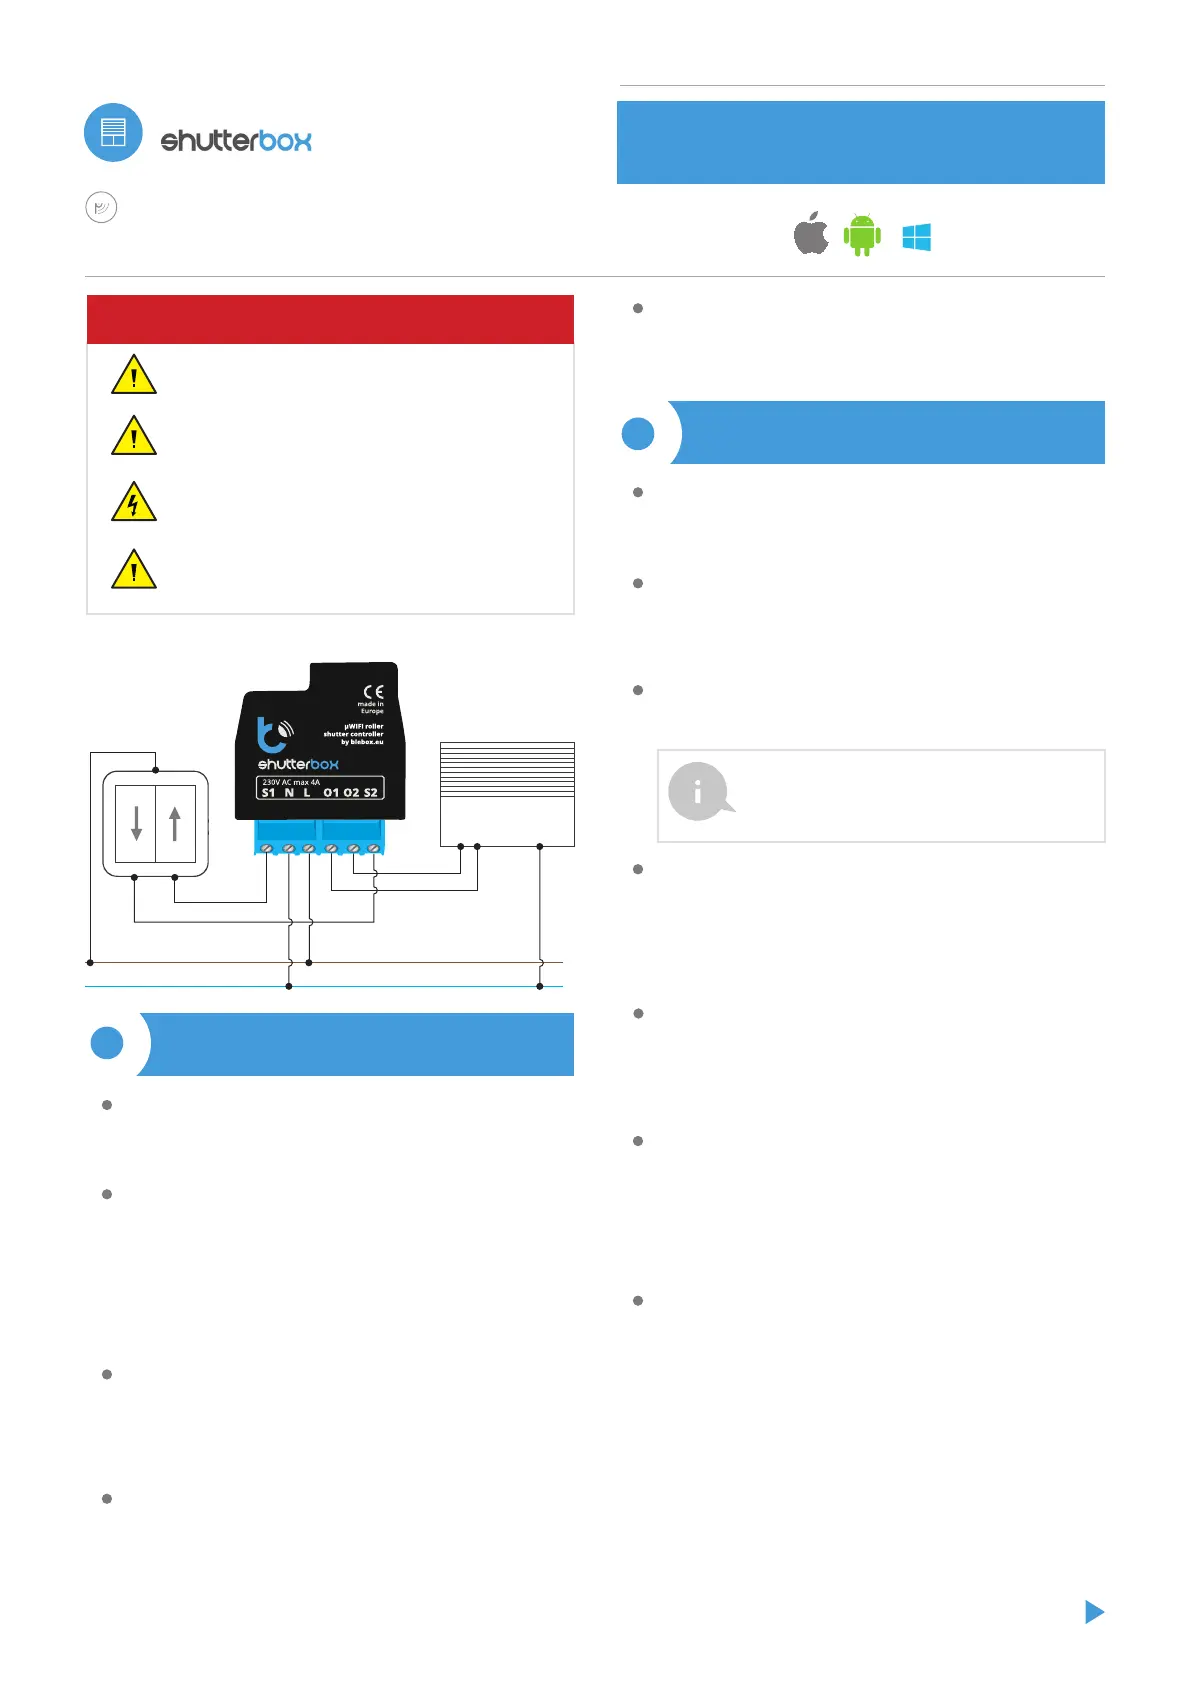
Read the diagram and then proceed to install the controller. Pay particular
attention to the designation of the controller connectors. Start with power
wires - phase L (usuallybrown) and neutral N (blue). Then, connect the load. If
you only want a local control with a wall switch, connect the wall push-button
according to the diagram. To control using only your phone or Tablet, it is not
necessary to install the wall push-button.
The controller supports all types of double monostable push-button. The
order of connection of the S1 / S2 input, to the right / left push-button does
not matter at the installation stage - it can be set at a later stage of the
controller conguration.
1
INSTALLATION - BASICS
Unlock your phone or tablet and download the free wBox application. If you
have an Android mobile device, you will nd the application in the Play Store.
For iOS devices the application is in the App Store. For phones with Windows
Phone, you can download the application from the Windows Phone Store.
By using your mobile phone or tablet, connect it to the device wireless
network. To do this, enter to your smartphone or tablet settings, then go to
setting of the WiFi network and nd the network name „shutterBox-
-xxxxxxxxxx” where xxxxxxxxxx is the serial number of the device. Connect to
this network.
Turn on the wBox application. A device will appear at the top of the screen. To
add it to the application, click on "plus" on the right side of the name. To
pre-congure the controller, click on the default device name.
2FIRST START
You can also set the conguration using the web browser
of your phone / tablet. After connecting to the wireless
network of the controller, turn on the browser and go to:
http://192.168.4.1
After making sure that the device is connected in accordance with the
diagram and that there are no metal components near the controller which
may accidentally cause short-circuit, start the device by turning on the power
(turning on the mains fuse or connecting the power cord to the power outlet).
electric shutter controller
with μWiFi technology
N
L
sb101
CONNECTION DIAGRAM
electric shutter
button
Product specificaties
| Merk: | Blebox |
| Categorie: | Niet gecategoriseerd |
| Model: | shutterBox |
| Kleur van het product: | Zwart |
| Breedte: | 42 mm |
| Diepte: | 39 mm |
| Hoogte: | 24 mm |
| Materiaal behuizing: | Polyurethaan |
| Internationale veiligheidscode (IP): | IP20 |
| Stroom: | 5 A |
| Frequentie: | 2400 MHz |
| Op afstand bedienbaar: | Ja |
| Compatibele producten: | Apple iPhone, Apple iPad, iPad Mini |
| Gemakkelijk te installeren: | Ja |
| AC-ingangsspanning: | 230 V |
| Type product: | Rolluikbediening |
| Maximaal schakelvermogen: | 1000 W |
Heb je hulp nodig?
Als je hulp nodig hebt met Blebox shutterBox stel dan hieronder een vraag en andere gebruikers zullen je antwoorden
Handleiding Niet gecategoriseerd Blebox

4 Februari 2024
4 Februari 2024
4 Februari 2024
Handleiding Niet gecategoriseerd
Nieuwste handleidingen voor Niet gecategoriseerd
27 Juli 2026
27 Juli 2026
27 Juli 2026
27 Juli 2026
27 Juli 2026
27 Juli 2026
27 Juli 2026
27 Juli 2026
27 Juli 2026
27 Juli 2026