Bikemate MCP30102 Handleiding
Bikemate Fietscomputer MCP30102
Bekijk gratis de handleiding van Bikemate MCP30102 (2 pagina’s), behorend tot de categorie Fietscomputer. Deze gids werd als nuttig beoordeeld door 22 mensen en kreeg gemiddeld 4.7 sterren uit 3 reviews. Heb je een vraag over Bikemate MCP30102 of wil je andere gebruikers van dit product iets vragen? Stel een vraag
Pagina 1/2
MCP 30102
4 x
1 x1 x
1
oder / or
?
A
B
90°
B.1 B.2
B.3 B.4
4x
4x
2
oder / or
+
oder
or
/
3
+
4
max. 5mm
5
oder / or
6
45°
click!
A
+
-!
DEnter button S
Mode buttonM-IMode-button M-II
CLOCK TRIP
KM+
KCAL
CAL
ODO
MAXSPD
AVSPD
RIDET
SCAN
CLOCK MXTEMP
MNTEMP
TEMP°C
STW FATB TIME +
CLOCK MXTEMP
MNTEMP
TEMP°C
STW FATB TIME +
AFTER SALES SUPPORT
Helpline: 00800 147 03 690
International freecall www.mcp-ag.net
Box Includes
1 bike computer, 1 speed sensor, 4 cable ties, 1 spoke
magnet, 2 o-rings 32mm, 1 o-ring 42mm, 1 instruction
manual, 1 warranty card
Warranty Period 36
5596 04/2008
Helpline: 00800 147 03 690
1
2
1
/
2
x
1
.
7
5
44-559 26x1.6
47-559 26x1.75x2
50-559 26x1.9
54-559 26x2.00
57-559 26x2.125
37-59026x1 3/8
37-58426x1 3/8x1 1/2
20-571 26x3/4
32-63027x1 1/4
28-63027x1 1/4 Fifty
40-622 28x1.5
47-622 28x1.75
40-63528x1 1/2
37-62228x1 3/8x1 5/8
18-622 700x18C
20-622 700x20C
23-622 700x23C
25-622 700x25C
28-622 700x28C
32-622 700x32C
37-622 700x35C
40-622 700x40C
2051
2070
2089
2114
2133
2105
2086
1954
2199
2174
2224
2268
2265
2205
2102
2114
2133
2146
2149
2174
2205
2224
1
2
1
/
2
x
1
.
7
5
WS
C
WS
Caution: Do not install the magnet on the same position as the
transmitter. The ideal mounting points are in the lower, or in the
upper half of the transmitter (Please see picture 5).
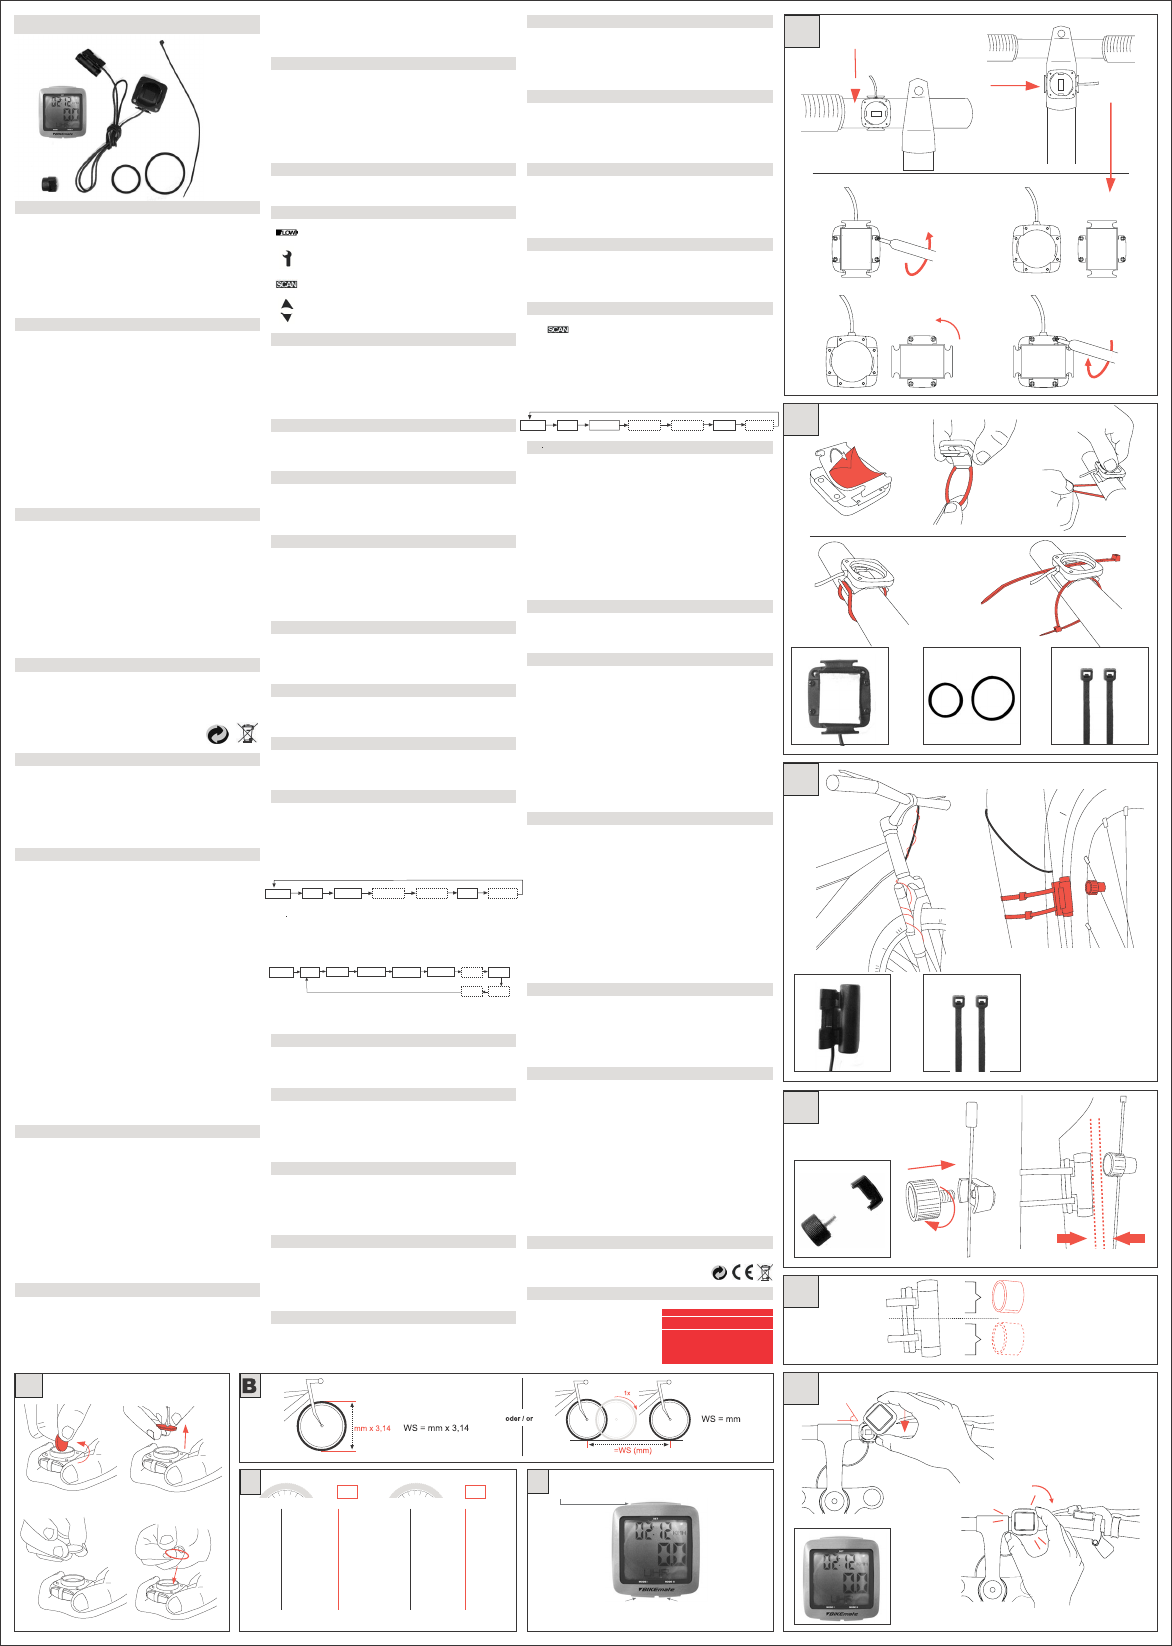
Attaching the Computer (See Picture 6)
After installing the holder, sensor and magnet, you can attach
the computer. Insert the computer into the computer holder
turned approx. 45° to the left.
Turn the computer clockwise with gentle pressure until it firmly
sits in the holder. To remove the computer turn it clockwise in
the opposite direction.
Description of the buttons
For the Description of the buttons please see Picture D.
Description of Symbols
Replace battery as soon as possible.
Symbol for maintenance interval, indicates pre-
programmed servicing.
Symbol for continuous display of trip data.
Graphically shows the relation between current speed
in relation to the average speed
Basic Settings Language Sprache
To save the battery during shipment and warehousing, your
BIKEmate bicycle computer is kept in the so called delivery state.
The display is inactive. To start the Setup of your bicycle computer
press any button. Now you can select a language for your
bicycle computer from German, English and French.
Basic Settings Wheel Size
Please find information for the evaluation of wheel size in
pictures B and C.
Basic Settings Total Odometer
When you use your BIKEmate bicycle computer for the first time,
it is possible for you to set it to the previous mileage recorded
on your former bicycle computer.
Basic Settings Service
Modern bicycles are technically complex machines and should
be checked and serviced by trained personnel at regular intervals.
Your BIKEmate bicycle computer helps you to have such services
carried out at the right times. Your bicycle dealer will be glad
to recommend the ideal mileage between services.
Basic Settings Body Weight
The BIKEmate bicycle computer can calculate the calories
consumed per trip. For precise calculation the software requires
your body weight.
Basic Settings 12/24 Hour Format
Your BIKEmate bicycle computer is capable of displaying the
time in 12 or 24 hour format.
Basic Settings Time
After the Setup is done your bicycle computer changes over to
display the time.
Basic Functions and Additional Options
In order to blank out unused functions your BIKEmate bicycle
computer is divided into basic functions and additional options.
On delivery all additional functions are off.
The basic functions can be displayed by pressing theM-I-Button
and they appear in the following order:
Minimum and Maximum Temperature, Adjustable Timer, Current
Calorie, Adjustable Trip Distance and Scan-Mode can be added
or removed at your choice .
Please press theM-II-Button to display the following functions:
To display the single functions please press the buttons M-I
and M-II.
Menu Time and Stopwatch
Your BIKEmate bicycle computer can be used for regular time
display as well as for stopwatch mode.
Menu Temperature
The temperature measurement and temperature memory features
allow you to read off and record different temperatures (Current,
Minimum and Maximum Temperatures) during a trip, such as
occur over greatly varying altitudes.
Trip Distance and Trip Time Menu
The trip mileage and trip time features help you to organize your
bicycle trip optimally and keep a record of your trips. Please
note that the delete function for this data also affects the other
data logged for the trip!
Menu Average and Maximum Speed
The Average speed feature allows you to calculate your
anticipated time of arrival during a trip. If you keep a training
log, this value is also suitable for recording your training
achievement.
Menu Odometer
The Odometer feature of your bicycle computer accumulates all
ridden and preset kilometres.
Menu Calories
If you want to reduce your weight or body fat with your bicycle
training program, the BIKEmate bicycle computer can help you to
check your training achievement. The bicycle computer automatically
determines the kilo-calories or fat burned during each trip.
Menu Fatburn
By pressing theM-I-Button you switch over to the Fatburn
Menu. The bicycle computer shows the approx. value of burned
fat based on the unit of weight in Kilogram or Pounds which you
defined in the setup.
Menu Adjustable Trip Distance
With the Adjustable Trip Distance feature you can set tours
according to a guide book or road map (km-) or you can input
sections into the tour such as mountain ascents (km+). This
feature can also be used for training intervals.
Menu Timer +/-
You can use the timer either as a countdown timer (Time ),
when you want to set a training time or you can use it as an
additional stopwatch (Time +).
Menu Scan
This feature allows you to review all information saved
without having to remove your hands from the handlebars to
switch the display.
Pressing theM-IIbutton briefly during the Adjustable Trip
Distance switches the display to the Scan mode. While in scan
function the display shows all information for the current trip
at intervals of 2 seconds.
Speed comparison
During the ride your BIKEmate bicycle computer will illustrate
by means of an arrow symbol your current speed in relation to
your average speed.
The arrow pointing upwards indicates that your current speed is at
least 1Km/h greater than the average speed of your current trip.
The arrow pointing downwards indicates that your current speed
is at least 1Km/h lower than the average speed of your current trip.
Both arrows shown in the display indicate that your speed is in
line with the average speed of your current trip.
Background light
The background light allows you to read off the computer display
even with low visibility or in darkness.
Replacing Battery (See picture A)
You can change the batteries of your BIKEmate bicycle computer
without losing the set up values and additional options.
When the LOW battery symbol appears on the display it is
time to change the battery.
Open the battery cover on the rear of the computer by turning
it anti-clockwise with the aid of a coin or similar instrument.
You have 15 Seconds to replace the battery and reattach the
battery cover. During this time your bicycle computer keeps all
set up data and additional options.
Preserving Battery Life
To preserve the durability of the battery your BIKEmate bicycle
computer switches over to the following modes after pre-set times:
If the bicycle computer receives no signal from the sensor or if
no button is pressed for longer than 15 Minutes, the computer
switches to sleep mode. Now the display shows only the time
and the BIKEmate Logo.
If the bicycle computer receives no signal from the sensor or if
no button is pressed for longer than 7 days, the computer
switches off the display completely. Reactivate your bicycle
computer by pressing the button M-I or M-II. The display
shows the last function you used.
Restart / Reset
If the display no longer reacts or errors are present, this can
usually be corrected by restarting (resetting) the computer. Press
and hold the buttons M-I and M-II until the display ceases.
Then release the buttons. The computer restarts with the menu
for the Basic Settings and should now function properly.
Warranty
The Guarantee period is three years and starts on the day of
purchase.
Please keep your receipt as proof of purchase.
During the guarantee period you can send your product in to be
repaired via freight forwarding to our service centre.
The batteries, straps, and glass are not included under this
warranty. Once the guarantee has expired you can still send
your product in to be repaired, however you will be liable for
the costs. The guarantee is void if the product has been misused
or mistreated in any way and or has been repaired by anyone
other than our service centre.
Your statutory rights are not affected in any way.
See below for service address.
Technical Data
Battery: CR 2032
Protected against water splashes
MCP (Multi Consumer Products) AG, Rudolf-Diesel-Straße 9, D-61267 Neu-Anspach, Germany
Safety Precautions
- Please read and observe these operating instructions and
particularly the following safety precautions for the safe and
successful use of your new BIKEmate bicycle computer.
- When riding your bicycle give primary attention to the traffic
and check the display on your computer only when safe to do so.
- Learn how to operate your computer before starting a trip and
program the computer before beginning a trip or during a break.
- Keep these instructions safe and give them to any other users.
Safety Precautions, Batteries
- Never recharge batteries! Explosion hazard!
- Keep batteries away from children, do not short-circuit, break
open or throw onto fire.
- If a battery is swallowed consult a physician immediately.
- When inserting the batteries pay attention to the polarity.
- Clean battery and unit contacts as required before installing.
- Remove discharged batters from unit immediately due to
increased danger of leakage!
- Never subject batteries to extreme temperatures
- Failure to follow these precautions can cause the batteries to
discharge beyond their maximum voltage and leak!
Remove batteries immediately to avoid damage.
- Avoid contact with skin, eyes and mucus membranes. After
contact with battery acid rinse affected areas with large
quantities of clean water and consult a physician immediately.
Instructions for Use
- Do not use force to open the computer! Have such work done
by an authorized service agent.
- Do not expose the computer to extreme weather conditions.
- Avoid contact with solvents, concentrated cleaning agents, etc.
Use a soft rag with water and mild soap to clean the computer.
- Avoid subjecting the computer to hard impacts or improper
handling.
- Do not use a water jet, garden hose or high pressure cleaner
on the bicycle computer.
- Remove the batteries during long intervals between trips,
during the winter season, etc.
Disposal instructions:
When no longer required, dispose of the product packaging in
an environmentally sound manner. Do not dispose used batteries
with domestic waste; take them to a collection point for used
batteries. It is a legal requirement that the used device must be
disposed of properly at the end of its service life.
Check with your local disposal authorities.
Package Contents
1 BIKEmate bicycle computer
1 Computer holder (handlebar mount)
1 Spoke magnet with clamp
1 small rubber ring (32 mm)
1 big rubber ring (42 mm)
4 cable straps
Installation of computer holder (see Picture 1 & 2)
First remove the protective foil on the rear of the computer
holder.
Then hook the rubber ring which best matches the diameter of
your handlebars onto one of the hooks on the computer holder.
Then position the holder on the handlebars at the previously
determined angle. Guide the bottom part of the rubber ring
under the handlebars and attach to the hook on the other side.
Alternatively you can also fasten the computer holder with the
cable straps included. To do this, guide the cable straps through
the openings provided for this purpose and pull them down tight.
Cut off the excess at the end with a pair of scissors.
If you want to attach the computer holder to the stem please
do the following:
Loosen the 4 screws underneath the computer holder with a
screwdriver. Then disconnect the lower and upper sides of the
holder.
Then turn the lower side of the holder 90° and connect it to the
upper side of the holder by fastening the 4 screws again.
Mounting the Sensor (See picture 3)
Next fix the bracket mount to the handle bar. The sensor cable
is contrary to the direction of motion. Take the cable, guide it
under the bar and start winding it around the brake wire. Continue
winding the cable towards the fork.
Make sure that the cable is securely fixed and cannot come into
contact with/get trapped by the front tyre.
Reach through the middle of the fork to start mounting the
sensor by using one of the rubber rings. The size of the rubber
rings depends on the diameter of the fork. Use the cable ties
as an alternative method for fixing the sensor.
Installation of spoke magnet (See picture 4 and 5)
Screw the magnet onto one of the outer spokes opposite the
valve.
The distance between the magnet and the transmitter should
be between 1 mm and 4 mm. If necessary correct the position
of the transmitter and swivel it.
Product specificaties
| Merk: | Bikemate |
| Categorie: | Fietscomputer |
| Model: | MCP30102 |
Heb je hulp nodig?
Als je hulp nodig hebt met Bikemate MCP30102 stel dan hieronder een vraag en andere gebruikers zullen je antwoorden
Handleiding Fietscomputer Bikemate

9 Juni 2023
9 Juni 2023
9 Juni 2023
9 Juni 2023
9 Juni 2023
9 Juni 2023
29 Mei 2023
Handleiding Fietscomputer
Nieuwste handleidingen voor Fietscomputer
20 Juli 2026
14 Juni 2026
15 Mei 2026
11 Mei 2026
16 Maart 2026
15 Maart 2026
14 Maart 2026
5 December 2025
23 September 2025
25 Augustus 2025