Berker 85606100 Handleiding
Berker Niet gecategoriseerd 85606100
Bekijk gratis de handleiding van Berker 85606100 (1 pagina’s), behorend tot de categorie Niet gecategoriseerd. Deze gids werd als nuttig beoordeeld door 15 mensen en kreeg gemiddeld 5.0 sterren uit 9 reviews. Heb je een vraag over Berker 85606100 of wil je andere gebruikers van dit product iets vragen? Stel een vraag
Pagina 1/1
Best.-Nr./Order no./Nr. ord.
8560 51 00, 8560 61 00
KNX-Funk Handsender 2 und
4 Kanal,
KNX-RF hand-held transmitter
2 and 4 channels
KNX-Radio trasmettitore portatile
2e 4 canali
Die Geräte dienen zur Fernsteuerung von KNX-Funk-
Empfängern. Sie dienen zur Steuerung der Beleuchtung,
der Markisen, der Rollläden, der Heizung usw.
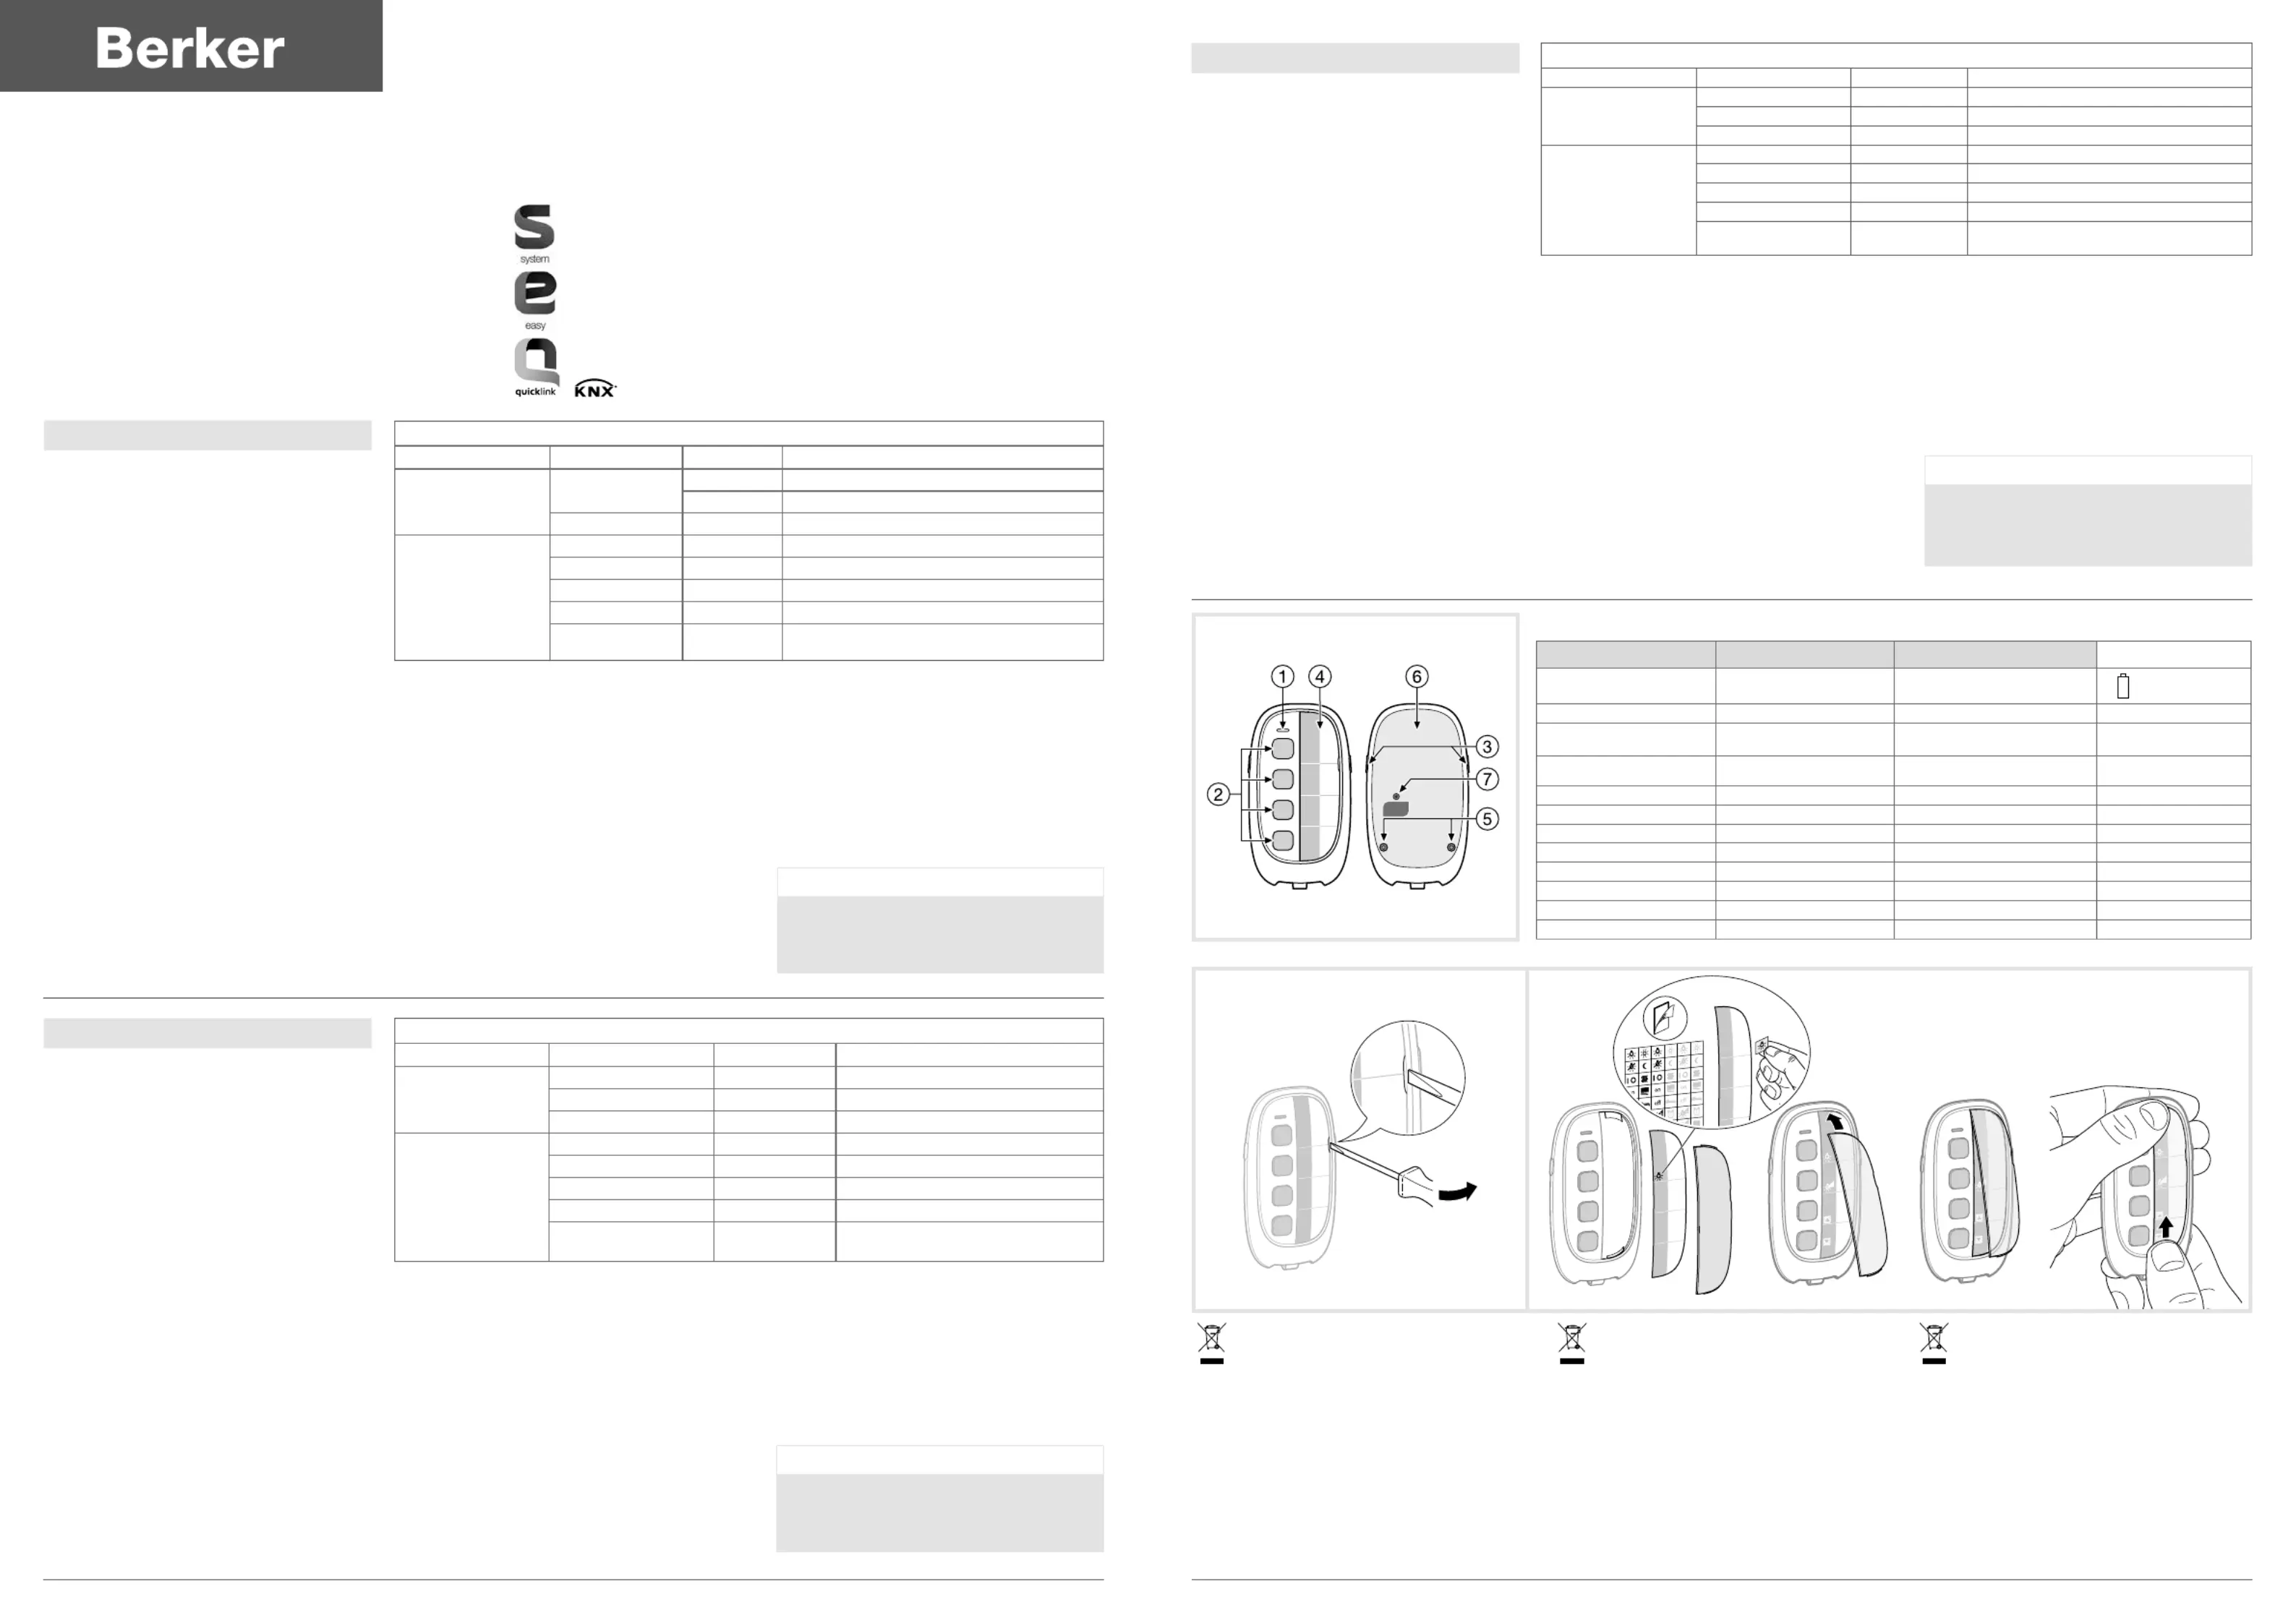
Funktionen
• 2 oder 4 voneinander unabhängig kongurierbare
Sende-Tasten
2
• Quittierungs-LED zur Sendebestätigung
1
• Tastensperre
3
• Beschriftungsfeld
4.
Einstellungen
Die Geräte lassen sich auf 3 unterschiedliche Arten
kongurieren :
•
quicklink& : Konguration ohne Werkzeug,
direkt am Gerät über
J-Taste und -LED (siehe
Kongurationsanleitung
quicklink&)
• tebis TX: Konguration über Verknüpfungsgerät von
Hager
• ETS3/ETS4 über KNX-Funk/TP Gateway : Datenbank
und Beschreibung der Anwendungssoftware beim
Hersteller erhältlich.
Konguration über ETS
J-Taste drücken zur Adressierung mittels Funk/KNX Gateway.
O
Um den Kongurationsmodus zu ändern, ist das Gerät
zwingend auf Werkseinstellung zurückzusetzen.
Tastensperre
Bei aktivierter Tastensperre werden nach Betätigung der
Sende-Tasten
2 keine Steuerbefehle gesendet. Die
Quittierungs-LED (s. Tabelle) leuchtet kurz orange auf.
Sender klonen
Durch Klonen lässt sich ein bereits kongurierter Master-
Funksender duplizieren. Auf diese Weise erhalten Sie
rasch vollkommen identische Kopien.
Vorgehensweise beim Klonen eines Senders
- Kongurationsmodus durch Betätigung der Taste J des
“Master-Gerätes” aktivieren: Die LED
cfg leuchtet auf.
- An dem zu klonenden Gerät, das noch die Werkseinstellungen
enthält, Taste cfg lang anhaltend drücken (über 15 Sek.), bis
die LED
cfg die zweite Blinkstufe (schnelleres Blinken) erreicht.
Sobald die LED erlischt, ist das Klonen beendet. Wiederholen
Sie diesen Vorgang an den restlichen zu klonenden Geräten.
- Klon-Modus beenden durch erneute Betätigung der Taste
J des Master-Gerätes.
Der geklonte Sender identiziert sich durch orangefarbenes
Aueuchten der LED
cfg bei Betätigung der Taste J.
O
Das Klonen ist nur möglich zwischen Sendern mit gleicher
Eingangsanzahl. Ein geklontes Gerät lässt sich nicht umpro-
grammieren. Dasselbe gilt für das Master-Gerät. Diese Geräte
müssen auf Werkseinstellungen zurückgesetzt und neu pro-
grammiert werden.
Zurücksetzen auf Werkseinstellungen
Taste Jdrücken und gedrückt halten, bis die LED cfg
blinkt >10 s, dann loslassen. Das Zurücksetzen auf
Werkseinstellungen wird durch das Erlöschen der LED
cfg
Quittierungs-LED1
Aktion
Zustand der LED Bedeutung Farbe der LED
Gleichzeitige Betätigung
der Sperr-Tasten
3
Leuchtet 1 Sekunde
lang
OrangeTastensperre aktiviert
GrünTastensperre deaktiviert
Blinkt 1 Sekunde lang Der Batterieladezustand ist schwach Rot
Betätigung einer der
Sende-Tasten
2
Leuchtet kurz auf Der Steuerbefehl wird gesendet Grün
Blinkt 1 Sekunde lang OrangeDie betätigte Taste ist nicht konguriert
Leuchtet kurz auf Tastensperre aktiviertOrange
Blinkt 1 Sekunde lang Der Batterieladezustand ist schwach Rot
Leuchtet nicht _- Keine Batterien oder Batterieladezustand sehr schwach
- Batterien verpolt
angezeigt. Bei dieser Operation wird die komplette
Konguration des Gerätes gelöscht, unabhängig vom
Kongurationsmodus. Nach einem Batteriewechsel oder
einem Zurücksetzen auf Werkseinstellungen ist eine
Wartezeit von 15 Sekunden abzuwarten, bevor die
Konguration vorgenommen werden kann.
Batterien auswechseln
Batteriefachdeckel 6 mittels Schraubendreher
demontieren. Entfernen Sie die 2 Batterien und legen Sie
die neuen Batterien ein. Hierbei ist auf korrekte Polung
zu achten (es sind stets beide Batterien gleichzeitig zu
wechseln). Batteriefachdeckel wieder einbauen.
6LE003065B
The devices are used for the remote control of KNX-RF
receivers. They make it possible to remotely control
lighting, blinds or rolling shutters, heating…
Functions
• 2 ou 4 send buttons that can be congured
independently
• LED for sending conrmation
1
• Key lock 3
• Labelling eld
4.
Conguration
The devices may be congured in 3 different ways :
•
quicklink& : conguration without tool, directly on
the device via
J button and LED (see conguration
instructions
quicklink&)
• tebis TX: conguration using connection device from
Hager
• ETS3/ETS4 via KNX-RF/TP gateway : database and
description of software application available from the
Manufacturer.
Conguration by ETS
Press
J button for addressing by means of radio/KNX
gateway.
O
In order to change the conguration mode, a reset to
factory settings is required.
Key lock
If the key lock is activated, no control commands are sent
after pressing the send button
2. The conrmation LED
(s. table) briey ashes orange.
Cloning of transmitters
Cloning allows duplicating a "Master" radio transmitter
previously congured to create fully identical copies qui-
ckly.
How to clone a transmitter?
- Enter in conguration mode by pressing the Jbutton of the
"Master": LED
cfg turns on.
- On the product to be cloned still in factory mode, press
J
button for an extended time > 15 s until the 2nd ickering
level (faster) of LED
cfg is reached. When LED ickering ends
(LED turns off), cloning is completed.
Repeat this step for the other products to be cloned.
- Exit the cloning mode by pressing again Master
J button.
When button is pressed, LED
cfg turns orange to signal the
cloned transmitter.
O
Cloning is possible only between transmitters with the
same number of inputs. A cloned product cannot be modi-
ed, including the "Master". The product shall be fac-
tory reset and reprogrammed.
Reset to factory settings
Hold the button depressed until Jcfg LED ickers >10 s,
then release it.
LED
cfg turns off to signal the end of reset to factory settings.
Conrmation LED 1
ActionLED stateLED Color Indication
Simultaneous activation
of the lock buttons
3
Switches on for 1 sKey lock is activatedOrange
Switches on for 1 sKey lockGreen
Flashes on & off for 1 s Low battery levelRed
Conrmation of one of
the send buttons
2
Switches on for a short timeGreenControl is transmitted
Flashes on & off for 1 s OrangeThe push-button pressed is not congured
Switches on for a short timeOrangeKey lock is activated
Flashes on & off for 1 s Low battery levelRed
Off - No batteries or very low battery level_
- Batteries are not placed correctly
This operation removes the entire product conguration,
whatever the mode of conguration. After a battery
change or a reset to factory settings, wait 15 s before
proceeding to conguration.
Replacement of batteries
Dismantle battery compartment lid 6.
Remove the 2 batteries and insert the new ones making
sure that matching of poles (+/-) is correct (both batteries
must be changed). Place battery cover
6 back on.
01Berker GmbH & Co. KG - Zum Gunterstal - 66440 Blieskastel/Germany - Tel.: +49 6842 945 0 - Fax: +49 6842 945 4625 - E-Mail: info@berker.de - www.berker.com6LE003065B- 10/2021
Technische Daten / Technical characteristics / Caratteristiche tecniche
E
E
E
EEZ
Z
Z
ZZ
Y
Y
Y
YY
VersorgungsspannungSupply voltageTensione di alimentazione 2x CR 2430 3,0 V
(SELV, TBTS)
SendefrequenzTransmission frequencyFrequenza portante868,3 MHz
Reichweite im freien FeldMax distanza di trasmissione in Range in a free eld
campo libero
100 m
Geschätzte Lebens-dauer der
Batterie
Approximate life
duration of the battery
Durata di avvicina a vita della bat-
teria
5 Jahre / 5 years / 5 anni
AbmessungenDimensionsIngombro83 x 46,5 x 15,8 mm
SchutzartDegree of protectionGrado di protezioneIP 50
BetriebstemperaturOperating temperatureTemperatura di funzionamento-10 … +70 °C
LagertemperaturStorage temperatureTemperatura di stoccaggio-20 … +70 °C
Maximale Sendeleistung
Maximum emission powerPotenza massima di emissione25mW
RF KNX ÜbertragungsmedienRF KNX Communication Media
Mezzo di comunicazione RF KNXRF1.R
Empfänger KategorieReceiver categoryRicevitore categoria2
Einschaltdauer SenderTransmitter duty cycleCiclo di lavoro del trasmettitore1%
Gli apparecchi servono per il comando remoto di KNX-
Radio ricevitori. Tramite essi è possibile controllare l’illu-
minazione, le tende o le tapparelle, il riscaldamento, ...
Funzioni
• 2 o 4 canali indipendenti di comando tramite il bus KNX.
• LED di conferma di trasmissione
1
• Blocco tasti 3
• Indicazione delle funzioni tramite porta etichette
4.
Congurazione
E’ possibile congurare queste trasmettitori portatili in 3
modi diversi :
•
quicklink& : congurazione senza utensili, direttamente
sull'apparecchio attraverso il tasto
J e il LED (si veda
il
quicklink& relativo alle istruzioni di congurazione)
• tebis TX: congurazione attraverso il dispositivo di Hager
• ETS3/ETS4 attraverso KNX-Radio/TP gateway : base di
dati e descrizione del software applicativo disponibile
presso il costruttore.
Congurazione mediante ETS
Premere il tasto
J per l'indirizzamento per mezzo del
Gateway radio/KNX.
O
P er cambiare il modo di congurazione, occorre
tassativamente effettuare un “ripristino delle
congurazioni di fabbrica” del prodotto.
Blocco tasti
Con il blocco tasti attivato, dopo l'azionamento del tasto di
invio
2 non viene inviato alcun ordine di comando. Il LED di
conferma (v. tabella) si illumina brevemente di arancione.
Clonazione d’emittenti
La clonazione permette di duplicare un’emittente radio “master”
già congurata per creare rapidamente copie tutte identiche.
Come clonare un’emittente?
- Entrare in congurazione premendo il tasto J del
“master” : si illumina il LED
cfg.
- Sul prodotto da clonare ancora in modo "fabbrica", premete
a lungo > 15 s il tasto
J no al 2° livello di lampeggio (più
rapido) del LED
cfg. L’avvenuta clonazione è segnalata dallo
spegnimento del LED.
Ripetere questa tappa sugli altri prodotti da clonare.
- Uscita dal modo clonazione premendo nuovamente il tasto
J del “master”.
L’avvenuta clonazione dell’emittente è segnalata dall’accen-
sione (arancione) del LED
cfg premendo il .tasto J
O
La clonazione è possibile solo fra emittenti munite del
medesimo numero d’entrate. Impossibile modicare un
prodotto clonato compreso il "master": ripristinate le
congurazioni di fabbrica e riprogrammate il prodotto.
Ripristino impostazioni di fabbrica
Premere e mantenere il tasto J no al lampeggio del
LED -cfg> 10 s poi rilasciare. La ne del ripristino delle congura
LED di conferma 1
Azione Tasto del LED Colore del LED Signicato
Azionamento
contemporaneo
dei pulsanti di blocco
3
Acceso sso per 1 sArancio Il modo blocco tasti è attivato
Acceso sso per 1 sVerdel modo blocco tasti è disattivato
Lampeggia per circa 1 s Rosso Livello delle batterie basso
Azionamento di uno dei
tasti di invio
2
Brevemente accesoL’ordine è stato emessoVerde
Lampeggia per circa 1 s ArancioIl pulsante azionato non è congurato
Brevemente accesoIl modo blocco tasti è attivatoArancio
Lampeggia per circa 1 s Livello delle batterie bassoRosso
Spento _- Assenza batterie o livello delle batterie basso
- Non rispetto della polarità delle batterie
zioni di fabbrica è segnalata dallo spegnimento del LED cfg.
Questa operazione provoca la scomparsa totale della
congurazione del prodotto, qualunque sia il modo di
congurazione. Dopo una sostituzione delle pile un o
ripristino delle congurazioni di fabbrica, attendere
15 s prima di procedere ad una congurazione.
Cambio delle batterie
Smontare il coperchio dello scomparto batterie 6.
Rimuovere le 2 pile e inserire le nuove rispettando la
polarità (cambiare sempre le 2 pile contemporaneamente).
Rimontare lo sportello delle pile
6.
e
z
y
E
E
E
E E Bedienungsanleitung
Z
Z
Z
Z Z User instructions
Y
Y
Y
Y Y Istruzioni d’uso
Kann in ganz Europa und in der Schweizå
Hiermit erklärt Hager Controls, dass der Funksender/-
Empfänger der 2014/53/UE Richtlinie entspricht.
Die EG-Erklärung kann auf der Website eingesehen werden:
www.hagergroup.com
Can be used throughout Europe å and in Switzerland
Hager Controls hereby declares that the radio transmitter/
receiver complies with the 2014/53/UE directive.
The EC declaration may be consulted on the website:
www.hagergroup.com
cfg
Può essere utilizzato in tutta Europa å e in Svizzera
Con la presente Hager Controls dichiara che il
ricetrasmettitore radio è conforme alla direttiva 2014/53/UE.
La dichiarazione CE può essere consultata sul sito internet:
www.hagergroup.com
Korrekte Entsorgung dieses Produkts
(Elektromüll).
(Anzuwenden in den Ländern der Europäischen Union und anderen europäischen
Ländern mit einem separaten Sammelsystem).
Die Kennzeichnung auf dem Produkt bzw. auf der dazugehörigen Literatur gibt
an, dass es nach seiner Lebensdauer nicht zusammen mit dem normalen
Hausmüll entsorgt werden darf. Entsorgen Sie dieses Gerät bitte getrennt von
anderen Abfällen, um der Umwelt bzw. Der menschlichen Gesundheit nicht
durch unkontrollierte Müllbeseitigung zu schaden. Recyceln Sie das Gerät, um
die nachhaltige Wiederverwertung von stoichen Ressourcen zu fördern.
Private Nutzer sollten den Händler, bei dem das Produkt gekaut wurde, oder die
zuständigen Behörden kontaktieren, um in Erfahrung zu bringen, wie sie das
Gerät auf umweltfreundliche Weise recyceln können.
Gewerbliche Nutzer sollten sich an ihren Lieferanten wenden und die
Bedingungen des Verkaufsvertrags konsultieren. Dieses Produkt darf nicht
zusammen mit anderem Gewerbemüll entsorgt werden.
Correct Disposal of This product
(Waste Electrical & Electronic Equipment).
(Applicable in the European Union and other European countries with separate
collection systems).
This marking shown on the product or its literature indicates that it hould not be
disposed with other household wasted at the end of its working life. To prevent
possible harm to the environment or human health from uncontrolled waste
disposal, please separate this from other types of wastes and recycle it
responsibly to promote the sustainable reuse of material resources.
Household users should contact either the retailer where they purchased this
product, or their local government oce, for details of where and how they can
take this item for environmentally safe recycling.
Business users should contact their supplier and check the terms and conditions
of the purchase contract. This product should not be mixed with other commercial
wastes of disposal.
Corretto smaltimento del prodotto
(rifiuti elettrici ed elettronici).
(Applicabile nei paesi dell’Unione Europea e in quelli con sistema di raccolta
dierenziata).
Il marchio riportato sul prodotto o sulla sua documentazione indica che il
prodotto non deve essere smaltito con altri rifiuti domestici al termine del ciclo di
vita. Per evitare eventuali danni all’ambiente o alla salute causati dall’inopportuno
smaltimento del rifiuti, si invita l’utente a separare questo prodotto da altri tipi di
rifiuti e di riciclarlo in maniera responsabile per favorire il riutilizzo sostenibile delle
risorse materiali.
Gli utenti domestici sono invitati a contattare il rivenditore presso il quale è stato
acquistato il prodotto o l’ucio locale preposto per tutte le informazioni relative
alla raccolta dierenziata e al riciclaggio per questo tipo di prodotto.
Gli utenti aziendali sono invitati a contattare il proprio fornitore e verificare i
termini e le condizioni del contratto di acquisto. Questo prodotto non deve essere
smaltito unitamente ad altri rifiuti commerciali.
02
Product specificaties
| Merk: | Berker |
| Categorie: | Niet gecategoriseerd |
| Model: | 85606100 |
| Kleur van het product: | Black, Grey |
| Gewicht: | - g |
| Breedte: | 46.5 mm |
| Diepte: | 83 mm |
| Hoogte: | 15.8 mm |
| LED-indicatoren: | Ja |
| Frequentieband: | 0.868 GHz |
| Accu/Batterij voltage: | 3 V |
| Ondersteund aantal accu's/batterijen: | 2 |
| Interface: | RF Draadloos |
| Maximumbereik: | 100 m |
| Oplaadbaar: | Ja |
| Input type: | Drukknopen |
| Aantal kanalen: | 4 kanalen |
| juiste gebruik afstandsbediening: | Smart home-apparaat |
| Bedrijfstemperatuur (T-T): | -10 - 45 °C |
| Batterijtechnologie: | Lithium |
| Type batterij: | CR2430 |
Heb je hulp nodig?
Als je hulp nodig hebt met Berker 85606100 stel dan hieronder een vraag en andere gebruikers zullen je antwoorden
Handleiding Niet gecategoriseerd Berker

15 September 2025
30 November 2024
30 November 2024
30 November 2024
30 November 2024
17 November 2024
17 November 2024
17 November 2024
15 Januari 2024
15 Januari 2024
Handleiding Niet gecategoriseerd
Nieuwste handleidingen voor Niet gecategoriseerd
5 Juli 2026
5 Juli 2026
5 Juli 2026
5 Juli 2026
5 Juli 2026
4 Juli 2026
4 Juli 2026
4 Juli 2026
4 Juli 2026