Berkel Home Line 200/250 Handleiding
Berkel Messenslijper Home Line 200/250
Bekijk gratis de handleiding van Berkel Home Line 200/250 (4 pagina’s), behorend tot de categorie Messenslijper. Deze gids werd als nuttig beoordeeld door 21 mensen en kreeg gemiddeld 5.0 sterren uit 9 reviews. Heb je een vraag over Berkel Home Line 200/250 of wil je andere gebruikers van dit product iets vragen? Stel een vraag
Pagina 1/4
SÉCURITÉ
Pour votre sécurité, il est recommandé de lire attentivement les instructions reportées dans le ma-
nuel d’utilisation de la machine, avant de commencer à utiliser l’aiguisoir.
ATTENTION !La lame peut couper des parties du corps ! Ne jamais placer la main dans la zone de
découpe entre la voile et la lame si la poignée de réglage de l’épaisseur de la tranche (5) n’est pas
en position de sécurité (Fig. A). Durant les opérations de nettoyage et d’aiguisage de la lame, faire
extrêmement attention à garder les mains le plus loin possible de la zone non protégée. L’utilisation
de gants de protection est conseillée.
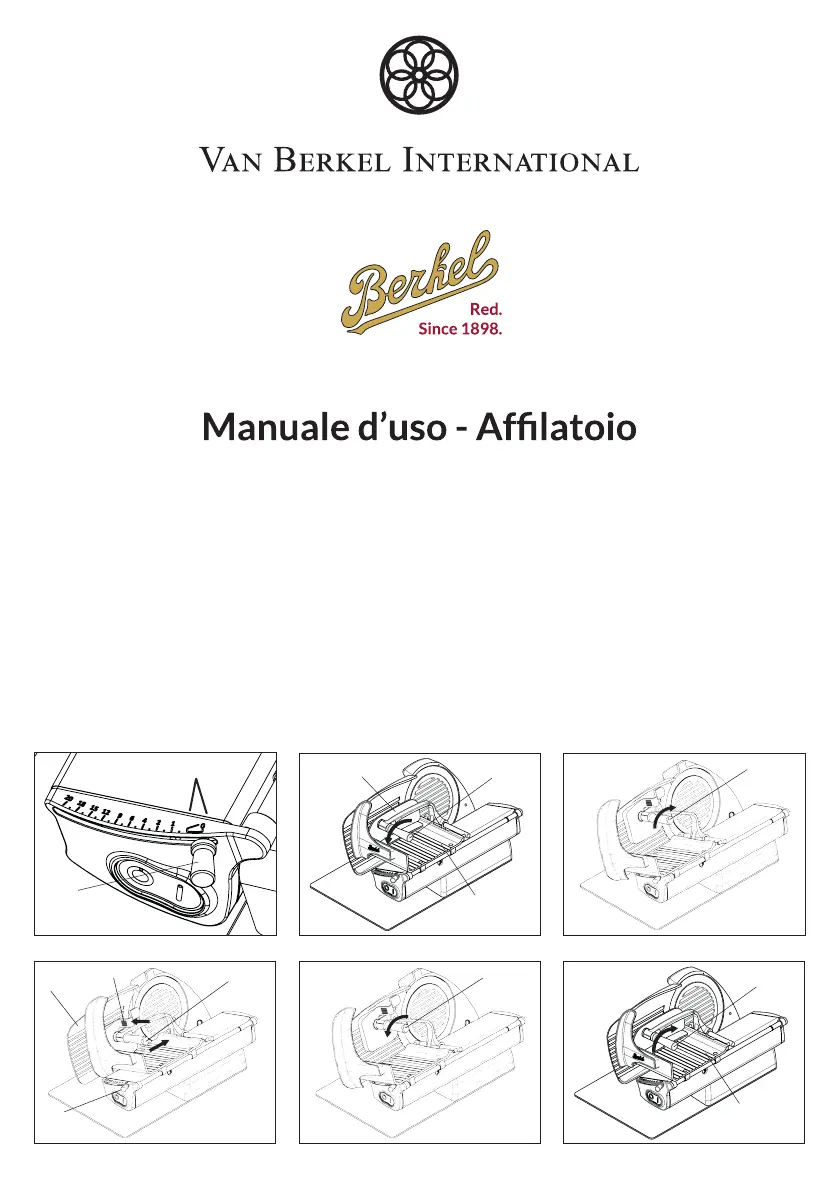
UTILISATION DE L’AIGUISOIR
Suivre les instructions pour l’aiguisage :
1. placer de manière sécurisée (en position 0) la poignéede réglage d’épaisseur delatranche (5) (Fig. A) ;
2. reculer entièrement le plat porte-aliment (8) en direction de l’opérateur ;
3. retirer le presse-aliment en dévissant dans le sens anti-horaire la poignée du presse-aliment (14)
jusqu’au retrait complet du presse-aliment (Fig. B) ;
4. assembler l’aiguisoir en position en vissant dans le sens horaire la poignée du presse-aliment (14)
(Fig. C) ;
5. mettre la poignée de réglage de l’épaisseur de la tranche (5) en position 20 et placer l’aiguisoir vers
la v
oile (6) ;
6. démarrer la lame enappuyant sur le bouton d’allumage.
7. effectuer l’aiguisage de la lame en plaçant le ressort d’aiguisage contre la lame pendant 10-15 se-
condes en utilisant la poignée du presse-aliment (14) et en exerçant une légère pression (Fig. D) ;
ATTENTION ! Une pression excessive peut compromettre l’aiguisage.
8.
plat porte-aliment (8) vers l’opérateur ;
9. éloigner l’aiguisoir de la voile (6) sécuriser la poignée de réglage d’épaisseur de la tranche (5) (en
position 0) (Fig. A) ;
10. retirer l’aiguisoir en dévissant dans le sens anti-horaire la poignée du presse-aliment (14) ju-
squ’au retrait complet de l’aiguisoir (Fig. E) ;
11. assembler le presse-aliment (9) en position en vissant dans le sens horaire la poignée du pres-
se-aliment (14) (Fig. F).
Van Berkel International S.r.l.
via Ugo Foscolo, 22
21040 Oggiona S. Stefano (VA) - ITALY
T +39 0331 214311
info@berkelinternational.com
www.theberkelworld.com
Red.
Since 1898.
User manual - Sharpener
Gebrauchsanleitung - Schleifvorrichtung
Manuel d’instructions - Aiguisoir
HOME LINE 200/250
(A)(B)(C)
SAFETY
(D)(E)(F)
5
14
8
14
8
9
14
14
14
1
6
5
FR
Product specificaties
| Merk: | Berkel |
| Categorie: | Messenslijper |
| Model: | Home Line 200/250 |
Heb je hulp nodig?
Als je hulp nodig hebt met Berkel Home Line 200/250 stel dan hieronder een vraag en andere gebruikers zullen je antwoorden
Handleiding Messenslijper Berkel

1 Juli 2023
23 Juni 2023
Handleiding Messenslijper
Nieuwste handleidingen voor Messenslijper
29 Juni 2026
4 Juni 2026
2 Juni 2026
2 Juni 2026
29 April 2026
28 April 2026
18 April 2026
30 Maart 2026
6 Maart 2026
3 Maart 2026