Audibax CM408L-BT Handleiding
Bekijk gratis de handleiding van Audibax CM408L-BT (2 pagina’s), behorend tot de categorie Speaker. Deze gids werd als nuttig beoordeeld door 31 mensen en kreeg gemiddeld 5.0 sterren uit 8 reviews. Heb je een vraag over Audibax CM408L-BT of wil je andere gebruikers van dit product iets vragen? Stel een vraag
Pagina 1/2
CEILING SPEAKER
CM series
USER GUIDE
The CM range is a series of passive ceiling speakers that comes en pairs (1 active and 1 passive)
designed with a woofer from 5 inches to 8 inches and a 13mm tweeter. The CM series is the perfect
choice for the distribution of microphone calls and background music both for restaurants or
commercial stores. The mounting frame is made of high quality ABS. The grille is made of metal.
The CM is available in white.
• Keep this manual for future reference.
• When cutting the mounting hole for the speaker, make sure there is sufficient clearance behind
the panel (no obstructions like A/C channels, power lines etc).
• Take care of your speaker wires, they should be free of damage. Damaged speaker wires might
result in poor sound quality and can damage amplifiers.
• Only use accessories specified by the manufacturer.
• Make sure the mounting panel can support the speakers weight.
• Use sufficient amount of speakers to avoid dead spots.
• No mains power shall be connected to the loudspeakers, doing so will damage the speaker.
• This apparatus should only be serviced by qualified personnel. If not warranty might be void.
• Use cable of the right gauge, certainly for long runs.
• Use cables with clear color indication and maintain polarity throughout the whole system.
• Avoid loud feedback from microphones, this can damage your speaker.
• Please check the units condition after unpacking. If the outside of the carton box has been
damaged, inform your shipper immediately.
SAFETY PRECAUTION
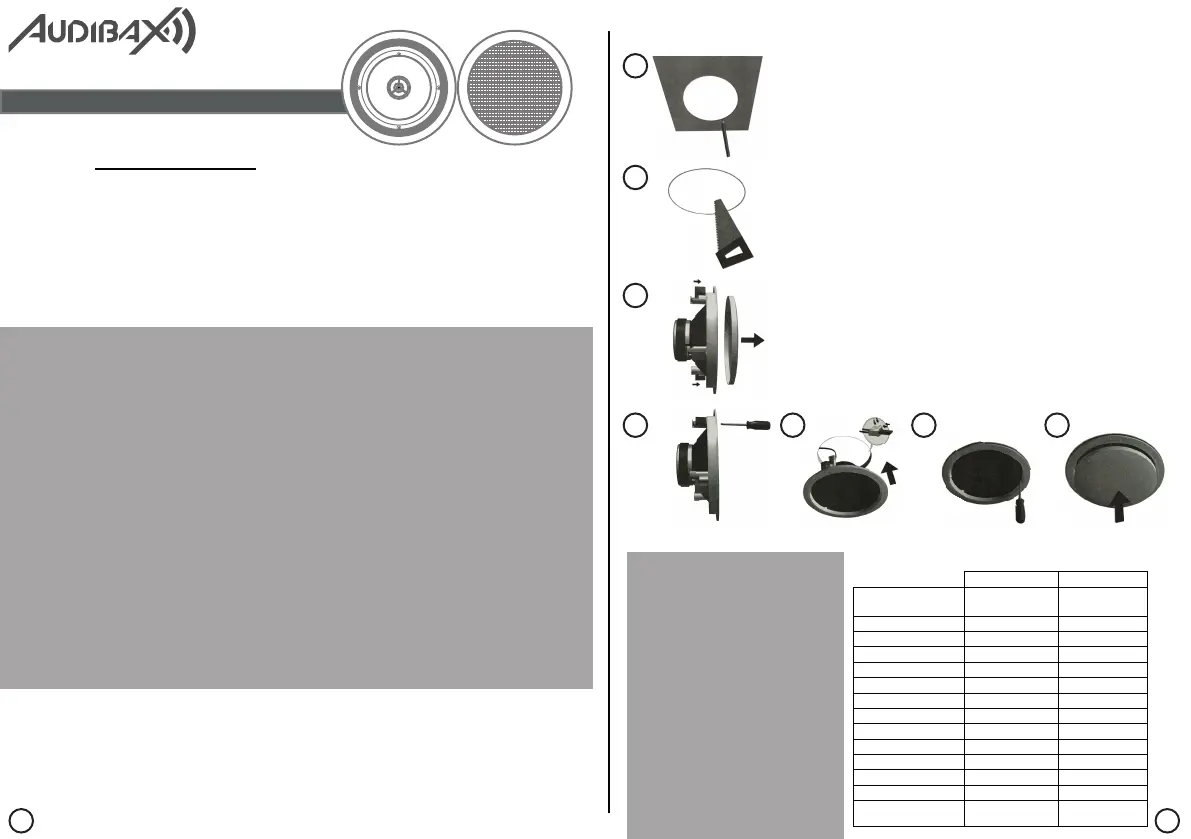
The loudspeaker is easy to install, due to its simple mounting system.
(1) Use the cutout template to mark the mounting hole.
(2) When making the hole in your mounting panel, double check if
there are no cables or any other obstructions behind the mounting
panel. Cutting the mounting panel without this check might result
in damaged infrastructure or power lines. Please make sure that the
mounting structure is capable of safely supporting the speaker's
weight.
(3) Remove the speaker grille: turn the mounting clamps (dog-ears)
outwards and push them in the direction of the grille until it pops out.
Remove the grille.
(4) Turn the dog-ears inwards again and tighten the dog-ear screws
slightly to make them stay in the inward position.
(5) Connect the speaker wires and insert the speaker in the precut
speaker opening. Connect the active and passive speaker with the
tiny (+/—)
(6) Fasten the dog-ear screws carefully until the speaker sits safely in
place. Do not overtighten the dog-ear screws!
(7) Carefully push the grille back in place.
MOUNT THE SPEAKER
The warranty for hidden defects can only be considered if they appear within the 24-month warranty
period. The warranty is not valid in case of misuse, wear, power surges, improper packaging or
shipping, improper use or storage and failure to comply with Audibax recommendations. The product
must be returned in the original packaging with proof of purchase made by an authorized distributor
of Audibax
WARRANTY INFO
CONNECT WITH THE SPEAKER
Connect your Audibax CM series
partner by following these steps:
1. Turn on the speakers.
2. Search CM Series.
3. Connect to the CM Series device.
4. You will already be connected
and do not need a password.
1
2
3
4567
Model
Model
Characteriscs
CM408-BT4
CM408L-BT
Outside diameter
170mm
170mm
Depth
75mm
85mm
Loudspeaker system
2 ways
1 way
Woofer size
5”x 2
5”x 2
Tweeter size
13mm
13mm
Impedance
8 ohmios
8 ohmios
Power
60w
40w
SPL
88
90
Frequency
80HZ-20KHZ
150HZ-20KHZ
Material
ABS
ABS
Grille material
Metal
Metal
100W Line
No
No
Bluetooth
Yes
Yes
SPECIFICATIONS CM
12
Product specificaties
| Merk: | Audibax |
| Categorie: | Speaker |
| Model: | CM408L-BT |
Heb je hulp nodig?
Als je hulp nodig hebt met Audibax CM408L-BT stel dan hieronder een vraag en andere gebruikers zullen je antwoorden
Handleiding Speaker Audibax

10 Juli 2026
4 Mei 2026
3 Maart 2026
3 Maart 2026
2 Maart 2026
9 December 2025
5 Augustus 2025
4 Augustus 2025
4 Augustus 2025
9 Juni 2025
Handleiding Speaker
Nieuwste handleidingen voor Speaker
23 Juli 2026
23 Juli 2026
22 Juli 2026
22 Juli 2026
22 Juli 2026
21 Juli 2026
21 Juli 2026
21 Juli 2026
21 Juli 2026
21 Juli 2026