Artusi CACC32KX Handleiding
Bekijk gratis de handleiding van Artusi CACC32KX (2 pagina’s), behorend tot de categorie Fornuis. Deze gids werd als nuttig beoordeeld door 49 mensen en kreeg gemiddeld 4.6 sterren uit 4 reviews. Heb je een vraag over Artusi CACC32KX of wil je andere gebruikers van dit product iets vragen? Stel een vraag
Pagina 1/2
Model
Power Supply
Power(W)
Size (mm)
Buit-in Hole Size
(mm)
AC 220-240V
50-60Hz
1800W
(180mm)
1200W
(145mm)
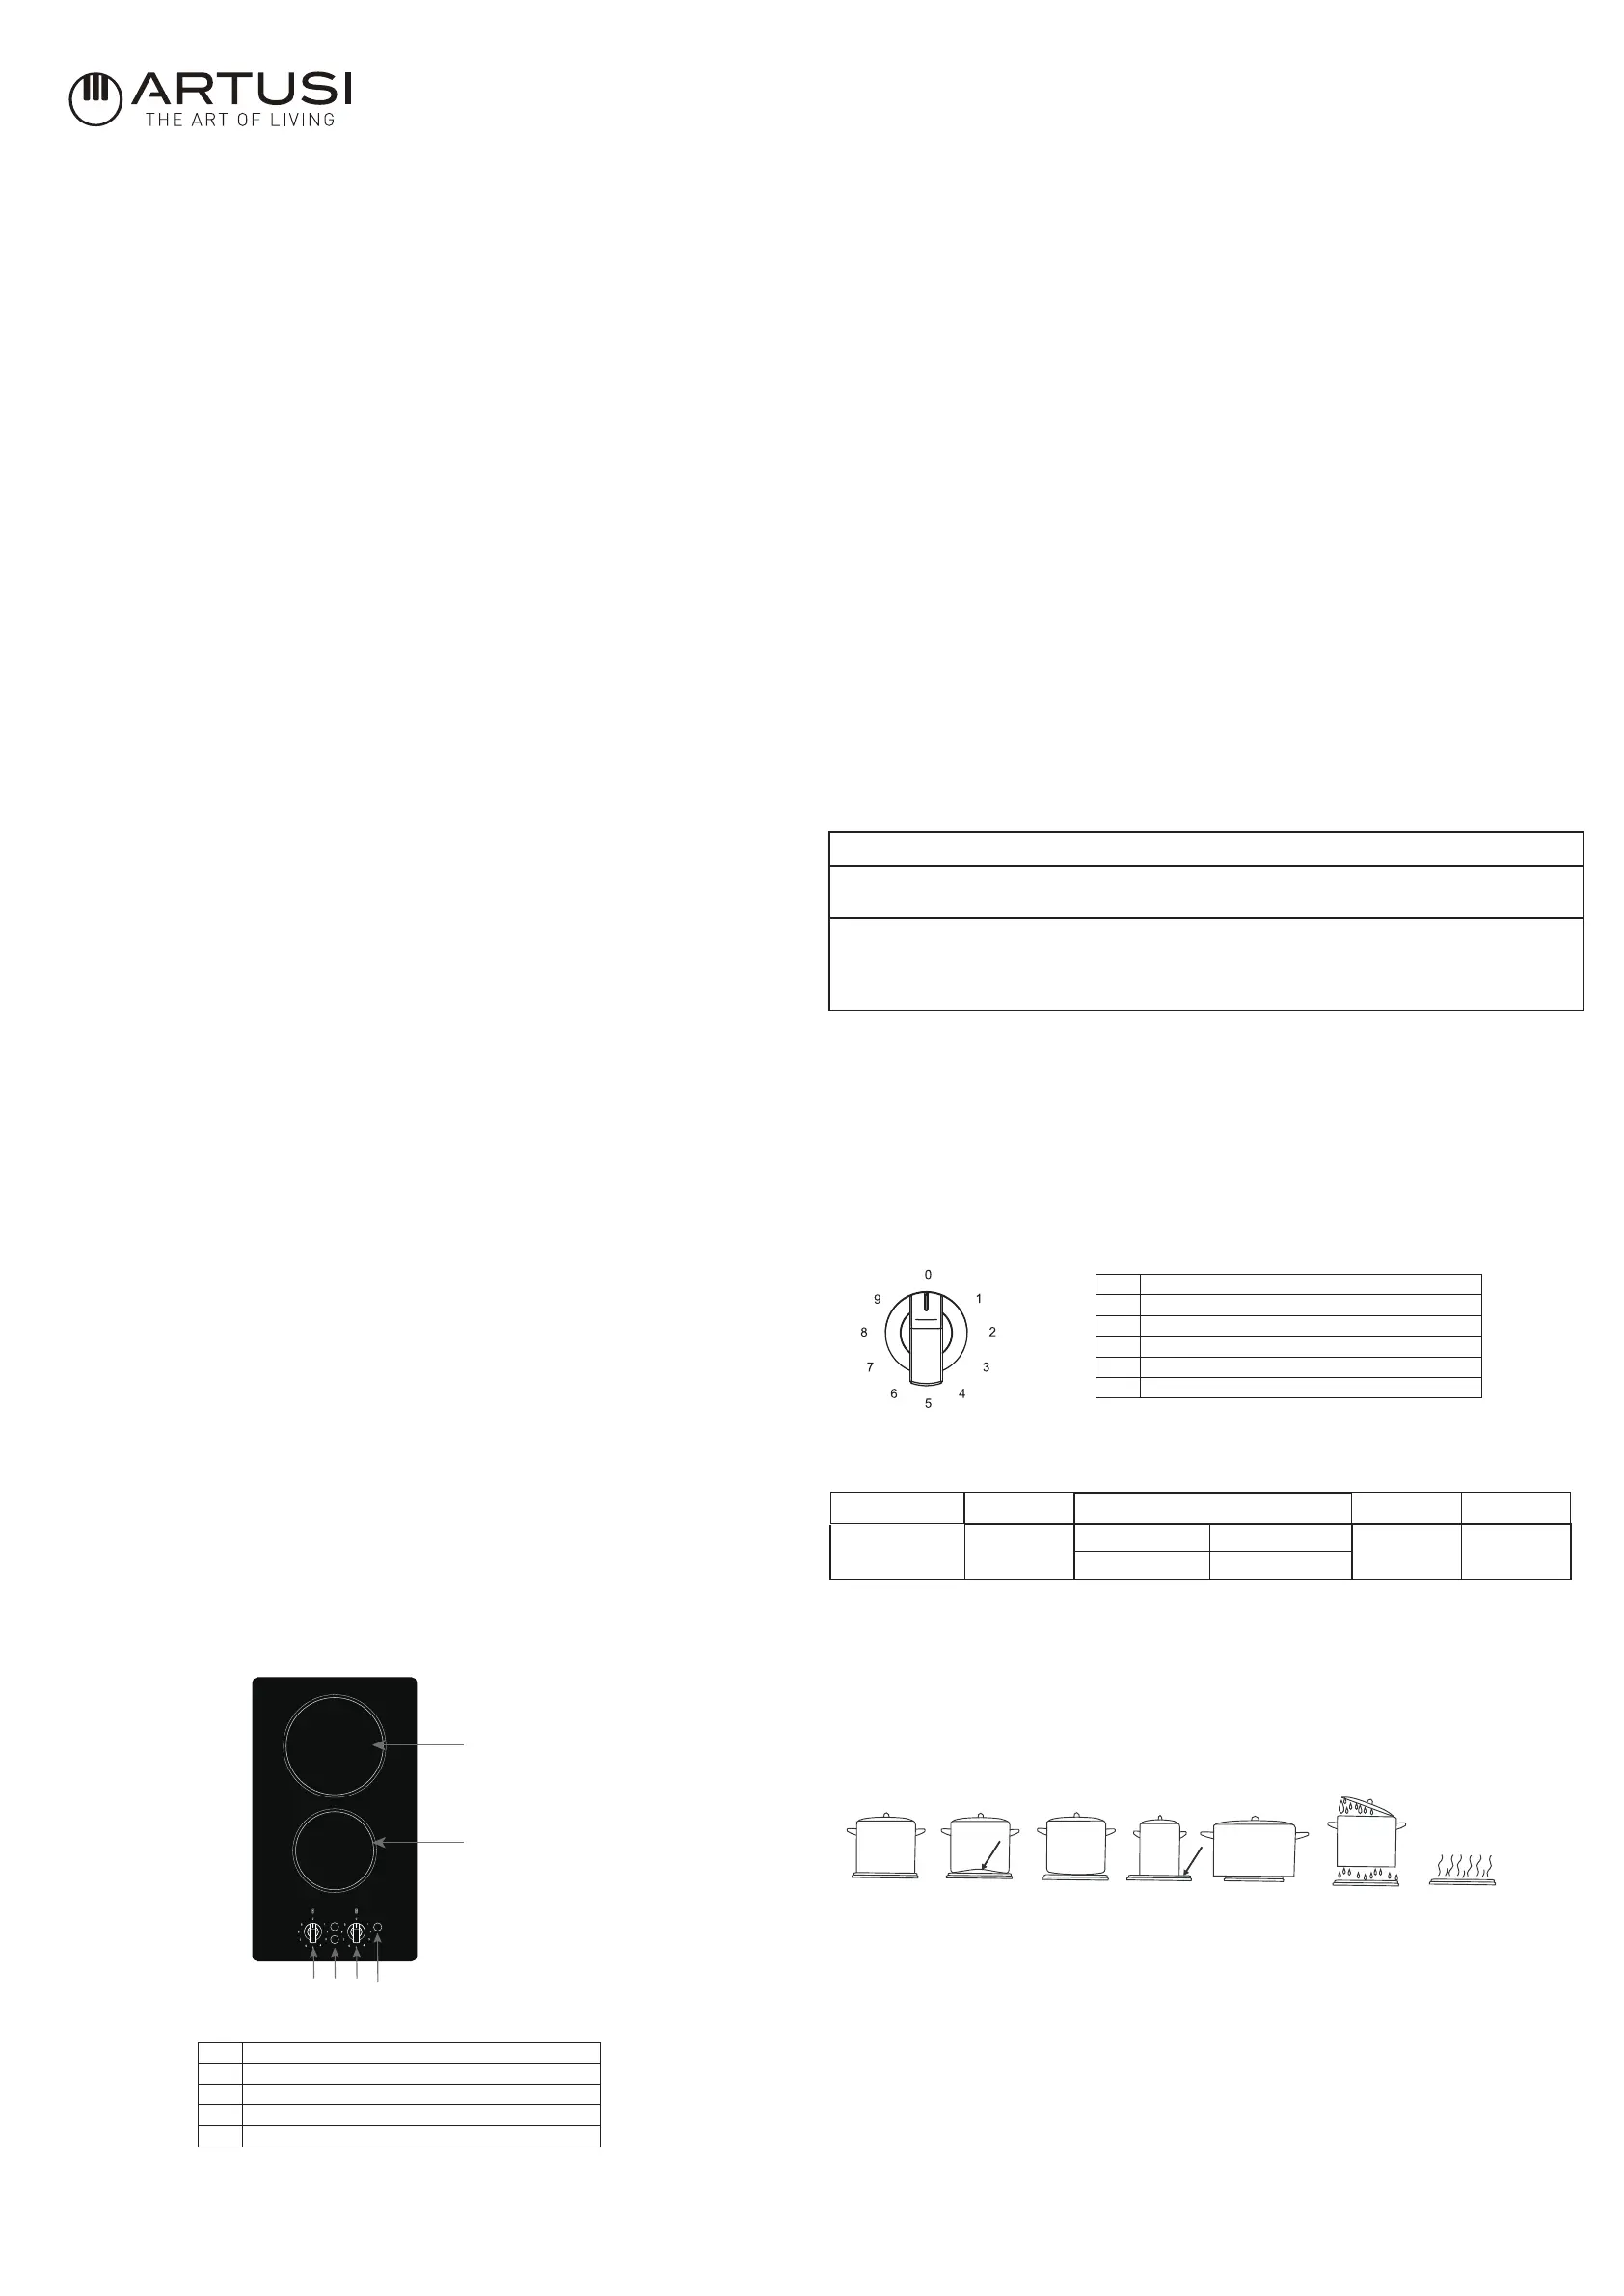
GoodBad
(recessed base)(convex base)(undersize)(oversize)
BadBadBadBad Bad
(moisture on hotplate) (no pan)
Technical Data
CACC32K
CACC32K
Please read the instruction manual carefully before operating your new hob.
Dear Owner: Thank you for purchasing our cooktop designed to give you many years of cooking
pleasure. Before using your new appliance please read the user manual carefully and keep it in a safe
place for future reference.
THIS APPLIANCE MUST ONLY BE INSTALLED BY A QUALIFIED PERSON USING THE
INSTRUCTIONS PROVIDED. THE MANUFACTURER DECLINES ALL RESPONSIBILITY FOR
IMPROPER INSTALLATION THAT MAY HARM PERSONS AND ANIMALS OR CAUSE DAMAGE
TO PROPERTY. THE APPLIANCE MUST ONLY BE USED FOR THE PURPOSE FOR WHICH IT
WAS DESIGNED. ANY OTHER USE (e.g. HEATING ROOMS) IS CONSIDERED TO BE IMPROPER
AND MANUFACTURER DECLINES ALL RESPONSIBILITY FOR DAMAGE RESULTING FROM
IMPROPER AND/ OR IRRESPONSIBLE USE.
Utensils
Use pans with flat bottoms. Uneven or thin bottoms will waste energy and cooking times will be slow.
Use pans slightly larger than the cooking zones. Smaller pans will waste energy.
Do not use oversized pans. More than 50mm oversize can overheat cooktop components and can cause
fine cracks in the enamel hob that will trap dirt.
Use only dry utensils. Do not place wet or steamy parts (eg. lids) on the hotplates.
Do not use pots and pans that are unsteady and likely to rock or overbalance.
Do not operate the cooktop without pots or pans on the cooking zones.
Do not use enamel pots .
BUILT-IN CERAMIC HOB
INSTALLATION AND OPERATION MANUAL
IMPORTANT NOTICE
Please register your warranty card. Return the enclosed warranty card dated and signed. The Manufacturer
shall not be held responsible for any inaccuracies in this handbook due to printing or transcription errors. The
designs in the images and figures are purely indicative. The Manufacturer reserves the right to make any
modifications to the products as may be considered necessary or useful or in the interests of the user, without
jeopardizing the main functional and safety features of the product.
WARNING: Unattended cooking using fat or oil can be dangerous
and may result in a fire. In the event of a fire: Switch off the appliance
and then cover the flame with a lid or a fire blanket. NEVER try to
extinguish a fire with water.
CAUTION: Never leave any cooking food unattended. Spills,
overflows, burnt food and/or fire may result.
Danger of fire: Do not store items on the cooking surfaces.
SAFETY WARNING
1.Inspect the built-in ceramic hob carefully after opening the package. When there are any problems
please refer to the supplier.
2.Dispose of packaging materials (plastic bag, foam, nails, carton) carefully. Avoid a place where
children can easily access. Please dispose of packaging in an environmentally friendly manner.
3.Never attempt to change the wiring under any circumstances.
4.Dispose of the appliance in an environmentally friendly manner.
5.Replace damaged power cords by the manufacturer, its service agent or similarly qualified persons in
order to avoid a hazard.
6.The appliance is not to be used by persons (including children) with reduced physical, sensory or
mental capabilities, or a lack of experience and knowledge. All such users must be given instruction
and kept under supervision. Always supervise children and never allow them to play with the appliance.
7.Never stare at the hob elements when the appliance is working. It may damage your eyes.
8.Avoid burns: young children should be kept away as accessible parts become hot during use
9.WARNING: If the hob surface is cracked, switch off the appliance to avoid the possibility of electric
shock as hob glass-ceramic protect users from live electric parts.
10.Never use a steam cleaner on the hob.
11.Do not place metallic objects such as knives, forks, spoons and lids on the hob surface since they
can get hot.
12.CAUTION: The surface temperature exceeds 95°C. To avoid a hazard under bench access must be
restricted. Refer to the installation instructions.
13.WARNING: The appliance and its accessible parts become hot during use. Care should be taken to
avoid touching heating elements.
14.Do not operate the appliance with an external timer or separate remote-control system.
15.WARNING: Use only hob guards designed by the manufacturer of the cooking appliance or
indicated by the manufacturer of the appliance in the instructions for use as suitable or hob guards
incorporated in the appliance. The use of inappropriate guards can cause accidents.
16.Do not touch the built-in ceramic hob with wet hands or while standing in water with bare feet.
17.Do not operate the built-in electric hob when you are bare footed.
18.Always disconnect the power supply before you do any maintenance and cleaning.
When the built-in ceramic hob is working, the temperature of the electric hob and the ambient tempera-
tures become higher, so do not touch it and keep children away.
19.The built-in ceramic hob must be built into a heat resistant cabinet.
20.NOTE: Some smoke may occur when the hob is first used. Leave the hob on for a short period to
burn off excess sealants etc. used in the manufacturing process.
304X524X90
280(L)X496(W)
Operation of the top with the heating area
An appropriately selected pan saves energy. A pan should have a thick, flat base with a diameter equal
to the plate diameter as in that case heat is transferred most efficiently.
Advice on the use of cooking tops. To save energy and to have a longer life of the ceramic tops, we
advise using pans with flat bottom and with a diameter not less than the diameter of the tops. Care must
be taken that fluids do not spill on the ceramic plates. Never leave the tops on without pans on them or
with empty pans, and never use the tops to heat the plates. Switch on the plates after having set the
pans on them. Once switched off, the plates remain warm for a while, do not touch. Switch off the
heating element before removing the pans.
Use
Directions and suggestions for using
1.Do not touch the built-in ceramic hob with wet hands or feet.
2.Do not operate the built-in ceramic hob when you are bare footed.
3.Do not let young children operate the built-in ceramic hob.
4.Please disconnect the power supply before you do any maintenance and cleaning.
5.When the built-in ceramic hob is working, the temperature of the electric hob and the ambience become
higher, so please do not touch it and keep the children away from it.
6.A steam cleaner must not be used for cleaning the appliance.
7.The appliance is not intended to be operated by means of an external timer or separate remote-control
system.
8.The built-in ceramic hob must be built into a heat resistant cabinet. Some smoking may occur when first
used. Leave on for a short period to burn off excess sealant.
according to your needs, the tops can be adjusted by turning the knobs either clockwise or
anti-clockwise on 9 position besides the 0 position (off). The positions marked by the higher numerical
index match the maximum output of heat (see table).
0
1-2
3-4
5-6
7-8
9
Switch off
MIN.Warming up
Stewing vegetables,slow cooking
Slow frying
Grilling meat,fish
MAX.Fast heating up ,fast cooking,frying
Switch Knob
Power indicator
1
2
3
4
5
Cooking zone 1800W
Cooking zone 1200W
Glass panel high temperature indicator
1
2
3534
Cod:0070304812-CV20231216
Product specificaties
| Merk: | Artusi |
| Categorie: | Fornuis |
| Model: | CACC32KX |
Heb je hulp nodig?
Als je hulp nodig hebt met Artusi CACC32KX stel dan hieronder een vraag en andere gebruikers zullen je antwoorden
Handleiding Fornuis Artusi

30 Oktober 2025
27 Oktober 2025
31 Maart 2025
5 Februari 2025
3 Juli 2024
7 Mei 2024
18 Maart 2024
6 Maart 2024
6 Maart 2024
6 Maart 2024
Handleiding Fornuis
Nieuwste handleidingen voor Fornuis
8 Juni 2026
8 Juni 2026
8 Juni 2026
8 Juni 2026
3 Juni 2026
2 Juni 2026
2 Juni 2026
2 Juni 2026
1 Juni 2026
31 Mei 2026