AMX NXA-SMT43X Handleiding
AMX Flat panel steun NXA-SMT43X
Bekijk gratis de handleiding van AMX NXA-SMT43X (2 pagina’s), behorend tot de categorie Flat panel steun. Deze gids werd als nuttig beoordeeld door 137 mensen en kreeg gemiddeld 4.0 sterren uit 5 reviews. Heb je een vraag over AMX NXA-SMT43X of wil je andere gebruikers van dit product iets vragen? Stel een vraag
Pagina 1/2
Installation Guide
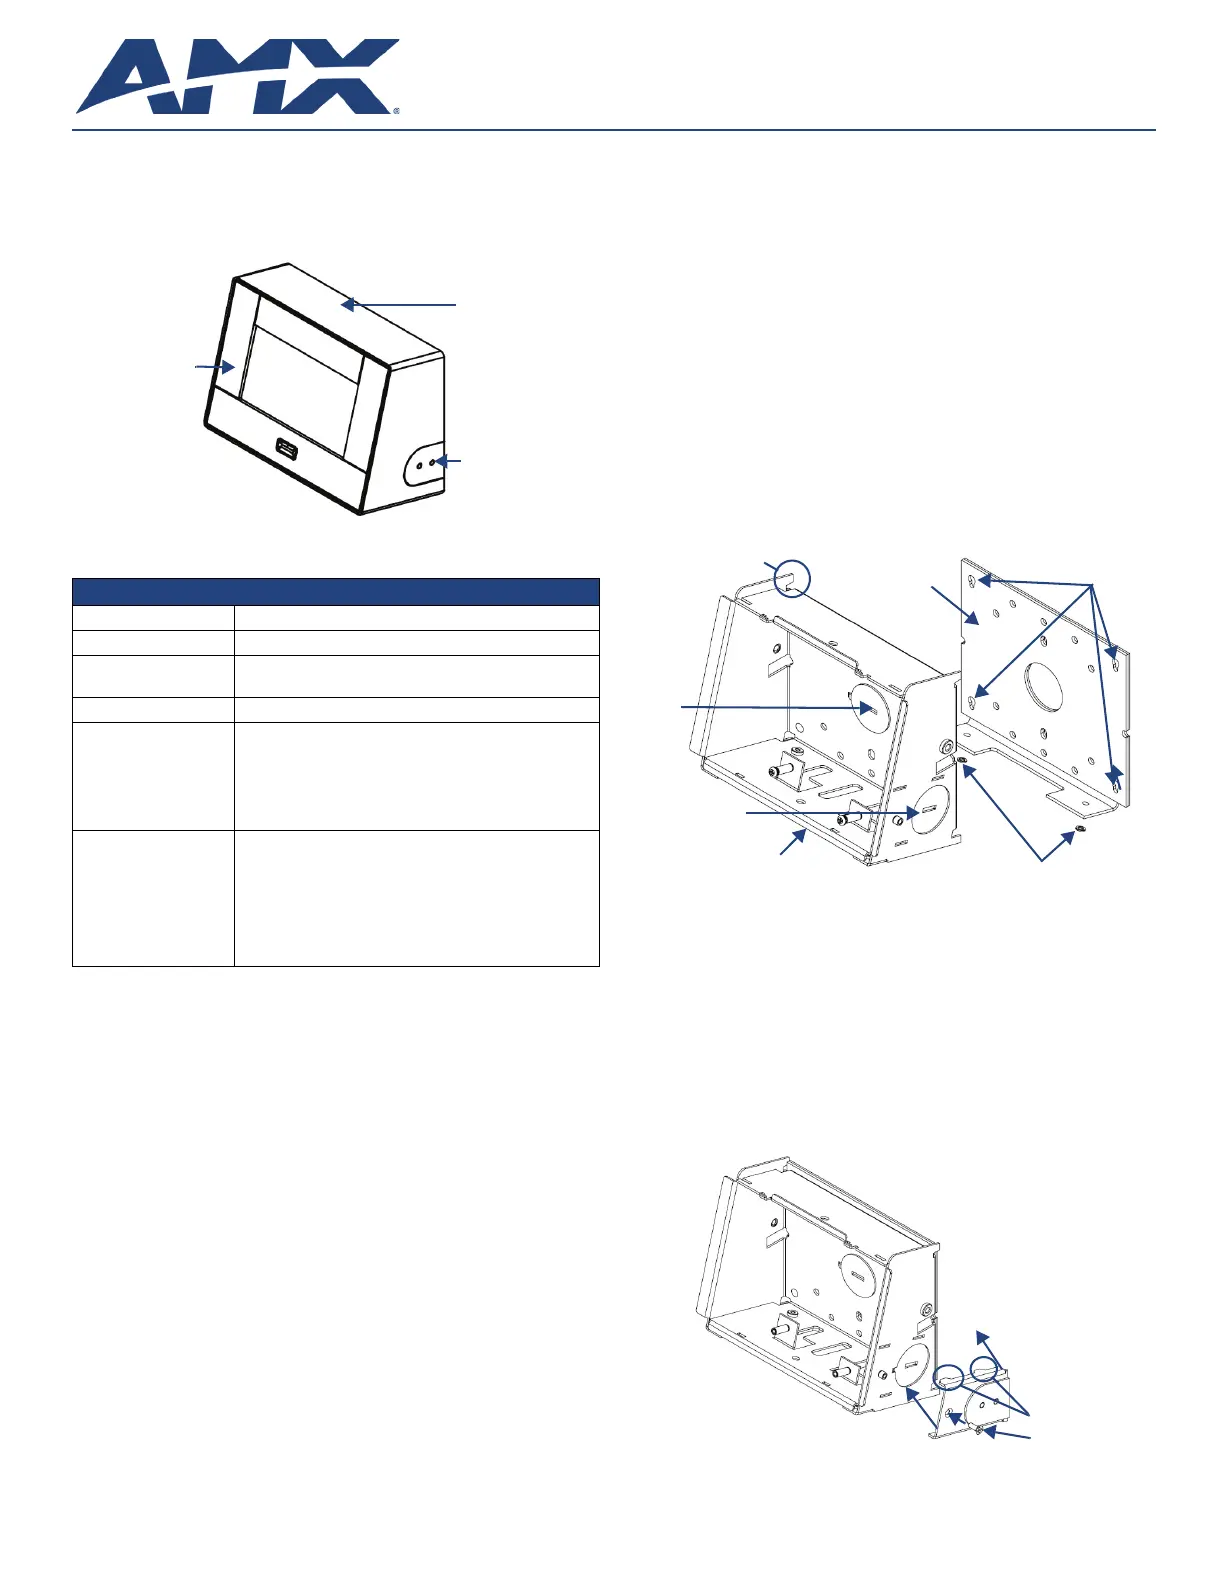
NXA-SMT43X NXD-430/435 Surface Mount Box
Overview
The NXA-SMT43X NXD-430/435 Surface Mount Box (FG2262-16) allows the installation of
NXD-430 and NXD-435 panels in existing structures and in locations where a flush
installation is not possible.The NXA-SMT43X (FIG. 1) is comprised of four components: the
mounting plate, the surface mount box, the side conduit knockout cover, and the cover, as
well as an optional wall cover plate.
Product Specifications
UL Type 1 Installation Requirements
•Use in clean and dry mechanical rooms.
•Cover during the construction phase to ensure equipment does not get infiltrated with
construction dust.
•Use in environments that do not exceed 95% non-condensing humidity.
Preparing the NXD-430/435 for Installation
When shipped, the NXD-430 or NXD-435 touch panel to be installed into the NXA-SMT43X
is assembled with a front bezel and back box. (For more information, please refer to the
NXD-430/435 Operation Reference Guide, available at www.amx.com.) Both the bezel
and back box must be removed before the panel display can be installed.
To prepare the NXD430/435 for installation:
1.Lift up on the bezel to detach the front bezel.
2.With an NXD-435, carefully disconnect the bezel from the ribbon connector on the
touch panel.
3.Remove the two screws at the bottom of the display (FIG. 4) to disconnect the display
from the back box. These are plastic screws, and cannot be reused.
4.From the bottom, swing the display out and then down to release it from the two
retention prongs at the top of the display.
Assembling the NXA-SMT43X
The NXA-SMT43X has been designed to fit US domestic and a variety of international
conduit wall boxes. Use the appropriate holes in the pattern provided for mounting. If
mounting to a conduit wall box, remove the rear conduit knock out and assemble the
mounting plate to the surface mount box with the two screws provided on the bottom of the
unit. (The backing plate may be omitted if mounting the NXA-SMT43X to a conduit box, but is
recommended to help maintain proper spacing from the wall.)
Before starting assembly of the NXA-SMT43X, select its installation location. For power and
data, this site needs access to an Ethernet connection, either through the wall itself or via a
conduit. If the Ethernet cable can be run through a wall, the rear knockout on the surface
mount may be removed and the cable run through the rear knockout and the mounting plate.
If the Ethernet cable needs to be installed through a conduit, the side conduit knockout may
be removed and the conduit connected to the side of the surface mount box.
For added security, it is recommend that additional screws be used if the device is surface
mounted with no conduit box. Prior to placing the mounting plate on the mounting surface,
use the mounting plate to mark 2 to 4 screw locations, using these locations install
appropriate screw inserts. After the screw inserts have been installed, remove the protective
adhesive backing from the mounting plate and apply plate to the chosen surface. Make sure
that the plate is square and level and lined up with the screw hole locations. Remove the
appropriate conduit knockout on the surface mount box at this time. Attach the surface mount
box to the mounting plate using the 4 key-way slotted holes and two #4-40 cap head screws
supplied.
Installing the Mounting Plate (Adhesive and Screws)
1.For additional strength, remove the protective backing from the adhesive on the
mounting plate and attach the mounting plate to the wall. Do NOT attempt to remove
and reposition the mounting plate, as this may damage both the adhesive and the wall.
1.If the NXA-SMT43X is to be mounted to drywall and you would like additional screws
for a more secure mounting, use the holes on the mounting plate (FIG. 2) to mark
locations for plastic screw inserts and install them at this time. (Mounting screws and
inserts are not supplied.) Any combination of holes may be used to secure the
mounting plate to the wall, but do NOT use the four corner pin slots at each corner of
the mounting plate.
2.Use at least 2 mounting screws (not supplied) to secure the mounting plate to the wall.
Installing the Surface Mount Box to the Mounting Plate
1.If connecting Ethernet cable to the touch panel through the wall, remove the rear
knockout (FIG. 2) at this time. If connecting Ethernet cable via a conduit, remove the
side knockout.
2.Attach the surface mount box to the mounting plate, using the corner pin slots on the
mounting plate.
3.Secure the bottom mounting plate to the surface mount box with two assembly screws.
Put one split washer between the screw head and the mounting plate (FIG. 2).
4.For additional security, use the appropriate mounting holes in the back of the surface
mount box to insert 2 or more mounting screws (not supplied). The hole pattern in the
surface mount box and mounting plate will fit many single and double gang conduit
boxes.
NOTE: Do not over-tighten the mounting screws. The corner tabs on the surface mount box
must NOT penetrate the mounting surface.
Assembling the Side Conduit Knockout Cover
1.If not using a side conduit for the Ethernet connection, assemble the side conduit
knockout cover by placing the 3 locating tabs on the knockout cover into the 3 slots on
the surface mount box and secure with the supplied screw (FIG. 3).
NOTE: Do not over-tighten the screw, as this can bend the side conduit knockout cover.
FIG. 1 NXA-SMT43X NXD-430/435 Surface Mount Box
NXA-SMT43X Specifications
Dimensions (HWD):•4 1/4” x 5 3/4” x 3 1/8” (108 mm x 147 mm x 79 mm)
Weight:
1.80 lbs (0.82 Kg)
Operating Environment:•32 - 104°F (0 - 40°C)
Max. relative humidity - 85% (non-condensing)
Certifications:•UL Listed
Included Accessories:•Screw, #4-40 x .250 (4) (80-0110)
•Screw, #8-32 x .50 (2) (80-0146-02)
•Washer, #4, Split (2) (80-0310)
•Screw, #4-40 x .250, Torx Flat Head, White (2)
(80-5966-04)
•NXA-SMT43X Wall Cover Plate (53-2266-02)
Other AMX Equipment:•NXD-430-BL, Black 4.3" Modero Wall/Flush Mount Touch
Panel (FG2262-01)
•NXD-430-WH, White 4.3" Modero Wall/Flush Mount Touch
Panel (FG2262-02)
•NXD-435-BL, Black 4.3" Modero Wall/Flush Mount Touch
Panel (FG2262-03)
•NXD-435-WH, White 4.3" Modero Wall/Flush Mount Touch
Panel (FG2262-04)
Touch panel
front bezel
Side conduit
knockout cover
Cover
FIG. 2 Attaching the surface mount box to the mounting plate
FIG. 3 Side conduit knockout detail
Corner tabs MUST NOT
penetrate mounting
surface
Mounting plate
Surface mount box
Rear
Side knockout
Corner pin slots
Washers
knockout
Locating tabs
Screw
Product specificaties
| Merk: | AMX |
| Categorie: | Flat panel steun |
| Model: | NXA-SMT43X |
| Kleur van het product: | Wit |
| Gewicht: | 820 g |
| Breedte: | 147 mm |
| Diepte: | 79 mm |
| Hoogte: | 108 mm |
| Montagewijze: | Muur |
| Maximale gewichtscapaciteit: | - kg |
| Certificering: | FCC 15 B, CE, IEC 60950, UL\r\n |
| Paneelmontage-interface: | - mm |
| Duurzaamheidscertificaten: | RoHS |
| Maximale schermgrootte: | 4.3 " |
| Minimale schermgrootte: | - " |
Heb je hulp nodig?
Als je hulp nodig hebt met AMX NXA-SMT43X stel dan hieronder een vraag en andere gebruikers zullen je antwoorden
Handleiding Flat panel steun AMX

13 November 2023
13 November 2023
13 November 2023
13 November 2023
13 November 2023
13 November 2023
13 November 2023
Handleiding Flat panel steun
Nieuwste handleidingen voor Flat panel steun
5 Mei 2026
5 Mei 2026
5 Mei 2026
5 Mei 2026
5 Mei 2026
30 April 2026
22 April 2026
20 April 2026
17 April 2026