ALSEYE Halo AIO H120 Handleiding
ALSEYE Hardwarekoeling Halo AIO H120
Bekijk gratis de handleiding van ALSEYE Halo AIO H120 (1 pagina’s), behorend tot de categorie Hardwarekoeling. Deze gids werd als nuttig beoordeeld door 47 mensen en kreeg gemiddeld 4.8 sterren uit 9 reviews. Heb je een vraag over ALSEYE Halo AIO H120 of wil je andere gebruikers van dit product iets vragen? Stel een vraag
Pagina 1/1
Back
plate scr x 4ew
F an
S
cr
ew
H120
:
x4, H240
:
x8, H360
:
x12
R
adia
t
or
S
cr
ew
H120
:
x4, H240
:
x8, H360
:
x12
H240
F an
At daper
C able
x 1
H360
F an
At daper
C able
x 1
P
roduc
t
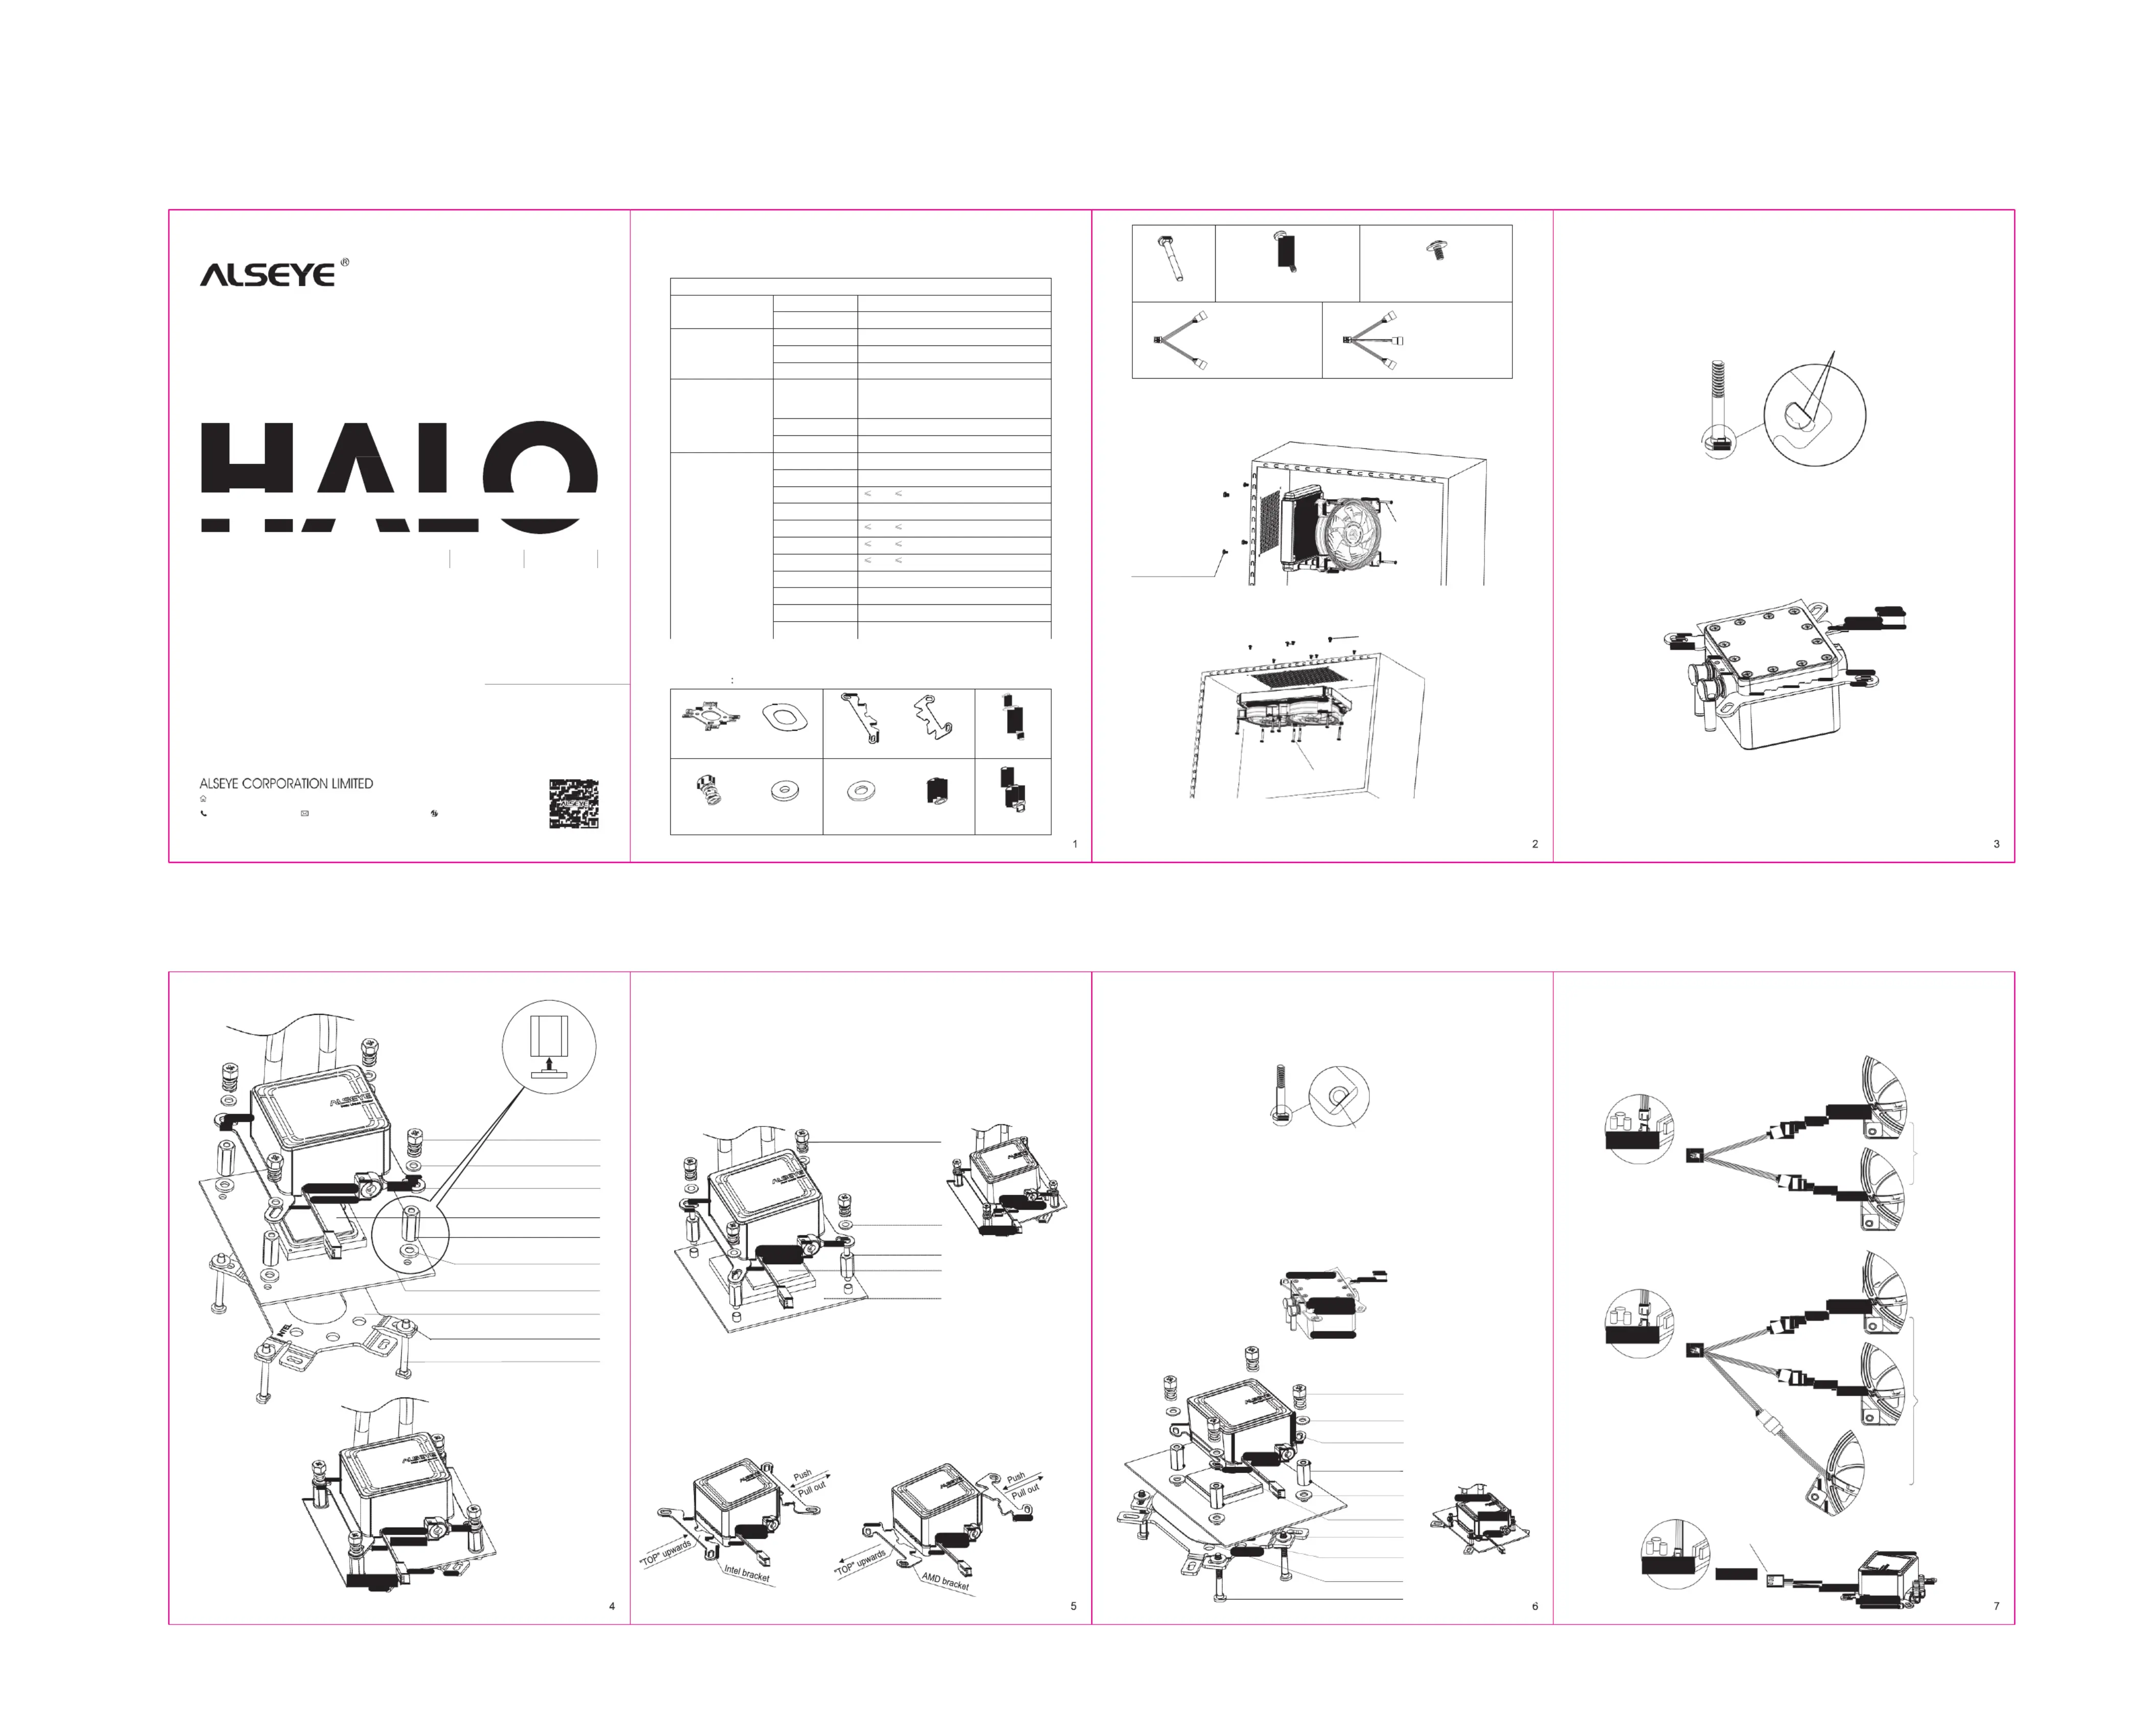
Specica
tions
W
a
t
er
Block
Dimensions
62x55x44mm
Merialat
Copper/Engineering
P
lastic
P
ump
R
a
t
ed
Voltage
12V
Speed
2600R.P.M.±10%
B
ear
ing
Ceramic
B
ear
ing
R
adia
t
or
Dimensions
H120:
120x157x27mm
H240:
120x275x27mm
H360:
120x393x27mm
Merialat
Aluminum
C
olor
Black
Fa
n
Dimensions
120x120x25mm
Voltage
DC
12V
C
urr
en
t
0.15~0.3A
Fan
Speed
800~2000R.P.M.
Air
F
low
18.3~45.2CFM
S
ta
tic
P
r
essure
0.53~1.8mm/H2O
Noise
Level
13.5~35.2dB(A)
Bring ea
T
ype
Hydraulic
B
ear
ing
C
onnec
t
ors
2510~4Pin
Lead Wire
Length
300mm
LED
R
ainbo
w
16 LEDs
Back
plate x 1 AMD gasket x 1
Int bracket x 2 AMD bracket x 2el
Thermal
grease
x 1
Spring nut x 4
Plastic
gasket x 8
Metal gascket x 4 Hexagonal nut x 4
Double-headed r x 4scew
Specica
tions
I ntel
S
ocket
L
GA775/115X/1366/2011/2066
A MD
S
ocket
F
M1/F
M2/AAM2+/AM3/AM3+/AM2/
M4
I ntel
Platform
Installation
1. Check
the I metal ntel
back
plate and the motherboard
socket
.
2. Pce la
the
back
plate
scr ew
to the
back
plate with
a plastic gasket
between it and the mother
boar
d
,
then
pass
the
back
plate
scr ew
through the motherboard to its
o sidebverse
.
3. Hexagonal
nut oo the nt
back
plate
scr ew
fr the om
oerse side bv
of the mother
boar
d
.
Plastic
gasket
between the motherboard and
every hexagonal
nut
.
Indicating
P
osition
H120
Installation
Diag
r
am
1. Fix
the
fan
oo the nt
r
adia
t
or
;
2. Fix
the
radiator
with the
fans
oo the nt
case
.
AIO
Liquid
C
ooler
H120 H240 H360
R
adia
t
or
S
crew
H240
Installation Diagram
1. Fix
the
fan
oo the nt
r
adia
t
or
;
2. Fix
the
radiator
with
fan
oo the nt
case
.
Fan
S
crew
R
adia
t
or
S
crew
4.
Apply the thermal
paste
on the
CPU
surcefa
.
5.
I
nser
t
the I ntel
bracket
to the
side
of water block with “”Ielnt
upw
ards
.
6. Tear
o the protecve ti
sticker
fr the copper om
base
of the cold plate and install the cold e platon the
CPU surce fa
and
scr ew
with spring nut (put
a
metal
gasket
between
every
spring nut and the
I
n
t
el
bracket). M ake
the copper botomt
close
to the
CPU surce fa
and lock the ring nut tightly and sp
fla
t
.
User
M
anual
Aessoriescc
Fan
S
crew
HQ: Jinhua Building, Dalang Street, Longhua District, Shenzhen,
China.
860755--23600230 [email protected]
www.alseyecorp.com
©2009-2018
ALSEYE CORPORATION LIMITED.
All rights
are
reserved.
*All brand names and logos are trademarks their respecve companies and copyright belongs ofti
to them.
H360
Installation
Ref er
to H240.
I ntel
Platform
LGA 2011/2066
Installation
1. Twist
the
doublheadede- r scew
to
every hole
on the
motherrd boa
by
short readed end th
(as
belo
w).
2.
Apply the
thermal te pas
on the
surce fa
of
CPU
.
3. Tear
othe
protecve sticker ti
fr the om
c base opper
of the cold plate
and install
the cold
plate on the
CPU suscrce and far ew
with
spring
nut (put
a
metal
gasket betw every een
spring
nut
and
the I ntel
bracket). Make
the
copper
bott om
close
to the
CPU surce and lock fa
the
spring
nut tightly
and fla
t
.
A Platform MD
Installation
1.
S
elec
t
the
A MD
metal
back
plate to the
motherrd boa
socket
(F
M1/F
M2/AM2/AM2+/AM3/AM3+/A
M4).
2. Pce la
the
back
plate
scr ew
to the
back
plate with
a plastic gasket between
it
and
the
mother
boar
d
,
then
pass
the
back
plate
scr ew
thr the ough
motherboard
to its
obverse side
.
Cable
C
onnec
tion
1. H120:
cct onne
the
fan
to
“
CPU_F
AN
”
on the mother
boar
d
.
2. H240/360:
connect
the
fans
to
“
CPU_F
AN
”
on the
motherboard via
the
adapert cable
.
Spring
nut
Metal gasket
INTEL
br
acket
CPU
He xagonal
nut
Plastic
gasket
M
other
boar
d
Back
pla
t
e
Plastic
gasket
Back
plate
scr
ew
Iel/A ntMD
Bracket
Installation
Spring
nut
Metal
gasket
Double- headed
scr
ew
CPU
Motherrdboa
F
ool-proong
por
t
3. Hexagonal
nutnt oo the
back
plate
scr ew
fr the motherom
boar
d
’
s
front
side
.
Plastic
gasket
beeentw every hexagonal
nut
and
the mother
boar
d
.
4.
Apply the
thermal te pas
on the
CPU
surcefa
.
5. I
nser
t
the
A bracket MD
to the
side
of
water block
with
“
A
MD
”
upw
ards
.
6. Tear
othe
protecve sticker ti
fr the om
c base opper
of the cold plate
and install
the cold
plate on the
CPU suscrce and far ew
with
spring
nut (put
a
metal
gasket betw every een
spring
nut
and
the I ntel
bracket). Make
the
copper
bott om
close
to the
CPU surce and lock fa
the
spring
nut tightly
and fla
t
.
CPU_F
AN
CPU_F
AN
For
H240
1.
S
elec
t
the
corresponding bracket
to the
motherrd boa
type
(Iel/AMD) nt
with
"TOP"
upw
ards
.
Installation
is as
belo
w
.
2. T bracket can he
be
pushed
io the nt
card
slot dir
ec
tly
.
No rews are sc
needed
.
Spring
nut
Metal
G
asket
A MD
br
acket
For
H360
Hexagonal
nut
Plastic
gasket
CPU
Plastic
gasket
Back
pla
t
e
3-pin cct onneor
of pump
A gasketMD
Back
plate
scr
ew
SYFS_
AN-(3PIN)
Product specificaties
| Merk: | ALSEYE |
| Categorie: | Hardwarekoeling |
| Model: | Halo AIO H120 |
Heb je hulp nodig?
Als je hulp nodig hebt met ALSEYE Halo AIO H120 stel dan hieronder een vraag en andere gebruikers zullen je antwoorden
Handleiding Hardwarekoeling ALSEYE

14 Juli 2025
11 Juni 2024
11 Juni 2024
28 Februari 2024
28 Februari 2024
28 Februari 2024
Handleiding Hardwarekoeling
Nieuwste handleidingen voor Hardwarekoeling
9 Maart 2026
9 Maart 2026
6 Maart 2026
5 Maart 2026
4 Maart 2026
3 Maart 2026
3 Maart 2026
3 Maart 2026
3 Maart 2026
3 Maart 2026