Whirlpool W10225949 Handleiding
Bekijk gratis de handleiding van Whirlpool W10225949 (10 pagina’s), behorend tot de categorie Fornuis. Deze gids werd als nuttig beoordeeld door 68 mensen en kreeg gemiddeld 4.7 sterren uit 34.5 reviews. Heb je een vraag over Whirlpool W10225949 of wil je andere gebruikers van dit product iets vragen? Stel een vraag
Pagina 1/10

W10273541A
BACKSPLASH WITH SHELF
Use & Care / Installation Instructions
For questions about features, operation/performance, parts, accessories or service, call: or visit our 1-800-422-1230
website at www.kitchenaid.com
In Canada, for assistance, installation and service, call: 1-800-807-6777 www.Kitchenaid.ca or visit our website at
PANNEAU ANTI-ÉCLABOUSSURE AVEC ÉTAGÈRE
Utilisation et entretien / Instructions d’installation
Pour des questions à propos des caractéristiques, du fonctionnement/rendement, des pièces, des accessoires ou du service,
composer le : 1230 ou visitez notre site Web sur www.Kitchenaid.ca 1-800-422-1230
Au Canada, pour assistance, installation ou service, composer le : or visit our website at 1-800-807-6777 www.Kitchenaid.ca
Table of Contents/Table des matieres
INSTALLATION REQUIREMENTS………………………….2 EXIGENCES D’INSTALLATION....………………....……....……............................7
INSTALLATION INSTRUCTIONS……………………………3 INSTRUCTIONS D’INSTALLATION…………………...………...............................8
BACKSPLASH USE & CARE……………………………….. UTILISATION ET ENTRETIEN DU PANNEAU ANTI-ÉCLABOUSSURE..........5 10

INSTALLATION REQUIREMENTS
• Level
• Stud Finder
• Phillips Head Screwdriver
Parts Supplied
• Backsplash
• Shelf
• Shelf brackets
• Wall brackets
• Screws, 8-18 x ½”
• Screws, 10-2 x 2”
Tools and Parts
Gather the required tools and parts before starting installation. Read and follow the instructions provided
with any tools listed here.
Tools Required
• Drill
• 1/8” Drill Bit
• Tape Measure
Location Requirements
The backsplash can be installed on the backwall
behind a commercial style range or cooktop.
Appliance must be level side to side and front to back.
Proper installation is your responsibility.
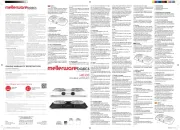
Backsplash Dimensions
2
B
A
C
A. Backsplash width
W10225950: 30”
W10225949: 36”
W10225948: 48”
B. Backsplash height, 22 3/8”
C. Backsplash depth
10 1/2” with shelf
1 3/8” without shelf
Center
Line
Mounting Bracket
Guide Line
Bottom Edge of Backguard
Range/Cooktop
Height
21 3/8”
1 3/8”

INSTALLATION INSTRUCTIONS
Mark Guide Lines
1. Mark a small line on the backwall at the height of the range or cooktop.
2. Measure 1 3/8” down from this line and scribe a level line the full length of the installation space. This
line represents the lower edge of the backsplash.
3. Position the bottom edge of the fl ange along the bottom edge of backsplash line. Align the center of
the backsplash with the center of the appliance. Mark each mounting hole (3 locations) with a pencil.
Set panel aside.
4. Measure up 21 3/8” from the bottom edge of backsplash line and draw a level line the full length of
the installation space. This line represents where the mounting brackets will attach to the wall.
Install Mounting Brackets
1. Using a stud fi nder, locate the edges of the wall studs within the installation space.
2. Mark the center of each stud and draw a line down the center of the stud.
3. Line up the top of the wall mounting bracket along the top edge line from “Mark Guide Lines” section.
4. Center a bracket along the centerline of each wall stud.
5. Mount each bracket to wall using two 10-12 x 2” screws per bracket (included with kit). A minimum of
two mounting brackets should be installed for the 30” and 36” models. The 48” model requires three
mounting brackets.
Attach Shelf Brackets
1. Place the shelf brackets on the top of the Backsplash as shown in the picture.
2. Attach the bracket to the Backsplash using two 8-18 x ½” screws.
Rear view
3
Align this surface
with the guide line
Product specificaties
| Merk: | Whirlpool |
| Categorie: | Fornuis |
| Model: | W10225949 |
Heb je hulp nodig?
Als je hulp nodig hebt met Whirlpool W10225949 stel dan hieronder een vraag en andere gebruikers zullen je antwoorden
Handleiding Fornuis Whirlpool
15 Juli 2025

14 Juli 2025

14 Juli 2025

14 Juli 2025

4 Juli 2025
3 Juni 2025

13 Mei 2025

13 Mei 2025

13 Mei 2025

6 Mei 2025
Handleiding Fornuis
- Rex
- Kenwood
- Sirius
- Ariston Thermo
- Bora
- OneConcept
- Electrolux
- FORS
- LAFE
- Lacanche
- Bifinett
- Platypus
- Elba
- Teka
- Arthur Martin
Nieuwste handleidingen voor Fornuis
6 Augustus 2025
6 Augustus 2025
6 Augustus 2025
6 Augustus 2025

6 Augustus 2025

5 Augustus 2025

5 Augustus 2025

5 Augustus 2025

5 Augustus 2025

5 Augustus 2025