Whirlpool AKP 3840 PIX AUS Handleiding
Bekijk gratis de handleiding van Whirlpool AKP 3840 PIX AUS (8 pagina’s), behorend tot de categorie Oven. Deze gids werd als nuttig beoordeeld door 110 mensen en kreeg gemiddeld 4.9 sterren uit 55.5 reviews. Heb je een vraag over Whirlpool AKP 3840 PIX AUS of wil je andere gebruikers van dit product iets vragen? Stel een vraag
Pagina 1/8

EN
1
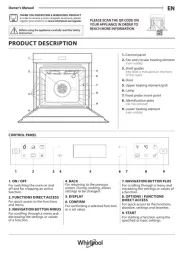
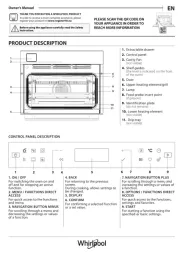
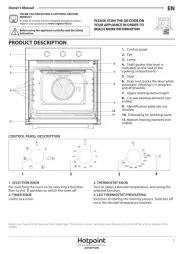
PRODUCT DESCRIPTION
DAILY REFERENCE
GUIDE
CONTROL PANEL
Before using the appliance carefully read the Health and Safety guide.
1. Control panel
2. Fan
3. Lamp
4. Shelf guides
(the level is indicated on the wall
of the cooking compartment)
5. Door
6. Door lock
(the level is indicated on the wall
of the cooking compartment)
7. Upper heating element/grill
8. Circular heating element
(non-visible)
9. Identification plate
(do not remove)
10. Bottom heating element
(non-visible)
1. SELECTION KNOB
For switching the oven on by
selecting a function.
Turn to the position to switch
the oven off.
2. LIGHT
With the oven switched on, press
to turn the oven compartment
lamp on or off.
3. TIME SETTING
For accessing the cooking time
settings, delayed start and timer.
For displaying the time when the
oven is off.
4. DISPLAY
5. ADJUSTMENT BUTTONS
For changing the cooking time
settings.
6. THERMOSTAT KNOB
Turn to select the temperature you
require when activating manual
functions.
Automatic functions use .
THANK YOU FOR PURCHASING AN
WHIRLPOOL PRODUCT
To receive more comprehensive help and
support, please register your product at
www . whirlpool . eu/ register
You can download the Safety Instructions
and the Use and Care Guide by visiting our
website docs . whirlpool . eu and following
the instructions on the back of this booklet.
1
2
3
4
5
9
10
8
7
6
1 32 4 5 6

2
CONVENTIONAL
For cooking any kind of dish on one shelf only.
FORCED AIR
For cooking different foods that require the
same cooking temperature on several shelves
(maximum three) at the same time. This function
can be used to cook different foods without odours
being transferred from one food to another.
MAXI COOKING
For cooking large joints of meat (above 2.5
kg). We recommend turning the meat over during
cooking to ensure that both sides brown evenly. We
also recommend basting the joint every so often to
prevent it from drying out excessively.
PIZZA
For baking different types and sizes of pizza
and bread. It is a good idea to swap the position of
the baking trays halfway through cooking.
GRILL
For grilling steaks, kebabs and sausages,
cooking vegetables au gratin or toasting bread.
When grilling meat, we recommend using a drip tray
to collect the cooking juices: Position the pan on any
of the levels below the wire shelf and add 200 ml of
drinking water.
TURBO GRILL
For roasting large joints of meat (legs, roast
beef, chicken). We recommend using a drip tray to
collect the cooking juices: Position the pan on any
of the levels below the wire shelf and add 200 ml of
drinking water.
ACCESSORIES
Download the Use and Care Guide from
docs . whirlpool . eu for more information
WWW
WIRE SHELF BAKING TRAY
The number of accessories may vary depending on which model is purchased.
Other accessories can be purchased separately from the After-sales Service.
INSERTING THE WIRE SHELF
AND OTHER ACCESSORIES
. Insert the wire shelf onto the level you require by
holding it tilted slightly upwards and resting the
raised rear side (pointing upwards) down first. Then
slide it horizontally along the shelf guide as far as
possible.
. Other accessories, like the baking tray, are to be
inserted horizontally, letting them slide on the shelf
guides.
. The shelf guides can be removed to facilitate the
oven cleaning: pull them to remove from their seats.
RISING
For helping sweet or savoury dough to rise
effectively. Turn the thermostat knob to the icon to
activate this function.
ECO FORCED AIR
For cooking roasts and stuffed roasting joints
on a single shelf. Food is prevented from drying out
excessively by gentle, intermittent air circulation.
When this ECO MODE function is in use, the light
will remain switched off during cooking but can be
switched on again by pressing .
BREAD AUTO
This function automatically selects the ideal
temperature and baking time for bread. For best
results, carefully follow the recipe . Activate the
function when the oven is cold.
DESSERT AUTO
This function automatically selects the ideal
temperature and baking time for cakes. Activate the
function when the oven is cold.
AUTOMATIC CLEANING
For eliminating cooking spatters using a cycle
at a very high temperature (over 400 °C).
FUNCTIONS Download the Use and Care Guide from
docs . whirlpool . eu for more information
WWW

EN
3
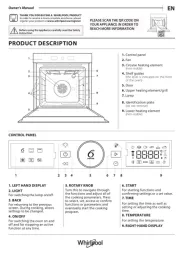
1. SETTING THE TIME
You will need to set the time when you switch on the
appliance for the first time: Press until the
icon and the two digits for the hour start flashing on
the display.
Use or to set the hour and press to confirm.
The two digits for the minutes will start flashing. Use
or to set the minutes and press to confirm.
Please note: When the icon is ashing, for example
following lengthy power outages, you will need to reset the
time.
2. REHEAT THE OVEN
A new oven may release odours that have been left
behind during manufacturing: This is completely
normal.
Before starting to cook food, we therefore
recommend heating the oven with it empty in order
to remove any possible odours.
Remove any protective cardboard or transparent film
from the oven and remove any accessories from inside
it.
Heat the oven to 250 ° C for about one hour,
preferably using the “Maxi Cooking” function. The
oven must be empty during this time.
Follow the instructions for setting the function
correctly.
Please note: It is advisable to air the room after using the
appliance for the rst time.
USING THE APPLIANCE FOR THE FIRST TIME
1. SELECT A FUNCTION
To select a function, turn the selection knob to the
symbol for the function you require: The display will
light up and an audible signal will sound.
2. ACTIVATE A FUNCTION
MANUAL
To start the function you have selected, turn the
thermostat knob to set the temperature you require.
Please note: During cooking you can change the function
by turning the or adjust the temperature by selection knob
turning the .thermostat knob
The function will not start if the thermostat knob is on .
You can set the cooking time, cooking end time (only if you
set a cooking time) and a timer.
AUTOMATIC
To start the automatic function you have selected
(“Bread” or “Dessert”), keep the thermostat knob at the
position for automatic functions ( ).
To finish cooking, turn the selection knob to position 0.
Please note: You can set the cooking end time and timer.
RISING
To start the “Rising” function, turn the thermostat
knob to the relevant symbol; if the oven is set to a
different temperature, the function will not start.
Please note: You can set the cooking time, cooking end time
(only if you set a cooking time) and a timer.
3. PREHEATING
Once the function starts, an audible signal and a
flashing icon on the display indicate that the
preheating phase has been activated.
At the end of this phase, an audible signal and the
fixed icon on the display will indicate that the oven
has reached the set temperature: At this point, place
the food inside and proceed with cooking.
Please note: Placing the food in the oven before preheating
has nished may have an adverse eect on the nal cooking
result.
DAILY USE
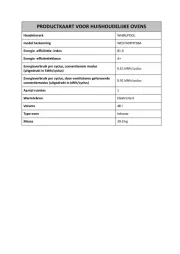
Product specificaties
| Merk: | Whirlpool |
| Categorie: | Oven |
| Model: | AKP 3840 PIX AUS |
Heb je hulp nodig?
Als je hulp nodig hebt met Whirlpool AKP 3840 PIX AUS stel dan hieronder een vraag en andere gebruikers zullen je antwoorden
Handleiding Oven Whirlpool
4 Augustus 2025
4 Augustus 2025

4 Augustus 2025
5 Juli 2025
4 Juli 2025
4 Juli 2025
4 Juli 2025
4 Juli 2025

4 Juli 2025
4 Juli 2025
Handleiding Oven
- Mayer
- Zelmer
- Alpina
- De Dietrich
- Day
- Tomado
- Hisense
- Novamatic
- Bakers Pride
- Scandomestic
- Barazza
- Wolkenstein
- Zoppas
- Equator
- La Germania
Nieuwste handleidingen voor Oven

9 Augustus 2025
9 Augustus 2025
8 Augustus 2025
8 Augustus 2025
8 Augustus 2025

8 Augustus 2025
7 Augustus 2025
6 Augustus 2025

6 Augustus 2025
6 Augustus 2025