Wet Sounds PORTED 12 ENC Handleiding
Wet Sounds Niet gecategoriseerd PORTED 12 ENC
Bekijk gratis de handleiding van Wet Sounds PORTED 12 ENC (2 pagina’s), behorend tot de categorie Niet gecategoriseerd. Deze gids werd als nuttig beoordeeld door 51 mensen en kreeg gemiddeld 4.7 sterren uit 6 reviews. Heb je een vraag over Wet Sounds PORTED 12 ENC of wil je andere gebruikers van dit product iets vragen? Stel een vraag
Pagina 1/2
PORTED 12 ENC
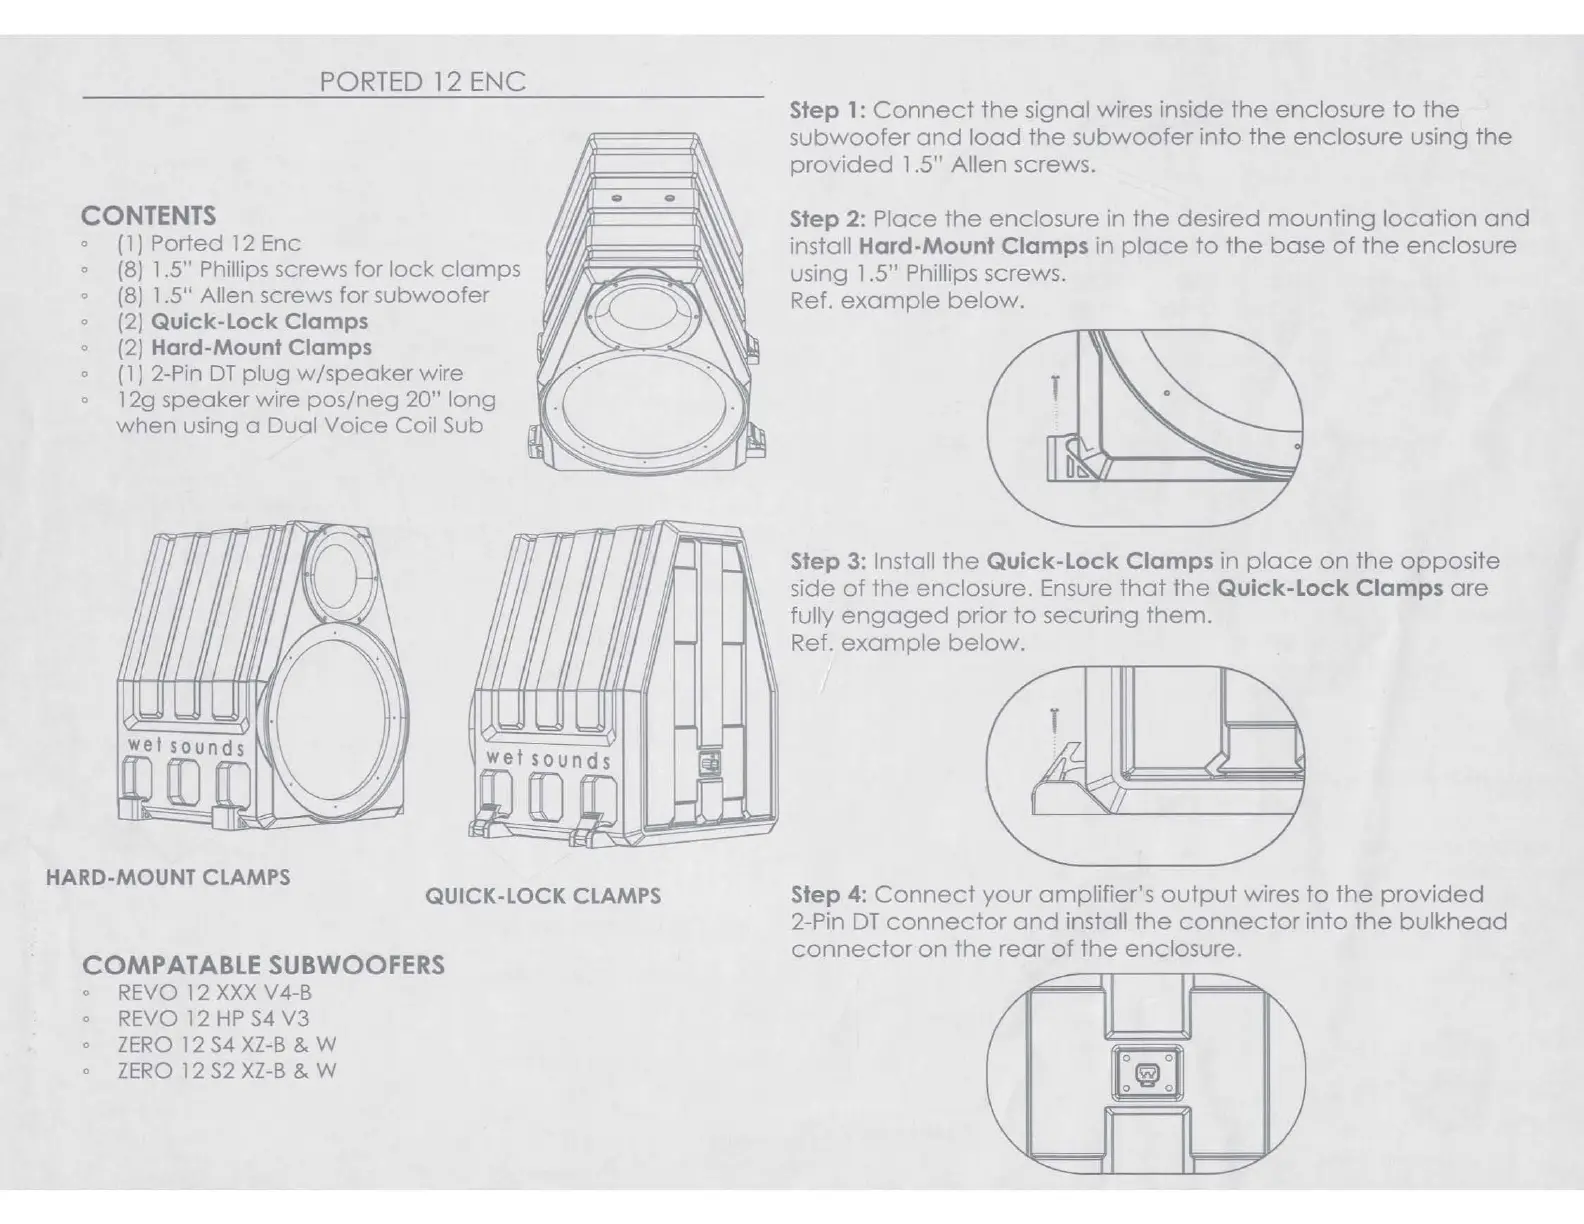
CONTENTS
0
( 1 J Ported
12
Enc
0
(8)
1.5" Phillips screws for
lock
clamps
0
(8)
1.5" Allen screws for subwoofer
o
(2)
Quick-Lock Clamps
0
(2) Hard-Mount Clamps
0
(
1 J
2-Pin
OT
plug
w/speaker
wire
0
12g speaker wire
pos/neg
20" long
when
using a Dual
Voice
Coil Sub
HARD-MOUNT
CLAMPS
QUICK-LOCK
CLAMPS
COMPATABLE SUBWOOFERS
0
REVO
12
XXX
V4-B
0
REVO
12
HP
S4
V3
0
ZERO
12
S4
XZ-B
& W
0
ZERO
l 2
S2
XZ-B
& W
Step
1:
Connect
the
signal wires inside
the
enclosure
to
the
subwoofer
and
load
the
subwoofer
into
the
enclosure using
the
provided
1 .5" Allen screws.
Step
2:
Place
the
enclosure
in
the
desired
mounting
location
and
install
Hard-Mount
Clamps
in
place
to
the
base
of
the
enclosure
using 1 .5" Phillips screws.
Ref.
example
below.
Step
3:
Install
the
Quick-Lock
Clamps
in
place
on
the
opposite
side
of
the
enclosure. Ensure
that
the
Quick-Lock
Clamps
are
fully
engaged
prior
to
securing
them.
Ref.
example
below.
T
Step 4:
Connect
your
amplifier's
output
wires
to
the
provided
2-Pin
OT
connector
and
install
the
connector
into
the
bulkhead
connector
on
the
rear
of
the
enclosure.
~
~
PORTED 12 ENC
CONTENTS
0
( 1 J Ported
12
Enc
0
(8)
1.5" Phillips screws for
lock
clamps
0
(8)
1.5" Allen screws for subwoofer
o
(2)
Quick-Lock Clamps
0
(2) Hard-Mount Clamps
0
(
1 J
2-Pin
OT
plug
w/speaker
wire
0
12g speaker wire
pos/neg
20" long
when
using a Dual
Voice
Coil Sub
HARD-MOUNT
CLAMPS
QUICK-LOCK
CLAMPS
COMPATABLE SUBWOOFERS
0
REVO
12
XXX
V4-B
0
REVO
12
HP
S4
V3
0
ZERO
12
S4
XZ-B
& W
0
ZERO
l 2
S2
XZ-B
& W
Step
1:
Connect
the
signal wires inside
the
enclosure
to
the
subwoofer
and
load
the
subwoofer
into
the
enclosure using
the
provided
1 .5" Allen screws.
Step
2:
Place
the
enclosure
in
the
desired
mounting
location
and
install
Hard-Mount
Clamps
in
place
to
the
base
of
the
enclosure
using 1 .5" Phillips screws.
Ref.
example
below.
Step
3:
Install
the
Quick-Lock
Clamps
in
place
on
the
opposite
side
of
the
enclosure. Ensure
that
the
Quick-Lock
Clamps
are
fully
engaged
prior
to
securing
them.
Ref.
example
below.
T
Step 4:
Connect
your
amplifier's
output
wires
to
the
provided
2-Pin
OT
connector
and
install
the
connector
into
the
bulkhead
connector
on
the
rear
of
the
enclosure.
~
~
PORTED
12 ENC
I
Product specificaties
| Merk: | Wet Sounds |
| Categorie: | Niet gecategoriseerd |
| Model: | PORTED 12 ENC |
Heb je hulp nodig?
Als je hulp nodig hebt met Wet Sounds PORTED 12 ENC stel dan hieronder een vraag en andere gebruikers zullen je antwoorden
Handleiding Niet gecategoriseerd Wet Sounds

9 Oktober 2025
31 Oktober 2023
30 Juni 2023
27 Juni 2023
20 Juni 2023
19 Juni 2023
19 Juni 2023
18 Juni 2023
17 Juni 2023
15 Juni 2023
Handleiding Niet gecategoriseerd
Nieuwste handleidingen voor Niet gecategoriseerd
23 Juli 2026
23 Juli 2026
23 Juli 2026
23 Juli 2026
23 Juli 2026
22 Juli 2026
22 Juli 2026
22 Juli 2026
22 Juli 2026
22 Juli 2026