WAC Lighting WL-LED300 Handleiding
WAC Lighting Verlichting WL-LED300
Bekijk gratis de handleiding van WAC Lighting WL-LED300 (3 pagina’s), behorend tot de categorie Verlichting. Deze gids werd als nuttig beoordeeld door 18 mensen en kreeg gemiddeld 5.0 sterren uit 6 reviews. Heb je een vraag over WAC Lighting WL-LED300 of wil je andere gebruikers van dit product iets vragen? Stel een vraag
Pagina 1/3
WAC Lighting
www.waclighting.com
Phone (800) 526.2588 • Fax (800) 526.2585
Headquarters/Eastern Distribution Center
44 Harbor Park Drive • Port Washington, NY 11050
Phone (516) 515.5000 • Fax (516) 515.5050
Western Distribution Center
1750 Archibald Ave • Ontario, CA 91761
Phone (800) 526.2588 • Fax (800) 526.2585
WAC Lighting retains the right to modify the design of our products at any time as part of the company's continuous improvement program. JUNE, 2014
INSTALLATION INSTRUCTION
LED Step and Wall Lights
WL-LED300
WARNING
IMPORTANT: NEVER attempt any work without shutting o the electricity.
- Read all instructions before installing.
- System is intended for installation by a qualied electrician in accordance with the National Electric Code,
and local regulations. Consult with local inspector to ensure compliance.
- To reduce the risk of re, electrical shock and injuries to persons, turn o power at main switch before installing
or modifying the system.
- Retain instructions for future maintenance reference.
- Not complying with instructions could result in failure of the xtures, and void the warranty.
FRAMEMOUNTED INSTALLATION INTO NEW STRUCTURES:
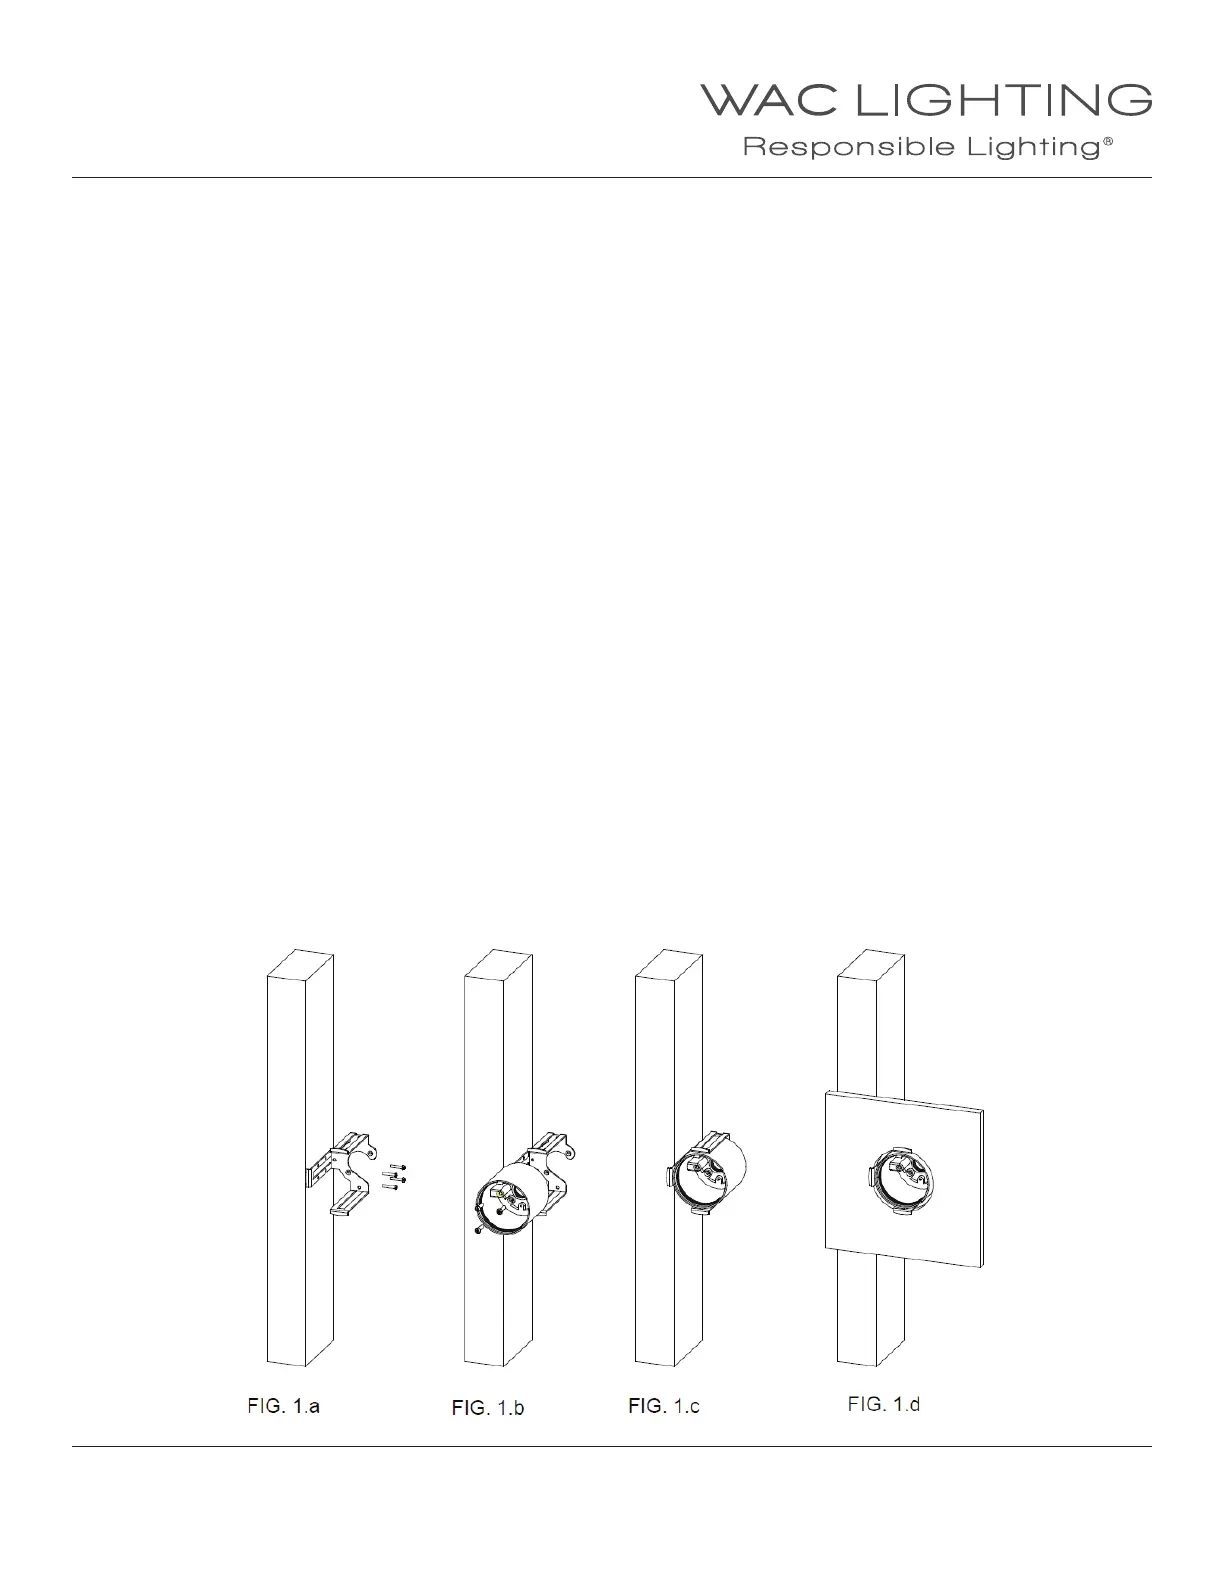
1. Remove all (3) adjusting brackets from mounting bracket as shown in Fig. A.
2. Use wood or sheet metal screws (by others) to attach mounting bracket to stud.
Important: Oset bracket forward to account for drywall or wood thickness. (Fig. 1a)
3. Attach the metal conduit to the canopy, then attach the canopy to the mounting bracket using the (3) screws
and (3) rubber washers (pre-installed at the factory) provided. (Figs 1b & 1c). Note: For indoor installation,
rubber washers are not required, and can be discarded. Connect building wires to the canopy in
accordance with the National Electrical Code and local ordinances.
4. Install drywall (or other material) after cutting a 3 1/8” diameter hole to allow for the recessed mounting bracket. (Fig. 1d)
5. Slip gasket onto the back of the xture. (Fig. 2)
Note: For indoor installation, gasket is not required, and can be discarded.
6. Connect the xture wires to the housing wires as follows: Black xture wire to black (Hot) housing wire,
White xture wire to white (Neutral) housing wire, and Green xture wire to Ground. (Fig. 3)
Note: Multiple xtures (up to 200) can be wired together in parallel: Hot to hot, and neutral to neutral.
7. Place all wiring and connectors back in housing and install the xture.
Note: For outdoor installation, it is recommended that the installer run a bead of clear, outdoor-rated silicone
(GE RTV-162 or equivalent) caulk between gasket or back of xture and mounting surface to prevent seepage
of water into xture.
8. Secure the xture to the housing using two screws and two rubber washers (pre-installed at the factory) provided. (Fig. 4)
Product specificaties
| Merk: | WAC Lighting |
| Categorie: | Verlichting |
| Model: | WL-LED300 |
Heb je hulp nodig?
Als je hulp nodig hebt met WAC Lighting WL-LED300 stel dan hieronder een vraag en andere gebruikers zullen je antwoorden
Handleiding Verlichting WAC Lighting

22 Juni 2026
29 April 2026
29 April 2026
26 April 2026
26 April 2026
26 April 2026
25 April 2026
24 April 2026
23 April 2026
22 April 2026
Handleiding Verlichting
Nieuwste handleidingen voor Verlichting
22 Juni 2026
22 Juni 2026
22 Juni 2026
22 Juni 2026
22 Juni 2026
22 Juni 2026
22 Juni 2026
22 Juni 2026
19 Juni 2026
18 Juni 2026