Videocon VU324LDF Handleiding
Bekijk gratis de handleiding van Videocon VU324LDF (30 pagina’s), behorend tot de categorie Televisie. Deze gids werd als nuttig beoordeeld door 101 mensen en kreeg gemiddeld 4.3 sterren uit 51 reviews. Heb je een vraag over Videocon VU324LDF of wil je andere gebruikers van dit product iets vragen? Stel een vraag
Pagina 1/30

Welcome
Congratulations on purchasing this LCD Television with iDTV tuner. Please take time to carefully read
this user operating manual paying special attention to the section detailing “Warnings and Safety
Precautions”. Being familiar with all of the operational functions of your new TV will greatly improve
your viewing enjoyment. Please keep this guide safe for your future reference.
Do not touch any parts inside the TV or make changes to any settings not described in this user guide!
Table of Contents
1. - Specifications........................................................................... 01
2. - Initial Setup.............................................................................. 02
3. - Basic Connection and Switching the TV On............................. 04
4. - Tuning: First Installation........................................................... 05
5. - General Troubleshooting.......................................................... 07
6. - Operating Controls and Connections ...................................... 08
7. - Using your TV............................................................................ 11
8. - Menu Operation (Adjusting Settings)....................................... 14
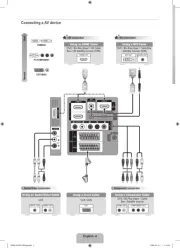
9. - Connecting External Equipment to the TV............................... 22
10. - Disposal Instructions................................................................ 26
11.
-
Warnings and Safety Precautions............................................
27
1
1. Specifications
Service Number 0845 293 7697
Screen size(diagonal) 262LD 263LD 323LD 324LD 324LDF 326LD 326LDF 327LD 327LDF
26" 26" 32” 32” 32” 32” 32” 32” 32”
Display Resolution 1366 x 768 1366 x 768 1366 x 768 1366 x 768 1920x1080p 1366 x 768 1920x1080p 1366 x 768 1920x1080p
Viewing Angle (H/V) 160°, 150° 160°, 150° 178°, 178° 178°, 178° 178°, 178° 178°, 178° 178°, 178° 178°, 178° 178°, 178°
Brightness 450 cd/m2 500 cd/m2 450 cd/m2 450 cd/m2 450 cd/m2 450 cd/m2 450 cd/m2 450 cd/m2 450 cd/m2
Display Colours 16.2 Million 16.2 Million 16.7 Million 16.7 Million 16.7 Million 16.7 Million 16.7 Million 16.7 Million 16.7 Million
Response Time 8 msec 8 msec 6 msec 6 msec 8 msec 6 msec 8 msec 6 msec 8 msec
Back Light Life (normal
setting) Approx. 60,000 Hours minimum
Colour System PAL / SECAM - BG / I / L / L’ / DK. (NTSC (3.58 & 4.43) colour compatibility only via AV inputs)
Channel coverage VHF – 2 -12, UHF 21-69, CATV – X ~Z+2, S1~S41
Nominal input voltage 100-240 V~ 50/60 Hz
Antenna input
Impedance 75 Ohms unbalanced
Power consumption 130 W 135 W 150 W 180 W 180 W 180 W 180 W 180 W 180 W
VESA SIZE (mm) 200 x 100 200 x 100 200 x 200 200 x 200 200 x 200 200 x 200 200 x 200 200 x 200 200 x 200
Audio output
(Rated output) 2 X 10 W (+/- 1W) (RMS)
This receiver supports only free to air channels
Accessories : Remote handset, User Guide book, Power Lead, 2 x AAA Battery’s, Quick Start Guide
THE COMPANY RESERVES THE RIGHT TO BRING TECHNOLOGICAL, AESTHETICAL AND DIMENSIONAL CHANGES, FOR PRODUCT IMPROVEMENT OR FOR
MANUFACTURING NEEDS, WITHOUT NOTICE.
Please note that this user guide is designed for use with more than one LCD TV range - (see above
table for applicable models to use with). Illustrations and images used for reference in this user guide
may differ slightly from the model purchased, however, all operational functionality is identical.
11.
Warnings and Safety Precautions............................................
27
12. - Warranty Certificate and Service Contact Details................... 29

2. Initial Setup
Before Starting
Please read the warnings and safety precautions
Section starting on page 27 before using your TV.
Please note the following important points!
1. Two people should lift or carry the TV!
2. Ensure you have plenty of space to work in safely!
3. A screw driver is required to fit the stand!*
4. When fitting the stand ensure that the area you lay the TV face down on, is flat, stable and cushioned to prevent
damage to the screen!*
5. Carefully remove the TV and accessories from the box supplied in – retain this and any packaging for 60 days
before disposing of.
In the Box/ Standard Accessories
1 x LCD Television 2 x AAA Batteries (Remote)
1 x Mains Cable 4 x Stand Mount Screws (2 x BLACK Screws, 2 x SILVER Screws) *
1 x Quick Start Guide 1 x Stand Mount *
1 x User’s Manual 1 x Remote Control
If any of the above items are missing please contact our service helpline on the number below!
Fitting the Stand Mount to the TV*
Remove the TV panel from the box and place face down on a flat,
cushioned surface (take care not to damage the screen)
1
Remove the blocking plate from the bottom of the TV as
IMPORTANT NOTE
DO NOT PLUG YOUR TV INTO THE AC MAINS SOCKET UNTIL YOU
HAVE READ THIS CAREFULLY!
•DO NOT CONNECT THE TV TO THE MAINS or USE UNLESS EITHER
THE STAND IS FITTED or THE BLOCKING PLATE (SUPPLIED) IS
SCREWED SECURELY IN PLACE – SEE INSTRUCTIONS BELOW!!!!!
2
1.
Remove the blocking plate from the bottom of the TV as
shown in fig 1 (taped in position – retain for possible future
use – as this will require re-fitting if wall mounting).
2. Insert the stand mount into the stand recess at the bottom
of the TV as shown, and carefully slide into position – fig 2.
3. Insert and tighten the four screws supplied in the following
sequence. Ensure you follow the steps below - fig 3 and 4.
1. A – Bottom Left (BLACK Screw)
2. B – Top Left (SILVER Screw)
3. C – Top Right (SILVER Screw)
4. D – Bottom Right (BLACK Screw)
4. When the stand is secure carefully lift the TV upright and
position on a stable, flat surface for viewing.
•To detach the stand, perform the above steps in reverse and
re-fit the blocking plate, using the 2 BLACK screws to secure in
position (fix through bottom screw holes A and D) – fig 3.
fig 5
Front
Back
Stand – Top View
Stand Column
Service Number 0845 293 7697
* Not applicable on 262LD model.
fig 1
fig 2
fig 3
fig 4
A
B C
D

Initial Setup
Notes on wall mounting the TV – (VESA Compliant- See Specification Chart for size per model)
Wall mount items (sold separately) allow you to wall mount this TV onto a wall.
For detailed information on installing the wall mount, please see the instructions provided with the specific bracket.
THE BLOCKING PLATE SUPPLIED, MUST BE FITTED AND SCREWED (SCREWS SUPPLIED) TO THE TV IF WALL MOUNTING
Contact a technician for assistance when installing the TV on a wall mounted bracket.
•DO NOT install your wall mount while the TV is turned on. It may result in personal injury due to electric shock.
•Remove the stand and cover the stand mount recess with the plate originally supplied with the TV (see previous page)
Remote Control: Battery Installation
The remote control uses 2 x 1.5V AAA batteries.
For battery installation and replacement please
follow the instructions below..
1. Turn the remote control unit upside down.
Carefully press down on the grip of the
battery compartment - slide back and
remove the cover in the direction of the
arrow – see fig 1 and 2.
2. Install the new batteries making sure that
the battery polarity matches the + and –
guide inside the battery compartment . The
unit can be damaged if the batteries are not
positioned correctly – see fig 3
1. Press
-
-
+
+
+
+
-“Click”
3
3. Close the battery compartment cover
carefully by sliding it in the direction
indicated – fig 4. It should click into place
once secured.
Cautions regarding the remote control unit
•Do not expose the remote control to
impacts – dropping, sitting on etc...
•Do not spill liquids on the remote control
and do not place in areas of high humidity.
•Do not leave in direct sunlight – the heat
may cause deformation of the unit.
•Remove the batteries from the remote
control if you are not using it for a long
period of time (several weeks)
•Do not throw away used batteries with
normal household waste.
•Do not mix new and used batteries.
•Do not use rechargeable batteries.
•Do not mix battery types – (alkaline with
carbon, zinc etc)
•Do not expose batteries to excessive heat,
throw them on the fire, recharge them or
try to open them as this could cause them
to leak or explode.
2. Slide and remove
-
+
-
3. Fit the batteries 4. Slide and Close
(These figures are just for reference.)
Use the remote control by pointing it towards the
remote control sensor on the TV.....
Remote control sensor
If the remote control doesn’t work, check the following:
Is the TV power on?
Are the batteries fitted correctly – plus and minus terminals ?
Are the batteries drained?
Is there a power outage, or is the power cord unplugged?
Are there objects between the remote and the TV sensor?
The remote control may not
work properly if the remote
control sensor on the TV is in
direct sunlight or bright lighting.
In such case , change the angle
of the lighting or TV, or operate
the remote control unit closer to
the remote sensor.
Service Number 0845 293 7697
Product specificaties
| Merk: | Videocon |
| Categorie: | Televisie |
| Model: | VU324LDF |
| Kleur van het product: | Zwart |
| Kinderslot: | Ja |
| Gewicht verpakking: | 18450 g |
| Geïntegreerde klok: | Ja |
| Gebruikershandleiding: | Ja |
| Stroomvoorziening: | 100 - 240 V, 50/60 Hz |
| LED-indicatoren: | Slaapstand |
| Beeldschermdiagonaal: | 32 " |
| Resolutie: | 1920 x 1080 Pixels |
| Oorspronkelijke beeldverhouding: | 16:9 |
| Kijkhoek, horizontaal: | 178 ° |
| Kijkhoek, verticaal: | 178 ° |
| Audiosysteem: | I /BG /DK /L /L' |
| Helderheid: | 450 cd/m² |
| Afmetingen verpakking (BxDxH): | 895 x 770 x 218 mm |
| Aantal USB 2.0-poorten: | 1 |
| Aantal HDMI-poorten: | 3 |
| PC audio ingang: | Ja |
| Composiet video-ingang: | 1 |
| Componentingang video (YPbPr/YCbCr): | 1 |
| S-Video ingang: | 1 |
| Ingebouwde luidsprekers: | Ja |
| Gemiddeld vermogen: | 20 W |
| Stroomverbruik (in standby): | 1 W |
| Aantal luidsprekers: | 2 |
| HD type: | Full HD |
| Ingang stroom: | Ja |
| HDMI: | Ja |
| Display technologie: | LCD |
| Responstijd: | 8 ms |
| Paneelmontage-interface: | 200 x 200 mm |
| Diepte ( zonder voet ): | 115 mm |
| Hoogte (zonder voet ): | 530 mm |
| Breedte ( zonder voet ): | 807 mm |
| Gewicht (zonder voet): | 14620 g |
| PC-ingang (D-Sub): | Ja |
| Soort tuner: | Digitaal |
| Breedte apparaat (met standaard): | 807 mm |
| Diepte apparaat (met standaard): | 281 mm |
| Hoogte apparaat (met standaard): | 582 mm |
| Teletext: | Ja |
| Equalizer-instellingen: | Ja |
| Aan/uit-timer: | Ja |
| Elektronische TV-gids: | Ja |
| On Screen Display (OSD): | Ja |
| Common interface (CI): | Ja |
| Aantal RF-poorten: | 1 |
| Aansluitingen: | S/PDF x 1 |
| Auto channel search: | Ja |
| Teletekst: | 500 pagina's |
| Aantal SCART-poorten: | 2 |
| Aantal kanalen: | 999 kanalen |
| Teletextniveau: | 2.5 |
| DVB: | DVB-T |
| Afstandsbediening inbegrepen: | Ja |
| Stroomverbruik (typisch): | 180 W |
| Slaaptimer: | Ja |
Heb je hulp nodig?
Als je hulp nodig hebt met Videocon VU324LDF stel dan hieronder een vraag en andere gebruikers zullen je antwoorden
Handleiding Televisie Videocon

9 Februari 2023

9 Februari 2023

9 Februari 2023

9 Februari 2023

9 Februari 2023
Handleiding Televisie
- Englaon
- Fujitsu
- Star-Light
- Elements
- Grunkel
- ECG
- Nokia
- AudioAffairs
- ElectriQ
- Arcelik
- Irradio
- QFX
- Emerson
- AEG
- Technika
Nieuwste handleidingen voor Televisie
16 September 2025
16 September 2025

15 September 2025
15 September 2025
15 September 2025

15 September 2025
15 September 2025
13 September 2025

12 September 2025
9 September 2025