Velbus VMBSIG Handleiding


Lees hieronder de đź“– handleiding in het Nederlandse voor Velbus VMBSIG (4 pagina's) in de categorie Niet gecategoriseerd. Deze handleiding was nuttig voor 55 personen en werd door 2 gebruikers gemiddeld met 4.5 sterren beoordeeld

Pagina 1/4
VMBSIG
Velbus Legen Heirweg 33, BE-9890 Gavere, Belgium tel. +32 9 384 36 11 e-mail: info@velbus.eu – – – – www.velbus.eu
VMBSIG- 3 ed
NEDERLANDS
Lees en begrijp deze handleiding en de veiligheidsinstructies vóór
ingebruikname. Bewaar deze handleiding voor verdere
raadpleging.
KORTE OMSCHRIJVING
Signum IoT Gateway met rechtstreekse Velbus aansluiting. Voor
de volledige kenmerken, specs en bijkomende documentatie, zie
de VMBSIG productpagina op . www.velbus.eu
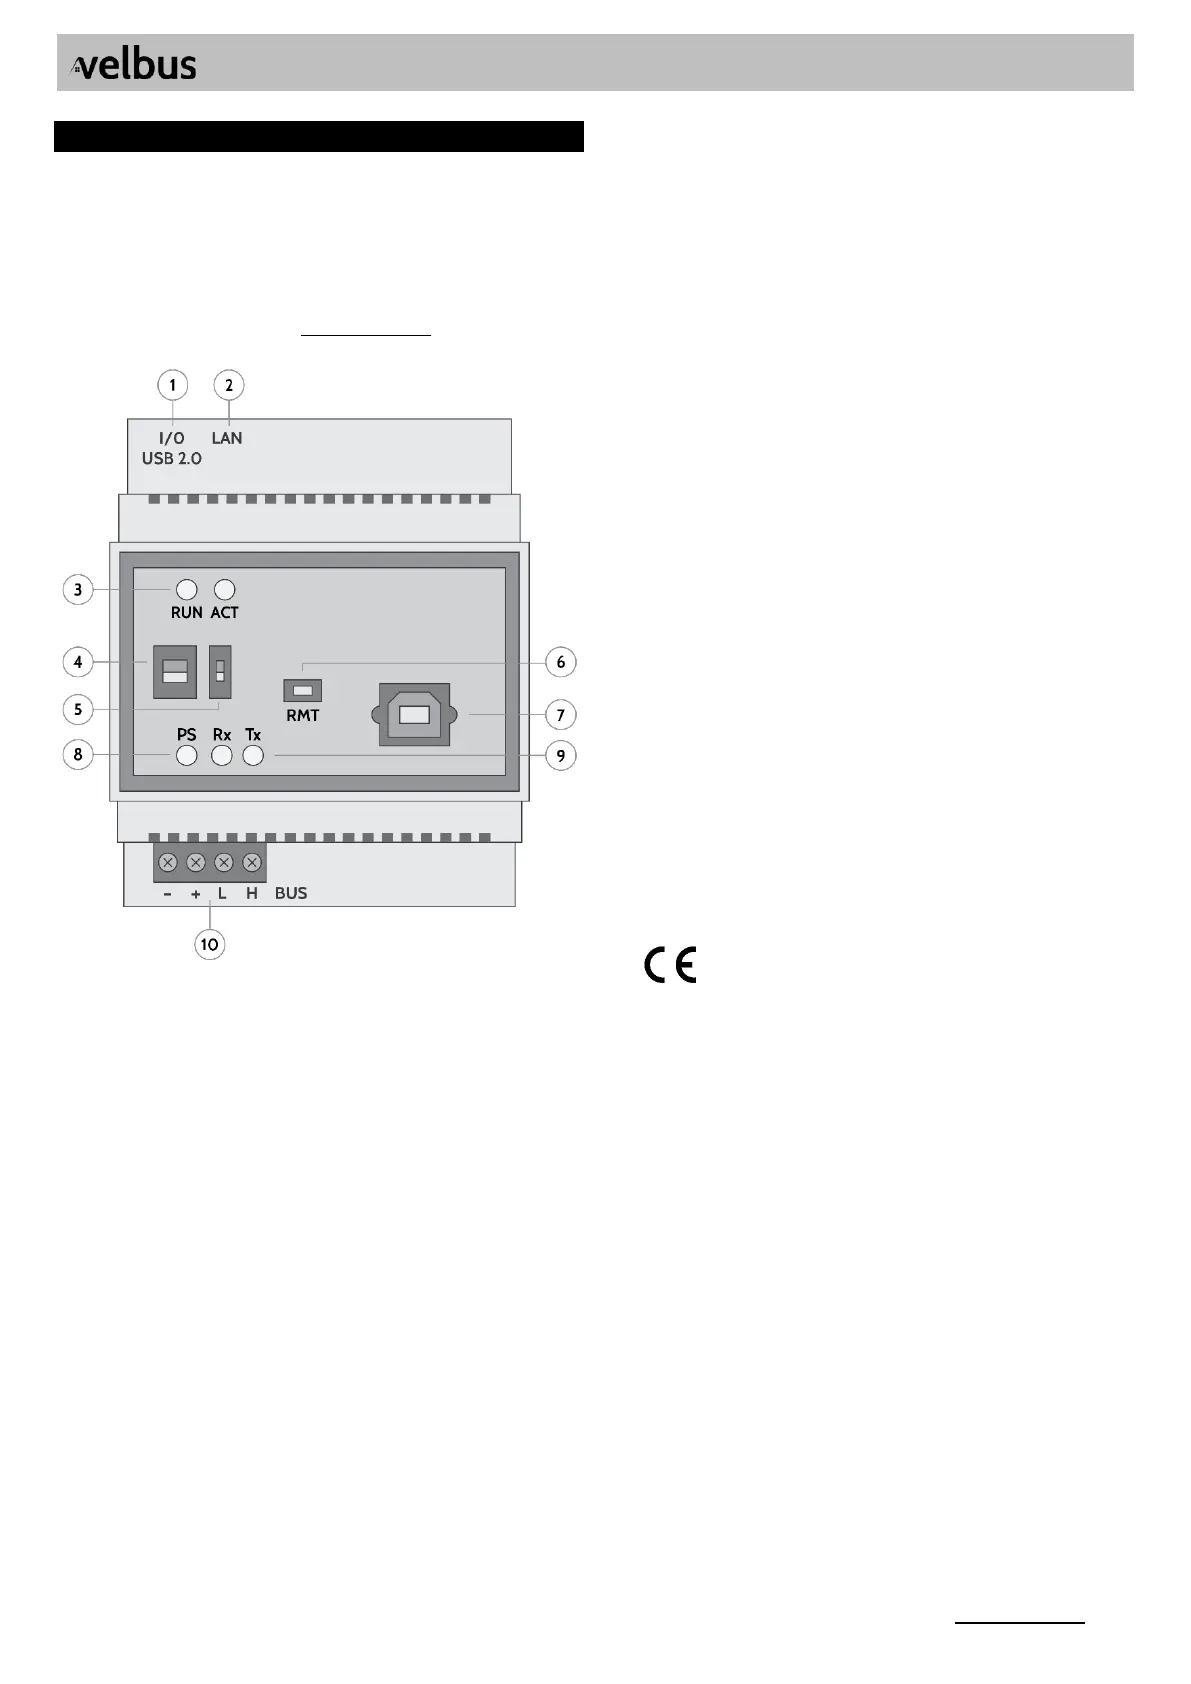
ONDERDELEN VAN DE MODULE
1. I/O USB 2.0: gereserveerd voor uitbreidingen
2. LAN: Ethernet aansluiting
3. RUN ACT en leds: indicatie van status en fouten. In normaal
bedrijf is de RUN led continu aan en toont de ACT led een hartslag
(2 x knipperen, uit, enz.)
4. CAN-bus afsluitweerstand*
5. RESET DIS knop (bij sommige modellen genaamd): in normaal
bedrijf naar beneden. Schuif naar boven om de module te
ontkoppelen van de voeding (hardware reset).
6. RMT (Remote): o.a. gebruikt voor identificatie tijdens de
Quickstart en bij een software reset.
7. USB-B poort: voor USB-verbinding PC, bv. voor de met
configuratiesoftware VelbusLink. (In normale omstandigheden
niet in gebruik, aangezien alle communicatie a LAN kan vi
verlopen.)
8. PS led: Power Supply, continu aan in normaal bedrijf*
9. Rx en Tx leds: flikkeren wanneer er buscommunicatie is*
10. BUS-connector: verbinding met de Velbus buskabel (incl.
voeding 15V+/-3V DC).
* Zie algemene Velbus Installatiehandleiding
AANSLUITING
Verbind de Signum met de Velbus installatie via de BUS-
connector, en met het lokale netwerk via de LAN-connector. Voor
beheerde netwerken: zorg ervoor dat uw firewall uitgaand
verkeer op poort 123 (NTP) accepteert. (Voor de meeste
thuisgebruikers is dit standaard het geval.)
Wacht tot de RUN led continu aan is, en de ACT led een hartslag
toont (2 x knipperen, uit, enz.). Dit kan tot 3 minuten duren
tijdens het opstarten.
Open VelbusLink en geef de VMBSIG een geldig adres. Je kan
verbinding maken via een USB-kabel (gebruik daarvoor de USB-B
poort vooraan), of via LAN met de optie Verbinden > “Verbinden
via Signum” in VelbusLink.
QUICKSTART
Configureer de Velbus installatie vooraleer de Quickstart te
starten.
Op mobiele toestellen Velbus Signum app: installeer de via de
Google Play Store of de Apple App Store.
Op PC: surf naar het IP-adres van de Signum in een browser
(laatste versie van Edge, Chrome, Firefox of Safari). Je kan het IP-
adres in VelbusLink terugvinden via de knop Verbinden >
“Verbinden met Signum”.
Volg nu de aanwijzingen in de app of browser. De Signum zal
automatisch de Velbus installatie scannen en een werkend
dashboard creëren.
PORT FORWARDING EN DDNS
Je vindt alle nodige informatie over port forwarding en DDNS in
de Signum toepassing > Configuratie > Settings > Network
Settings.
RUN LED
• UIT: Signum staat uit is aan het opstarten of
• 1x knipperen: geen IP-adres toegekend
• 2x knipperen: IP-adres toegekend maar kan niet ontdekt
worden op netwerk (discovery service werkt niet)
• 3x knipperen: kan gevonden worden op netwerk, maar is niet
toegankelijk (webserver werkt niet)
• 4x knipperen: is toegankelijk in browser en app, maar de
statussen in de webapp kunnen onjuist zijn
• 5x knipperen: niet-kritische waarschuwing. Ga naar
Configuration > Status of surf naar YOUR_IP/status voor meer
info
• AAN: normale werking
Dit product voldoet aan alle geldende
Europese richtlijnen en voorschriften.
VMBSIG
Velbus Legen Heirweg 33, BE-9890 Gavere, Belgium tel. +32 9 384 36 11 e-mail: info@velbus.eu – – – – www.velbus.eu
VMBSIG- 3 ed
FRANÇAIS
Lisez et comprenez ce mode d'emploi et toutes les consignes de
sécurité avant d'utiliser l'appareil. Gardez ce mode d'emploi pour
toute référence ultérieure.
DESCRIPTION COURTE
Passerelle Signum IoT avec connexion directe Velbus. Pour les
fonctionnalités complètes, les spécifications et la documentation
supplémentaire, consultez la page produit VMBSIG sur
www.velbus.eu.
PARTIES DU MODULE
1. I/O USB 2.0: réservé aux extensions
2. LAN: connexion Ethernet
3. LED et : indication de l'Ă©tat et des erreurs. En RUN ACT
fonctionnement normal, le voyant RUN est allumé en continu et
le voyant ACT affiche un battement de cœur (2 clignotements,
Ă©teint, etc.)
4. RĂ©sistance de terminaison du bus CAN*
5. Bouton (appelé sur certains modèles): abaissé en RESET DIS
fonctionnement normal. Faites glisser vers le haut pour
déconnecter le module de l'alimentation (réinitialisation).
6. RMT (Remote): utilisé pour l'identification lors du démarrage
rapide et lors d'une réinitialisation du logiciel.
7. Port USB-B: pour Ă©tablir une connexion USB entre un PC et le
VMBSIG, par exemple pour le logiciel de configuration
VelbusLink. (Non utilisé dans des circonstances normales, car
toutes les communications peuvent être effectuées via
Ethernet.)
8. PS : alimentation. Allumée en continu en fonctionnement LED
normal*
9. LED Rx et Tx: clignotent en cas de communication sur le bus*
10. Connecteur BUS: connexion avec le câble de bus Velbus (avec
alimentation 15V +/- 3V DC)
* Voir le manuel d'installation général de Velbus
CONNEXION
Connectez le Signum avec Velbus via le connecteur l’installation
BUS en bas, et au réseau local via le connecteur LAN. Pour les
réseaux gérés: assurez-vous que votre pare-feu accepte le trafic
sortant sur le port 123 (NTP). (Ce qui est le cas par défaut pour la
plupart des utilisateurs Ă  domicile.)
Attendez que la LED RUN soit allumée en continu et que la LED
ACT affiche un battement de cœur (2 clignotements, éteint, etc.)
Cela peut prendre jusqu'à 3 minutes au démarrage.
Ouvrez VelbusLink et donnez au VMBSIG une adresse valide.
Vous pouvez connecter via un câble USB (utilisez le port USB-B à
l'avant), ou via LAN avec l'option «Connecter via Signum» dans
VelbusLink.
DÉMARRAGE RAPIDE
Configurez l'installation Velbus avant de démarrer le démarrage
rapide.
Sur les appareils mobiles: installez l'application Velbus Signum
via le Google Play Store ou l'App Store d'Apple.
Sur PC: surfez sur l'adresse IP du Signum dans un navigateur
(dernière version de Edge, Chrome, Firefox ou Safari). Vous
pouvez trouver l'adresse IP dans VelbusLink via le bouton
Connecter > «Se connecter avec Signum».
Suivez maintenant les instructions de l'application. Le Signum
analysera automatiquement l'installation Velbus et créera un
tableau de bord fonctionnel.
REDIRECTION DE PORT DDNS ET
Vous pouvez trouver toutes les informations nécessaires sur la
redirection de port et le DDNS dans l'application Signum >
Configuration > Settings > Network settings.
LED RUN
• OFF: le Signum est éteint ou en train de démarrer
• 1 clignotement: aucune adresse IP attribuée
• 2 clignotements: adresse IP attribuée mais le Signum ne peut
pas être découvert sur le réseau (le service de découverte ne
fonctionne pas)
• 3 clignotements: le Signum peut être trouvé sur le réseau,
mais n'est pas accessible (le serveur web ne fonctionne pas)
• 4 clignotements: le Signum est accessible dans le navigateur
et dans l'application, mais les Ă©tats de retour de l'application
web peuvent ĂŞtre incorrects
• 5 clignotements: avertissement non critique. Accédez à
Configuration > Status ou surfez sur VOTRE_IP/status pour plus
d'informations
• ON: fonctionnement normal
Ce produit est conforme Ă  toutes les
directives et réglementations européennes
applicables.
VMBSIG
Velbus Legen Heirweg 33, BE-9890 Gavere, Belgium tel. +32 9 384 36 11 e-mail: info@velbus.eu – – – – www.velbus.eu
VMBSIG- 3 ed
ENGLISH
Read and understand this manual and all safety signs before
using this appliance. Keep this manual for future reference.
SHORT DESCRIPTION
Signum IoT Gateway with direct Velbus connection. For full
features, specs and additional documentation, see the VMBSIG
product page at .www.velbus.eu
COMPONENTS OF THE MODULE
1. I / O USB 2.0: reserved for extensions
2. LAN: Ethernet connection
3. RUN ACT and leds: indication of status and errors. In normal
operation the RUN led is continuously on, and the ACT led shows
a heartbeat (2 flashes, off, etc.)
4. CAN bus terminator*
5. button (called on some models): down in normal RESET DIS
operation. Slide up to disconnect the module from the power
supply (hardware reset).
6. RMT (Remote): used for identification during the Quickstart
and during a software reset.
7. USB-B port: for USB connection with a PC, e.g. for the
configuration software VelbusLink. (Not in use under normal
circumstances, as all communication can pass over the LAN .)
8. PS led: Power Supply, continuously on in normal operation*
9. Rx and Tx leds: flicker when there is bus communication*
10. BUS connector: connection with the Velbus bus cable (incl.
power supply 15V +/- 3V DC)
* See general Velbus Installation manual
CONNECTION
Connect the Signum to the Velbus installation via the BUS
connector, and to the local network via the LAN connector. For
managed networks: make sure your firewall accepts outgoing
traffic on port 123 (NTP). (For most home users this should be the
case by default.)
Wait until the RUN led is continuously , and the ACT led on
shows a heartbeat (2 blinks, off, etc.). This can take up to 3
minutes during startup.
Open VelbusLink and give the VMBSIG a valid address. You can
connect via a USB cable (using the USB-B port at the front), or via
LAN with the option “Connect via Signum” in VelbusLink.
QUICKSTART
On mobile devices: install the Velbus Signum app via the Google
Play Store or the Apple App Store.
On PC: surf to the Signum's IP address in a browser (latest version
of Edge, Chrome, Firefox or Safari). You can find the IP address in
VelbusLink via the Connect button > “Connect with Signum”.
Now follow the directions in the app or browser. The Signum
will automatically scan the Velbus installation and create a
working dashboard.
PORT FORWARDING AND DDNS
You can find all necessary information about port forwarding and
DDNS in the Signum application > Configuration > Settings >
Network Settings.
RUN LED
• OFF: Signum is off or starting up
• 1 flash: Signum has no IP address assigned
• 2 flashes: IP address assigned but Signum cannot be
discovered on network (discovery service does not work)
• 3 flashes: Signum can be found on network, but is not
accessible (web server not working)
• 4 flashes: Signum can be accessed in browser and app, but the
statuses in the web app may be incorrect
• 5 flashes: non-critical warning. Go to Configuration> Status or
surf to YOUR_IP/status for more information
• ON: normal operation
This product complies with all of the relevant
European guidelines and regulations.


Product specificaties

Merk: Velbus
Categorie: Niet gecategoriseerd
Model: VMBSIG

Heb je hulp nodig?

Als je hulp nodig hebt met Velbus VMBSIG stel dan hieronder een vraag en andere gebruikers zullen je antwoorden


Handleiding Niet gecategoriseerd Velbus

Handleiding Niet gecategoriseerd

Nieuwste handleidingen voor Niet gecategoriseerd