Texican El Primo TCD-1 Handleiding
Texican
Niet gecategoriseerd
El Primo TCD-1
Bekijk gratis de handleiding van Texican El Primo TCD-1 (2 pagina’s), behorend tot de categorie Niet gecategoriseerd. Deze gids werd als nuttig beoordeeld door 4 mensen en kreeg gemiddeld 4.6 sterren uit 2.5 reviews. Heb je een vraag over Texican El Primo TCD-1 of wil je andere gebruikers van dit product iets vragen? Stel een vraag
Pagina 1/2

Instructions,Warranty Clarications,
Trouble Shooting & Parts Directory
MODELS TCD-1 & CD-45
TexicanSpecialty.com • 1(800) 869.5918
Texican Tostada Dispensers
User’s Manual
Texican Tostada Dispensers
User’s Manual
WARRANTY CLARIFICATION:
1.
The manufacturer will provide all parts and labor at no cost for a period of (90) ninety
days following the installation and startup of the dispensers. The manufacturer shall
also make any repairs necessary resulting form a manufacturing or fabrication defect
for a period of (1) one year.
2. Further, the manufacturer shall replace at no cost all parts (except lexan loading
doors) for a period of (1) one year, but not labor following the initial (90) ninety days.
3. Each dispenser is furnished with complete instructions for set-up, operations and
cleaning as noted above. Failure to follow these instructions may void the warranty.
The manufacturer can not be held responsible for damage or conditions which may
have been caused by neglect, ignorance or improper usage. The end user shall
bear full responsibility for all costs related to service calls when it is determined that
employees or management have failed to properly execute the normal operating and
cleaning procedures or maintenance.
4. Failure by the end user to install the dispenser on a stable platform and damage
resulting from this unstable condition, may void the warranty. Do not install the
dispensers on pedestal tables, undersized tables or carts nor any other equipment
which could result in the accidental tripping or dropping of the dispenser.
5. Service work performed by unauthorized service companies, in-house mechanics
or management, without rst notifying the manufacturer as to identify the problem
may also void the warranty. When in doubt, contact the manufacturer or an area
representative prior to any repair work that may appear to require component
replacement or repair.
Visit us online for FAQs, Trouble Shooting tips,
Replacement Parts, Product Spec Sheets,
& Instructional Videos.
TexicanSpecialty.com
Scan This & Visit Our Website
EASY SET-UP:
1. Unbox the dispenser.
If the dispenser(s) was shipped via common carrier, check the packaging for possible
damage. Should the packaging appear sound, check the contents (dispenser or stand) for
damage after removing it from the carton. If there is damage, contact the delivering carrier
immediately, saving the carton and the equipment until an inspection is completed and a
claim initiated.
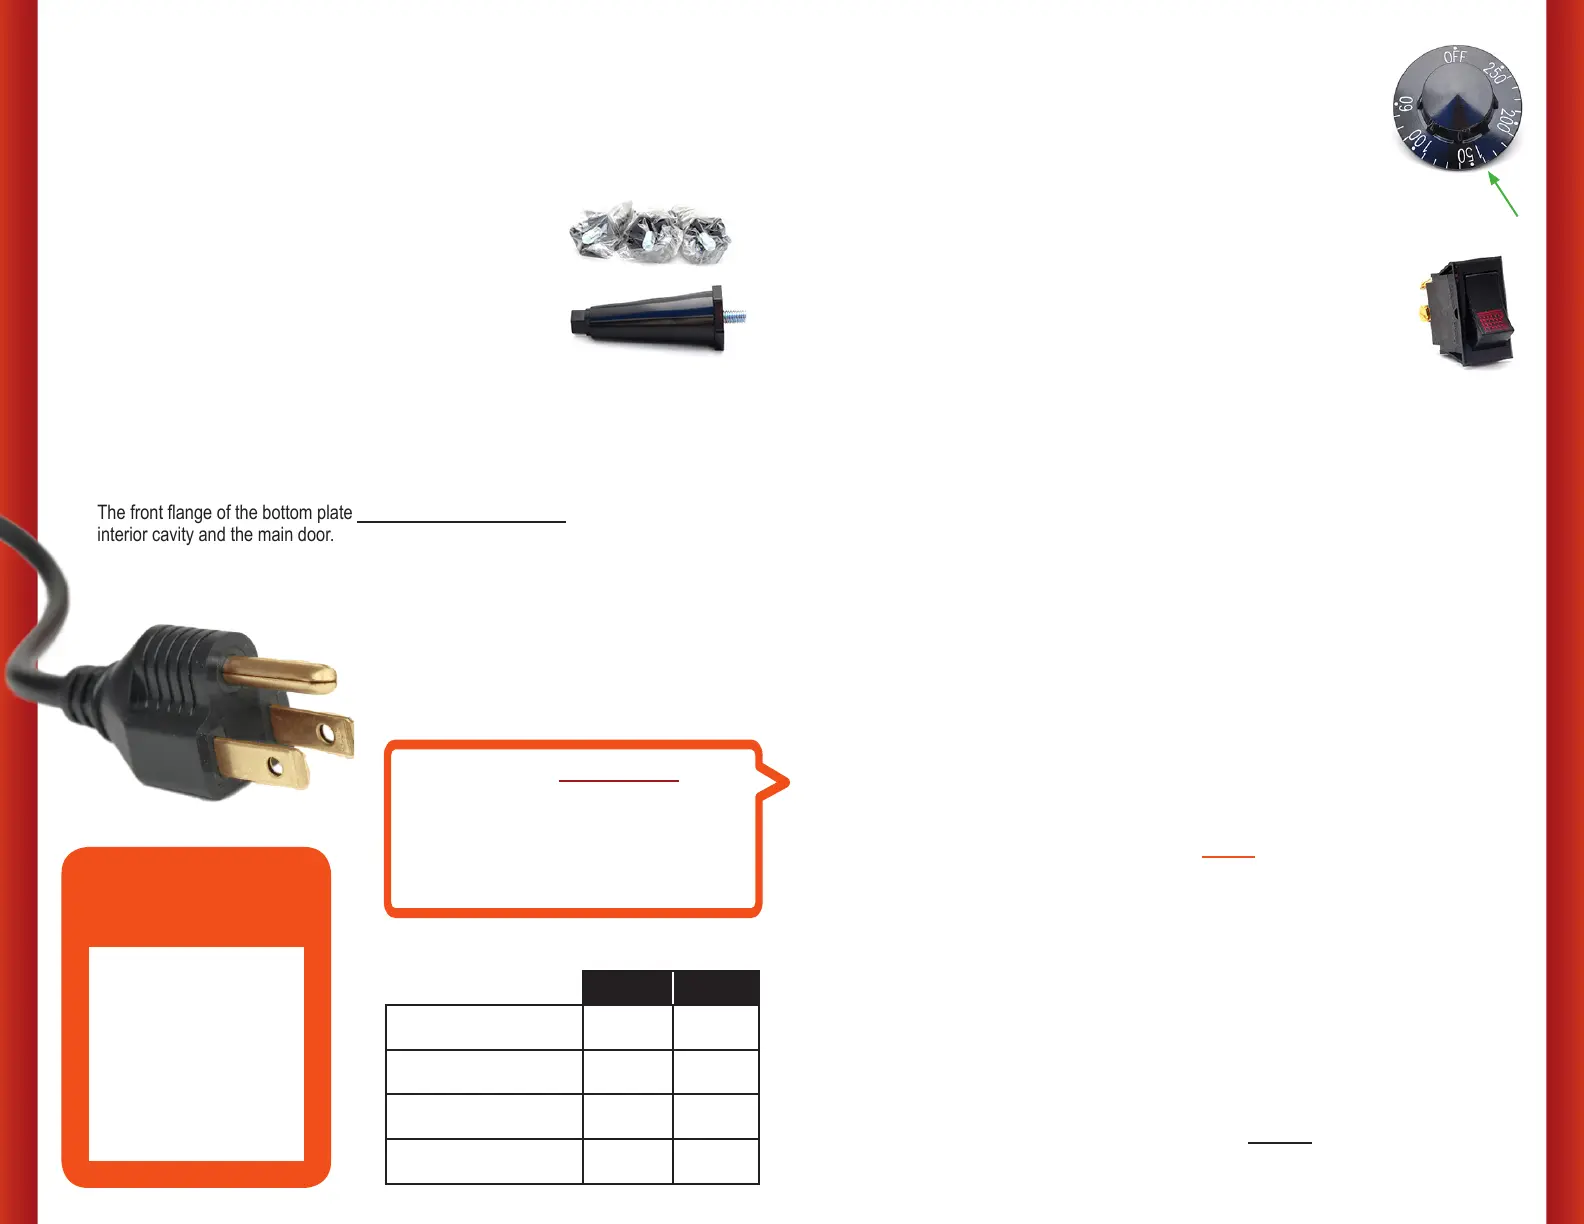
2. Screw legs into bottom of dispenser.
Every dispenser ships with 4 legs that screw into threaded
holes at each corner of the underside of the base of the
cabinet. If a stand was ordered, it bolts into these same holes
instead of the legs.
3. Remove all packing materials.
Remove the protective plastic coverings on the upper loading doors. If there is dust or
residue in or on the dispenser, clean prior to operating.
Note: The proper cleaning instructions are included.
4. Set the removable perforated interior bottom plate fully
inside the dispenser.
The front ange of the bottom plate must be inside the dispenser and NOT between the
interior cavity and the main door.
5. Plug the cord into an
independent 20 amp
grounded electrical outlet,
120/60/1, for best results.
OPERATIONS:
1. Set the temperature at 150-170 degrees F.
The average restaurant can normally maintain product quality at this
temperature range. High volume units may require slightly higher
settings. Once set, no further adjustments are advised nor required.
Note: The arrow in the vertical position. Set the dial to the arrow.
2. Clean all interior surfaces prior to loading with chips
and activating the heating system.
3. Push the rocker switch to the ON position.
A red light will be on only in the ON position. It will take about 20-25
minutes to fully heat the dispensers, but because the recirculating heat is
concentrated at the base, you can begin to serve chips within 10 minutes
after start-up.
Note: The Main Front door must be closed and latched prior to commencing operations.
4. Load the tortilla chips.
The upper loading doors rotate to the right and left to give you the maximum loading area.
The rst-in, rst-out supply of product ensures a steady fresh supply of hot dry tortilla chips.
5. Flip down the lower access door.
Begin serving within 10 mins. Add chips as necessary.
TCD-1 CD-45
4” adjustable legs
8
2.5” adjustable legs
8
44 gallon capacity
8
22 gallon capacity
8
DAILY CLEANING:
1. Push the rocker switch to the OFF position.
(The red light should go out)
2. Open the Main Front door.
Clean out the remaining chips. Save or discard the chips as per your particular policies.
3. Remove the perforated interior bottom plate.
4. Wipe clean the bottom plate and all interior surfaces.
Note: Daily cleaning of the dispenser interior is a must in order to prevent oil residue
build-up which could affect the chips’ avor.
ROUTINE MAINTENANCE:
1.
Every SIX (6) months inspect the interior fan cover plate, the fan, the air duct
and plenum over the fan, and heating element for grease accumulation. If
there is substantial grease build-up, remove the duct and plenum and clean
thoroughly before replacing.
2. Every SIX (6) months oil the motor with light oil at the front and rear of the motor. Keep the
motor openings clean and free of debris.
3. Periodically remove LEXAN loading doors and clean. Use only soft soap and water or other
nonabrasive or toxic cleaners & soft towels or sponges as the lexan will scratch.
NEVER LEAVE
MACHINE
UNATTENDED for
an extended time.
Overheating of
certain products
could result.
2
c
WATER SHOULD NOT BE
ALLOWED TO ACCUMULATE
IN MACHINE.
!
Excess water could cause a fault in the
heating elements & a short on certain electrical
systems.
Product specificaties
| Merk: | Texican |
| Categorie: | Niet gecategoriseerd |
| Model: | El Primo TCD-1 |
Heb je hulp nodig?
Als je hulp nodig hebt met Texican El Primo TCD-1 stel dan hieronder een vraag en andere gebruikers zullen je antwoorden
Handleiding Niet gecategoriseerd Texican

15 September 2025

15 September 2025

15 September 2025
Handleiding Niet gecategoriseerd
- Koala
- Cateye
- Strex
- Copernicus
- Hobby
- MDT
- Thermaltake
- X-Rite
- Bēm Wireless
- Silkn
- Tece
- Commercial Chef
- ProLights
- Digi-Pas
- Storm
Nieuwste handleidingen voor Niet gecategoriseerd
15 September 2025

15 September 2025

EK Water Blocks EK-Quantum Velocity³ 1700/1851/AM5 Handleiding
15 September 2025
15 September 2025

15 September 2025
15 September 2025

15 September 2025
15 September 2025

15 September 2025
15 September 2025