Techno Line WS7079S Handleiding


Lees hieronder de đź“– handleiding in het Nederlandse voor Techno Line WS7079S (7 pagina's) in de categorie Weerstation. Deze handleiding was nuttig voor 46 personen en werd door 2 gebruikers gemiddeld met 4.5 sterren beoordeeld

Pagina 1/7

WIRELESS 433 MHz WEATHER STATION
Instructions Manual
INTRODUCTION:
Congratulations on purchasing this Weather Station with wireless 433 MHz
transmission of outdoor temperature and display of indoor temperature and
humidity, weather forecast icons and weather tendency indicators. It is further
featuring a DCF-77 radio controlled clock with calendar display, and four easy to
use function keys, this innovative product is ideal for use in the home or office.
THE WEATHER STATION
SETTING UP:
1. First, insert the batteries into the Weather station (see “How to install and
replace batteries in the Weather Station” below). Once the batteries are
in place, all segments of the LCD will light up briefly. Following some test
data display, the indoor temperature and humidity, the time as 0:00 the
date as 1.1. and the weather icons sun and clouds will be displayed. If the
indoor temperature and humidity are not displayed after 30 seconds,
remove the batteries and wait for at least 10 seconds before reinserting
them. Once the indoor data is displayed proceed to step 2.
FEATURES:
DCF-77 Radio controlled time with manual setting options
Time reception ON/OFF
12/24 hour display
Hour and minute display, seconds indicated by flashing dot
Time zone option ±12hours
Date and month calendar display
Weather forecasting with 3 weather icons and weather tendency indicator
Weather forecasting icon sensitivity setting
Temperature display in degrees Celsius (°C) or Fahrenheit (°F) selectable
Indoor and outdoor temperature display with MIN/MAX recording
Indoor humidity reading displayed as RH% with MIN/MAX recordings
All MIN/MAX temperature recordings show date and time received
All MIN/MAX recordings can be reset
Indoor comfort level indicator - happy or sad face icons
Can take up to three outdoor transmitters
LCD contrast setting
Low battery indicator
Wall mounting or table standing
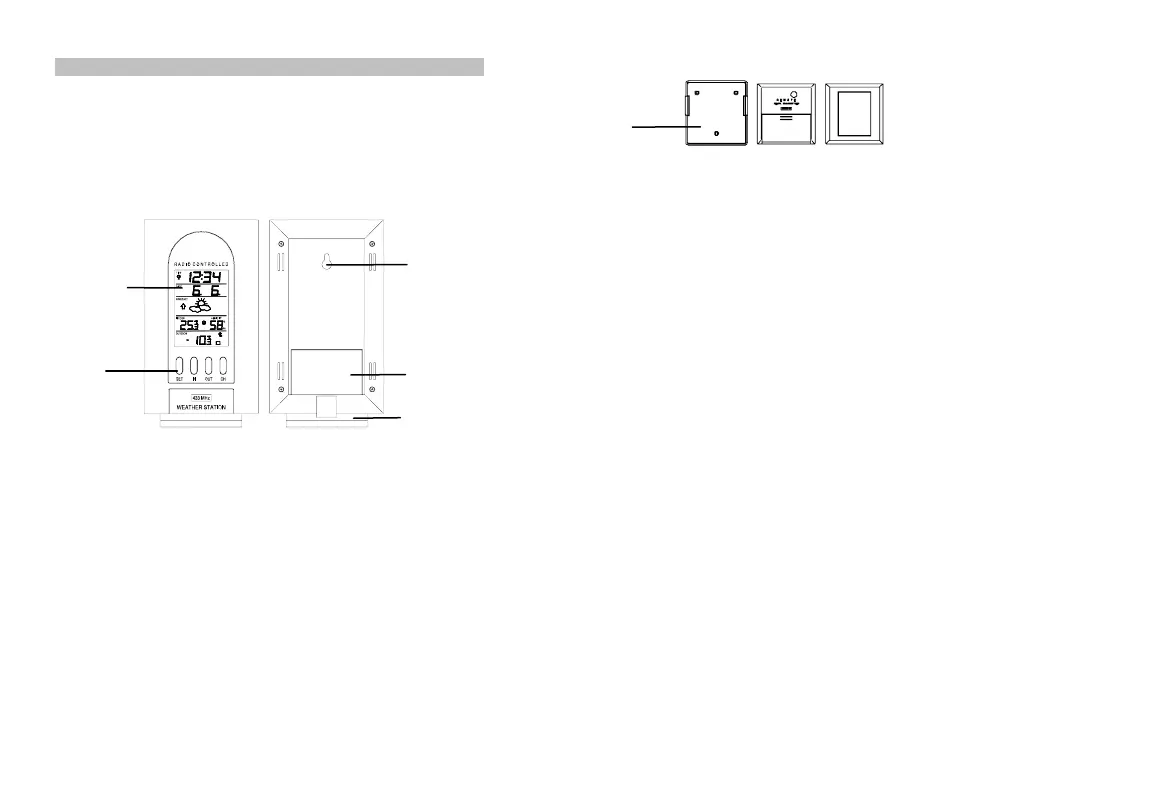
THE OUTDOOR TRANSMITTER
Holder
Remote transmission of outdoor temperature to weather station by 433 MHz
signal
Wall mounting case
Hanging Hole
LCD Display
2. Within 3 minutes of activating the Weather station, place the batteries into
the transmitter (see “How to install and replace batteries in the
Temperature Transmitter” below).
3. After a few seconds of inserting the batteries into the transmitter, the
Weather Station will start receiving data from the transmitter. The remote
temperature will then be displayed on the Weather Station. If this does not
happen after 15 minutes, the batteries will need to be removed from both
units and reset from step 1.
4. The Weather Station can take up to 3 remote transmitters. If you have
purchased additional transmitters, follow step 2 for all extra transmitters.
However, ensure that you leave 10 seconds in between the reception of
the last transmitter and the set-up of the following transmitter. The Weather
Station will number the transmitters in the order of set-up, i.e. the first
transmitter will have the temperature displayed with the number 1 against it
and so on.
5. When all the transmitters are set up, there is a testing period, during which
the display switches quickly between all the received transmitters at
random, according to which random transmission it receives. Pressing any
key will stop this process. The process also stops automatically if no keys
are pressed for a few minutes.
6. Once the remote temperature has been received and is displayed on the
Weather Station, the DCF-77 time code reception is automatically started.
This takes typically between 3 - 5 minutes in good conditions. This time
period is an excellent opportunity to locate the transmitter(s) in suitable
location(s) outdoors. In order to ensure sufficient 433 MHz transmission
however, this should under good conditions be no more than 25 meters
from where the Weather Station will be finally positioned (see notes on
“Positioning” and “433 MHz Reception”).
Detachable
Stand
Function
Keys Battery Cover
7. If after 10 minutes the DCF time has not been received, use the SET key to
manually enter a time initially. The clock will automatically attempt to
receive the DCF time at each full hour. When this is successful, the
received time will override the manually set time. The date is also updated
with the received time (Please refer also to notes on “Radio controlled
time” and “Manual time setting”).
HOW TO INSTALL AND REPLACE BATTERIES IN THE WEATHER
STATION
The Weather Station uses 2 x AA, IEC LR6, 1.5V
batteries. When batteries need to be replaced, the
low battery symbol will appear on the LCD. To
install and replace the batteries, please follow the
steps below:
1. Insert finger or other solid object in the space
at the bottom center of the battery
compartment and lift up to remove the cover.
2. Insert batteries observing the correct polarity.
(see marking).
3. Replace compartment cover.
HOW TO INSTALL AND REPLACE BATTERIES IN THE
TEMPERATURE TRANSMITTER
The Temperature Transmitter uses 2 x AAA, IEC, LR3, 1.5V batteries. To install
and replace the batteries, please follow the steps below:
1. Remove the cover.
2. Insert the batteries, observing the
correct polarity (see marking).
3. Replace the battery cover on the unit.
Note:
In the event of changing batteries in any of the units, all units need to be reset by
following the setting up procedures. This is because a random security code is
assigned by the transmitter at start-up and this code must be received and stored
by the Weather Station in the first three minutes of power being supplied to it.
BATTERY CHANGE:
It is recommended to replace the batteries in all units on an annual basis to
ensure optimum accuracy of these units.
Please participate in the preservation of the environment.
Return used batteries to an authorised depot.
FUNCTION KEYS:
WEATHER STATION:
The weather station has four easy to use function keys.
Indoor Outdoor
Channel
Setting
SET key (Setting)
Used to enter the set mode for the following functions: LCD contrast, Time
zone, Time Reception ON/OFF, 12/24 hour display, Manual time, Year,
Date, °C/°F, and Weather forecasting icon sensitivity settings.
The year can only be displayed in the set mode (not displayed in normal
mode)
IN key (Indoor)
Used to toggle between the current/ minimum / maximum indoor
temperature and humidity
Press for over 3 seconds to reset the indoor maximum and minimum
temperature and humidity records (will reset all records to current level)
Note: the Time/date information is only available for MIN/MAX temperature
data, and will be changed to default time after the reset operation
Change LCD contrast, time zone, Time Reception ON/OFF, 12/24 hour
display, hour, year, month, day, °C/°F and weather forecasting icon
sensitivity units in setting modes
Note: in 24hr time display mode, the day is set by using the IN key. In 12hr
time display mode, the month is set by using the IN key
OUT key (Outdoor)
Used to toggle between the current / minimum / maximum outdoor
temperature
Press for around 3 seconds to reset the outdoor maximum and minimum
temperature records (will reset all temperatures to current level of the
relative transmitter being reset - each transmitter’s data must be reset
separately)
Note: the time/date information of MIN/MAX data will be reset to default
time as well.
Change minute, month, day in setting modes
Note: in 24hr time display mode, the month is set by using the OUT key. In
12hr time display mode, the day is set by using the OUT key
CH key (Channel)
Toggle between the outdoor Temperature Transmitters 1, 2 and 3 (if more
than 1 transmitter is used)
Exit manual setting mode
LCD SCREEN AND SETTING

LCD (flashing)
For better distinctness, the LCD screen is split into 5 sections displaying the
information for time, date, weather forecast, indoors and outdoors.
DCF RADIO CONTROLLED TIME
The time base for the radio controlled time is a Cesium Atomic Clock operated by
the Physikalisch Technische Bundesanstalt Braunschweig which has a time
deviation of less than one second in one million years. The time is coded and
transmitted from Mainflingen near Frankfurt via frequency signal DCF-77 (77.5
kHz) and has a transmitting range of approximately 1,500 km. Your radio-
controlled Weather Station receives this signal and converts it to show the precise
time in summer or wintertime.
The quality of the reception depends greatly on the geographic location. In normal
cases, there should be no reception problems within a 1500km radius of
Frankfurt.
Once the outdoor temperature is displayed on the Weather station, the DCF tower
icon in the clock display will start flashing in the upper left corner. This indicates
that the clock has detected that there is a radio signal present and is trying to
receive it. When the time code is received, the DCF tower becomes permanently
lit and the time will be displayed.
If the tower icon flashes, but does not set the time or the DCF tower does not
appear at all, then please take note of the following:
Recommended distance to any interfering sources like computer monitors or
TV sets is a minimum of 1.5 - 2 metres.
Within ferro-concrete rooms (basements, superstructures), the received signal
is naturally weakened. In extreme cases, please place the unit close to a
window and/ or point its front or back towards the Frankfurt transmitter.
During nighttime, the atmospheric disturbances are usually less severe and
reception is possible in most cases. A single daily reception is adequate to
keep the accuracy deviation below 1 second.
DCF Tower
Icon (for time
reception) Time
Low battery
Indicator icon
Date MANUAL SETTINGS
Month The following manual settings can be changed when pressing the SET key for:
Weather
Forecast
Icon
LCD contrast setting
Time zone setting
Time reception ON/OFF setting
12/24-Hour setting
Manual time setting
Calendar setting
Snooze setting
°C/°F setting
Weather forecasting icon sensitivity setting
LCD CONTRAST SETTING:
The LCD contrast can be set to 8 different levels to suit the users needs (default
LCD contrast setting is LCD 5). To set the desired contrast level:
Pr1. ess the IN key to select the level of contrast desired.
2. Press the SET key to confirm and enter the “Time Zone setting” or exit
the setting mode by pressing the CH key
TIME ZONE SETTING
The time zone default of the Weather Station is 0. To change to another time
zone:
1. Press the SET key after completing the LCD contrast setting in order to
enter the time zone setting (flashing).
2. sing the IN key, set the time zone. The range runs from 0 to +12 and then
runs from -12 back to 0 in consecutive 1 hour intervals.
U
3. Press the SET key to confirm and enter the “Time Reception ON/OFF
setting” or exit the setting mode by pressing the CH key
Indoor Relative
Humidity %
Comfort Indicator
Icon
Weather
Ten ency d
Icon
Indoor
Temperature
in °C or °F
Outdoor
transmission
signal
Outdoor
Temperature
in °C or °F Outdoor transmitter Identification number
Time Zone (flashing)


Product specificaties

Merk: Techno Line
Categorie: Weerstation
Model: WS7079S

Heb je hulp nodig?

Als je hulp nodig hebt met Techno Line WS7079S stel dan hieronder een vraag en andere gebruikers zullen je antwoorden


Handleiding Weerstation Techno Line

Handleiding Weerstation

Nieuwste handleidingen voor Weerstation