Sunding SD-201C Handleiding
Sunding Fietscomputer SD-201C
Bekijk gratis de handleiding van Sunding SD-201C (1 pagina’s), behorend tot de categorie Fietscomputer. Deze gids werd als nuttig beoordeeld door 16 mensen en kreeg gemiddeld 4.3 sterren uit 5 reviews. Heb je een vraag over Sunding SD-201C of wil je andere gebruikers van dit product iets vragen? Stel een vraag
Pagina 1/1
SundingBicycleComputer
SD-201C(25Functions)
FUNCTIONS
-AUTOWAKEUP
-SPDCURRENTSPEED
-ODOODOMETER
0.001-99999km/m
-DSTTRIPDISTANCE
-MXSMAXIMUMSPEED
-AVSAVERAGESPEED
-TMELAPSEDTIME
-CLKCLOCK
12H/24H
-TMP
TMP
TMP
TEMPERTERATURE
-10~70
-MIN
-MAX
-SCAN
-COMPARATOR
-CAL
099999Kcal
-FAT09999.9kg
-SETTINGSPEEDSCALEkm/h,m/h
-SETTINGTYRECIRCUMFERENCE0mm9999mm
-SETTINGTHELASTVALUEOFODOMETER/ODO
-SETTINGRIDER’SWEIGHT
-FREEZEFRAMEMEMORY
-MAINTENANCEALERT
-“
”LOWPOWERREMINDING
-BACKLIGHT
-AUTOON/OFF
-WIRELESSDIGITALCODE
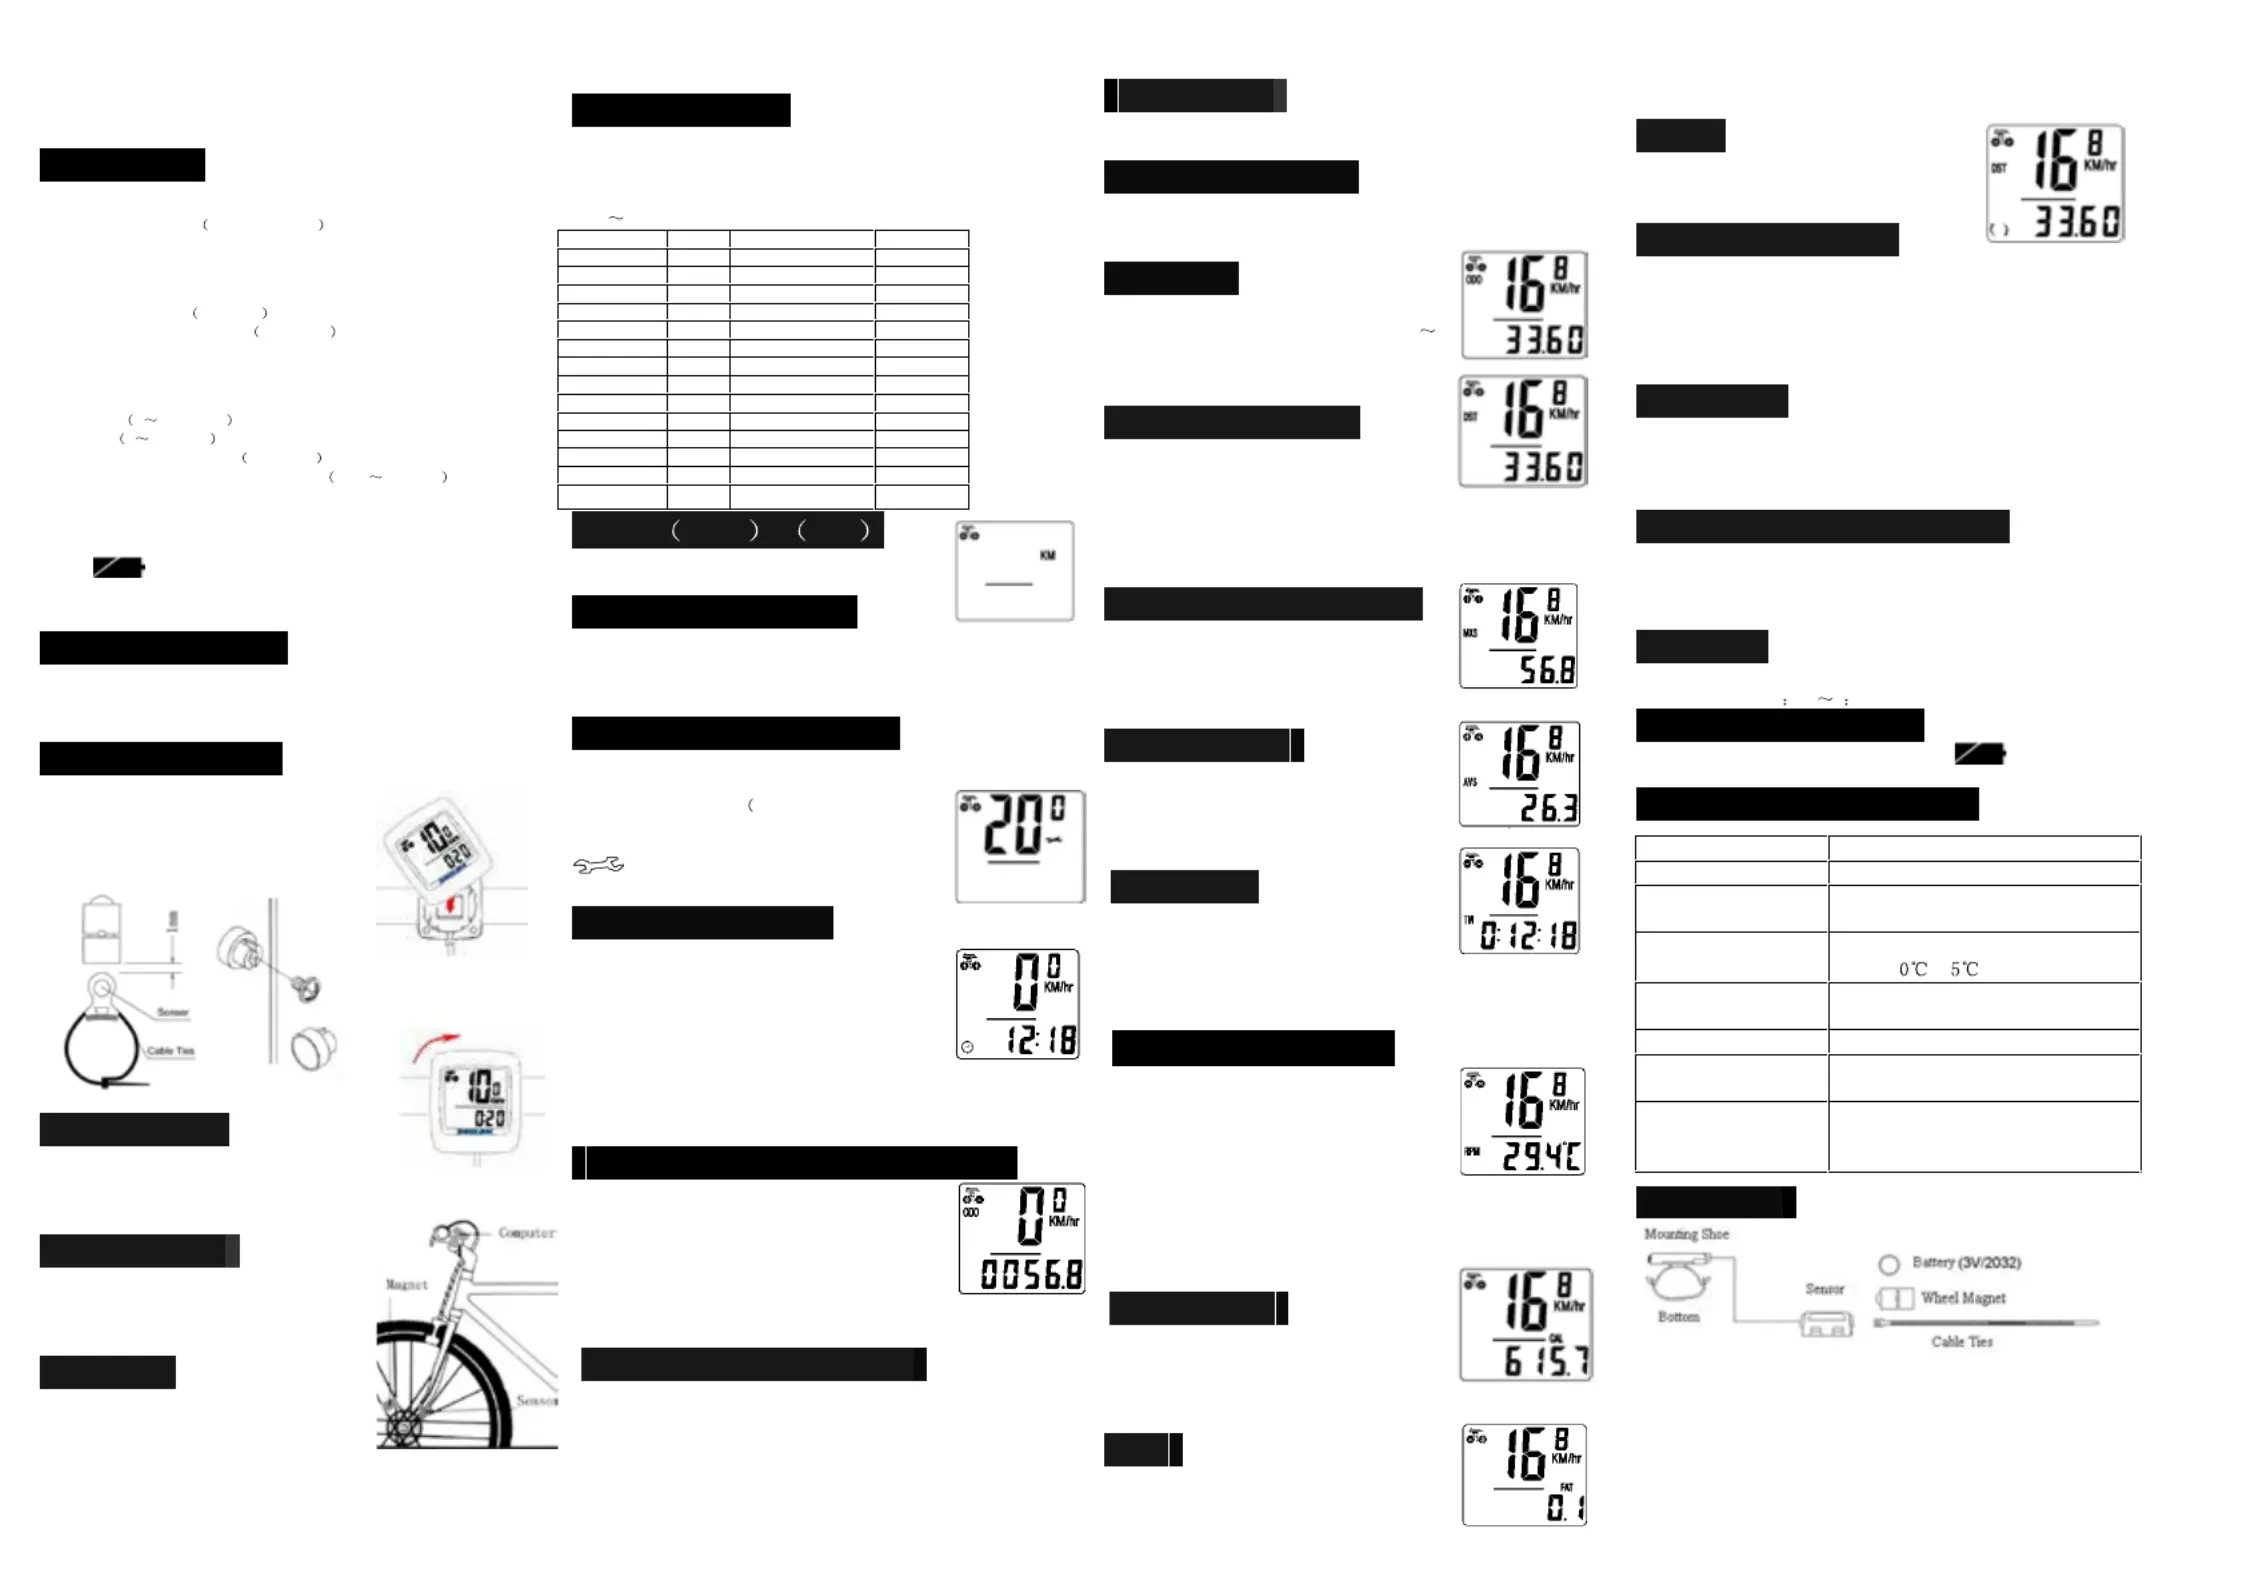
BatteryInstallation
Removethebatterycoverfromthebottomofthecomputerbyusinga
flatbladescrewdriver,installanCR2032batterywiththepositive(+)
polefacingthebatterycoverandreplacethecover.ShouldtheLCD
showirregularfigures,takeoutthebatteryandre-installit.
SpeedometerSensor
Attachthespeedometersensorbrackettotheleftforkblade,usingthe
shimstoadjustthediameter,andusingthecableo
tieitwiththefork.Positionthesensorandmagne
thatthearcofthemagnetintersectsthealignmer
with1mmclearance.
MountingShoe
Attachthemountingshoewiththecable
tiestothehandlebar,adjustthemounting
shoeonthehandlebarwiththeshimsto
holditsposition.
SensorWiring
Routethesensorwireuptheforkblade,
usingcabletiestosecureitatthebottom
andcrowntoavoidithinderthemovement
ofthefrontwheel.
Computer
Attachthecomputertothemountingshoe
byslidingtheunituntilitsnapsfirmlyinto
itspostion.Toremoveit,pressthebuttonon
itintheoppositedirection.
Tocheckforproperspeedfunctionandsensoralignment,spinthe
frontwheelwithcomputerinspeedmode.Adjustthepositionof
sensorandmagnetwhenthereisnoorweakreaction.
WheelSizeInput
‘2060’appearsonthescreenwhenthebatteryhasbeeninstalled,
withonefigureflashing,choosethecorrectwheelcircumferencefrom
thetablebelow.PressRIGHTbuttontoadvancedigitsasneededand
LEFTbuttontoconfirmandadvance.(Thecircumferenceranges
0mm
9999mm),pressLEFTbuttontoenterKM/Mmode.
TIRESIZE
CIRC
TIRESIZE
CIRC
700cx38mm218026’’x2.25’’2115
700cx35mm216826’’x2.1’’2095
700cx32mm215526’’x2.0’’2074
700cx30mm214526’’x1.9’’/1.95’’2055
700cx28mm213626’’x1.75’’2035
700cx25mm212426’’x1.5’’1985
700cx23mm210526’’x1.25’’1953
700cx20mm207426’’x1.0’’1913
700cTubulari213024’’x1.9’’/1.95’’1916
650cx23mm199020’’x1-1/4’’1618
650cx20mm194516’’x2.0’’1253
27’’x1-1/4’’216116’’x1.95’’1257
27’’x1-1/8’’215516’’x1.5’’1206
26’’x2.3’’2135
Settingkm/h/m/h
PresstheRIGHTbuttontochoosekm/horm/h.
PresstheLEFTbuttontoenterRider’sWeightsetting..
SettingRider’sWeight
Thedefaultweightis65kg,presstheRIGHTbuttontoadjustthe
flashingweightnumberaccordingtorider’sweight,pressLEFT
buttontoconfirmandadvance.Weightranges:20~150kg.Pressthe
LEFTbuttontoenterintoMaintenanceAlertsetting.
SettingMaintenanceAlert
WhilethedefaultMaintenanceAlertdigit200km/m
isflashing,PresstheRIGHTbuttontochoose
200/400/600/800km/m.
PresstheLEFTbuttonto
confirmandenterintoClockmode.(Whenthe
ODO>theMaintenanceAlertdigityouset,the
willappearonthescreentoalerttherider,
presstheLEFTbuttontocancelit.)
CLKMode(12H/24H)
InCLOCKMode,presstheLEFTbuttonfor3
secondstoenter12/24Hselection.Re-pressthe
LEFTbuttonfor12/24exchanging.Pressthe
RIGHTbuttontoenterHoursettingmode,when
thefigureindicatingHOURstarttoflash,pressthe
LEFTbuttontoadjustit.
ContinuetopresstheRIGHTbuttontoenterMinutesettingmode,
whenthefigureindicatingMINUTEstarttoflash,presstheLEFT
buttontoadjustitandRIGHTbuttontoconfirm,re-pressRIGHT
buttonto
enterODOmode.
SettingtheLastvalueofOdometer
InODOmode,presstheLEFTbuttonfor2
secondstosettheODOvalue,itsinitial
valueis0000.0.whenonefigureflashing,
pressRIGHTbuttontoadjustitandLEFT
buttontoconfirmit,andstarttosetthe
nextfigure.(afterre-installthebattery,
latestvaluecanbeinputtedaccordingtothevalueexists
beforethebatteryisre-installed).
ResetofMileageParameter
InODOmode,PressandholdbothRIGHTandLEFTbutton
simultaneouslyfor3secondstoclearthecircumferencevalueand
cancel(km/m)&MaintenanceAlertsetting.Theuserneedtoreset
thetyrecircumference,(km/m)&MaintenanceAlert,theoriginal
ODOvalueandCLOCKwillremainunaffected.
Speedometer
Whenridingspeedisshownallthetimeonthescreen,itranges:0-
99.9km/h(m/h),anditisaccurateto+/-0.1km/h(m/h).
SpeedComparator
Duringriding,¡øand¨‹willdispalyonthescreen,¡øindicatesthe
currentspeedishigherthanaveragespeed.¨‹indicatesthecurrent
speedislowerthanaveragespeed.
Odometer
InODOmode,thetotaldistanceisindicated
onthescreen,itsmileageranges:0.001
99999km(m).Thedisplaywillbebackto0
whenvalueexceedsitsmaximumlimit,press
theRIGHTbuttontoenterDSTmode.
TripDistance(DST)
InDSTmode,thedistanceforonetripis
indicatedonthescreen.Thisdistanceisstartto
becalculatedwhenDSTbeclearedto0.It
ranges:0~9999km(m),whenexceedtherangelimit,itwillrestart
from0automatically.InDSTmode,pressLEFTbuttonfor5seconds
tocleartheDST,MXS,AVS,TMrecords.PresstheRIGHTbuttonto
enterintoMXSmode.
MaximumSpeed(MXS)
InMXSmode,maximumspeedisindicatedon
thebottomline.PresstheLEFTbuttonfor5
secondstocleartherecordsofMXS,DST,AVS
andTM.PresstheRIGHTbuttontoenterAVS
mode.
AverageSpeed
InAVSmode,theaveragespeedforone
tripisindicatedonthescreen.Pressthe
LEFTbuttonfor5secondstoclearthe
AVS,DST,MXS,TMrecords.Pressthe
RIGHTbuttontoenterIntoTMmode.
TripTime
InTMmode,thetriptimeforonetripis
indicatedonthescreen.TMranges:
0:00:00~9:59:59,restartfrom0:00:00when
itexceedtherangelimit.InTMmode,press
theLEFTbuttonfor5secondstocleartheTM,DST,MXS,AVS
records.PresstheRIGHTbuttontoenterinto TMPmode.
Temperature(TMP)
In TMPmode,thecurrentoutdoor
temperatureisindicatedonthescreen.
MinimumTemperature(MIN TMP)
MaximumTemperature(MAX TMP)
Thedefaultdisplayfor TMPis
--
buttonfor5secondstoclear TMPMINMAX,DST,MXS,AVS.
PresstheRIGHTbuttontoenterintoCAL
mode.
CAL(Calory)
InCALmode,thetotalheatenergytherider
consumediscalculatedfromthelast
restorationofthecomputerisindicatedonthe
screen.Itranges:0~99999Kcal.PresstheRIGHTbuttontoenterinto
FATmode.
FAT
InFATmode,thetotalFATtherider
consumediscalculatedfromthelast
restorationofthecomputerisindicatedonthescreen.Itranges:
0~9999.9kg.PresstheRIGHTbuttontoenterintoScanmode.
SCAN
InSCANmode,theDST,MXS,AVS,TMare
indicatedinturnevery4seconds.Pressthe
RIGHTbuttontoenterintoCLKmode.
MenuHideFunction
InanymodeexceptCLKmode,presstheRIGHTbuttonfor
5seconds,thecomputerisgoingtoMenuhidemode,it
hidesMIN TMP,MAX TMP,CAL&FAT,whichwillnot
beindicatedonthescreenbutstillrunningwithouteffect.
AlsoinanymodeexceptCLKmode,presstheRIGHT
buttonfor5secondsagain,thesefunctionsareresumed.
SleepMode
Ifnosignalhasbeeninputtedfor300seconds,computer
willenterintoSleepmode,CLKremains.Itwillturnbackto
theformermodewithallthedatacollectedwhenanysignal
isinputtedoranybuttonispressed.
FREEZEFRAMEMEMORY
Inanymode,presstheLEFTbuttontoenterintoFreeze
Framememorymode,flashingTMdatawillappearonthe
screen,presstheRIGHTbuttontoviewtherecordsofDST,TM,AVS
andMXS.PresstheLEFTbuttontoendit.
BackLight
Thebacklightfunctionisswitchedonoroffwhenyoupressany
buttonduringPM:18
00800.Itwillnotworkatanyothertime.
LowPowerReminding
Whenthebatteryislowpower,thesymbolwillbeshining,
Whichremindstheridertochangeintoanewbattery.
Malfunctionsandproblems
Accessories
Malfunctionsproblems
NospeedometerImpropermagnet/sensoralignment
Inaccuratevalueis
indicated
Improperinput,suchaswheel
circumference.
Slowdisplay
response
Temperatureexceedsoperating
limits(
~5)
Blackdisplay
Toolongtimeinsunlight,should
takebacktoshadeforaperiod.
WeakdisplayPoorbatteryordeadbattery
Displaysirregular
figures
Takebatteryoutandreinstallit
after10seconds.
Abnormalsound
whenshaking
computer
RollingBallswitchvoice/shaking
thecomputerinsleepmode,
computerautoon.
Product specificaties
| Merk: | Sunding |
| Categorie: | Fietscomputer |
| Model: | SD-201C |
Heb je hulp nodig?
Als je hulp nodig hebt met Sunding SD-201C stel dan hieronder een vraag en andere gebruikers zullen je antwoorden
Handleiding Fietscomputer Sunding

25 Augustus 2025
22 April 2025
22 April 2025
8 Juli 2023
7 Juli 2023
6 Juli 2023
5 Juli 2023
5 Juli 2023
4 Juli 2023
3 Juli 2023
Handleiding Fietscomputer
Nieuwste handleidingen voor Fietscomputer
23 Juli 2026
20 Juli 2026
14 Juni 2026
15 Mei 2026
11 Mei 2026
16 Maart 2026
15 Maart 2026
14 Maart 2026
5 December 2025
23 September 2025