Sunding JOY-587A Handleiding
Sunding Fietscomputer JOY-587A
Bekijk gratis de handleiding van Sunding JOY-587A (1 pagina’s), behorend tot de categorie Fietscomputer. Deze gids werd als nuttig beoordeeld door 6 mensen en kreeg gemiddeld 4.7 sterren uit 5 reviews. Heb je een vraag over Sunding JOY-587A of wil je andere gebruikers van dit product iets vragen? Stel een vraag
Pagina 1/1
CLK Mode(12H/24H)
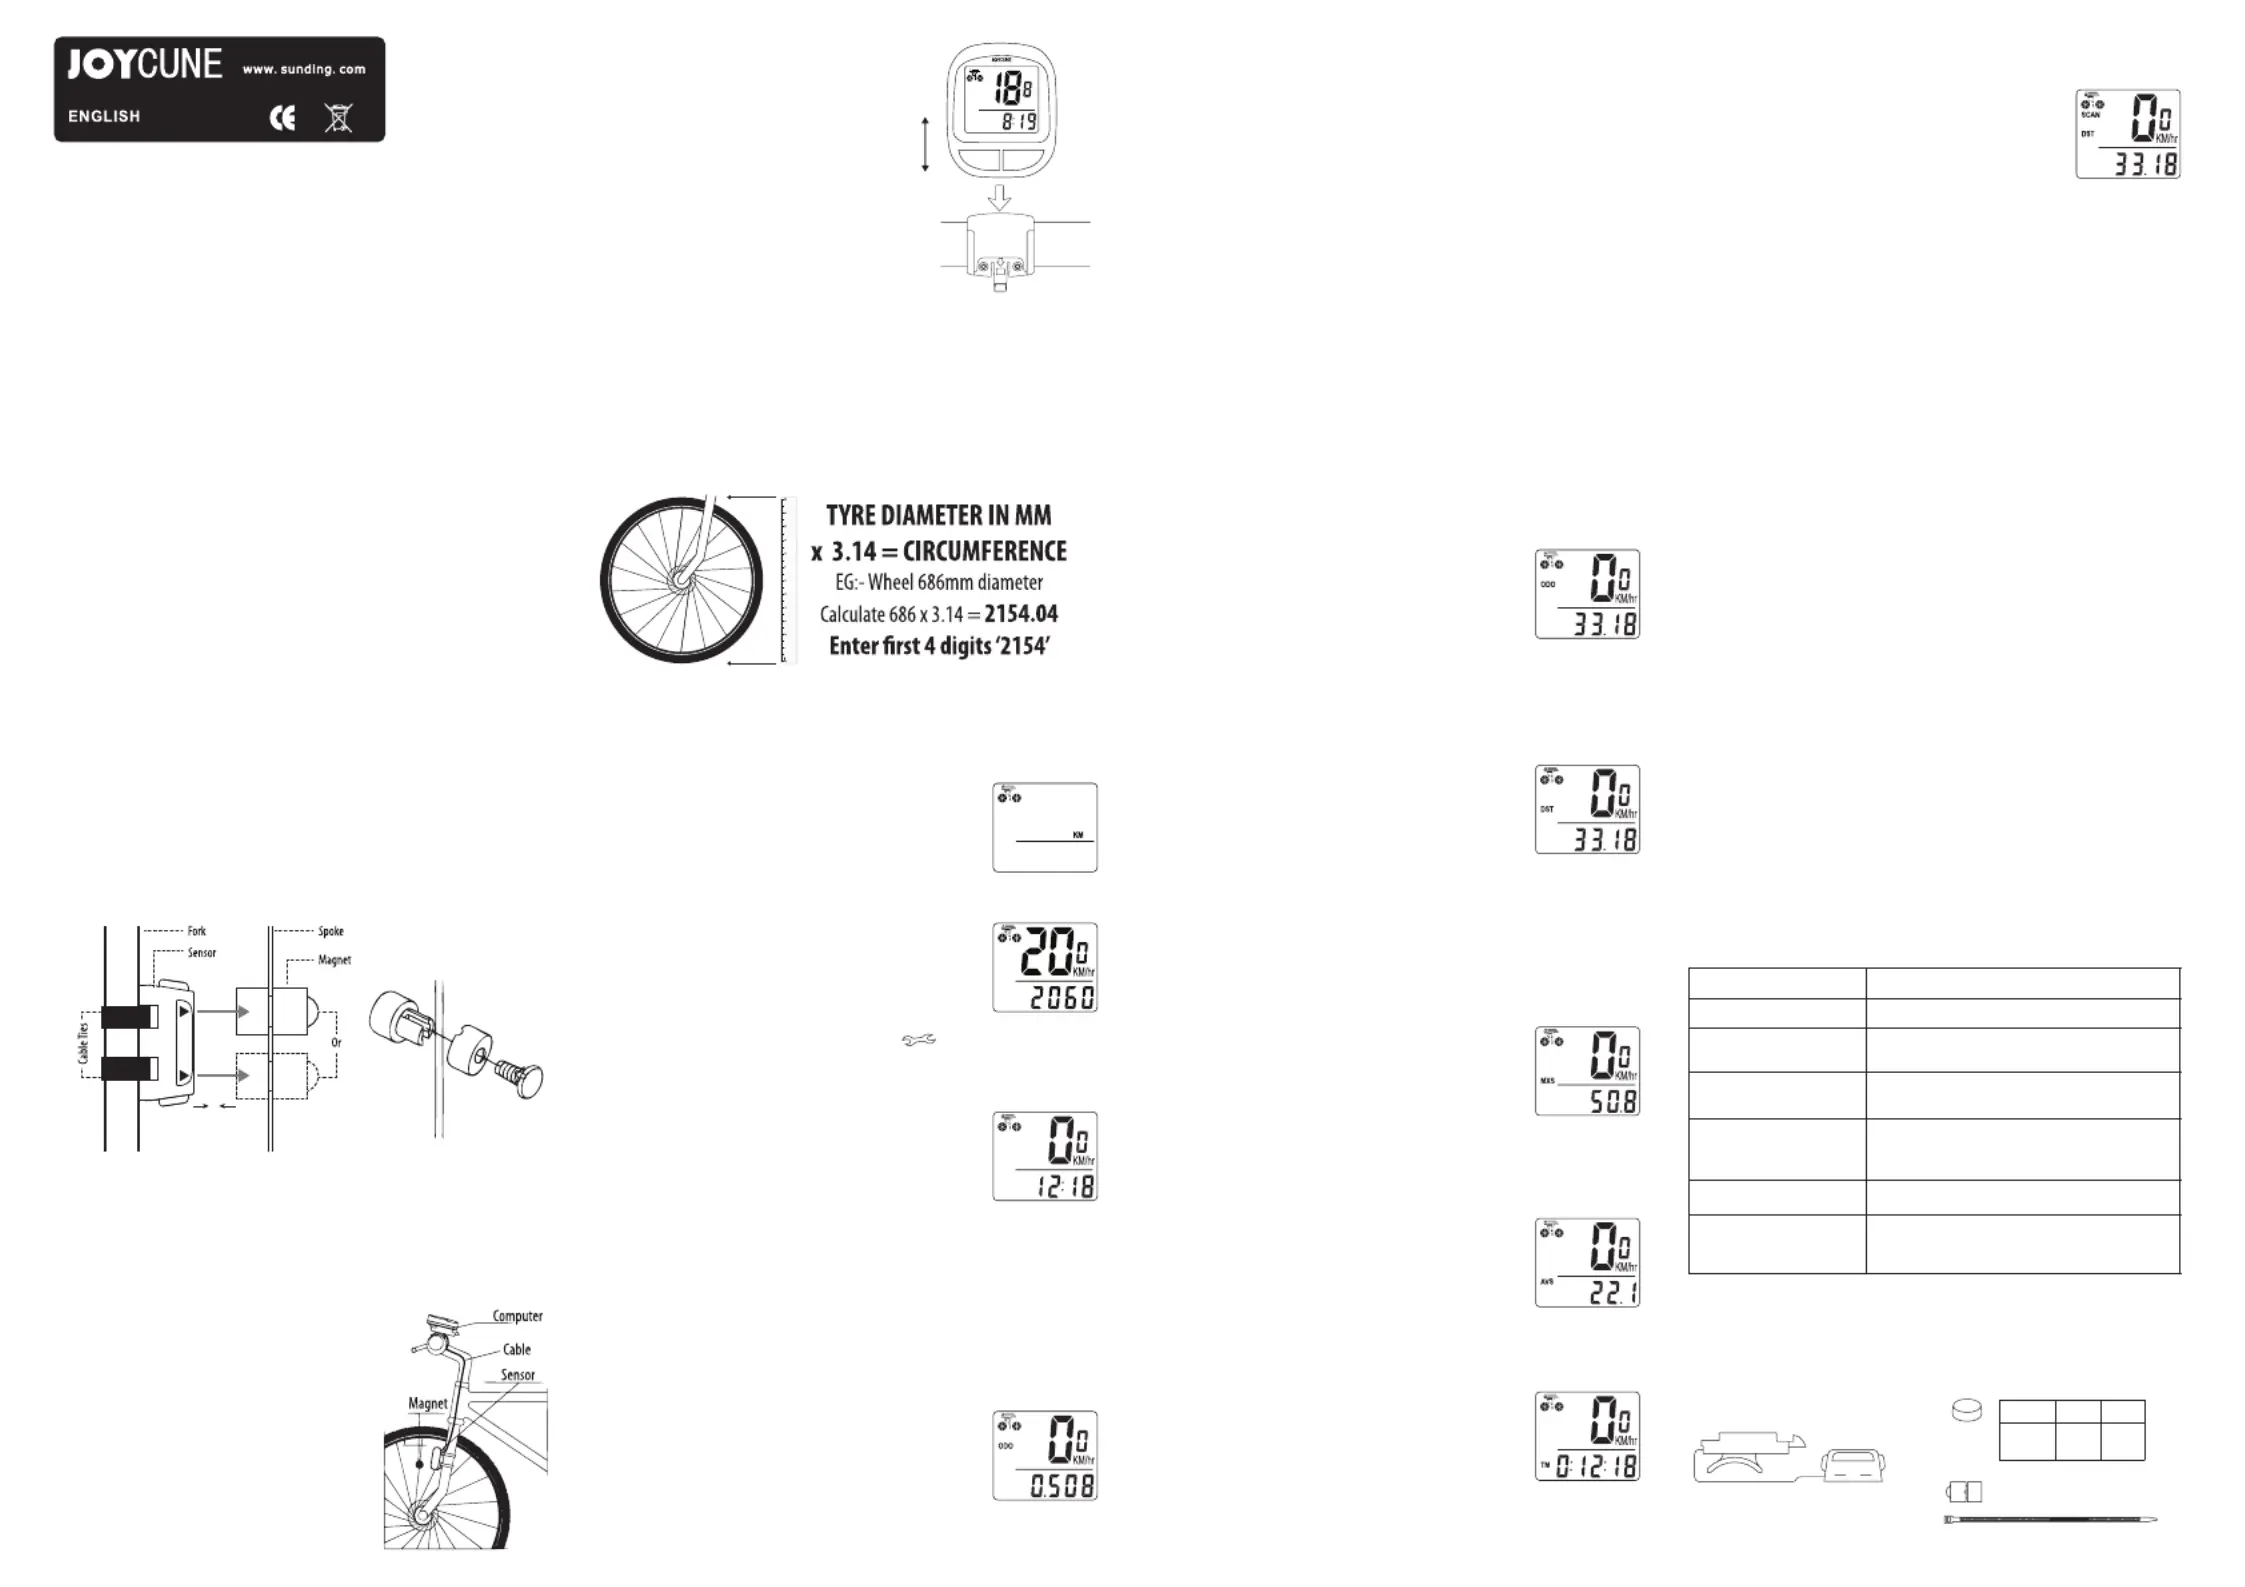
Mounting Shoe
Sensor Wiring
Computer Battery Installation
While the default Maintenance Alert digit
200RIGHTkm/m is flashing, Press the button
to choosekm/m. Press the 200/400/600/800
left button to confirm and enter into Clock mode. (when the ODO
the Maintenance Alert digit you set, the will appear on
the screen to alert the rider, press theRIGHT button seconds 3
to cancel it.)
SPD CURRENTSPEED
ODOODOMETER (0.001~99999km/m)
DST TRIPDISTANCE
MXS MAXIMUMSPEED
AVSAVERAGESPEED
TM ELAPSEDTIME
CLKCLOCK (12H/24H)
SCAN
“-” “+” COMPARATOR
SETTINGSPEEDSCALE ,(km/hm/h)
SETTINGTYRECIRCUMFERENCE (0mm~9999mm)
SETTINGTHELASTVALUEOFODOMETER /ODO
MAINTENANCEALERT
FREEZEFRAMEMEMORY
AUTOONOFF/
15 function cycle computer
Instruction Manual
FUNCTIONS
Remove the battery cover from the bottom of the computer by using a
flat blade screwdriver, install battery with the positive (+) pole facing the
battery cover and replace the cover. Should the LCD show irregular
figures, take out the battery and reinstall it.
Speedometer Sensor
Attach the sensor transmitter to either front fork using the supplied cable
ties. Fit the magnet to a spoke using the diagram above as a guide.
Position the sensor & magnet as shown above. Take care to align the
magnet to either arrow on the sensor with 3~5 mm gap in between.
Route the sensor wire up the fork blade,
using the cable ties to secure it. Make
sure it does not hinder the movement
of the front wheel.
Attach the mounting shoe with the cable ties
to the handlebars as shown in the diagram.
Attach the computer to the mounting shoe
by sliding the unit until it snaps firmly into position.
To remove, press down on the release catch, and
remove the computer. To check for proper speed
function and sensor alignment, spin the front wheel with the computer in
speed mode. Adjust the position of sensor and magnet if there is on or
weak signal.
Computer
Wheel Size Input
‘’ appears on the screed when the battery has been installed, with 2060
one figure flashing enter the wheel circumference using the formula below.
In the example above you would enter . Press the button to 2198RIGHT
advance the digits as needed and the button to confirm and LEFT
advance. (The circumference ranges 0mm~9999mm), press the LEFT
button to enter mode.KM/M
Setting(km/h)/(m/h)
Press the button to choose or .RIGHTkm/hm/h
Press the button to enter mode.LEFTCLOCK
Setting Maintenance alert
In mode, press the button for seconds to ODOLEFT2
set the value. The initial value is . when ODO0000.0
one figure flashes, press the button to adjust it, RIGHT
and the LEFT button to confirm and start to set the
next figure. NOTE: Before re-installing the battery, take a note of your
mileage and then re-enter the value once the battery is replaced.
In CLOCK Mode, press the button for seconds LEFT3
to enter 12/24H selection. Press once more to swap between 12/24 hours.
Press the RIGHT button to enter the Hour mode, when the figure indicating
HOUR starts to flash, press the LEFT button to adjust it. Continue to press
the RIGHT button to enter the Minute mode, when the figure indicating
MINUTE starts to flash, press the button to adjust. Press the LEFTRIGHT
button to confirm & press the RIGHT button again to switch to mode. ODO
Setting the Last value of Odometer
JOY-587A
3~5mm
KM/hr
SET MODE JOY-587
NO
OFF
Accessories
Malfunctions and Problems
Button Instruction
Freeze Frame Memory
Sleep Mode
Trip Time
Average Speed
Maximum Speed (MXS)
Reset of Mileage Parameter
In mode, press and hold both the and buttons ODORIGHTLEFT
simultaneously for seconds to clear the tyre circumference and (km/m) 3
settings. The clock settings will remain unchanged.
Speedometer
In mode, the total distance is indicated ODO
on-screen.
The mileage range is ~ km(m). The 0.00199999
display will return to when the value exceeds its 0
maximum limit, press the button to enter mode.RIGHTDST
Speed is shown at all times on-screen, its maximum reading is
99.90.1km/h(m/h), and is accurate to +/- km/h (m/h).
Speed Comparator
During riding, ‘’ and ‘’ indicates the current speed is higher or lower +-
than the average speed (AVS).
Odometer
Trip Distance (DST)
In mode, the distance for one trip is indicated DST
on the bottom line. ranges from km(m).DST0~9999
When the value exceed the range limit, it resets to 0
automatically. Both the time and the distance records
will be cleared when the time of one trip exceed the range limits.
Press the button for seconds to clear the records of , ,LEFT5DSTMXS
AVS TMand .
Press the button to enter mode.RIGHTMXS
In mode, maximum speed is indicated on the MXS
bottom line. Press the button for seconds to LEFT5
clear the records of, , MXSDSTAVSTM and .
In AVS mode, average speed is indicated on the
bottom line. Press the button for seconds to LEFT5
clear the records of AVS DSTMXS TM,, and .
Press the right button to enter mode.TM
In mode, trip time is indicated on the bottom line.TM
TM ranges from to , and will be reset 0:00:0099:59:59
to when the value exceed the limit.0
Press the button for seconds to clear the records of ,, LEFT5TM DST
MXSAVS and .
Press the button to enter mode.RIGHTSCAN
Scan
In mode ,, , SCANDSTMXSAVSTM and modes are
indicated in turn every seconds.4
Press the button to enter Mode.RIGHTCLOCK
If no signal has been received for seconds, the computer will enter 300
into Sleep Mode, the value remains stored. It will turn back to the CLK
previous mode with all the data collected when the signal is received again
or any button is pressed.
Press the button at any time to enter into freeze frame memory LEFT
mode. Flashing data will appear on the screen. Press the TMRIGHT
button to view the records of, , DSTMXSAVSTM. and
Press the button to choose any mode below : , , , RIGHTODODSTMXS
AVSTM SCANDSTMXSAVSTMCLOCK, , (, , & ) and . It is not necessary
to press the button except to select the Freeze frame Memory LEFT
mode.
In Freeze Frame Memory mode, press the button, data will be RIGHT
displayed, press button once more to return back to other modes.LEFT
Malfunction
Problems
No speedometer
Incorrect magnet / sensor alignment.
Inaccurate value is
indicated
Improper input, such as wheel
circumference.
Slow display response
Temperature exceeds operating limits
(0°C~55°C).
Black display
Temperature too high, or placed in direct
sunlight for too long. Let the unit cool
down.
Weak display
Poor battery contact or dead battery.
Display shows irregular
figures
Take out battery and re-install after 10
seconds.
Sensor Transmitter
Mounting Shoe
Cable Ties
Wheel Magnet
Model
548B
581A
Battery
15V.
AG13
AG10
Product specificaties
| Merk: | Sunding |
| Categorie: | Fietscomputer |
| Model: | JOY-587A |
Heb je hulp nodig?
Als je hulp nodig hebt met Sunding JOY-587A stel dan hieronder een vraag en andere gebruikers zullen je antwoorden
Handleiding Fietscomputer Sunding

25 Augustus 2025
22 April 2025
22 April 2025
8 Juli 2023
7 Juli 2023
6 Juli 2023
5 Juli 2023
5 Juli 2023
4 Juli 2023
3 Juli 2023
Handleiding Fietscomputer
Nieuwste handleidingen voor Fietscomputer
23 Juli 2026
20 Juli 2026
14 Juni 2026
15 Mei 2026
11 Mei 2026
16 Maart 2026
15 Maart 2026
14 Maart 2026
5 December 2025
23 September 2025