Sony RM-X2S Handleiding
Sony
Afstandsbediening
RM-X2S
Bekijk gratis de handleiding van Sony RM-X2S (4 pagina’s), behorend tot de categorie Afstandsbediening. Deze gids werd als nuttig beoordeeld door 66 mensen en kreeg gemiddeld 4.8 sterren uit 33.5 reviews. Heb je een vraag over Sony RM-X2S of wil je andere gebruikers van dit product iets vragen? Stel een vraag
Pagina 1/4

3-810-811- (1)11
Rotary
Commander
Operating Instructions
Mode d’emploi
Bedienungsanleitung
Manual de instrucciones
Gebruiksaanwijzing
Bruksanvisning
Istruzioni per l’uso
Manual de instruções
RM-X2S
Sony Corporation 1995 Printed in Thailand
Specifications
Dimensions Approx. 43 83 49 mm (w/× ×
h/d)
(1 3/ 3 4×3/8 1 ×15/ in.)16
Mass Approx. 70 g (2.47 oz.)
Supplied accessories Screws (2)
Mounting hardware (1)
Labels (2)
Cramper (1)
Spécifications
Dimensions Approx. 43 × 83 × 49 mm (l/h/p)
(1 3/ 3 4×3/ 1 8×15/ pouces)16
Masse Approx. 70 g (2,47 onces)
Accessoires fournis Vis (2)
Matériel de montage (1)
Etiquettes (2)
Agrafe (1)
Technische Daten
Abmessungen ca. 43 × × 83 49 mm (B/H/T)
Gewicht ca. 70 g
Mitgeliefertes Zubehör Schrauben (2)
Montageteil (1)
Aufkleber (2)
Klammer (1)
Especificaciones
Dimensiones 43 × 83 × 49 mm. aprox. (an/al/f)
Peso 70 g. aprox.
Accesorios suministrados
Tornillos (2)
Ferretería de montaje (1)
Etiquetas (2)
Fijador de cables (1)
Specificaties
Afmetingen Ong. 43 83 49 mm (b/h/d)× ×
Gewicht Ong. 70 g
Meegeleverde accessoires
Schroeven (2)
Bevestigingselementen (1)
Labels (2)
Klemband (1)
Specifikationer
Mått Ca 43 83 × × 49 mm (b/h/d)
Vikt Ca 70 g
Medföljande tillbehör Skruvar (2)
Monteringsdel (1)
Etiketter (2)
Krampa (1)
Specifiche
Dimensioni Appross. 43 × 83 × 49 mm (l/a/p)
Peso Appross. 70 g
Accessori in dotazione Viti (2)
Staffa di montaggio (1)
Etichette (2)
Morsetto (1)
Especificações
Dimensöes Aprox. 43 × 83 × 49 mm (l/a/p)
Peso Aprox. 70 g
Acessórios fornecidos Parafusos (2)
Material de montagem (1)
Etiquetas (2)
Braçadeira (1)
Supplied Mounting Hardware/
Matériel de montage fourni/
Mitgelieferte Montageteile/
Ferretería de montaje
suministrada/Meegeleverde
montage-accessoires/
Medföljande monteringstillbehör/
Staffa di montaggio in
dotazione/Material de
Montagem Fornecido
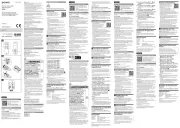
Labels/Etiquettes/Aufkleber/Etiquetas/Labels/Etiketter/Etichette/Etiquetas
Two button name labels are supplied with the rotary
commander. Attach the appropriate label for the installing
position of the rotary commander.
Deux étiquettes d’identification de touche sont fournies avec le
satellite de commande. Apposez l’étiquette correspondant à la
position de montage du satellite de commande.
Mit dem Joystick werden zwei Aufkleber mit Tastennamen
geliefert. Bringen Sie den Aufkleber an, der der
Montageposition des Joystick entspricht.
Se suministran dos etiquetas de nombre de botón con el
mando rotativo. Adhiera la etiqueta adecuada a la posición de
instalación del mando rotativo.
Bij fr bedieningssatelliet worden twee labels geleverd die de
namen van de toetsen aangeven. Bevestig het label dat
overeenstemt met de installatiepositie van de
bedieningssatelliet.
Två etiketter medföljer vridkontrollen. Fäst den etikett som
passar fjärrkontrollens monteringsläge.
Insieme al comando a rotazione vengono fornite due etichette
su cui sono indicate le funzioni dei tasti. Applicare l'etichetta
corrispondente alla posizione di installazione del comando a
rotazione.
Juntamente com o comando rotative são fornecidas dois
etiquetas com a identificação das teclas. Coloque a etiqueta
adequada na posição de instalação do comando rotativo.
A B
× ×2 1
C
×1
SEL
DSPL
MODE
SEL
DSPL
MODE

Emplacement et fonction des
Les touches et les commandes suivantes (à l’exce
Location and Function of Controls
The following buttons and controls (except the SOURCE and MODE button) share
the same functions as those on the master unit or the wireless remote commander.
For more information about the functions of each button or control,
operating instructions of your Sony car audio equipment.
1VOL (volume) control
2SEEK/AMS control
During CD playback:
•AMS function: Locates the beginning of the tracks. Rotate th*
number of times you wish to skip the tracks.
To skip several tracks at once, rotate the control momentarily
Within one second, rotate it again and hold it in this position
track is reached, release.
* Automatic Music Sensor.
•Manual search: Locates the desired part of a track. Rotate the
or right, and keep it in the rotated position until the desired p
During radio reception:
•Automatic tuning: Automatically tunes to a station. When a s
the search stops automatically. Rotate the control momentaril
until a desired station is tuned in.
•Manually searches a station. Rotate the control either left or ri
the rotated position until the desired station is tuned in. If yo
within one second, you can continue manual search for anoth
3DSPL button
Changes the display mode, and sets the time.
4OFF button
Press to turn off the unit.
5MODE button
During Radio reception: Changes the preset groups within the b
Pressing the MODE button changes preset groups in FM and
MW LW.˜
6SOURCE button
Press to select program sources.
7SEL button
Functions in the same way as the SEL button on the master uni
8MUTE button
Press to mute the sound momentarily.
9PRESET/DISC control
Press and rotate the VOL control. (The VOL control and the SEE
turn together.)
During radio reception: Receives the stations memorized on t
buttons on the master unit.
Warm the mounting surface and the double-sided adhesive tape on the mounting hardware to the tempeB
attach the mounting hardware onto the mounting surface by applying even pressure. Then screw it down w
Attach a piece of heavy duty tape etc. on the other side of the mounting surface to cover the protruding tips of the screws so that they will
etc. inside the steering wheel column.
Chauffez la surface de montage et la bande adhésive double face sur le support de montage à une tempéB
support de montage sur la surface de montage en exerçant une pression uniforme. Vissez-la ensuite à l’aide
Collez de la bande adhésive résistante, etc., de l’autre côté de la surface de montage de manière à couvrir l’extrémité saillante des vis de te
contact direct avec les câbles électriques, etc., à l’intérieur de la colonne de direction.
Erwärmen Sie die Montagestelle und das Doppelklebeband an Montageteil auf eineB
Temperatur von 20°C bis 30°C. Befestigen Sie dann das Montageteil auf der Montagefläche,
indem Sie es gleichmäßig andrücken. Dann schrauben Sie es mit den mitgelieferten
Schrauben A an.
Bringen Sie ein Stück sehr festes Klebeband o. ä. an der Gegenseite der Montagefläche an, um die vorstehenden Spitzen der Schrauben abz
Elektrokabel in der Lenkradsäule beschädigen können.
Caliente la superficie de montaje y la cinta adhesiva de doble cara de la ferretería de
montaje a una temperatura entre 20°C y 30°C, y ajuste la ferretería de montaje a laB
superficie de montaje ejerciendo una presión uniforme. A continuación, apriete los tornillos
A suministrados.
Adhiera un trozo de cinta adhesiva resistente, etc. en el otro lado de la superficie de montaje para cubrir los extremos de los tornillos que s
interfieran con los cables de electricidad, etc., del interior de la columna de dirección.
4
Choose the exact location for the rotary commander to be mounted, then clean
the mounting surface.
Dirt or oil impair the adhesive strength of the double-sided adhesive tape.
Choisissez la position de montage exacte du satellite de commande et nettoyez la
surface de montage.
Les souillures et l’huile altèrent le pouvoir adhérent de l’adhésif double face.
Wählen Sie die Stelle aus, an der Sie den Joystick montieren wollen, und reinigen
Sie dann die Montagefläche.
Staub oder Fettspuren beeinträchtigen die Haftung des doppelseitigen Klebebandes.
Una vez elegido el lugar de montaje del mando rotativo, limpie previamente la
superficie de montaje.
La suciedad o la grasa dañan la intensidad adhesiva de la tira adhesiva por las dos caras.
1
A
B
Installation
Notes
•Choose the mounting location carefully so that the rotary commander will not
operating the car.
•Do not install the rotary commander in a place where it may jeopardize the saf
passenger in anyway.
•When installing the rotary commander, be sure not to damage the electrical ca
side of the mounting surface.
•Avoid installing the rotary commander where it may be subject to high temper
direct sunlight or hot air from the heater etc.
Example of a mounting location/Exemple de
montage/Beispiel für die Montage/Ejemplo de un
lugar de montaje
SEL
MUTE
SEEK
AMS
VOL
PRESET
DISC
SOURCE
MODE
DSPL
Note on Operative Directions of the Rotary Commander Contr
Assuming the rotary commander to be installed on the left of the
column, the operative directions of the VOL, SEEK/AMS and PRE
controls were factory-set so that turning left corresponds to the +
the installation position should require it, the operative direction
PRESET/DISC and SEEK/AMS controls can be reversed. To rever
SEL button for at least two seconds while pressing on the VOL co
(Pressing the reset button on the master unit will restore the origi
When the POWER SELECT switch on the master unit is set to pos
can turn on the master unit by pressing the SOURCE button on th
commander.

Positie en functie van de bedieningselementen
De volgende toetsen en bedieningselementen (behalve de SOURCE en MODE toets)
hebben dezelfde functie als die op het hoofdtoestel of de draadloze
afstandsbediening.
Meer informatie over de functies van elke toets of regeling vindt u i
van uw Sony car audio-apparatuur.
1VOL (volume) regeling
2SEEK/AMS-regeling.
Tijdens CD-weergave:
• AMS* functie: om het begin van een nummer te zoeken. Draa
u nummers wilt overslaan.
Om meerdere nummers ineens over te slaan, draait u even aa
u hem dan los. Draai er binnen de seconde opnieuw aan en ho
stand. Wanneer het gewenste nummer is bereikt, laat u hem l
* Automatic Music Sensor
• Manueel zoeken: om de gewenste passage van een nummer te
regelaar naar links of naar rechts tot u de gewenste passage h
Tijdens radio-ontvangst:
• Automatisch afstemmen: om automatisch af te stemmen op e
Wanneer op een zender is afgestemd, stopt het zoeken autom
enkele malen aan de knop tot de gewenste zender wordt ontv
• Om manueel een zender te zoeken. Draai de regelaar naar link
en hou hem in die stand tot de gewenste zender wordt ontva
binnen de seconde opnieuw draait, kunt u manueel naar een
blijven zoeken.
3DSPL-toets
om te wisselen van display mode en de tijd in te stellen.
4OFF-toets
Indrukken om het toestel uit te schakelen.
5MODE toets
Tijdens radio-ontvangst: Om de vooringestelde groepen binnen
band te wijzigen.
Door op de toets MODE te drukken verandert u de vooringes
FM en schakelt u over van MW naar LW en omgekeerd.
6SOURCE-toets
Indrukken om een programmabron te kiezen.
7SEL-toets
Werkt op dezelfde manier als de SEL-toets op het hoofdtoestel.
8MUTE-toets
Indrukken om het geluid tijdelijk uit te schakelen.
9PRESET/DISC-regeling
VOL-regelaar indrukken en verdraaien. (De VOL-knop en de SE
draaien samen.)
Tijdens radio-ontvangst: om zenders te ontvangen die zijn op
voorkeuzetoetsen op het hoofdtoestel.
Kontrollernas placering och f
Följande knappar och kontroller (förutom SOUR
samma funktioner som motsvarande knappar oc
4
1Kies de exacte installatieplaats voor de bedieningssatelliet en maak vervolgens
het montagevlak schoon.
Vuil of vet tasten het kleefvermogen van de dubbelzijdige kleefband aan.
Välj var du vill montera vridkontrollen och rengör ytan.
Smuts eller olja minskar den dubbelsidiga tejpens fästförmåga.
Scegliere la posizione esatta di montaggio del comando, quindi pulire la superficie
di montaggio.
La sporcizia o l’unto possono pregiudicare la tenuta del nastro biadesivo.
Escolha o local exacto onde deseja montar o comando rotativo e depois limpe a
superfície de montagem.
A sujidade ou o óleo enfraguecem as capacidades adesivas da fita adesiva dupla.
Warm het montagevlak en de dubbelzijdige kleefband op het montage-accessoire op tot 20 à 30°C en bevB
door gelijkmatige druk uit te oefenen. Schroef het vervolgens vast met de meegeleverde schroeven .A
Breng een stuk sterke kleefband of dergelijke aan op de andere kant van het bevestigingsvlak om te voorkomen dat de uitstekende schroefpu
bedrading en dergelijke binnenin de stuurkolom.
Värm monteringsytan och den dubbelsidiga tejpen på monteringsdelen till mellan 20°C och 30°C och tryckB
sedan fast den med de två medföljande skruvarna .A
Använd maskeringstejp för att täcka över skruvspetsarna på monteringsytans baksida så att de inte skaver mot elkablar eller liknande inn
Riscaldare la superficie di montaggio e il nastro biadesivo sulla staffa di montaggio B ad una temperatura co
applicare la staffa di montaggio alla superficie di montaggio applicando una leggera pressione. Quindi avvita
Applicare una striscia di nastro adesivo pesante sull’altro lato della superficie di montaggio in modo da coprire la punta sporgente delle v
cavi elettrici all’interno della colonna del volante.
Aqueça a superfície de montagem e a fita adesiva dupla do material de montagem até uma temperatura dB
material de montagem na superfície de montagem exercendo uma pressão uniforme. Em seguida, fixe-o com
Coloque um pouco de fita adesiva, etc. no outro lado da superfície de montagem para tapar as protuberâncias dos parafusos, de forma a qu
eléctricos, etc., localizados no interior da coluna da direcção.
Installatie
Opmerkingen
• Ga zorgvuldig tewerk bij het kiezen van een geschikte montagepositie zodat de
nooit hindert bij het rijden.
• Installeer de bedieningssatelliet nooit op een plaats waar hij de veiligheid van
gevaar kan brengen.
• Bij het installeren van de bedieningssatelliet moet u erop letten dat u de elektri
dergelijke aan de andere kant van het montagevlak niet beschadigt.
• Installeer de bedieningssatelliet niet op plaatsen waar hij blootstaat aan hoge t
bijvoorbeeld door rechtstreekse zonnestraling of warme lucht afkomstig van de
Montagevoorbeeld/Montering/Esempio di
posizione di montaggio/Exemplo de um local para
montagem
A
B
SEL
MUTE
SEEK
AMS
VOL
PRESET
DISC
SOURCE
MODE
DSPL
Opmerking betreffende de werkingszin van de bedieningssatel
Wanneer de bedieningssatelliet links van de stuurkolom wordt geïn
VOL, SEEK/AMS en PRESET/DISC regelingen af fabriek zo ingeste
draaien overeenkomt met de + richting ( ). Indien de montageposiA
de werkingszin van de VOL-, PRESET/DISC- en SEEK/AMS-regela
omgekeerd. Hiervoor moet u de SEL-toets langer dan twee seconde
houden en tegelijkertijd de VOL-regelaar indrukken ( ). (Door de teB
het hoofdtoestel in te drukken, wordt de originele instelling herstel
Wanneer de POWER SELECT-schakelaar op het hoofdtoestel in st
kunt u het hoofdtoestel aanzetten door de SOURCE-toets op de
bedieningssatelliet in te drukken.
Product specificaties
| Merk: | Sony |
| Categorie: | Afstandsbediening |
| Model: | RM-X2S |
Heb je hulp nodig?
Als je hulp nodig hebt met Sony RM-X2S stel dan hieronder een vraag en andere gebruikers zullen je antwoorden
Handleiding Afstandsbediening Sony
4 Juli 2025
26 April 2024

26 April 2024

26 April 2024
26 April 2024

26 April 2024

26 April 2024
26 April 2024

26 April 2024
26 April 2024
Handleiding Afstandsbediening
- Hunter
- Philips
- Fantini Cosmi
- Electia
- Ranex
- Amewi
- Xavax
- BeamZ
- Beoplay
- Amazon
- Bang And Olufsen
- Hager
- AXIL
- EVE
- Trust
Nieuwste handleidingen voor Afstandsbediening
15 September 2025
8 September 2025
8 September 2025
1 September 2025

1 September 2025
1 September 2025
1 September 2025

31 Augustus 2025
19 Augustus 2025
18 Augustus 2025