Sony PCWA-A220 Handleiding
Sony Overige computer accessoire PCWA-A220
Bekijk gratis de handleiding van Sony PCWA-A220 (4 pagina’s), behorend tot de categorie Overige computer accessoire. Deze gids werd als nuttig beoordeeld door 86 mensen en kreeg gemiddeld 4.3 sterren uit 3 reviews. Heb je een vraag over Sony PCWA-A220 of wil je andere gebruikers van dit product iets vragen? Stel een vraag
Pagina 1/4
4-666-352- (1)11
Sony Corporation © 2002 Printed in Japan
PCWA-A220 What to do if...
Troubleshooting Guide
This document provides solutions to the most common problems users
have with their Access Points.
Please refer to this guide before contacting Sony Customer Information
Services.
Case 1
Scan Utility does not start. Or Access Point cannot be found with Scan Utility
1Did you wait long enough?
Occasionally, searching for the Access Point can take up to 30 seconds. Start Scan Utility, or click the “Scan” button, wait 30 seconds, and then confirm that the Access
Point has been detected.
2Did you connect the Access Point to the power outlet?
The Access Point’s “POWER” indicator lights when the Access Point is connected to a power outlet.
3Did you remove or insert the wireless LAN PC card while Scan Utility was starting up?
Start Scan Utility with the wireless LAN PC card inserted.
4Is the Windows XP Internet Connection Firewall function enabled?
If the Internet Connection Firewall function is enabled, communication may not be possible. Follow the procedure below to check or change the settings.
1Click the “Start” button, point to “Connect To,” and click “Show all connections.”
2Right-click the Wireless Network Connection icon to be connected, and click “Properties.”
3Click the “Advanced” tab and (if selected) deselect the “Protect my computer and network by limiting or preventing access to
this computer from the Internet” check box.
4Click “OK.”
z Hint
Refer to Windows XP Online Help for details about the Internet Connection Firewall.
Note
Take appropriate precautions to ensure security when the “Internet Connection Firewall” function is disabled. Except when configuring the Access Point, it is
strongly recommended that you enable the Internet Connection Firewall function at all times.
5If the above action does not remedy the problem, refer to “Case 2: The computer cannot communicate with the Access
Point.”
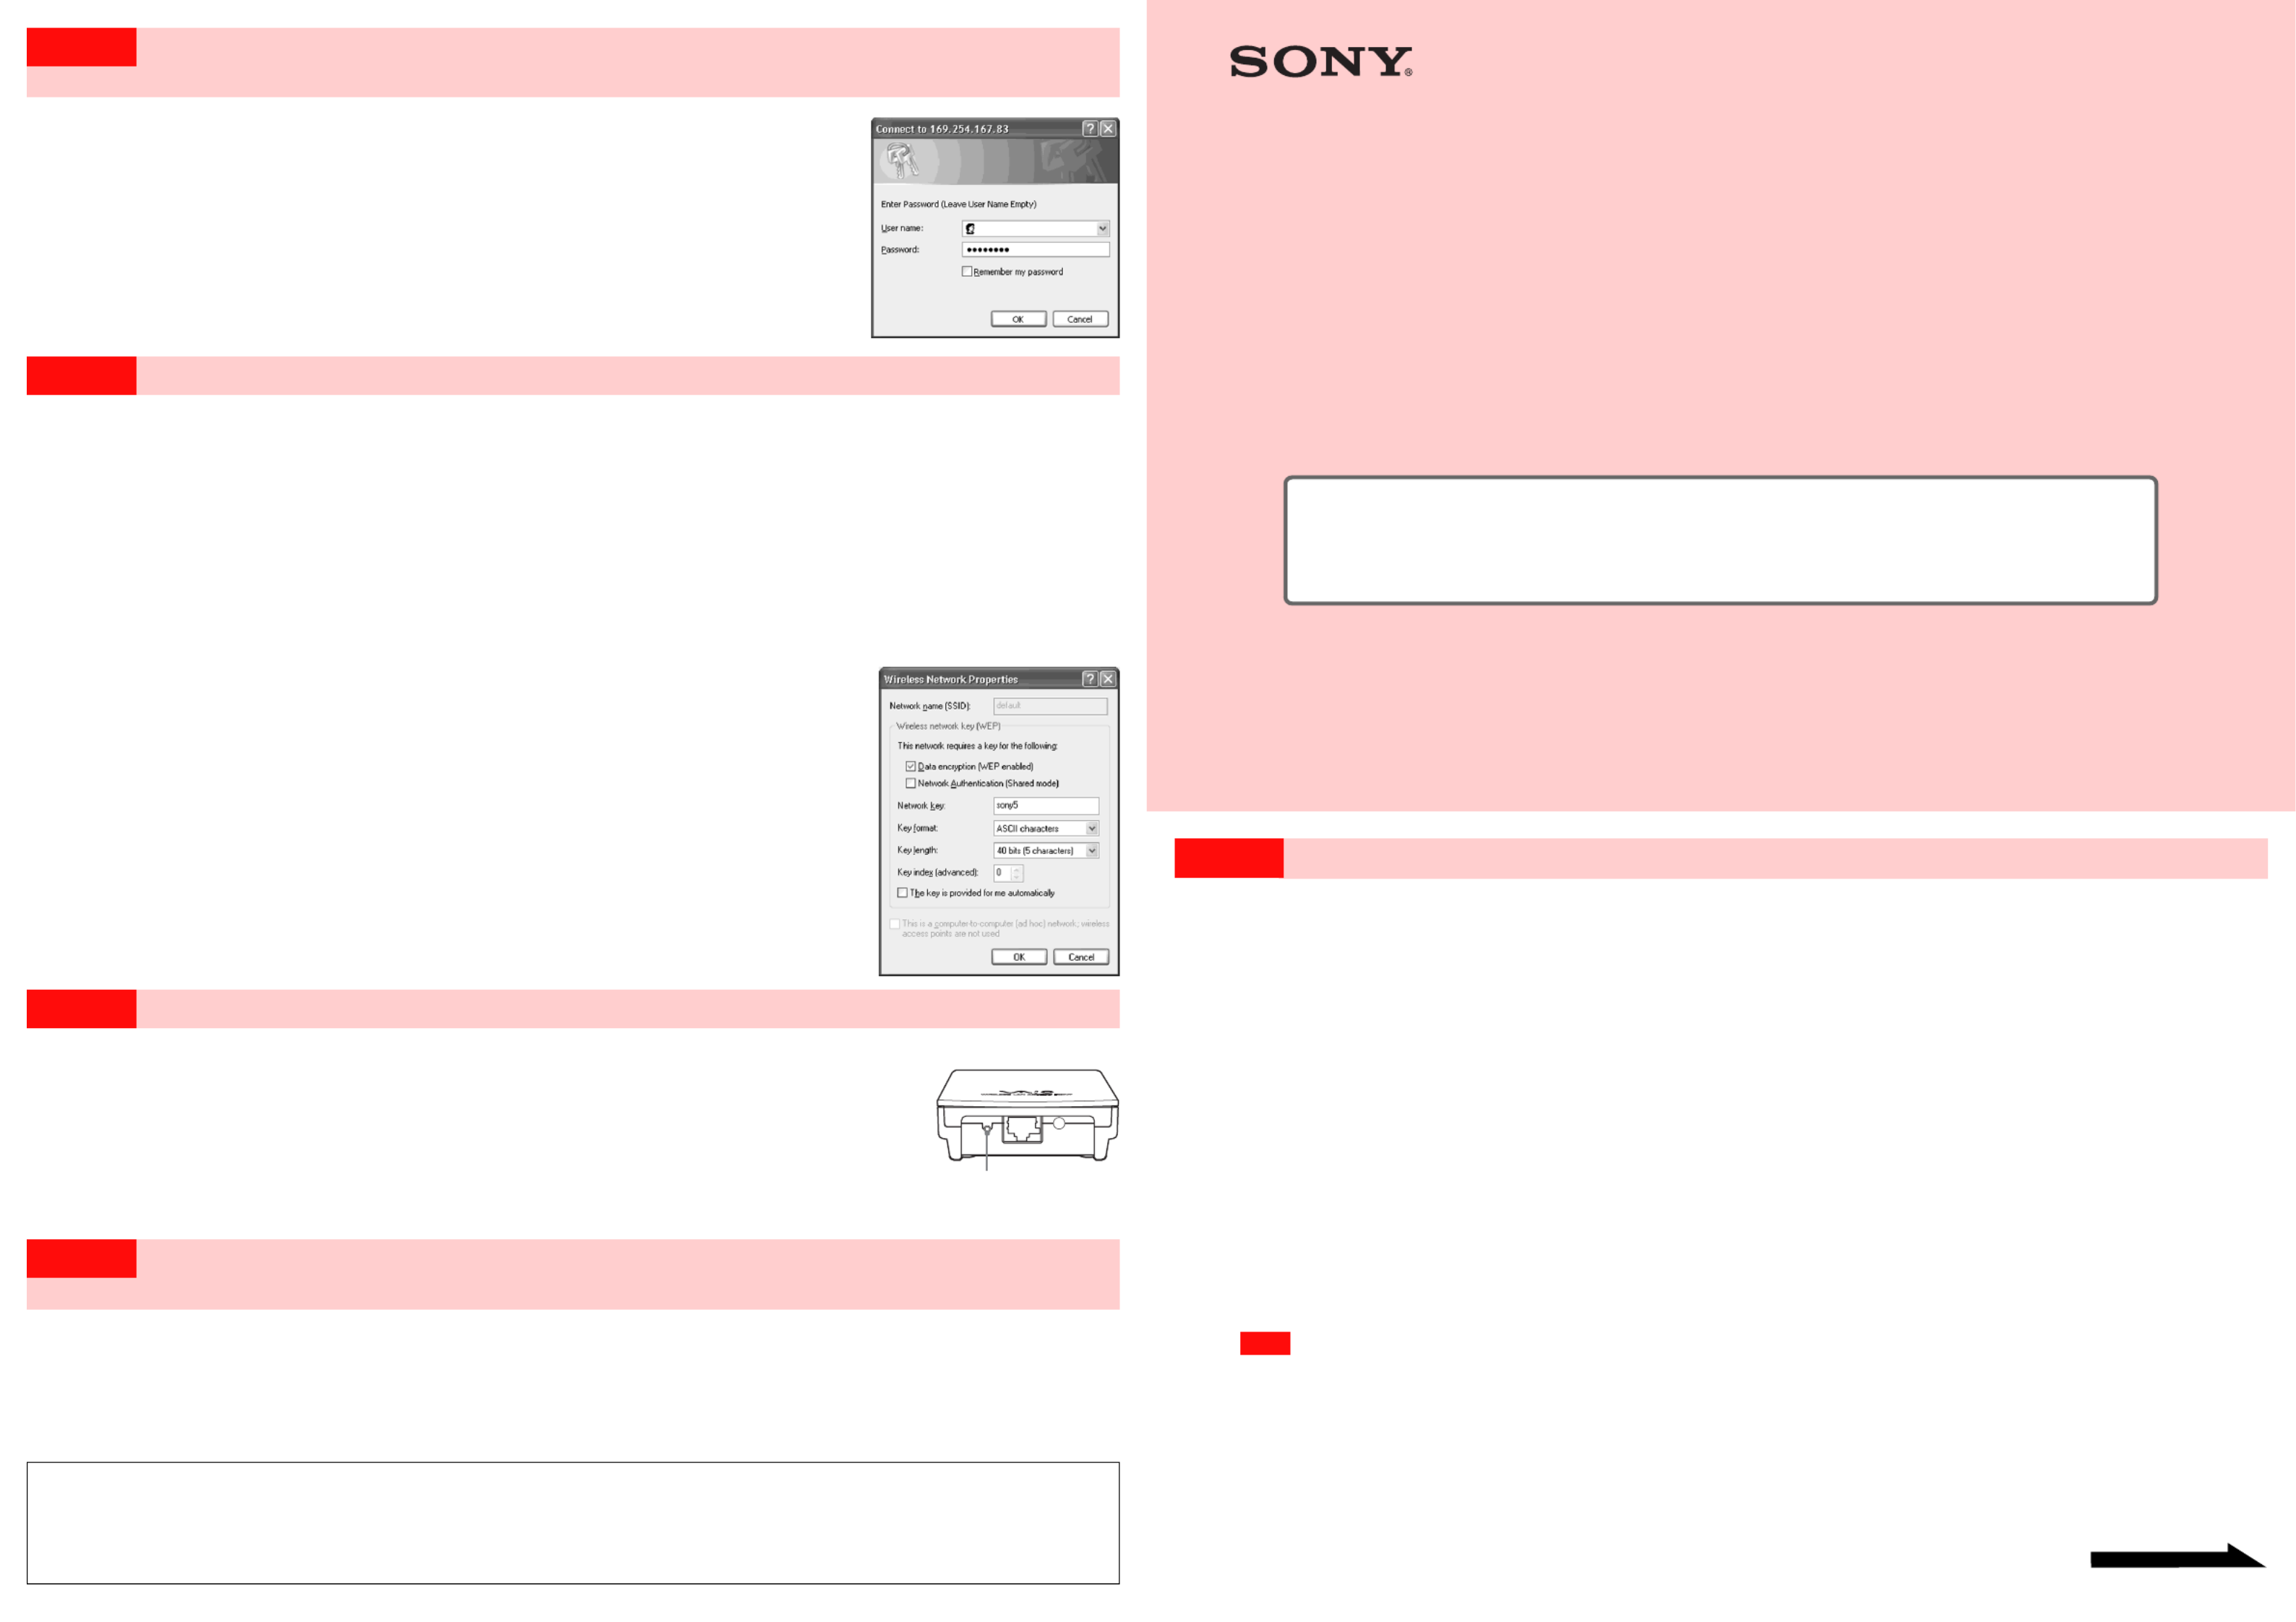
Case 5A window with the “User Name” field appears when configuring the
Access Point, but I don’t know what to enter
You do not need to enter a user name. In the Password field appearing in the same screen, enter the Administrator Password of
the administrator who configured the Access Point. (The example shows the screen for Internet Explorer 5 running on
Windows XP. The screen appearance differs depending on the operating system you are using.)
Case 6Connection is not possible after completing the configuration
1Did you complete procedures 1 through 6 of the Quick Start Guide?
Refer to the procedure described in “Case 7: Forgot Settings” to reset the Access Point to its factory default settings, and then redo procedures 1 through 6 described in the
Quick Start Guide.
2After configuring “Wireless Settings” in steps 12-14 of procedure 5 in the Quick Start Guide, did you also configure the
computer to match the settings?
With Windows 98 SE, Windows Me or Windows 2000, refer to the instruction manual provided with the wireless LAN PC card you are using, and change the computer
settings so that they match the Access Point settings. With Windows XP, follow the procedure below to change the computer settings.
1Perform steps 1-2 of under “Case 2: The computer cannot communicate with the Access Point.”2
2Click “Advanced.”
3From “Available networks,” select the same name that you set for the Access Point Network
Name (SSID), and click “Configure.”
z Hint
If the network has the same name as one appearing in “Preferred networks,” select the network from the list in “Preferred
networks,” and click “ Remove” to remove it from the list.
4If WEP encryption is enabled, select the “Data encryption (WEP enabled)” check box, clear the
“The key is provided for me automatically” check box, and type the WEP key set for the Access
Point into the “Network key” field.
5Click “OK.”
z Hint
If you have forgotten your Access Point settings, refer to the procedure described in “Case 7: Forgot Settings” to reset the
Access Point to its factory default settings.
Case 7Forgot Settings
Follow the procedure below to reset the Access Point to its factory default settings.
With the Access Point’s power on, use the end of a paper clip or a similar object to hold
down the reset switch located on the bottom of the Access Point.
Upon pressing the reset switch, the “WIRELESS” indicator goes on. Hold the switch down for about 6 seconds until the indicator goes
off.
The Access Point is reset to its factory default settings when the “WIRELESS” indicator goes off.
Case 8I want to know more about Access Point functions and perform advanced
settings
Click the “Start” button, point to “Programs” (“All Programs” when using Windows XP), “Wireless LAN,”
“PCWA-A220,” and click “Online Help.”
Online Help appears.
z Hint
For updates and connection information, refer to product information and Q&A search at the Sony Online Support (http://ita.sel.sony.com/support/wirelesslan/).
•Microsoft and Windows are registered trademarks of Microsoft Corporation in the U.S. and in other countries.
•In this document, the term “Windows 98 SE” is used to refer to Microsoft
® Windows® 98 Second Edition, the term “Windows Me” to Microsoft® Windows® Millennium
Edition, “Windows 2000” to Microsoft® Windows®2000 Professional, and “Windows XP” to Microsoft
® Windows® XP Home Edition and Microsoft® Windows® XP
Professional.
•Other system names and product names that appear in this manual are registered trademarks or trademarks of their respective owners. Note that the ™ and ® symbols
are not used in this manual.
Continued on next page
Reset switch
Product specificaties
| Merk: | Sony |
| Categorie: | Overige computer accessoire |
| Model: | PCWA-A220 |
Heb je hulp nodig?
Als je hulp nodig hebt met Sony PCWA-A220 stel dan hieronder een vraag en andere gebruikers zullen je antwoorden
Handleiding Overige computer accessoire Sony

3 Oktober 2025
18 Juni 2023
14 Juni 2023
31 Mei 2023
28 Mei 2023
15 Mei 2023
15 Mei 2023
12 Mei 2023
12 Mei 2023
12 Mei 2023
Handleiding Overige computer accessoire
Nieuwste handleidingen voor Overige computer accessoire
16 Juli 2026
16 Juli 2026
12 Juli 2026
23 Juni 2026
8 Juni 2026
18 Mei 2026
10 Mei 2026
27 April 2026
27 April 2026
22 April 2026