Smeg CR324PNF Handleiding
Bekijk gratis de handleiding van Smeg CR324PNF (23 pagina’s), behorend tot de categorie Koelkast. Deze gids werd als nuttig beoordeeld door 106 mensen en kreeg gemiddeld 4.8 sterren uit 53.5 reviews. Heb je een vraag over Smeg CR324PNF of wil je andere gebruikers van dit product iets vragen? Stel een vraag
Pagina 1/23

DESCRIPTION OF PRODUCT
FINDKNSGRIPENLFGBD
GB
On / Off
Press to activate/deactivate the appliance.
Note: This operation does not disconnect the
appliance from the power supply.
Fan (where provided)
The fan is factory set to ACTIVE.
The fan can be deactivated by pressing the
button on the base (as shown in the figure). If
the room temperature exceeds 27°C or if
water droplets form on the glass shelves, the
fan must be on in order to guarantee the
correct preservation of food. Deactivation of the fan enables energy
consumption to be optimised.
Fast Cool Function
Press the "Temperature" button for 3 seconds to cool the
refrigerator compartment quickly, or 6 hours before placing large
quantities of fresh food in the freezer compartment. When the
function is active, the yellow light is on and the three green lights
are off. This function is automatically deactivated after 30 hours, or
manually by pressing the button again for 3 seconds. When the
function is not active, the yellow light is off and the indication of the
set temperature is shown by the green lights.
Note: Do not place fresh food to be frozen in direct contact with
already frozen food.
5019 608 01100
Printed in Italy 11/11
Refrigerator compartment temperature
The three green lights indicate the set refrigerator compartment
temperature.
A different temperature can be set using the "Temperature "
button.
The following adjustments are possible:
LED's on Set temperature
High (least cold)
Medium-high
Intermediate
Medium-low
Low (coldest)
Refrigerator Compartment
A. Fan and antibacterial and antiodour filter (depending
on the model)
B. Lamp or LED light (depending on the model)
C. Shelves
D. LED lights (depending on the model)
E. Crisper drawer cover
F. Crisper(s)
G. Rating plate (located at side of crisper)
H. Control panel
N. Dairy compartment
O. Door trays
P. Bottle holder (if provided)
Q. Bottle bin
Least cold zone
Intermediate zone
Coldest zone
Fruit and vegetable zone
Freezer Compartment
I. Top drawer (freezing area)
L. Middle and bottom drawers (storage area for frozen
and deep frozen food)
M. Ice cube tray (if provided)
Note: All shelves, door trays and racks are removable.
The ideal temperatures for preserving foods are already
factory-set.
Carefully read the user handbook provided before
using the appliance.
The characteristics, technical data and images may
vary according to the model.
What to do if... Possible causes: Cures:
The control panel is switched off, the appliance does not work.
The appliance could be in off mode.
There may be an appliance power supply problem.
Activate the appliance with the On/Off button
Make sure:
- there is not a power outage
- the plug is properly inserted in the power socket and the mains double-pole switch (if present) is in the correct position
(i.e. allows the appliance to be powered)
- the household electrical system protection devices are efficient
- the power cable is not broken.
The inside light does not work. The light may need replacing.
Models with lamp: disconnect the appliance from the power supply, check the lamp and, if necessary, replace it with a
new one (see the section "Lamp or LED replacement").
Models with LED lights: contact the authorised Service Centre.
The temperature inside the compartments is not low enough. There could be various causes (see "Cures")
Make sure:
- the doors close properly
- the appliance is not installed near a heat source
- the set temperature is adequate
- the circulation of air through the vents at the bottom of the appliance is not obstructed
There is water on the bottom of the refrigerator compartment.
The defrost water drain is blocked. Clean the defrost water drain hole (see the section "Appliance Maintenance and Cleaning")
The front edge of the appliance, at the door striker seal, is hot. This is not a defect It prevents condensation from forming. No remedy is necessary.
One or more indicator lights flash. Malfunction alarm
The alarm indicates a fault in a technical component.
Call the authorised Service Centre.
The appliance continues to maintain minimum preservation conditions.

Always unplug the refrigerator before replacing any light bulbs, then follow the relevant instructions in
accordance with the type of lighting fitted in your appliance.
Only use bulbs of the same type, which can be requested from the After-Sales Service and authorised
dealers.
Lighting type 1)
1. Loosen the screws and take off the lamp cover.
2. The lamp has a bayonet bulb and needs to be pulled out, not
unscrewed, following the directions of the arrows as
indicated.
3. After the new bulb has been inserted, replace the lamp cover
and wait five minutes before plugging the appliance back in.
Lighting type 2)
To remove the light bulb, turn anticlockwise as shown in the figure.
Wait for 5 minutes before reconnecting the appliance.
Lighting type 3)
If the product has LED lighting which is in need of
replacing, contact the After-Sales Service for assistance.
LED lights last longer than normal bulbs, they illuminate
better and are more environmentally friendly
10
Clean the appliance regularly using a cloth and a solution of lukewarm
water and neutral detergent specifically formulated for refrigerator
interiors. Never use abrasive detergents. Clean inside the defrost water
drain outlet on the rear wall of the refrigerator (near the fruit and
vegetable crisper drawer) regularly, using the tool supplied with the
appliance so as to ensure defrost water is removed correctly (see figure).
Before all cleaning or maintenance procedures, unplug the appliance from
the mains or disconnect the electricity supply.
2
1
Connect the appliance to the mains power supply.
A beep may be emitted by some models, to indicate that the temperature alarm has intervened: press and
hold the button to switch off acoustic alarms. As applicable, insert the anti-bacterial/anti-odour filter into
the fan as indicated on the filter package.
Note: after switching on, the refrigerator needs approximately 4/5 hours to reach the correct
temperature for storing a normal fridge load of food.
FIRST USE
APPLIANCE MAINTENANCE
AND CLEANING
CHANGING THE BULB OR LED (depending on the model)

11
Unplug the appliance from the mains, then empty, defrost (if necessary) and clean it. Leave the doors ajar,
so that air can circulate inside the compartments. This will prevent the formation of mould and bad
odours.
WHEN THE APPLIANCE IS NOT IN USE
Keep the doors closed to allow the stored food to stay cold as long as possible. Do not refreeze partially
thawed food. If the blackout persists, the blackout alarm may sound (depending on the model).
DURING BLACKOUTS
The refrigerator compartment is designed for the storage of fresh food and beverages.
Refrigerator compartment defrosting is completely automatic.
Droplets of water on the rear wall of the compartment indicate that the periodic automatic defrost cycle
is in progress. The defrost water is automatically routed to a drain outlet and into a container from which
it evaporates.
Depending on the model, the appliance may have a special box ("Meat & Fish" or "Zero Degrees") which is
ideal for the storage of fresh meat and fish.
Important: refrigerator accessories must not be washed in a dishwasher.
Note: the ambient temperature, the door opening frequency and the position of the appliance may affect
temperatures inside the two compartments. Set the temperature in accordance with these factors.
Note: when there is a lot of moisture inside the refrigerator compartment and on the glass shelves in
particular, condensation may form. In this case, we recommend closing any liquid-filled containers (e.g.:
saucepans full of stock), wrapping foods with a high liquid content (e.g.: vegetables) and setting the
temperature to a warmer value.
Removing the crisper drawer (depending on the model)
If your product only has a crisper drawer, to facilitate its removal we recommend emptying (and, if
necessary, removing) the two lower door trays beforehand.
Fan and anti-bacterial/anti-odour filter (depending on the model)
The fan will ensure uniform air circulation inside the compartment, for improved food storage and excess
moisture reduction. Do not obstruct the fan inlet. The fan can be activated/deactivated manually (see
Quick Start Guide); when activated, it works automatically as necessary.
REFRIGERATOR COMPARTMENT
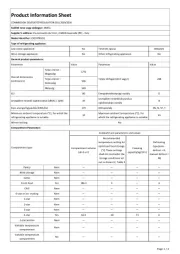
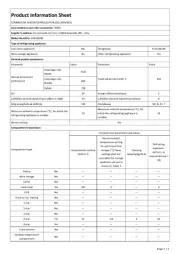
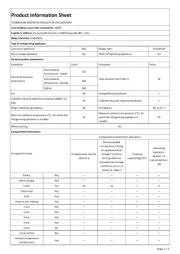
Product specificaties
| Merk: | Smeg |
| Categorie: | Koelkast |
| Model: | CR324PNF |
| Apparaatplaatsing: | Ingebouwd |
| Kleur van het product: | Wit |
| Deurscharnieren: | Rechts |
| Ingebouwd display: | Nee |
| Breedte: | 540 mm |
| Diepte: | 545 mm |
| Hoogte: | 1770 mm |
| Netbelasting: | 160 W |
| Geluidsniveau: | 38 dB |
| Jaarlijks energieverbruik: | 312 kWu |
| Energie-efficiëntieklasse (oud): | A+ |
| Brutocapaciteit vriezer: | - l |
| Nettocapaciteit vriezer: | 63 l |
| Vriescapaciteit: | 9 kg/24u |
| Ontdooifunctie: | Ja |
| Draairichting deur verwisselbaar: | Ja |
| Geschikt voor paneelaanpassing: | Nee |
| Nettocapaciteit koelkast: | 201 l |
| Brutocapaciteit koelkast: | - l |
| Koelkast binnenverlichting: | Ja |
| Multi-luchtwegsysteem (koelkast): | Ja |
| Aantal planken koelkast: | 4 |
| Aantal groente lades: | 2 |
| Vriezer positie: | Onder |
| No Frost (vriezer): | Ja |
| Bewaartijd bij stroomuitval: | 16 uur |
| Snelvriesfunctie: | Ja |
| Aantal planken vriezer: | 3 |
| Aantal sterren: | 4* |
| Totale nettocapaciteit: | 264 l |
| Flessenrek: | Ja |
| No Frost system: | Ja |
| Automatisch ontdooien (koelkast): | Ja |
| Totale brutocapaciteit: | 282 l |
| Ingebouwde vriezer: | Ja |
| Installatie compartiment breedte: | 560 mm |
| Installatie compartiment diepte: | 555 mm |
| Installatie compartiment hoogte: | 1776 mm |
| Plankmateriaal: | Gehard glas |
| Deur open alarm: | Ja |
| Klimaatklasse: | SN-T |
| Vormfactor: | Staand |
| Deur type: | Dubbel |
| Thermostaat: | Ja |
| Water dispenser: | Nee |
| Ijsblokjeshouder: | Ja |
Heb je hulp nodig?
Als je hulp nodig hebt met Smeg CR324PNF stel dan hieronder een vraag en andere gebruikers zullen je antwoorden
Handleiding Koelkast Smeg
16 Juni 2025
16 Juni 2025
16 Juni 2025
16 Juni 2025
16 Juni 2025

16 Juni 2025
16 Juni 2025

15 Juni 2025
15 Juni 2025
15 Juni 2025
Handleiding Koelkast
- XO
- Wells
- FrigeluX
- CaterCool
- Gardenline
- Unold
- Progress
- Meireles
- Mitsubishi
- Matrix
- Avanti
- Tristar
- Sunwind
- Freggia
- Equator
Nieuwste handleidingen voor Koelkast
30 Juli 2025

30 Juli 2025
30 Juli 2025
29 Juli 2025

29 Juli 2025
29 Juli 2025
29 Juli 2025
29 Juli 2025

29 Juli 2025

29 Juli 2025