SilverStone XE04-SP3 Handleiding
SilverStone Hardwarekoeling XE04-SP3
Bekijk gratis de handleiding van SilverStone XE04-SP3 (1 pagina’s), behorend tot de categorie Hardwarekoeling. Deze gids werd als nuttig beoordeeld door 14 mensen en kreeg gemiddeld 4.6 sterren uit 9 reviews. Heb je een vraag over SilverStone XE04-SP3 of wil je andere gebruikers van dit product iets vragen? Stel een vraag
Pagina 1/1
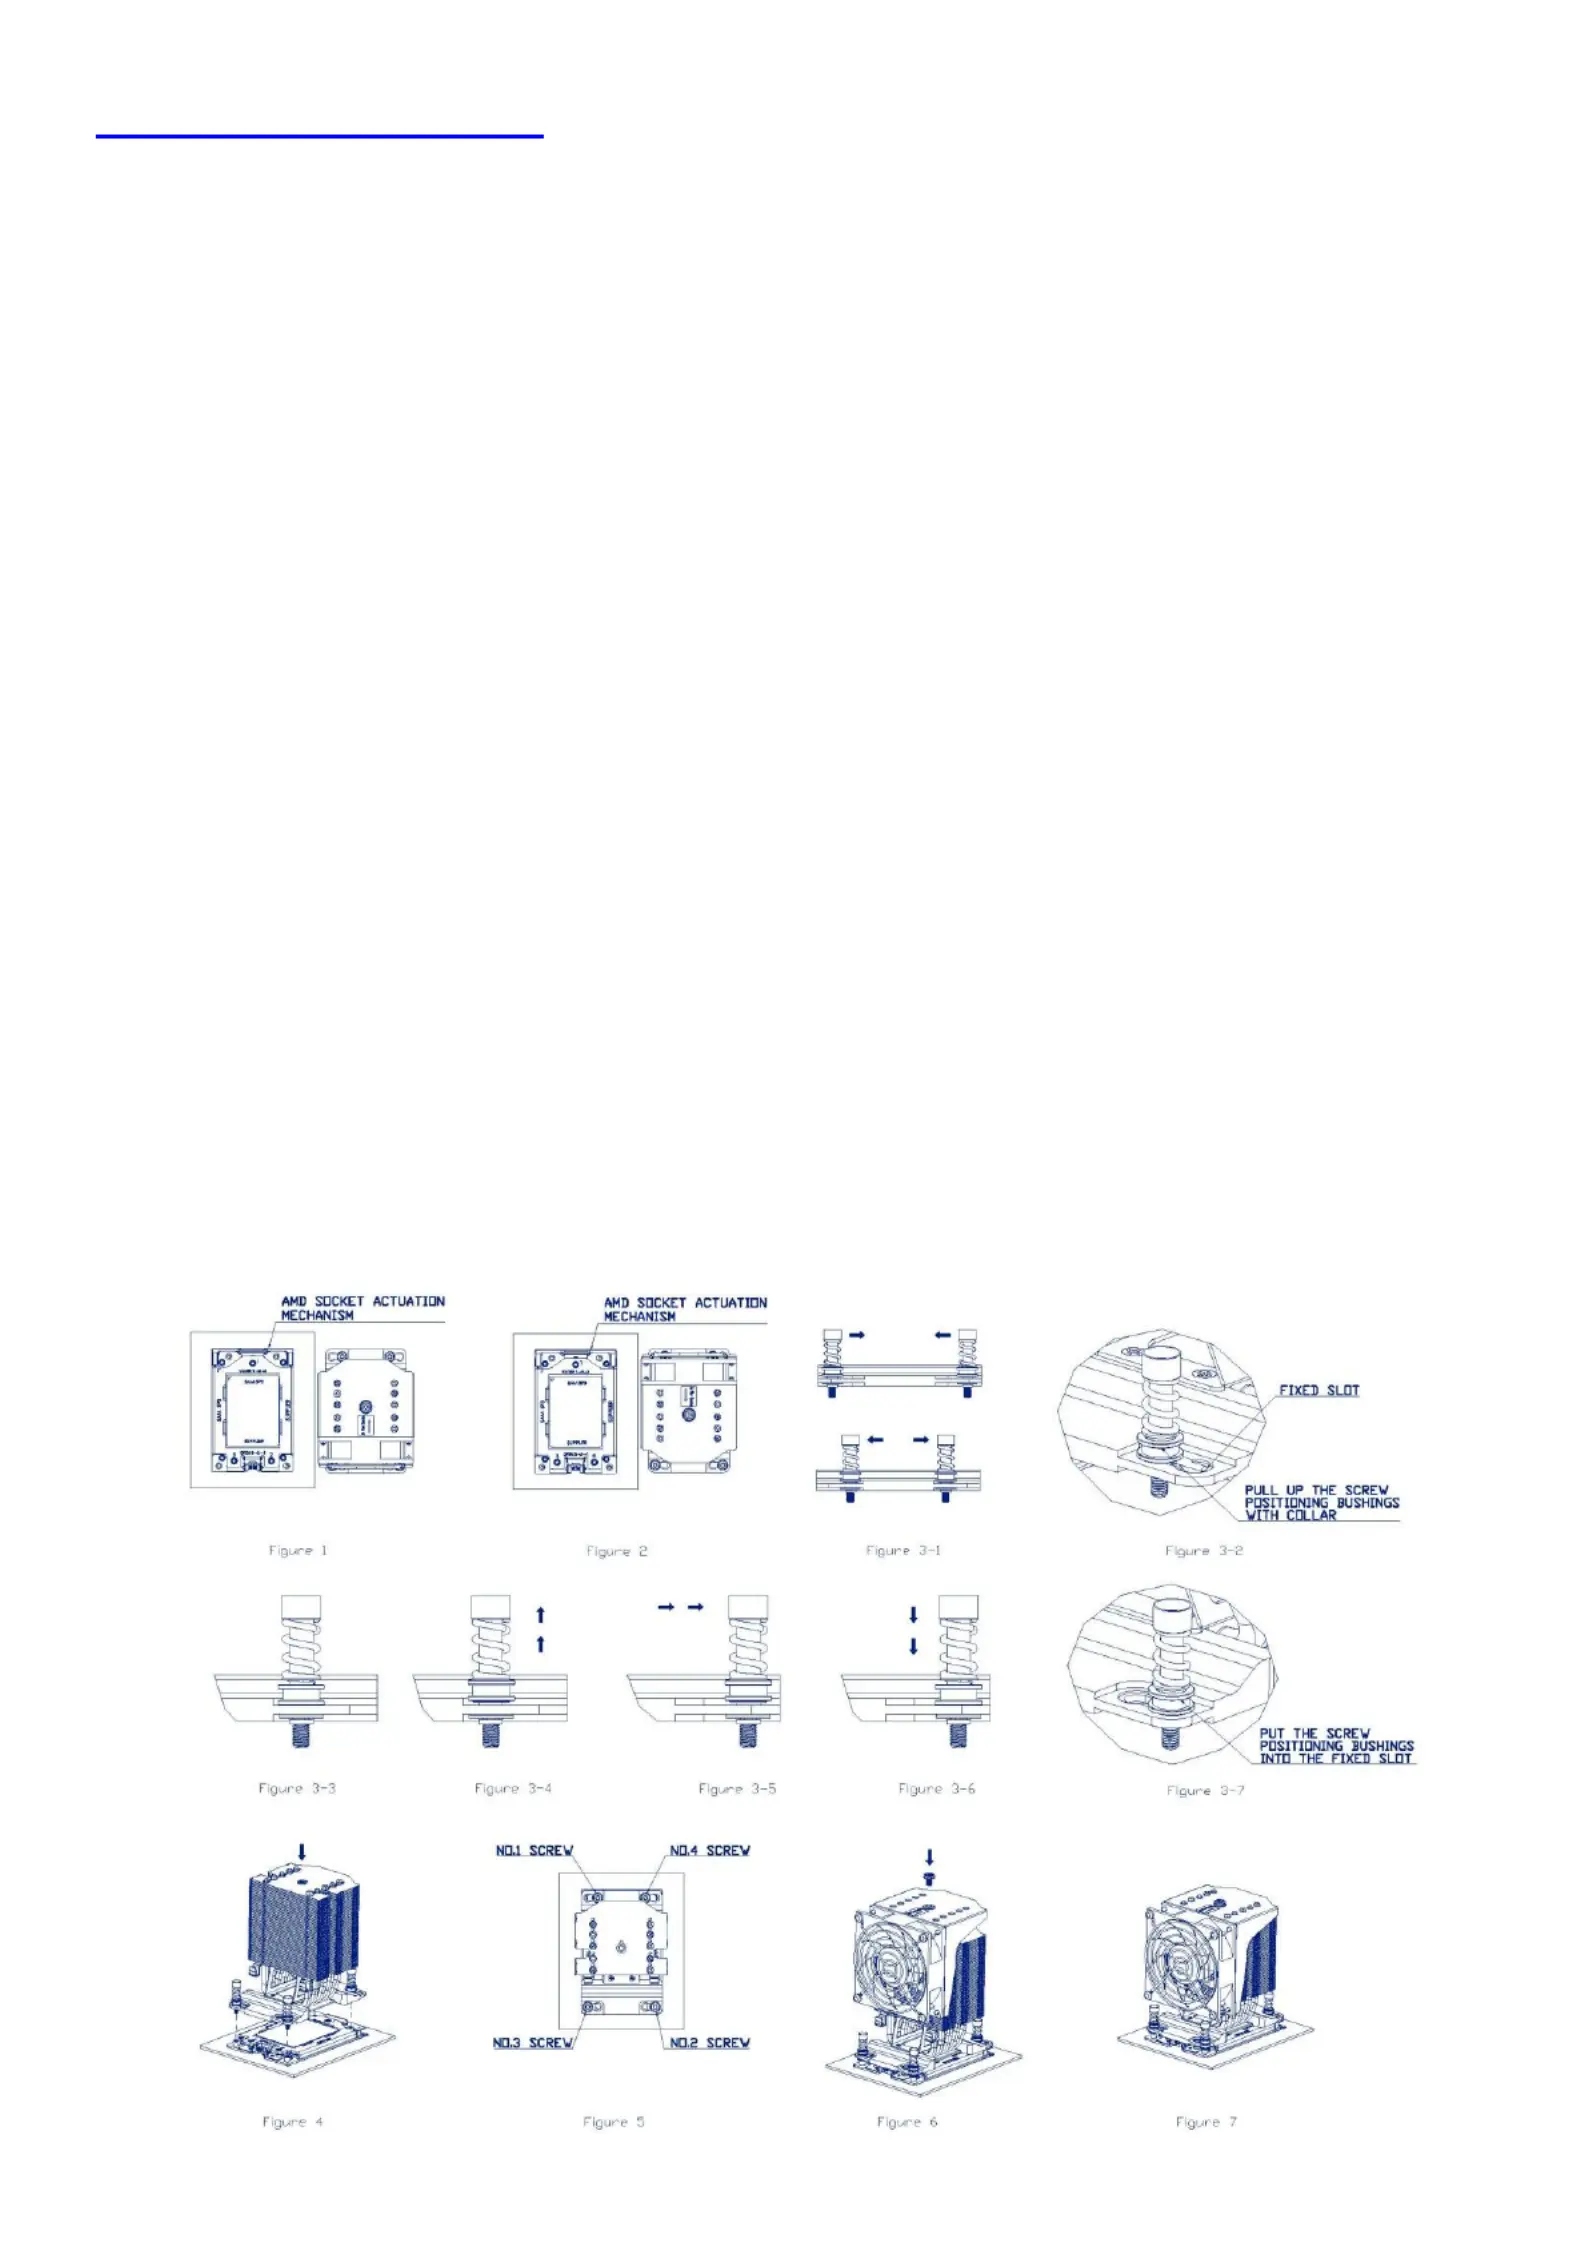
Installation Procedure
1. Take out 04-SP3 from its packing box. Before installing the heat sink, please check that heat sinkXE
must be properly oriented to the system cooling air ow direction (Figure 1 & Figure 2).
2. With the desired heat sink air ow direction, adjust the heat sink mounting screw positions so that they
can be aligned with the associated nut standos for heat sink attachment on the socket stiener frame
(Figure 3-1~3-7).
3. Remove the protection cover of thermal interface material (TIM) or thermal grease. The required amount
of TIM has been pre-applied on the bottom of the heat sink. Inspect pre-applied TIM for any damage.
4. Place the heat sink directly on top of the CPU (Figure 4) so that the four heat sink mounting screws are
aligned with and seated on the four heat sink mounting studs or nut standos on the socket stiener
frame. The heat sink must be proper orient to the system cooling air flow direction. Please note that lyed
the heat sink cooling fan should not be attached to the heat sink body when tightening the four heat sink
mounting screws.
5. Use a screwdriver with Torx T20 bit and adjust the screwdriver torque setting to .1 kgf-cm (.0 lbf-in). 1614
Before turning on the screwdriver, make sure that the screwdriver bit is fully engaged in the cavity of the
heat sink mounting screw head. Keep heat sink mounting screw vertical during installations.
6. Tighten the two diagonal heat sink mounting screwsi.e. the #1 and #2 screws (Figure 51 to 2 turns , )
until they are just snug. Do not fully tighten! Then do the same with the remaining two diagonal heat sink
mounting screws.
7. Follow the diagonal installation pattern on all four heat sink mounting screws to ensure that the bottom of
the heat sink is properly seated on the CPU and to prevent the heat sink from tilting. Finish by fully
tightening all the four heat sink mounting screws.
8.and Install the heat sink cooling fan holder assembly on the heat sink body then tighten the single and
locking screw on top of the fan holder (Figure 6 Figure 7). &
9. Connect 04-SP3 cooling fan connector to the fan header labeled for CPU on the motherboard.XE
Product specificaties
| Merk: | SilverStone |
| Categorie: | Hardwarekoeling |
| Model: | XE04-SP3 |
| Kleur van het product: | Zwart, zilver |
| Gewicht: | 750 g |
| Breedte: | 93 mm |
| Diepte: | 119 mm |
| Hoogte: | 126 mm |
| Soort: | Luchtkoeler |
| Type verpakking: | Doos |
| Materiaal: | Koper |
| Aantal per verpakking: | 1 stuk(s) |
| Maximum luchtstroom: | 54 cfm |
| Aantal ventilatoren: | 1 ventilator(en) |
| Thermal Design Power (TDP): | 250 W |
| Geschikte locatie: | Processor |
| Geluidsniveau ventilatie (max): | 38 dB |
| Spanningclassificatie: | 12 V |
| Nominale netspanning: | 0.385 A |
| Supported processor sockets: | SP6, Socket SP3, Socket TR4 |
| Maximum luchtdruk: | 6.8 mmH2O |
| Pulsbreedtemodulatie-ondersteuning: | Ja |
| Type lager: | Dubbele kogellager |
| Materiaal vinnen: | Aluminium |
| Aantal warmte pijpen: | 5 |
| Maten ventilator (b x d x h): | 92 x 25 x 92 mm |
| Warmte pijpen diameter: | 6 mm |
| Fan connector: | 4-pin |
| Fan snelheid (max): | 3800 RPM |
| Fan snelheid (min): | 1300 RPM |
| Ventilator gemiddelde storingsinterval (MTTF): | 100000 uur |
Heb je hulp nodig?
Als je hulp nodig hebt met SilverStone XE04-SP3 stel dan hieronder een vraag en andere gebruikers zullen je antwoorden
Handleiding Hardwarekoeling SilverStone

19 Februari 2026
19 Februari 2026
19 Februari 2026
19 Februari 2026
29 Januari 2026
27 Januari 2026
27 Januari 2026
27 Januari 2026
26 Januari 2026
23 December 2025
Handleiding Hardwarekoeling
Nieuwste handleidingen voor Hardwarekoeling
6 Maart 2026
5 Maart 2026
4 Maart 2026
3 Maart 2026
3 Maart 2026
3 Maart 2026
3 Maart 2026
3 Maart 2026
3 Maart 2026
2 Maart 2026