Rossmax V7 Handleiding


Lees hieronder de 📖 handleiding in het Nederlandse voor Rossmax V7 (2 pagina's) in de categorie Medisch. Deze handleiding was nuttig voor 32 personen en werd door 2 gebruikers gemiddeld met 4.5 sterren beoordeeld

Pagina 1/2
Model: V7
Suction Unit
www.rossmax.com
IN3V70000000000XX
OBM_IB_SU-V7_
EN_SW_ver2030
Warranty Card
This instrument is covered by a 2 year guarantee from the purchase date. The guarantee
is valid only on presentation of the guarantee card completed by the dealer confirming
purchase date or the receipt. Suction unit accessories are not included. Opening
or altering the instrument invalidates the guarantee. The guarantee does not cover
damage, accidents or noncompliance with the instruction manual. Please contact your
local seller/dealer or www.rossmax.com.
Customer Name: ____________________________________________________
Address: ___________________________________________________________
Telephone: _________________________________________________________
E-mail address: ______________________________________________________
Product Information
Date of purchase: ___________________________________________________
Store where purchased:
____________________________________________________________________
In the event that contaminated uids have moved past the internal unit, remove the tubing
and the lter, clean the casing, and decontaminate the collection canister. Return the device to
your local distributor or authorized Rossmax service center following Rules for returning and
repairing paragraph.
1. Sanitization
Before and after each use, sanitize the collection canister and the connecting tubing.
Rinse each part (9,11,15,15a,16,16a,17,20,22) with clean, hot running water (<50°C) with gentle
dishwashing liquid (non-abrasive). After cleaning, leave the parts to dry in an open, clean
environment.
2. Disinfection
The accessories which can be disinfected are 9,11,15,15a,16,16a,17,20.
Wash with a commercial disinfectant that must be an electrolytic chloroxidizer (active principle:
sodium hypochlorite) specic and follow the instructions and dilution rates supplied by the
disinfectant manufacturer carefully. It is eective on the parts that undergo this treatment only
if the parts to be treated have previously been sanitized. After cleaning, leave the parts to dry in
an open, clean environment.
Parts Material Sanitization Disinfection Steam Sterilization
(Gravity autoclave)
Collection Canister (9) PC(Polycarbonate) O O X
Canister supporting
handle (17) ABS / PC O O X
Canister Lid (15) ABS / PC O O X
Gasket (15a) Silicone O O X
Overflow valve (16) PP O O X
Rubber valve (16a) Silicone O O X
Float (16a) PP O O X
Tubing depository (11) PC O O X
Connecting tubing
(Ø7mm, 180cm) (22) PVC O X X
Connecting tubing
(Ø8mm, 14cm) (20) Silicone O O X
O: Applicable, X: Not applicable
Note:
1. The collection canister and tubing after disinfecting should be dated and stored in clean and dry
areas to avoid recontamination.
2. Do not use any cleaners or disinfectants that contain ammonia, benzene and/or acetone to clean
the parts.
3. Dispose of the solution following the instructions provided by the disinfectant manufacturer.
4. Dispose of the suction catheter in accordance with the local laws and regulations.
Collection canister – 1400 ML
Filter
Silicone and PVC tubing
Maintenance
Rules for returning and repairing
Microbial contamination
Accessories (optional)
Technical Specications
Troubleshooting
Electromagnetic Compatibility Information
Symbols
The collection canister consists of an overow valve, a bottle in PC (polycarbonate) material, a lid
with switch button on handle and must be replaced if there are visible signs of the damage.
Note:
1. Keep the device vertical to allow the overow valve to function correctly.
2. Do not overturn the collection canister during use, in order to prevent the intervention of the
overow valve; should this occur, switch the aspirator o and detach the tubing connected to
the antibacterial lter.
3. To accelerate aspiration and simplify cleaning, it is recommended to put water in the collection
canister before using.
4. Suction at the patient is automatically obstructed when the liquid level reaches the overow
valve located on the underside of the canister lid.
5. Contents of the container should be emptied when automatic overow valve is activated.
Further suctioning could cause damage to the vacuum pump.
The antibacterial lter supplied with Rossmax aspirators must be strictly replaced for each new
patient, or if overow occurs or the lter is saturated. Should the aspirator be used on the same
patient, the lter for single-patient use is recommended to be replaced after every application.
It should also be replaced if the unit is used with a patient whose risk of contamination is unknown.
The lter cannot be sanitized, disinfected, or sterilized.
Note:
1. Do not use the aspirator without the antibacterial lter, the unit could be damaged.
From a bacteriological point of view, it becomes dangerous for the patient.
2. Do not substitute any other material for this antibacterial lter. Substitution may lead to
contamination or poor performance; use only Rossmax lters.
The tubing is recommended to be single use, but the number of cycles of disinfection and/or
cleaning is strictly linked to the employment of the tubing. Therefore, after each cleaning cycle, it
is up to the nal user to verify whether the tubing is suitable for reuse. The component must be
replaced if there are visible signs of the decay of the tubing.
The suction equipment does not need maintenance or lubrication. It is, however to inspect the unit
and accessories before each use.
DANGER:
Electric shock hazard. Do not attempt to open or remove cabinet, there are no user-serviceable
internal components. If service is required, return the device to your local distributor or authorized
Rossmax service center. Opening or tampering with the unit will void warranty.
Rossmax requires the following procedures to be carried out to protect the instrument
and the safety of all who come into contact with it.
Before returning an instrument for repair, the external surfaces and all accessories MUST be
carefully disinfected with a cloth soaked in methylated spirits or hypochlorite-based solution. The
instrument and accessories should then be placed in a bag with a note outlining the disinfection
undertaken. Failure to follow this procedure will result in the instrument being returned to the
purchaser unrepaired. Instruments returned for repair MUST be accompanied by a description of
the problem. Rossmax will not be responsible for damage caused through improper use.
To avoid such damage, please read the instruction carefully.
Rossmax will not be responsible for damage of accessories. Accessories will be replaced at the
customers expense.
In the presence of pathologies with the risk of infection and microbial contamination, we recommend
personal use of the accessories, collection canister, connecting tubing and antibacterial lter and all
accessories should be thoroughly cleaned and disinfected after each use.
Note: Use only with original Rossmax accessories.
Name Model No.
Connecting PVC tubing (Ø7mm-length, 180cm) SU_AC_001_00
Collection canister (1400ml) SU_AC_002_00
Antibacterial lter kit (Antibacterial lter +
2 Silicone tubing Ø8mm-length, 14cm) SU_AC_004_00
Antibacterial lter SU_AC_005_00
Connecting Silicone tubing (Ø8mm-length, 14cm) SU_AC_006_00
Tubing depository SU_AC_008_00
Rechargeable Lithium-ion battery SU_AC_009_00
AC power cord (EU plug) SU_AD_004_00
AC power cord (US plug) SU_AD_005_00
AC power cord (UK plug) SU_AD_006_00
AC power cord (JET plug) SU_AD_007_00
AC/DC switching Adaptor (12V/5A) SU_AD_008_00 (PART No.: UES65-120500SPA1)
Suction class: High Vacuum / High Flow
Adaptor Input: 100-240V, 50/60Hz; Output: DC 12V 5.0A
Max. Vacuum @ pump inlet: -80 kPa/ -600 mmHg (mmHg for reference only)
Max air ow @ pump inlet: 30L/min (normal operation) and 25L/min (power saving/ economical
mode)
Power Consumption: <55W
Collection canister capacity: 1,400 ml
Battery charge duration: approx. 45 mins under normal operation / approx. 60 mins under
power saving/ economical mode at a zero vacuum level (free ow).
Battery charging time: 5 hours (at temp. 25°C)
Battery Rating: 7.2V 2900mAh*2 41.76WH
Weight: Approx. 3.6 (Kgs)
Machine dimension: 363 (W) × 175 (D) × 254.5 (H) mm (Incl. rubber pad)
Operating conditions: Temperature Min. 10°C; Max. 40°C; Relative humidity : 30% ~75%,
non-condensing; Atmospheric pressure: Min. 700 hPa; Max. 1060 hPa
Storage and transportation
conditions: Temperature Min. -20°C; Max. 50°C; Relative humidity: 10~85%, non-
condensing; Atmospheric pressure: Min. 700 hPa; Max. 1060 hPa
IP Classication: IP21: Protection against harmful ingress of water and particulate
matter
If, after checking the described conditions below the device is still not working properly, we
recommend that you consult your local distributor or authorized Rossmax service center.
Problem Possible cause Solution
The device does
not work
The AC adaptor has not been correctly
inserted into the socket of the device
or the power socket
Correctly insert the AC adaptor into
the sockets
Power switch has not been activated. Check if the power switch is turned to
the “I” (ON) position
The unit does
not work from its
battery
Battery at Fully charge the battery
Battery is not installed or inserted
properly Reinstall battery and check if the
battery connector is inserted properly
Battery ages If the unit does not operate after
charging, replace the battery with
new one
Battery broken
If the battery cannot be fully charged
and the GREEN charging indicator
keeps ashing, replace the battery
with new one.
Lack of suction
The collection canister lid has not
been correctly positioned on the
canister
Correctly position the collection
canister lid
Lid gasket (rubber O-ring) not in place Correctly position the gasket on the lid
Leaks or cracks in canister assembly Replace the canister
Filter blocked Replace the filter
Blocked float Incrustation on the float
Remove the canister lid and
overflow valve and extract the
float. Continue by carrying out the
cleaning procedures as described
in the paragraph Sanitization,
Disinfection operations
Vacuum power
poor and/or
non-existent
Vacuum flow adjustment knob/
vacuum regulator completely open Fully close the adjustment knob and
check the vacuum power
Filter blocked Replace the filter
Connecting tubing to the device or
collection canister is clogged, bent,
disconnected or broken; or suction
catheter is twisted or blocked
Check the condition of the tubing,
replace it if blocked or broken and
correctly connect it as per the
Assembling Procedures of this
manual
Canister lid overflow valve closed or
blocked
Unblock the overflow valve, keep the
device upright
Dirty, blocked or damaged pump
Take the device to your local
distributor or authorized Rossmax
service center
1. This device needs to be installed and put into service in accordance with the information provided
in the user manual.
2. WARNING: Portable RF communications equipment (including peripherals such as antenna cables
and external antennas) should be used no closer than 30 cm (12 inches) to any part of the V7,
including cables specied by the manufacturer. Otherwise, degradation of the performance of this
device could result.
If higher IMMUNITY TEST LEVELS than those specied in Table 9 are used, the minimum separation
distance may be lowered. Lower minimum separation distances shall be calculated using the
equation specied in 8.10.
Manufacturers declaration-electromagnetic immunity
The V7 is intended for use in the electromagnetic environment specied below. The customer or
the user of the V7 should assure that is used in such and environment.
Immunity test IEC 60601 test level Compliance level Electromagnetic environment-guidance
Conducted RF
IEC 61000-4-6
3 Vrms:
0,15 MHz – 80 MHz
6 Vrms: in ISM and
amateur radio
bands between
0,15 MHz and 80
MHz
80 % AM at 1 kHz
3 Vrms:
0,15 MHz – 80
MHz
6 Vrms: in ISM and
amateur radio
bands between
0,15 MHz and 80
MHz
80 % AM at 1 kHz
Portable and mobile RF communications
equipment should be used no closer to any
part of the V7 including cables, than the
recommended separation distance calcu-
lated from the equation applicable to the
frequency of the transmitter.
Recommended separation distance:
d = 1,2 √P, d = 1,2 √P 80MHz to 800 MHz, d
= 2,3 √P 800MHz to 2,7 GHz
Where P is the maximum output power rat-
ing of the transmitter in watts (W) accord-
ing to the transmitter manufacturer and d
is the recommended separation distance in
metres (m).
Interference may occur in the vicinity of
equipment marked with the following sym-
bol:
Radiated RF
IEC 61000-4-3
10 V/m
80 MHz – 2,7 GHz
80 % AM at 1 kHz
10 V/m
80 MHz – 2,7 GHz
80 % AM at 1 kHz
NOTE1: At 80 MHz and 800 MHz, the higher frequency range applies.
NOTE2: These guidelines may not apply in all situations. Electromagnetic propagation is aected by
absorption and reection from structures, objects and people.
More information on EMC compliance of the device can be obtained from Rossmax website: www.
rossmax.com.
Class II device
Type BF applied part
Attention: check the instructions before using this device
+More vacuum
SN Device serial number
Risk: Electrocution.
Consequence: Death.
Do not use the device while taking a bath or a shower
ΙSwitch on
ΟSwitch o
Direct current
1639 CE Marking medical ref. Dir 93/42/EEC amended by 2007/47/EC
Date of manufacture
Manufacturer
Attention: Consult accompanying documents
WARNING: The symbol on this product means that its an electronic product and fol-
lowing the European directive 2012/19/EU the electronic products have to be dis-
posed on your local recycling centre for safe treatment.
Rossmax Swiss GmbH,
Widnauerstrasse 1, CH-9435 Heerbrugg, Switzerland
Introduction
Intended Use
Preliminary Remarks
Warnings and Safety Instructions
DANGER, WARNING, CAUTION, NOTE/ATTENTION STATEMENT
Instructions for Use
Cleaning, Sanitization, Disinfection operations
Power Source Options
LED Explanations
Battery Charging
Battery Replacement
Power Saving Operation
We thank you for purchasing our Aspirator V7 which is adaptable to your needs. It is very important
that the health care worker and/or the patient read and understand the information for use and
maintenance.
Suction unit (Aspirator) V7 can be used to remove unwanted uids or infectious materials from the
airway or respiratory support system in health care structures like hospitals and home care.
The device generates suction (aspiration) which allows uids to be extracted through connecting
PVC tubing connected to a collection canister which retains the uids until they can be properly
disposed of. Use of the device must be prescribed by a doctor.
Carefully follow the recommended operations and procedures outlined in this instruction guide to
ensure proper functioning and maximize the life of the device.
This Suction unit (Aspirator) complies with the European regulations and bears the CE mark
“CE 1639”. The quality of the device has been veried and conforms to the provisions of the EC
council directive 93/42/EEC amended by 2007/47/EC (Medical Device Directive), Annex I essential
requirements and applied harmonized standards.
EN ISO 10079-1:2015 Medical suction equipment - Part 1: Electrically powered suction equipment.
Suction unit (Aspirator) V7 is EMC-tested in conformity with the requirements of IEC 60601-1-2 and
can be used in the vicinity of other EMC-tested devices that fulll the requirements as outlined in
the IEC 60601-1-2 standard. Untested HF sources, radio networks or the like can impair the function
of the device and should not be operated in combination with the Aspirator V7. The suction
equipment is not suitable for use in an MRI environment. Please read and observe these warning
and safety instructions before operation. These instructions for use must be kept with the device
for later reference. Please note that these instructions are a general guide for the use of the product.
Medical matters must be addressed by a physician. Rossmax considers himself only responsible for
the eect on BASIC SAFETY, reliability and performance of the Aspirator V7 if it is used in accordance
with the instructions for use.
Important Safeguards
This is a medical device and must be used by qualied users. It must be operated as
indicated in this user instruction manual.
Read All Instructions Before Using This Device. Save These Instructions.
The manufacturer makes every eort to ensure that every product is of the highest quality and
safety; however, as for any electrical appliances, basic safety regulations must always be observed
in order to avoid harming persons and things.
DANGER: Urgent safety information for hazards that will cause serious injury or death.
WARNING: Important safety information for hazards that draws attention to a potential danger.
CAUTION: Indicates correct operating or maintenance procedures to prevent damage to the
product or other property.
Note/Attention: Indicates information to which users should pay special attention.
DANGER:
1. The device is intended exclusively for the collection of NON-ammable or NON-corrosive uid
materials in medical applications only. This unit should not be used in the presence of ammable
anaesthetic mixture with air, or with oxygen or nitrous oxide.
2. Do not use outdoors or operate where aerosol (spray) products are being used or where oxygen is
being administered in a closed environment such as an oxygen reservoir.
3. Do not handle the AC/DC switching adapter plug with wet hands or use the unit when taking
a bath or shower. Never submerge the device in any liquids.
4. Do not use the unit if the plug or AC adaptor is worn or wet and remove or touch the immersed
device. If by chance it falls into water, do not attempt to remove the device from the water while the
plug is still connected; pull the plug out of the socket and disconnect the mains switch. Bring the
device to your local distributor or authorized Rossmax service center immediately. Do not attempt
to make the device work before it has been thoroughly checked by qualied personnel and/or
authorized Rossmax service center.
5. Do not place or store the device where it can fall or be pulled into a tub or sink.
Warning:
1. The medical device must NOT be used in the operating theater, for drainage or thoracic
drainage and nasogastric suction.
2. Never operate this product if a) it has a damaged cord or plug, b) it is not working properly, c) it has
been dropped or damaged, d) it has been dropped into water.
Immediately return the product to your local distributor or authorized Rossmax service center for
examination and repair.
3. For use only by medically trained persons who have been adequately trained in suction procedures
and in the use of aspirators.
4. Incorrect use can cause pain and injury to the patient.
5. Do not start the machine if you suspect the presence of explosive or inammable liquids or gases,
water inside the machine or environmental conditions that are not within the specied limits.
6. Do not perform any maintenance operations while the device is being used on a patient.
7. Replacement device must always be available if a breakdown of the device for patients can lead to
a critical situation (e.g. patients with acute dyspnoea or severe catarrhal congestion),
8. The patient should be monitored regularly according to the physicians instructions and facility
guidelines. Objective indications or signs of a possible infection or complication must be met
immediately (e.g. fever, pain, redness, increased warmth, swelling or purulent discharge). Non-
observance can lead to considerable danger for the patient. Monitoring the Aspirator V7 for
operating status is a must.
9. Consult the indications for use and consider risk factors and contraindications before using the
Aspirator V7. Failure to read and follow all instructions in this manual prior to use may result in
serious or fatal injury of the patient.
10. In the presence of children and non self-sucient individuals, the device must be used under the
close supervision of an adult who has been adequately trained in suction procedures and in the
use of aspirators.
11. Some parts of the device are small enough to be swallowed by children; keep the device out of
the reach of children.
12. Do not use the provided tubing and AC adaptor for any other purpose than those specied, as
they can cause risk of strangulation. Be particularly attentive with children and individuals with
disabilities because they are often unable to correctly assess risk.
The device must be checked before each use in order to detect malfunctions and / or damage
caused by transport and / or storage and do not connect to power if damage is apparent.
Before each use, the accessories must be carefully inspected to ensure the absence of dust,
incrustation, clots or liquid substances both inside the connecting tubing and the collection canister.
Furthermore, they must be cleaned following the instructions rigorously as stated in the "cleaning,
sanitization, disinfection".
We recommend personal use of the accessories, the collection canister, the connecting tubing and
antibacterial lter to prevent risk of contagious infection.
1. Assembling procedures
1-1. Connect one end of connecting silicone tubing (Ø8mm,14cm), with the antibacterial lter
marked IN side, to the VACUUM inlet of the collection canister marked in yellow
1-2. Connect the other end, with the antibacterial lter marked OUT side, to the AIR INLET
connector of the suction unit marked in yellow.
1-3. Connect the connecting PVC tubing (Ø7mm, 180cm) to the “PATIENT inlet of the collection
canister.
1-4. Connect the power cord with AC adaptor, insert AC adaptor into the AC adaptor jack on the
right side of the unit.
Note: Use only the authorized Rossmax AC adaptor with this aspirator.
Note: Ensure that the FLUID SIDE or IN marker on the lter is on the side facing the collection
canister and t into the VACUUM inlet. A wrong connection may cause immediate
destruction in case of contact with sucked liquids.
2. Setup Before Use
2-1. Before each use, inspect the unit and accessories. If damaged, expired and/or deteriorated,
replace it at once.
2-2. Place the unit on a at, horizontal surface.
2-3. Plug the AC adaptor into the socket.
2-4. Place the switch to the “I” (ON) position.
2-5. Collapse the tubing on the antibacterial lter and check the vacuum gauge to test that the
unit makes vacuum without any leakage and this level varies when the vacuum regulator is
acted on.
Before using the device, the manufacturer advises you to clean and/or disinfect the accessories.
Switch o the device before any cleaning procedures and unplug the AC adaptor from the socket.
Cleaning of the device
Use only a damp cloth with antibacterial soap (non-abrasive and with dissolvents of any sort) to
clean the external surfaces of the main unit.
Caution:
Particular care should be taken to ensure that the internal parts of the device do not get in touch
with liquids.
Do not submerge in water as this will result in damage to the vacuum pump.
Do not use any cleaners or disinfectants that contain ammonia, benzene and/or acetone to clean
the unit.
Collection canister and connecting tubing
Detach the suction catheter (24), the manual regulator (23) and the connecting PVC tubing (22)
from the collection canister.
Disconnect the silicone tubing (20) from both the canister and the device.
Remove the canister from its holder. Keep it upright, and empty it (in the WC at home, in the
biological waste container in the hospital) and clean it after each use.
Disassemble it as below:
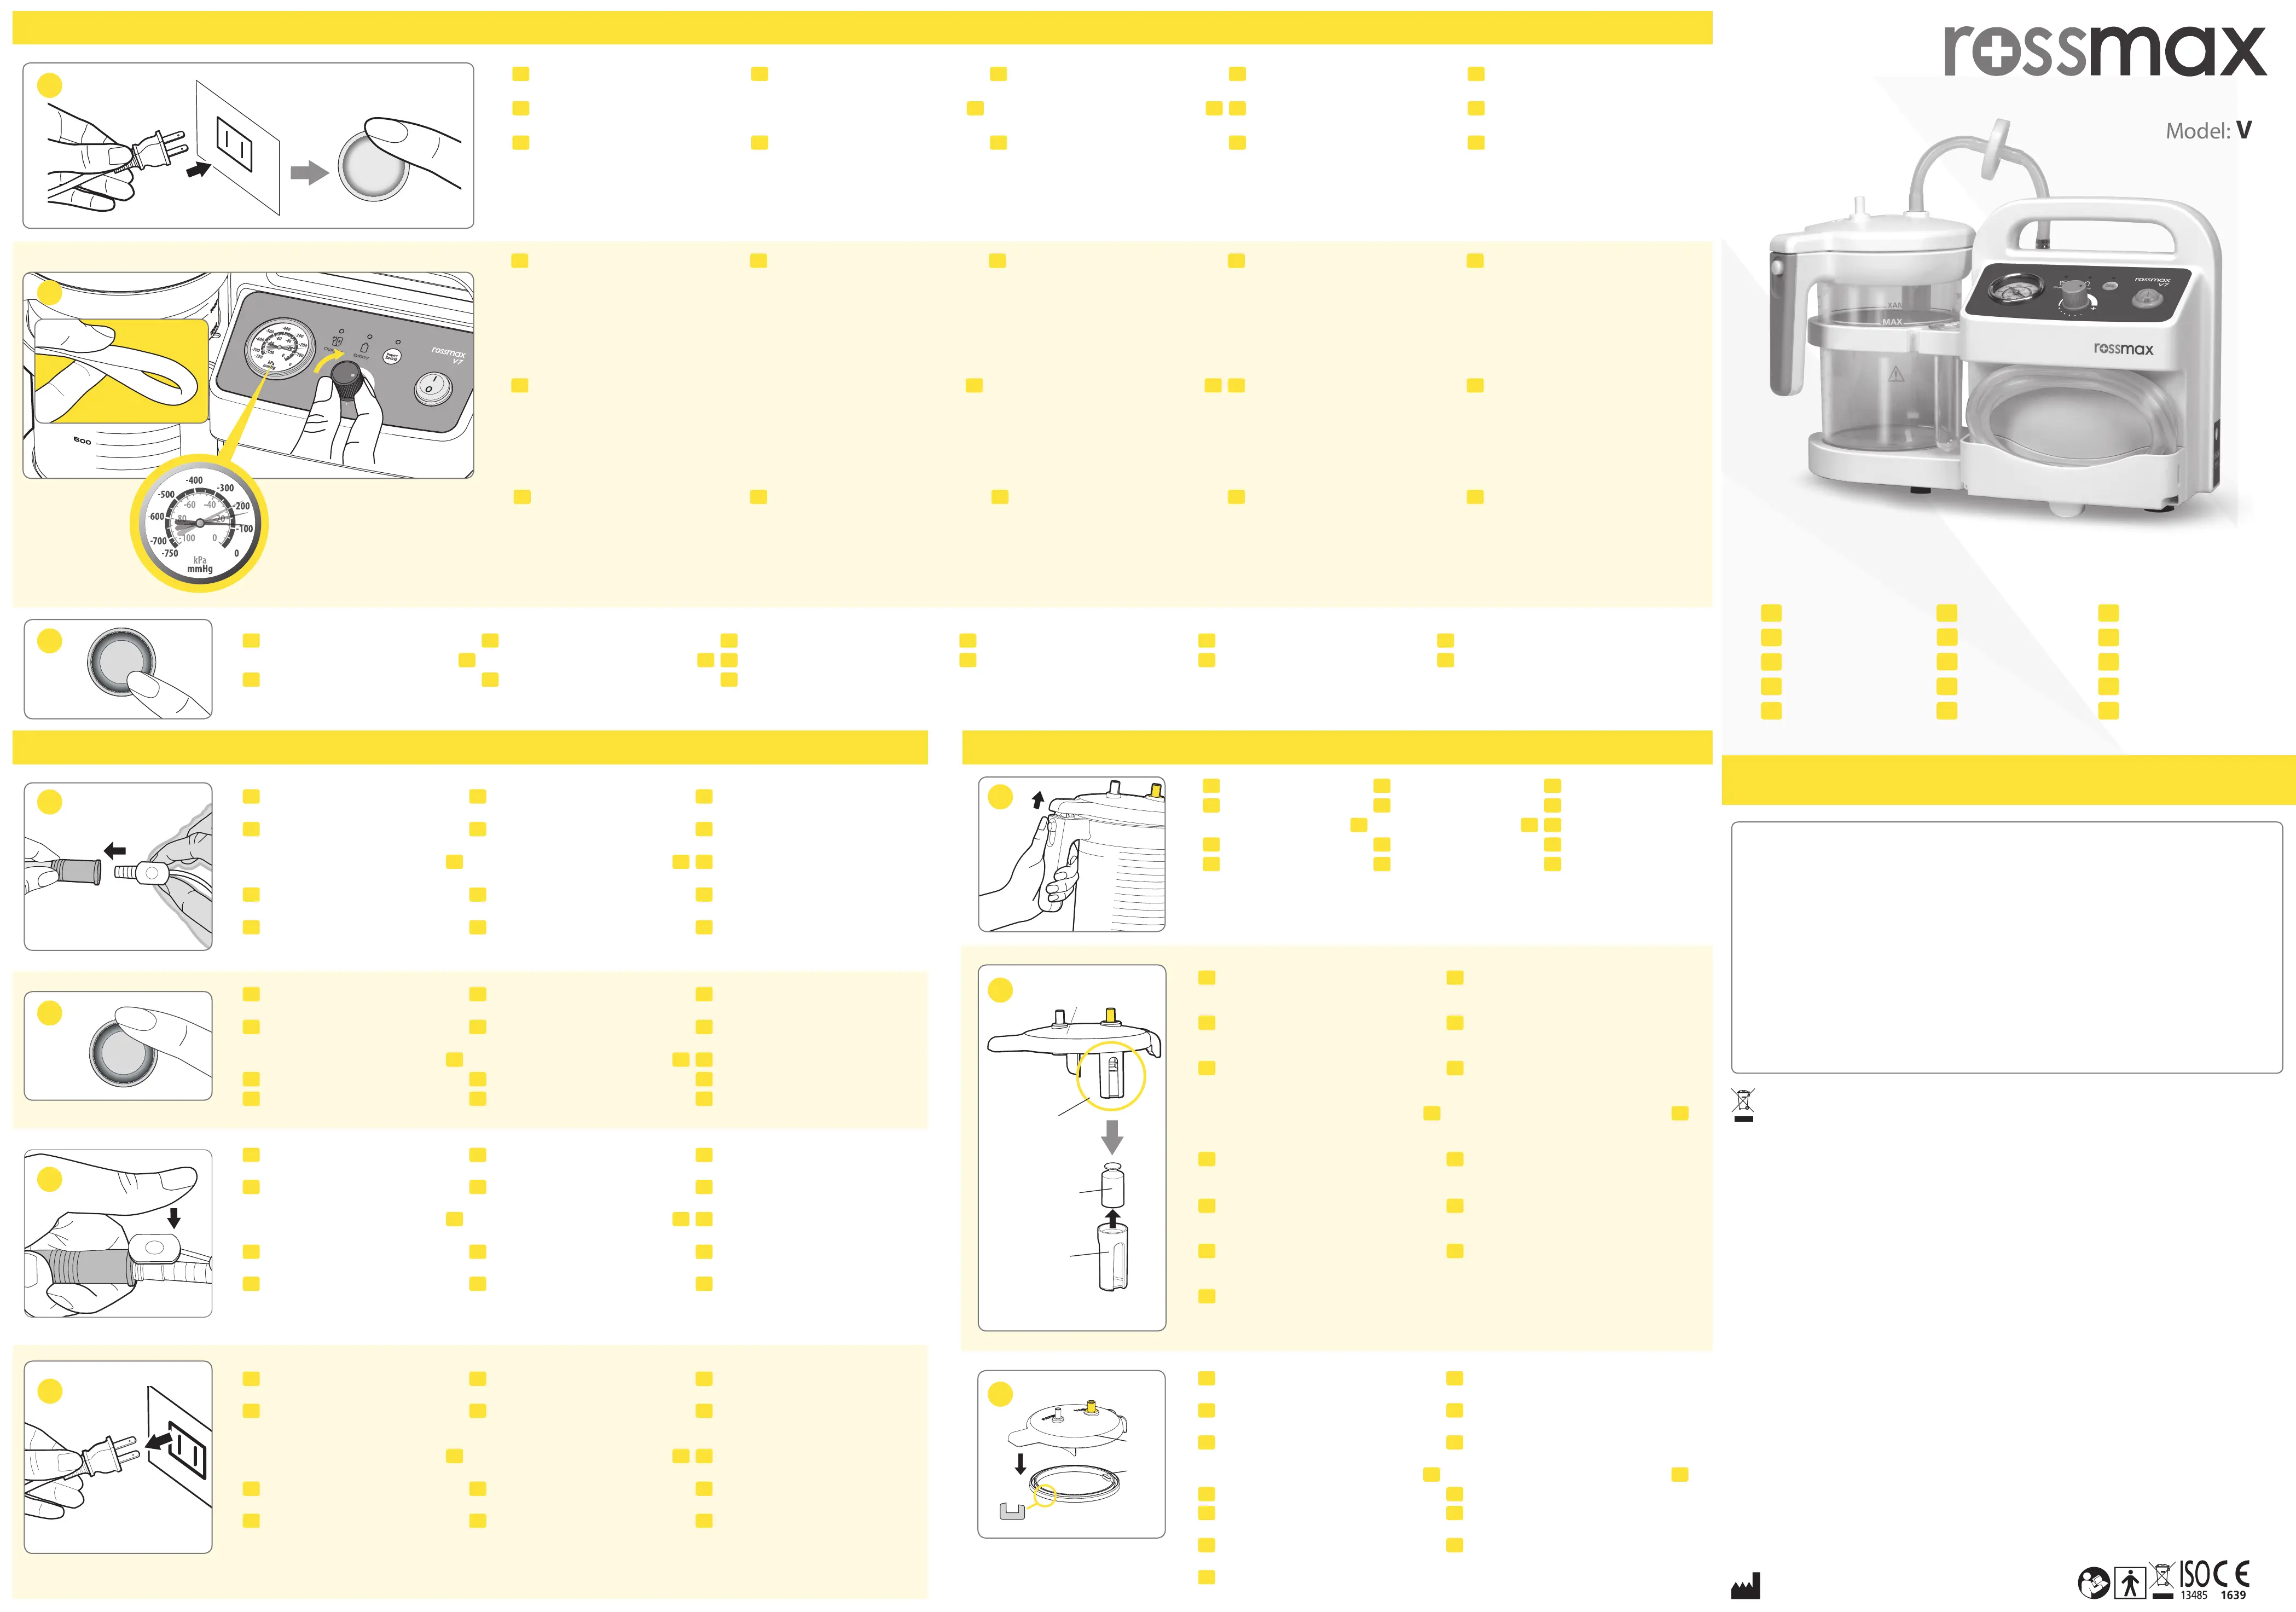
1. Open the collection canister by pressing the switch button.
2. Remove the overow valve (16) from the canister lid (15).
3. Remove the rubber valve and oat (16a) from the overow valve (16).
4. Remove the silicone gasket (15a) from the canister lid (15).
Sanitization and Disinfection operations
Warning:
To prevent possible risk of infection from contaminated cleaning/disinfection solutions, always
prepare fresh solution for each cleaning cycle and discard solution after each use.
Contaminated devices must be thoroughly cleaned prior to disinfection.
Personal protective equipment must be worn when handling contaminated equipment,
particularly tubing, lter and collection canister (protective clothing, disposable latex gloves, mask,
eye protection)
If any liquid accidentally enters in the main unit or in the pump, the unit may be damaged.
For this reason, we recommend not to use the aspirator. The failure should invalidate the guarantee
under the manufacturers responsibility.
AC Operation: Connect the AC adaptor with the AC adaptor jack on the right side of the unit. Plug
AC adaptor into a grounded wall-outlet power source.
Battery Operation: The suction unit is equipped with a factory-installed and high-capacity
rechargeable lithium-ion battery and has a LED light for low battery and charge indication. The
device is supplied with the battery partially charged. We therefore recommend fully charging the
battery for a minimum of 5 hours for initial use (please see battery charging).
Switch the device on by pressing the “ON/OFF” button and the green battery indicator comes on. If
the green light goes out during use, and the orange light comes on, there are about few minutes of
battery charge left (reserve level). Therefore, terminate the application if possible. If the application
cannot be terminated, it can be continued until the orange light ashes, but if this occurs do not use
the appliance for more than 3 minutes to avoid damaging the battery. To continue the application
with the battery at, connect the unit to an external power source.
WARNING: If you get the low battery warning symbol, immediately switch to use an AC adaptor
(external power source) to avoid an interrupted suction procedure. If the unit does not
receive external power or the battery does not get recharged immediately, the low
battery indicator keeps ashing and it will shut down rapidly.
Note:
1. When the battery power drops below a set level the aspirator shuts down to avoid damaging the
battery.
2. To operate the unit from an internal rechargeable battery, ensure that no external power source
(AC adaptor) is plugged into the suction unit. During charging or running of the unit, the power
supply may become warm to the touch. This is normal.
3. The AC adaptor can be used with the unit individually (without battery pack).
Battery charging: This GREEN light ashes while the battery is charging. The light will
illuminate when the battery is fully charged.
Low battery state: This ORANGE light ashes when the battery power is about to run out
and must be charged as soon as possible.
Middle battery state: This ORANGE light illuminates when there are about few minutes of
battery charge left (reserve level).
High battery state: This GREEN light illuminates when the battery has adequate power.
Power Saving state: This GREEN light illuminates when the Powering Saving operation is
activated.
Before using the rechargeable battery for the rst time, charge the battery for a minimum of 5 hours
to make sure it is fully charged.
When charging the battery, use an external power source (AC adaptor) and verify that the Green
charging indicator ashes when the power switch of the unit is in the O” (OFF) position.
The battery is NOT charged when the unit is in use, even the AC adaptor is plugged. Please be sure
that the device you are using has a battery installed prior to contacting your local distributor if the
battery is not charged.
Discharging the battery completely will shorten the life of the battery. If the low battery ORANGE
light ashes, do not operate the unit for more than 3 minutes. Recharge the battery as soon as
possible.
The GREEN charging indicator will keep ashing while the battery is charging.
As the battery nears a full charge, the high battery state GREEN light will illuminate, not ash.
Note:
1. Recharging the battery to full capacity may take up to 5 hours depending on the degree of
discharge. The battery should be recharged every month if the unit is not in use for extended
periods. The unit can be left charged when it is not in use to ensure that the battery is always
charged to the optimal level. A fully-charged battery will provide approx. 45 minutes under normal
operation and approx. 60 minutes under power saving operation/ economical mode. Operation
time will decrease with higher vacuum levels.
2. Unit run time will decrease as the battery ages.
Warning:
If the uid in the battery gets into your eye, wash the eye with sucient water without rubbing the
eye, then immediately consult the doctor for treatment. There is danger in losing your eyesight.
Do not use the exclusive battery pack other than those provided with the unit, or it will void the
warranty.
Do not throw the battery pack into re, or heat, or disassemble it. It may cause heat, ignition, short-
circuit, or rupture.
Caution:
Do not short-circuit the connector of the battery pack with a metal object such as wire.
If the uid in the battery is stained on your skin or clothes, immediately wash o the uid with
water. You may suer injury or the battery may leak, heat, ignite re, or explode.
1. Remove the screw on the battery cover located on the back side of the unit.
2. Disconnect the battery pack from the port and replace with a new one. Put the connector of
battery pack into the port of battery bay.
3. Install the battery cover and fasten it with screw. At this time, be careful not to pinch the lead wire.
4. Connect the unit with the AC adaptor, and then charge the battery pack.
The battery pack is partially charged. Before using the battery for the rst time, charge the battery
for a minimum of 5 hours to ensure it is fully charged.
Note:
1. Battery replacement must be performed following the above procedures. If there are any
problems, please contact your local distributor or authorized Rossmax service center for further
help.
2. It is recommended to replace the battery every 2 years, but the physical service life depends on
the number of uses. If the unit does not operate for more than 10 minutes after fully charging,
substitute the battery with a new one.
3. Batteries or damage from old batteries are not covered by warranty.
4. Batteries are hazardous waste. Do not dispose them together with the household garbage.
Power saving operation can extend the operating time of rechargeable battery up to 60 minutes
during service interruption and can also be used when low noise is needed.
1. Switch on the unit (ON/OFF switch).
2. Press the Power Saving key, and the indicator of Green light illuminates during use.
3. To deactivate the power saving operation and return to normal operation, press the Power
Saving key again, and the green light will go out.
13. Repairs must be done only by your local distributor or authorized Rossmax service center.
Unauthorized repairs void the warranty and may be hazardous for the user.
Attention: Do not modify this device without authorization from Rossmax.
14. The lter used by the same patient is recommended to be replaced after every application.
Attention: The antibacterial lter must be replaced for each new patient.
15. The suction catheter and the manual regulator are sterile, disposable products for single use and
must be replaced after every application.
Check the expiry date on the original packaging of the suction catheter and check the integrity of
the sterile packaging. If expired and/or deteriorated, replace it at once.
Attention: The suction catheter and manual regulator are not supplied by Rossmax.
Rossmax declines any responsibility for harm to the patient correlated to the deterioration
of the aforementioned sterile packaging due to THIRD PARTY handling during the original
packaging of the entire device
16. Do not use sterile accessories when the sterile packaging is damaged.
17. Do not connect this device to a passive drainage tube.
18. Do not operate the device on an obstructed, unstable surface to avoid incidents, which may cause
it to accidentally fall and lead to a malfunction and/or breakage. Should there be signs of damage
to the plastic parts, which may expose inner parts of the device, do not connect the plug to the
electrical socket. Do not attempt to make the device work before it has been thoroughly checked
by qualied personnel and/or authorized Rossmax service center
19. Never obstruct the air inlet positioned on the device.
20. Use of the device in ambient conditions other than those specied in the manual may seriously
impair its safety and technical characteristics.
21. Before cleaning the device, pull the plug out of the xed mains socket.
22. The connecting tubing supplied with the canister must never come into direct contact with the
suction area.
23. Never use while drowsy or asleep.
24. Always unplug the product immediately after use.
25. Use the device only in dust-free conditions, otherwise treatment could be compromised.
Caution:
1. Use only for the purpose intended. Do not use for anything other than the use dened by
the manufacturer. The manufacturer will not be responsible for damage due to improper use or
connection to an electrical system not complying with current regulations.
2. Do not tip the canister over while the device is working as the liquid may be aspirated into the device
causing pump damage. Should this occur, immediately switch o the suction machine, then empty
and clean the canister. Immediately bring the device to your local distributor or authorized Rossmax
service center.
3. Ensure that the connecting tubing and the canister lid have been carefully sealed in order to avoid
leakage of suction.
4. When the overow valve intervenes, suction is halted. Switch o the device, empty the canister and
carry out the cleaning procedures.
5. In the event of aspiration without the canister and/or antibacterial lter, or if it is suspected that
substances have entered the aspiration circuit, contact your local distributor or authorized Rossmax
service center at once.
6. Portable and mobile RF communications equipment can aect medical devices.
7. The AC adaptor and rechargeable battery provided have been specically designed for use with
Rossmax series aspirators. Never use the AC adapter and rechargeable battery with other devices or
for uses other than those specied in this manual, and never use Rossmax series aspirators with other
power supply units.
8. Before connecting the device always check that the electric data indicated on the data label and the
type of plug used.
9. The device casing is not waterproof. Do not wash the device under running water or by immersion
and keep it safe from being sprayed by water or other liquid.
10. Keep the AC/DC switching adaptor away from animals (for example, rodents) which could damage
the insulation.
11. Keep the device and AC/DC switching adaptor away from sources of heat, direct sunlight or extreme
hot locations.
12. When the liquid level reaches 50% of the total volume of the collection canister, it is recommended
to empty or change it before the overow valve acts, in this way the risk of the entrance of humidity
in the antibacterial lter is minimized.
13. The Rechargeable Lithium-ion battery integrated in the device is not to be considered as an ordinary
domestic waste. Such a component must be disposed of in a specic collection center in order to
be recycled.
2-6. Obstruct the connecting tubing and adjust the level of vacuum prescribed by the doctor in the
vacuum gauge turning the vacuum ow adjustment knob/ vacuum regulator.
Note: The vacuum regulator can be used to set the level of vacuum required (mmHg/kPa). Turn
the regulator clockwise, in the “+” direction, to obtain a higher vacuum; or anticlockwise for
a lower vacuum; these values can be read on the vacuum gauge.
Important: The vacuum values on the control decal are purely for guidance; always refer
to the reading shown on the vacuum gauge.
Note: Gauge is for reference only. If the unit sustains a severe drop, accuracy of the gauge must
be checked.
2-7. Place the switch to the “O” (OFF) position.
Note: 1. The device is intended to be used on a at, horizontal surface in order for the overow
valve to function correctly and prevent liquids from entering the suction pump. The
device must be kept away from walls to allow for adequate engine cooling.
2. In case unit is dropped, always transport unit with vacuum regulator rotated fully clockwise.
3. Starting the Suction
3-1. Connect the suction catheter to the connecting PVC tubing (Ø7mm, 180cm).
Note: suction catheter and manual regulator are not supplied by Rossmax.
3-2. Switch on the unit (ON/OFF switch).
3-3. Place your nger on the manual regulator to activate the suction, begin suction on the patient
using the suction catheter. The unit is ready to put the suction catheter to the patient.
3-4. After application, switch o the device and remove the AC adaptor from the mains socket.
Perform the cleaning operations as described in the “"cleaning, sanitization, disinfection ".
paragraph.
Note: A 30-minute interval is recommended after each use. Do not operate the device continuously
for more than 30 minutes for a single use without turning it o and following with a cooling
period for at least 30 minutes.
3. Unit run time will also be reduced by letting the battery sit at a discharged state for extended
periods.
Storage Note: Battery should be charged for a minimum of 5 hours prior to storage, and at least
once every month.


Product specificaties

Merk: Rossmax
Categorie: Medisch
Model: V7

Heb je hulp nodig?

Als je hulp nodig hebt met Rossmax V7 stel dan hieronder een vraag en andere gebruikers zullen je antwoorden