Rossmax HS200 Handleiding


Lees hieronder de 📖 handleiding in het Nederlandse voor Rossmax HS200 (2 pagina's) in de categorie Meetapparatuur. Deze handleiding was nuttig voor 10 personen en werd door 2 gebruikers gemiddeld met 4.5 sterren beoordeeld

Pagina 1/2
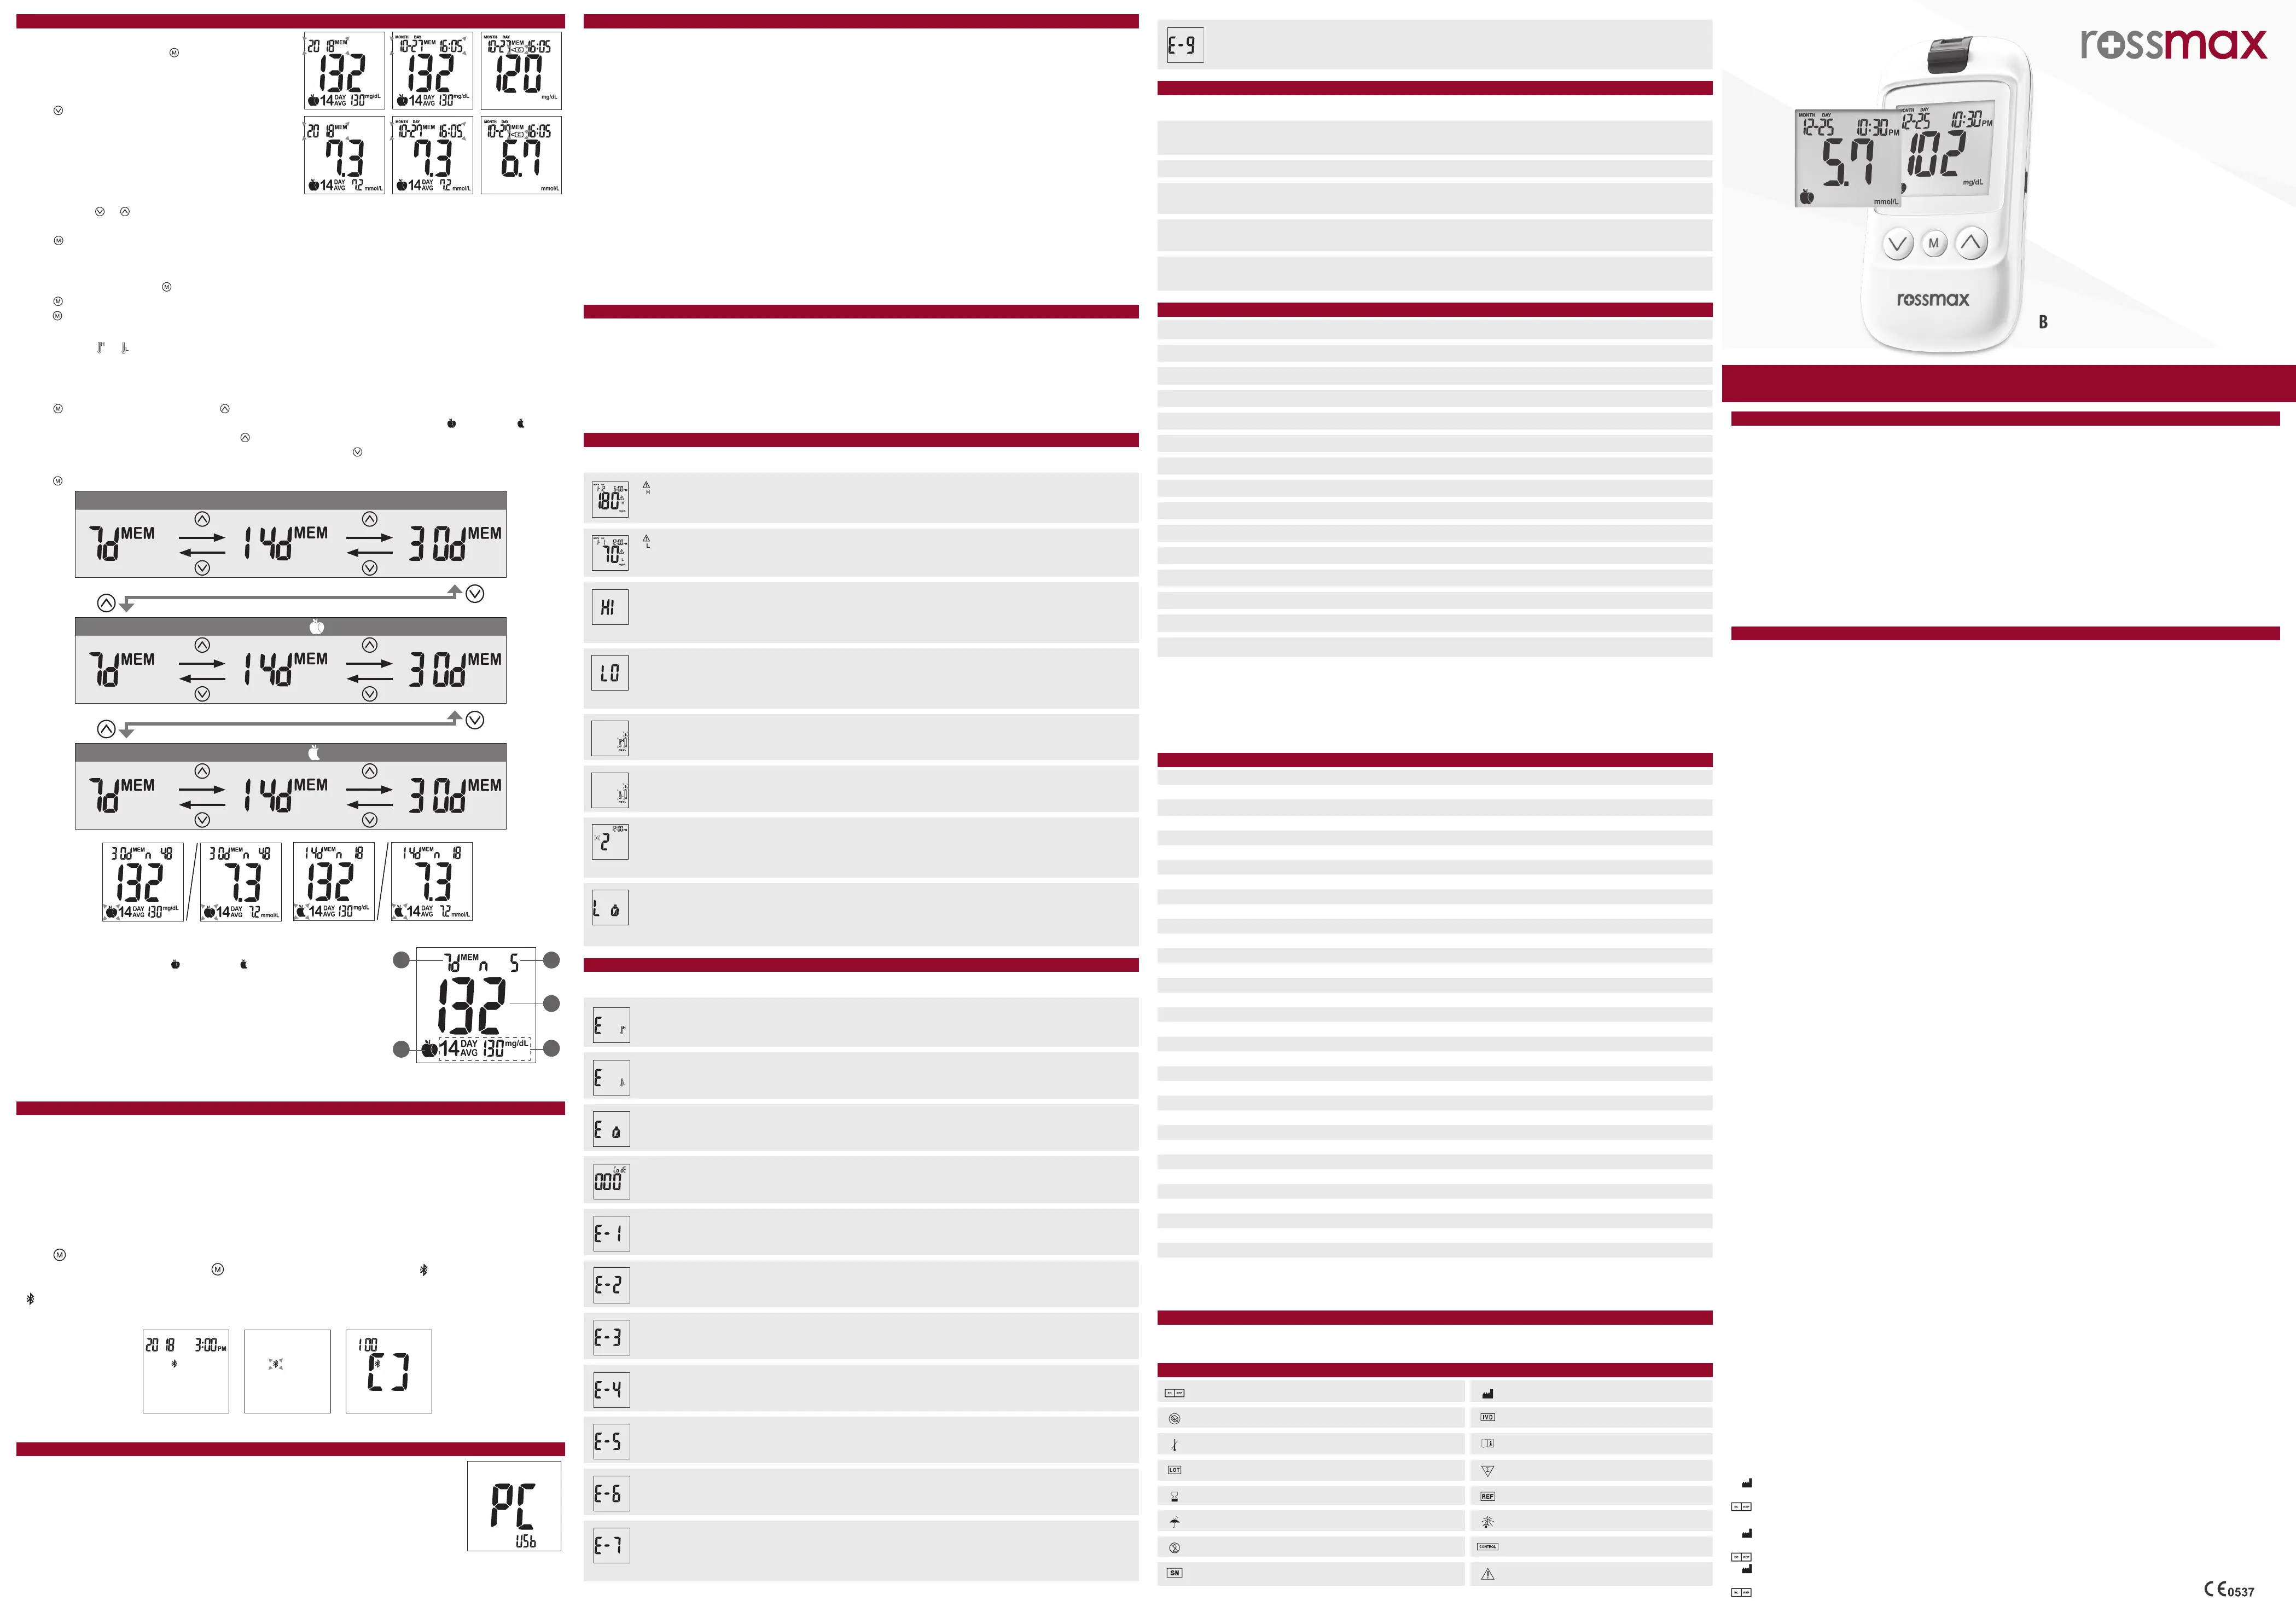
1. The time period for glucose results average
2. Meal ag (no meal / pre-meal / post-meal ).
3. The number used for time period based glucose results average.
4. The average glucose result calculated based on time period (upper left),
number of results (upper right) and meal ag (lower left).
5. The average glucose result calculated from all 14 day test results.
Note:
1. The consecutive 7/14/30 time period based glucose results average is
calculated from the test results obtained during the last consecutive
7/14/30 day periods.
Manufacturer of Blood Glucose Meter, Test Strip and Control Solution
Tyson Bioresearch, Inc.
5F., No. 16, 18, 20, 22, Kedong 3rd Rd., Zhunan Township, Miaoli County 35053, Taiwan
Medical Device Safety Service GmbH Schiffgraben 41, D-30175 Hannover, Germany
Manufacturer of Lancet and Lancing Device
Shandong Lianfa Medical Plastic Products Co., Ltd.
No.1 Shuangshan Sanjian Road 250200 Zhangqiu City, Jinan, Shandong PEOPLE’S REPUBLIC OF CHINA
Shanghai International Holding Corp. GmbH (Europe) Eiestraße 80, 20537 Hamburg, GERMANY
MEDIFUN CORPORATION (Lancing Device Only)
4F-1, 4F-9, 4F-10, No. 99, Jingke S. Rd., Nantun Dist.,Taichung City 408, Taiwan (R.O.C.)
MDSS GmbH Schiffgroben 41,30175 Hannover, Germany
Other problems which may occur Action
A test strip has not been inserted into the meter
properly.
Review the instructions and re-insert a test strip
correctly.
Defective test strip. Replace with a new test strip.
A test strip remains in the test port for more than 2
minutes before testing.
Review the instructions and re-insert a test strip
correctly.
LCD display on the meter is blank when trying to
perform a test.
Please return the device to your local distributor or
service center.
The meter does not function after new batteries are
installed.
Please remove batteries and wait for 1 minute, reinstall
batteries to see if meter is working properly.
Authorised Representative in the European Community Manufacturer
Do not use if package is damaged In vitro diagnostic medical device
Temperature limitation Consult instructions for use
Batch code Sucient for
Use by Catalogue number
Keep dry Keep away from sunlight
Do not reuse Control
Serial Number Caution
Trouble Shooting
Explanations of Symbols
Operation Temperature 10°C ~ 40°C (50°F ~ 104°F)
Operation Humidity 10 ~ 90% RH
Hematocrit 0 ~ 70%
Test Sample Venous and Capillary Whole Blood (ngertip, palm, forearm)
Sample Volume 0.7 ÂľL
Measuring Unit mg/dL or mmol/L
Measuring Range 20 ~ 600 mg/dL (1.1 ~ 33.3 mmol/L)
Test Time 5 seconds countdown
Memory Capacity 500 most recent results
External Output USB Type-C Interface
Average 7/14/30 days average
Power supply 2 AAA batteries
Battery Life Approximately 1000 tests
Dimension 108L x 55W x 17H mm
Weight 52 g without batteries
Note: Please refer to the Test Strip Insert for the performance of system accuracy and precision.
Electromagnetic Compatibility
This Meter meets the electromagnetic compatibility requirements as per EN 61326-1 and EN 61326-2-6.
Caution: Strong electromagnetic elds may interfere with the proper operation of the meter. Do not use the
meter close to sources of strong electromagnetic radiation.
Interference substance Highest tested concentration with no signicant interference
Acetaminophen 4.25 mg/dL
Ascorbate(Ascorbic acid) 3 mg/dL
Bilirubin 25 mg/dL
Cholesterol 1200 mg/dL
Creatinine 10 mg/dL
Dopamine 2 mg/dL
EDTA 200 mg/dL
Galactose 500 mg/dL
Gentisic acid 2.5 mg/dL
Glutathione 3.07 mg/dL
Haemoglobin-HUMAN 3000 mg/dL
Heparin 5 IU/ml
Hydrogenated starch hydrolysates (HSH) 0.09 mg/dL
Ibuprofen 50 mg/dL
Icodextrin 750 mg/dL
Isomalt 0.09 mg/dL
Lactitol 0.09 mg/dL
L -DOPA(L-3-4 dihydroxyphenylalanine) 0.5 mg/dL
Maltose 2575 mg/dL
Maltitol 0.09 mg/dL
Mannitol 0.09 mg/dL
Methyldopa 2.5 mg/dL
Pralidoxime iodide (PAM) 5 mg/dL
Salicylate 50 mg/dL
Sodium Carbonate 37.5 mEq/L
Sorbitol 0.09 mg/dL
Tolbutamide 100 mg/dL
Tolazamide 6 mg/dL
Triglycerides 1525 mg/dL
Uric acid 8 mg/dL
Xylose 5 mg/dL
Xylitol 0.09 mg/dL
Warning Xylose
Xylose would result in the overestimation of blood glucose reading if the blood sample containing xylose with the concentration over 5 mg/
dL. Do not use this system during or shortly after receiving xylose absorption therapy since xylose may case inaccurate blood glucose results.
Specications
Tolerance summary of interference substance
• Transport and store at temperature -20°C ~ 50°C ( -4°F ~ 122 °F), Less than 90% RH
• Precision instrument, do not crash when being transported.
Caution:
• Rossmax HS200 Blood Glucose Monitoring System is designed for in vitro diagnostic use only and is not intended
to test on neonate.
• Any change or administer of medication based on the Rossmax HS200 blood glucose test results without the con-
sent advice of a physician or healthcare professional is not recommended.
• The Rossmax HS200 Blood Glucose Test Strip are designed for use with fresh venous whole blood or capillary whole
blood samples obtained from the ngertip, palm and forearm. DO NOT use samples other than venous whole
blood or capillary whole blood.
• False results may occur when performing the test while severely dehydrated, severely hypotensive, in shock or in
a hyperglycemic-hyperosmolar state. If you believe you are suering from any of the above symptoms, consult a
healthcare professional immediately.
• Please refer to Rossmax HS200 Blood Glucose Test Strip Package Insert to access further information on strip Limi-
tations.
IMPORTANT
• The Rossmax HS200 Blood Glucose Meter, Rossmax HS200 Blood Glucose Test Strip and Control Solution are in
conformity with the IVDD 98/79/EC.
• Rossmax HS200 Blood Glucose Monitoring System manufacturer warranty is valid only when used properly within
the guidelines of this User Manual provided.
• The Lancing device and Lancets are in conformity with the MDD 93/42/EEC.
Manufacturer Warranty
This instrument is covered by a 3 year guarantee from the date of purchase, batteries and accessories are not in-
cluded. The guarantee is valid only on presentation of the guarantee card completed by the dealer confirming date
of purchase or the receipt. Opening or altering the instrument invalidates the guarantee. The guarantee does not
cover damage, accidents or non-compliance with the instruction manual. Please contact your local seller/dealer or
www.rossmax.com.
Customer Name: ___________________________________________________________________________
Address: __________________________________________________________________________________
Telephone: ________________________________________________________________________________
E-mail address: _____________________________________________________________________________
Product Information:
Date of purchase: ___________________________________________________________________________
Store where purchased:
__________________________________________________________________________________________
Meter Storage
Limitations of the Procedure
Service and Warranty
Display Description Action
appears when the result
is HIGHER than the “HI” alert
setting.
The default setting is 180mg/dL or 9.5mmol/L and it can be changed
according to ÂŤSetting Up the HI/LO AlarmsÂť
appears when the result
is LOWER than the “LO” alert
setting.
The default setting is 70 mg/dL or 3.2mmol/L and it can be changed
according to ÂŤSetting Up the HI/LO AlarmsÂť
Test result is HIGHER than 600
mg/dL (33.3 mmol/L).
Repeat the test by using a new test strip. If the same message displays
again, the result is confirmed to be higher than the meter operating
range. Please consult your healthcare professional immediately for
further advice.
Test result is LOWER than 20
mg/dL (1.1 mmol/L).
Repeat the test by using a new test strip. If the same message displays
again, the result is confirmed to be lower than the meter operating
range. Please consult your healthcare professional immediately for
further advice.
Temperature is TOO HIGH
during the test procedure.
Large variation may occur between results due to high or low
temperature. Move to an environment (10˚C ~ 40˚C or 50˚F ~ 104˚F)
and wait for 30 minutes before re-testing.
Temperature is TOO LOW
during the test procedure.
Large variation may occur between results due to high or low
temperature. Move to an environment (10˚C ~ 40˚C or 50˚F ~ 104˚F)
and wait for 30 minutes before re-testing.
The preset alarm is ringing to
remind the user that it is time
to perform a blood glucose
test.
Please press any button to turn off the alarm or wait for the alarm to be
turned off automatically in 30 seconds.
Battery power is LOW.
Meter will only provide
approximately 10 more
measurements.
Replace with 2 AAA batteries.
Display Description Action
Temperature is TOO HIGH to
perform a test.
Move to an environment (10˚C ~ 40˚C or 50˚F ~ 104˚F) and wait
for 30 minutes before re-testing.
Temperature is TOO LOW to
perform a test.
Move to an environment (10˚C ~ 40˚C or 50˚F ~ 104˚F) and wait
for 30 minutes before re-testing.
Battery power is depleted for any
further usage.
Replace with 2 AAA batteries immediately.
This message is displayed when
your meter has NOT been coded.
Please return the device to your local distributor or service center.
An error message indicates a
problem with the test strip.
Please review the instructions and try again with a new test strip.
If the problem persists, please return the device to your local
distributor or service center.
An error message indicates a
problem with the test strip or
meter.
Please review the instructions and try again with a new test strip.
If the problem persists, please return the device to your local
distributor or service center.
An error message indicates a
problem with the meter.
Please remove batteries and wait for 1 minute, reinstall batteries
to see if meter is working properly. If the problem persists, please
return the device to your local distributor or service center.
An error message indicates a
problem with the test strip.
Please review the instructions and try again with a new test strip.
If the problem persists, please return the device to your local
distributor or service center.
An error message indicates a
problem with the meter.
Please remove batteries and wait for 1 minute, reinstall batteries
to see if meter is working properly. If the problem persists, please
return the device to your local distributor or service center.
An error message indicates a
problem with the test strip.
Please review the instructions and try again with a new test strip.
If the problem persists, please return the device to your local
distributor or service center.
An error message indicates
insucient volume of blood
sample for the test.
Review the instructions and try again with a new test strip, then
applying a sucient blood sample to the test strip. Please return
the device to your local distributor or service center if the problem
persists.
Display Messages
Error Messages
Initial Set-Up
Please visit the website at http://www.rossmax.com for the initial set-up instructions.
1. Download and install the applicable APP onto your mobile device.
2. Turn the meter (refer to “ Preparing Test Strip” section ), Bluetooth and the APP of mobile device on and follow set-
up and pairing instructions.
3. If the pairing is successful, once the measurement is done, the current measured reading will automatically be
transferred to the APP.
Transfer Memory data
1. Turn Bluetooth your mobile device and applicable APP on.
2. Press to turn on the meter (Fig. 49).
3. When the meter is switched ON, hold for 4 seconds to enter Bluetooth mode. will appear and ash on the
meter if the meter is not never paring with a mobile device. (Fig. 50).
4. stops blinking when the meter & mobile device is connected.
5. Press the button on APP to transfer data. The meter will display while data are being transferred (Fig. 51).
You can use PC Link to transfer test results to your personal computer. Obtain the required
software and USB Type-C cable to be ordered separately. Please visit the website at http://
www.rossmax.com for proceeding the downloading and installation process.
1. Follow the instructions provided with software to install the software into your personal
computer.
2. Connect the interface cable to a USB port on your computer while the meter is o.
3. Connect the other end of interface cable to the data port located on the side of the meter.
4. The word "PC" will appear on the display indicates that the meter is now in the communication
mode (Fig. 52).
General Cleaning
• Switch the meter OFF.
• Use a soft cloth moistened with water or a mild detergent, gently wipe the meter surface.
• Please avoid using alcohol or organic solvents in cleaning.
• Do not immerse the meter in water when cleaning. Do not allow water or cleaning uids into the meter, test port,
and data port.
Professional Disinfection
Applicable for people who use the blood glucose meter
• Cleaning solution and disinfecting solution: Clorox Bleach Germicidal Wipes ( Clorox Professional Products Company.
EPA Reg. No. 67619-12). Contact Clorox Company at 1-800-537-1415.
• Personal Protection: Sanitize hands, and then put on gloves before removing a germicidal wipe from the canister.
When handling items soiled with blood or body uids, use disposable latex gloves, gowns, masks and eye coverings.
• Meter: turn it o
• Wipe: Clorox Bleach Germicidal Wipes by thoroughly wetting the exterior of the meter, allow the surface to stay wet
for 1 minute then allow to air dry.
• Disposal of Infectious Materials: Use disposable gloves. Never reuse or re-wet a disposable wipe. Dispose of according
to local regulations for infectious waste disposal.
• Please refer to the Clorox Bleach Germicidal Wipes detailed usage instructions.
Please handle the meter with care. Dropping the meter may result in damage.
1. Do not expose the meter, test strips, and the Control Solution to extreme conditions such as high humidity, heat,
freezing cold, or dust.
2. The meter should be stored at room temperature in a dry and clean area. DO NOT STORE IN DIRECT SUNLIGHT OR
AREAS WITH HIGH HUMIDITY AND/OR DUST.
It is advised that you store all parts of Rossmax HS200 Blood Glucose Monitoring System in the carrying bag
provided.
How to view results stored in the memory
1. When the meter is o, press button to turn on the
meter. The Data and Time will be shown on (At the left-
upper corner. Firstly the year is shown for 1 second, and
then Month-Day will be shown on in the same area.)
2. Press to view previous results. “MEM” icon will be dis-
played on the top center area. Initially, the “year” will be
display on the top left corner (Fig.43). After 1 second
“month-day” will then be displayed on the top left cor-
ner and “time” will be displayed on the top right corner
(Fig. 44). The most recent memory results will be dis-
played rst.
3. You can press or to scroll forwards and backwards
through the results.
4. Press button to exit the stored test results or the meter will be shut o automatically after 2 minutes without
any action.
How to view the control solution test result in the memory
1. When the meter is o, press button to turn on the meter.
2. Press button again, and the latest control solution test result will be displayed (Fig. 45).
3. Press button to turn o the meter or the meter will be shut o automatically after 2 minutes without any action.
Note:
1. A result with or symbol indicates that the reading was taken out of the meter’s specied operation
temperature range and may not be accurate. This value is excluded from the 7/14/30 time period based
glucose results average.
View Time Periods Based Average Glucose Results
1. Press to turn the meter on, then Press button to view time periods based average glucose results.
2. 7/14/30 time periods based average glucose results marked with a no meal / pre-meal / post-meal and will
be displayed on screen in sequence when is pressed (Fig. 46 ~ 48 ).
3. When the meter displays 7 days with no meal status assigned, press button and the meter will then change to
view stored test results in memory.
4. Press button to turn o the meter or the meter will be shut o automatically after 2 minutes without any action.
Bluetooth Data Transfer (optional)
PC Data Transfer (optional)
Cleaning and Disinfection Procedure
Care and Storage
Recalling Values from Memory
(Fig. 49) (Fig. 50) (Fig. 51)
(Fig. 52)
(Fig. 44) (Fig. 45)(Fig. 43)
2
3
4
5
1
(Fig. 47) (Fig. 48)
All results
Results marked with (pre-meal)
Results marked with (post-meal)
(Fig. 46)
An error message indicates a
problem with the meter.
Please remove batteries and wait for 1 minute, reinstall batteries
to see if meter is working properly. If the problem persists, please
return the device to your local distributor or service center.
 Rossmax Swiss GmbH, 9435 Heerbrugg, Switzerland, www.rossmax.com
Model: HS200
www.rossmax.com
lood Glucose Monitoring System
Instruction Manual
IN5HS200000000013
RM_IB_HS200_
EN_ver2324
Palm and Forearm
Rossmax HS200 Blood Glucose Monitoring System provides you
alternative sites testing (AST). This system provides you to test on the
palm and the forearm with the equivalent results to ngertip testing.
Caution:
Physiological dierences in the circulation between the nger and
other test sites like the forearm and palm may result in dierences
in blood glucose measurements from the other test sites and your
ngertips. Changes in blood glucose may be observed in nger
blood samples sooner than blood samples from the forearm and
other alternative sites. Rub the alternative test sites about 20
seconds before lancing. If you are testing for hypoglycemia (low
blood glucose), or if you suer from hypoglycemia unawareness,
we recommend that you test on your ngertips.
Talk to your doctor to see if alternative site testing is right for you.
With a little bit of education, you can give your ngertips a rest and
maybe test more often than you do now. For people with diabetes,
more frequent testing is a good thing. Just remember: any time you
want to be sure of an accurate, up-to-date blood glucose reading,
test on your ngertip. We strongly recommend you do.
AST ONLY in the following intervals:
• In a pre-meal or fasting state (more than 2 hours since the last meal).
• Two hours or more after taking insulin.
• Two hours or more after exercise.
1. Unscrew the lancing device cap (Fig.25).
2. Place a lancet into the lancing device (Fig.26).
3. Twist and pull to remove the protective lancet cap to
expose the sterile needle, save the cap for later use (Fig.
27).
4. Screw the lancing device cap back on. Select the skin
penetration depth preferred (Fig. 28).
5. Pull the barrel back until you hear a ‘click’ sound (Fig. 29).
6. Place the lancing device softly against the nger, palm,
or forearm, and press the release button to obtain a
blood sample (Fig. 30).
To unload the lancing device
1. After sampling, remove the cap containing the used
lancet carefully.
2. Push the exposed tip of the lancet into its Protective Cap
(Fig.31). Slide the Lancet Ejector forward and disposing
the used lancet in an approved container.
For further instructions please see the insert provided with
the lancing device.
CAUTION:
To reduce chances of infection:
• Always use a new and sterile lancet. Lancets are for single usage only.
• Wash hands thoroughly with soap and water before and after handling the meter, lancing device, and test
strips.
• Please refer to “Cleaning and Disinfection Procedure” section for detail instructions of meter maintenance.
SAMPLE MAY BE OBTAINED FROM FINGER, PALM OR FOREARM
1. After obtaining a blood sample, discard the rst drop to prevent contamination. Introduce the tip of the test strip
to the drop of blood. Blood sample will be automatically drawn into the test strip (Fig. 32).
2. Hold the tip of the test strip touching the blood drop until the meter beeps.
3. As soon as the blood has completely lled the conrmation window of the test strip, the meter will start a
countdown. The test result will appear on the display after 5 seconds and will be automatically stored into the
meter memory (Fig. 33).
Sucient
Blood
Insucient
blood
The Control Solution is to ensure that Rossmax HS200 Blood Glucose Meter is working properly and the user is
performing a test correctly, please contact your local distributor or service center on where to obtain control solution.
When to Perform a Control Solution Test
1. You get your meter for the rst time before testing your blood test.
2. You open a new vial of test strips.
3. You want to check the meter and strips.
4. You suspect that the meter or test strips are not working properly.
5. Your blood glucose test results are not consistent with how you feel.
6. You think your test result does not accurate.
7. You dropped your meter.
8. Whenever your healthcare professional recommends it.
Note: For more information regarding the Control Solution, please read the Control Solution package insert.
Performing a Control Solution Test
1. Prepare a vial of Rossmax HS200 Blood Glucose Test Strip within the use by date and a Rossmax HS200 Blood
Glucose Meter.
2. Be sure of the Rossmax HS200 Blood Glucose Meter, Rossmax HS200 Blood Glucose Test Strip and Control Solution
are at room temperature between 15°C ~ 35°C (59°F ~ 95°F) before testing.
3. Insert a Rossmax HS200 Blood Glucose Test Strip into the test port. The meter will be automatically turned ON (Fig.
39).
4. When test strip is inserted, a beep will sound if the buzzer is turned on and the system checking will appear
followed by a ashing “ ” icon (Fig. 40).
5. Press and hold button for 2 seconds to change to the Control Solution test mode. " " will appear on the
display. If button is pressed again for 2 seconds, the meter will switch back to the normal testing mode.
6. Shake the Control Solution gently. Discard the rst drop of the Control Solution and squeeze a small drop on a
clean nonabsorbent surface such as a clean piece of wax paper (Fig. 41). Do not apply the Control Solution to the
test strip directly from the bottle, as contamination may occur.
7. Introduce the tip of the test strip to the droplet of the Control Solution. The Control Solution is automatically
drawn into the strip. Hold until the meter beeps. The meter will now start to count down and the Control Solution
test result will appear on the LCD screen (Fig. 42).
Thank you for choosing Rossmax HS200 Blood Glucose Monitoring System to monitor your blood glucose level.
It is designed to be accurate, easy to use, and quick in response time. This User Manual will provide you with all
the information you need to operate and maintain Rossmax HS200 Blood Glucose Monitoring System. Please read
carefully and completely before use.
Rossmax HS200 Blood Glucose Meter can be used with:
Rossmax HS200 Blood Glucose Test Strip
Rossmax HS200 Blood Glucose Monitoring System is for quantitatively measuring glucose (sugar) in whole blood
obtained from the ngertip, palm, and forearm; or venous whole blood. It is Only for use outside the body (For
in vitro diagnostic use) and intended for self-testing at homes and under professional settings to monitor blood
glucose levels.
Test Principle
On each test strip there is a target area containing reaction chemicals. When blood is applied to this area, a chemical
reaction takes place, then a transient electrical current is formed. The blood glucose concentration is calculated
based on the electrical current detected by the meter, then the result is showed on the display. The test measures
glucose from 20 mg/dL (1.1mmol/L) to 600 mg/dL (33.3mmol/L). The Rossmax HS200 Test Strip is calibrated to
display the equivalent of plasma glucose values to allow easy comparison of results with laboratory methods.
Caution
• Do not use the device to diagnose diabetes; it is intended for regular monitoring only.
• Consult your physician with regard to insulin doses. Installing/Replacing Batteries (Fig.1)
1. From the back of the meter, gently slide and remove the
battery cover.
2. Install batteries with the + and – ends matching
indication marks on the battery compartment.
The meter requires 2 AAA batteries.
3. Slide battery cover back into place.
Setting Date/Time
1. When the meter is o, press and hold button for 4 seconds to enter this setting mode.
2. Press or to select “24hr” or “12hr”. Press to conrm (Fig.2).
3. The numbers of “year” will appear and ash. Press or to adjust and Press to conrm (Fig.3).
4. The number of “month” will appear and ash. Press or to adjust and press to conrm (Fig.4).
5. The numbers of “day ” will appear and ash. Press or to adjust and press to conrm (Fig.5).
6. The numbers of “hour” will appear and ash. Press or to adjust and press to conrm (Fig.6).
7. The numbers of “minute” will appear and ash. Press or to adjust and press to conrm (Fig.7).
The set date and time will now display on the LCD screen (Fig.8, Fig.9).
8. Press to turn o the meter. The meter date/time setting is complete.
Before Testing
• Always keep test strips in the original vial. Tightly close the vial cap immediately after removing a test strip.
• Use each strip immediately after removing it from the vial. Each test strip should be used ONCE ONLY.
• Do not use test strips or Control Solution beyond the expiration date printed on the package since this may cause
inaccurate results.
• Store your test strips and the meter in a cool, dry place between 4°C and 30°C (39°F and 86°F). Temperatures beyond
this range, as well as humidity, can damage test strips and lead to inaccurate results.
• Any change of medications based on the Rossmax HS200 Blood Glucose Monitoring System results without advices
of a doctor is NOT RECOMMENDED.
• The lancing device is intended only for single user and should NOT be shared.
• Only Rossmax HS200 Blood Glucose Test Strips and Control Solution can be used with the Rossmax HS200 Blood
Glucose Meter.
• For accurate results, testing must be done within the operating temperature range (10 - 40°C/ 50 - 104°F). If the
meter is moved to an area appropriate conditions from where is out of operating temperature range, place the
meter for 30 minutes before conducting the testing.
Before testing, you need the following items:
• Rossmax HS200 Blood Glucose Meter
• Rossmax HS200 Blood Glucose Test Strip
• Lancing device and sterile lancet
Preparing the Test Strip
1. Wash hands using soap and warm water. Rinse and dry thoroughly (Fig. 20).
2. Please remove protective wrap completely before opening the vial.
3. Check the use by date on the test strip vial; use only test strips which are within the use by date. Take a test strip
from the vial and re-cap the vial immediately (Fig. 21).
4. Insert the test strip, top side facing up into the test port. The meter will automatically turn on (Fig. 22).
5. System checking will appear (Fig. 23).
6. A beep will sound, you can press or to select the meal indicator for marking the test as pre-meal test ,
post-meal test , or no marker (default) (Fig. 24).
Note: Check if your meter displays the unit of measurement you are accustomed.
7. A blood sample can now be obtained (refer to next section).
Note: The meter will shut o automatically after 2 minutes without any action.
1. The Rossmax HS200 Blood Glucose Meter displays the test result.
2. The LCD of the meter shows the measuring result, the date and the
time (Fig. 34).
Normal Glucose Values
• The glycemic recommendations for nonpregnant adults with diabetes:
• Preprandial capillary plasma glucose: 80 ~130 mg/dL (4.4 ~ 7.2
mmol/L).
• Peak postprandial capillary plasma glucose: 180 mg/dL (10.0 mmol/L).
• Diabetic patients may have blood glucose values that are moderately
elevated.
Ejecting the used Test Strip
1. After completing the test, push the strip ejector (Fig. 35) or use a tissue
paper to remove the test strip.
To unload the lancing device
1. After sampling, carefully remove the cap containing the used lancet (Fig.
36).
2. Push the exposed tip of the lancet into its Protective Cap (Fig. 36).
Slide the Lancet Ejector forward and dispose the used lancet in an
appropriate container .
For further instructions please see the insert provided with the lancing
device.
Warning:
• DO NOT point the test strip at anyone when ejecting.
• Used lancets and test strips are considered bio-hazardous. Dispose
of used lancets and test strips in a clinical waste container.
Rossmax HS200 Blood Glucose Meter is designed to display test results
between 20 ~ 600 mg/dL (1.1 ~ 33.3 mmol/L). If a “HI” (Fig. 37) or a “LO”
(Fig. 38) message appears on the display, it indicates that the meter has
detected a blood glucose level is higher than 600 mg/dL (33.3 mmol/L) or
lower than 20 mg/dL (1.1 mmol/L). It is suggested the testing procedure
should be reviewed and the test should be repeated using a new test
strip to conrm the result again.
Setting Up Reminder Alarms
Rossmax HS200 Blood Glucose Meter provides 4 reminder alarms.
All reminder alarms are OFF as default. Please follow these steps to setup reminder alarms.
1. When the meter is OFF, press and hold button for 4 seconds or longer to enter setting.
2. The rst reminder alarm will appear on the display (Fig.10).
3. Press or to select “ON” or “OFF”. If “OFF” is chosen and pressed, the meter will proceed to the next reminder
alarm setting. If “ON” is chosen (Fig.11) and pressed, the number of “hour” will start ashing (Fig.12).
4. Press or to adjust and press to conrm.
5. The numbers of “minutes” will ash (Fig.13). Press or to adjust and press to conrm. The meter will go to the
next reminder alarm setting.
6. Repeat steps 3 to 5 to set the rest of reminder alarms.
Setting Up HI/LO Alarms
Rossmax HS200 Blood Glucose Meter provides HI/LO alarm.
1. After completing the reminder alarm setting, press to enter the HI alarm setting.
2. Press or to set “ON”, press to conrm. If “OFF” is chosen, the meter will skip this setting (Fig. 14, 15).
3. To change the alarm setting, press or until you reach your desired HI setting and then press to conrm
(Fig.16). The HI alarm value range is 100 ~ 400mg/dL (5.5 ~ 22.0mmol/L) and the default value is 180mg/dL or
9.5mmol/L.
4. Continue to the LO alarm setting (Fig.17), the LO alarm value range is 40 ~ 90mg/dL (2.0 ~ 5.0mmol/L) and the
default value is 70mg/dL or 3.2mmol/L. Repeat Step 2 and 3 (Fig.18, 19) to set up your desired LO alarm setting,
press to conrm and the meter will be turned o.
HI LO
(Fig. 14) (Fig. 17)
(Fig. 15) (Fig. 18)
(Fig. 16) (Fig. 19)
For Home Use
All parts of Rossmax HS200 Blood Glucose Monitoring System should be considered potentially infectious and are
capable of transmitting blood-borne pathogens. To assure that you are not placing yourself at risk, always remember:
• The meter and lancing device is for single person use. Do NOT share them with anyone including other family
members! Do not use on multiple people!
• All parts of the kit are considered to be bio-hazardous and can potentially transmit infectious diseases even after
cleaning and disinfection have been performed.
Reference:
• “FDA Public Health Notication: Use of Fingerstick Devices on More than One Person Poses Risk for Transmitting
Bloodborne Pathogens: Initial Communication” (2010)
http://www.fda.gov/MedicalDevices/Safety/AlertsandNotices/ucm224025.htm
• “CDC Clinical Reminder: Use of Fingerstick Devices on More than One Person Poses Risk for Transmitting Bloodborne
Pathogens” (2010)
http://www.cdc.gov/injectionsafety/Fingerstick-DevicesBGM.html
• “CDC: Infection Prevention during Blood Glucose Monitoring and Insulin Administration” (2010)
http://www.cdc.gov/injectionsafety/blood-glucose-monitoring.html
For Professional Use
• Users need to adhere to Standard Precautions when handling or using this device. All parts of the glucose
monitoring system should be considered potentially infectious and are capable of transmitting bloodborne
pathogens between patients and healthcare professionals. For more information, refer to “Guideline for Isolation
Precautions: Preventing Transmission of Infectious Agents in Healthcare Settings 2007”, http:// www. cdc.gov/hicp
ac/2007ip/2007isolationprecautions.html.
• The meter should be disinfected after use on each patient. This Blood Glucose Monitoring System may only be
used for testing multiple patients when Standard Precautions and the manufacturer’s disinfection procedures are
followed.
• Only auto-disabling, single use lancing devices may be used with this device.
• Cleaning Solution and Disinfecting Solution: Clorox Bleach Germicidal Wipes (Clorox Professional Products
Company. EPA Reg. No. 67619-12). Contact Clorox Company at 1-800-537-1415.
The complete kit contains:
• One Rossmax HS200 Blood Glucose Meter
• One Rossmax HS200 Blood Glucose Test Strip vial
• One bottle of Rossmax HS200 Control Solution
• One lancing device
• Lancets
• One Rossmax HS200 Blood Glucose Monitoring System User Manual
• One Rossmax HS200 Blood Glucose Monitoring System Quick Reference Guide
• One Rossmax HS200 Blood Glucose Test Strip Package Insert
• One Rossmax HS200 Control Solution Package Insert
• One Lancing Device Package Insert
• One Log Book
• One carrying bag
The actual composition is marked on the kit box. Some of items may not be included.
Rossmax HS200 Blood Glucose Test Strip is for blood glucose tests in conjunction
with Rossmax HS200 Blood Glucose Meter.
Each strip can be used ONCE ONLY!
A test strip consists of the following parts:
1. Target Area: Where a blood drop or control solution is touched.
2. Conrmation Window: To conrm if sucient blood drop or control solution has
been applied to Target Area.
3. Contact Bar: The end of the test strip is to be inserted into the test port (top side
facing up).
1. Check if your meter displays the Unit of
Measurement you are accustomed.
2. You can nd the that Unit of Measurement
your meter displays on the meter label.
3. If you do not know which is the right for Unit
you, ask your healthcare professional.
Introduction
Setting Up Rossmax HS200 Blood Glucose Meter
Important Information
Preparing Test Strip
Preparing the Lancing Device and Obtaining a Blood Sample
Applying a Blood Sample to the Test Strip to perform a test
Test Results
Ejecting the used Test Strip and Disposing of the Used Lancet
HI and LO Readings
Available Alternative Sites Testing
Control Solution (optional)
Important Safety Instructions
About Rossmax HS200 Blood Glucose Monitoring System
About Rossmax HS200 Blood Glucose Test Strip
Checking the Unit of Measurement
About Rossmax HS200 Blood Glucose Meter
About Rossmax HS200 Blood Glucose Meter Display
1. Test Port Insert test strip here
2. Strip Ejector Push to eject the test strip
3. Display To display measuring results and
information in numbers and icons
4. Button For the operation of the meter.
See more in the further sections
5. Meter Label Manufacturer information
6. Serial Numbers The meter manufacturer serials
7. Battery Cover To slide open and replace battery
8. Data Port To connect interface cable for data
transferring
1. Memory Icon Appears during memory mode
2. Year/Date To display year/date
3. Control Solution
Icon
Appears during a Control Solution
test and indicates its result as a
Control Solution test result
4. Alarm Icon Appears when an alarm is set
5. Test Result To display test results
6. Buzzer Icon Appears while sound setting
7. Meal Indicator Icon Pre-meal and post-meal
8. 14 day time period
average
The average glucose result calculated
from all 14 day test results
9. Time To display time.
10. Blood Drop Icon Flashes when it’s ready to perform a
test and collect a blood sample.
11. Warning Icon Appears when a result is out of range.
12. Test Strip Icon Appears when the meter is ready for
a test.
13. Temperature Icon Appears when the meter exceeds the
range of operating temperature.
14. Measurement
Units
To identify test result units (mg/dL or
mmol/L)
15. Battery Icon Appears when battery power is low.
16. Bluetooth Bluetooth connection.
(Fig. 1)
(Fig. 35)
(Fig. 36)
(Fig. 37) (Fig. 38)
(Fig. 2) (Fig. 3) (Fig. 4)
(Fig. 10)
(Fig. 5)
(Fig. 11)
(Fig. 6)
(Fig. 12)
(Fig. 7)
(Fig. 13)
(Fig. 8) (Fig. 9)
2020/05
2019MP0010
01 0
(Fig. 20) (Fig. 22)
(Fig. 29)
(Fig. 32) (Fig. 33)
(Fig. 34)
(Fig. 30) (Fig. 31)
(Fig. 25) (Fig. 26) (Fig. 27)
(Fig. 28)
(Fig. 21) (Fig. 23)
(Fig. 24)
Forearm
Palm
There are limitations for doing AST. Please
consult your healthcare professional
before you do AST.
(Fig. 39) (Fig. 40) (Fig. 41) (Fig. 42)
8
1
8
2
3
4
5
6
7
14
15
16
13
12
11
10
9
1
2
3
Blood Glucose Meter For self-testing
Tyson Bioresearch, Inc. Zhunan,Taiwan
Medical Device Safety Service GmbH
Schiffgraben 41, D-30175 Hannover,
Germany
RL5HS2000000000XX
YYMPXXXXXXXX
Blood Glucose Meter For self-testing
Tyson Bioresearch, Inc. Zhunan,Taiwan
Medical Device Safety Service GmbH
Schiffgraben 41, D-30175 Hannover,
Germany
RL5HS2000000000XX
YYMPXXXXXXXX
Date DateTime Time
Test Result Test Result
4. After the test result appears and if there is no further test, the meter will automatically turn o after 2 minutes. If
applying a blood sample of reduced volume, the error code (E-7) will appear on the display (Error code is described
clearly in "Error Messages" section).
Top side
Caution: If your room temperature is not between 15°C ~ 35°C (59°F ~ 95°F), the Control Solution Test Result
will incorrect.
Control Solution Results
The Rossmax HS200 Blood Glucose Meter is functioning correctly only if the Control Solution test result is within the
specied range printed on the test strip vial. If the test result is out of range, please repeat the test.
Out of range result may be caused by:
• Incorrect steps taken in performing the test.
• The Control Solution may be expired or contaminated or has been opened over 6 months.
• The Control Solution temperature is not within 15°C(59°F)- 35°C(95°F) prior to testing.
• Expired or contaminated test strips.
• Meter malfunction.
Note:
• The result under Control Solution test mode will not be included in time period based glucose results
average calculation.
• DO NOT use Rossmax HS200 Blood Glucose Meter if the problem persists. Please return the device to your
local distributor or service center.


Product specificaties

Merk: Rossmax
Categorie: Meetapparatuur
Model: HS200

Heb je hulp nodig?

Als je hulp nodig hebt met Rossmax HS200 stel dan hieronder een vraag en andere gebruikers zullen je antwoorden


Handleiding Meetapparatuur Rossmax

Handleiding Meetapparatuur

Nieuwste handleidingen voor Meetapparatuur