Rocketfish RF-BTR319 Handleiding
Rocketfish Mediaspeler RF-BTR319
Bekijk gratis de handleiding van Rocketfish RF-BTR319 (2 pagina’s), behorend tot de categorie Mediaspeler. Deze gids werd als nuttig beoordeeld door 17 mensen en kreeg gemiddeld 4.0 sterren uit 9 reviews. Heb je een vraag over Rocketfish RF-BTR319 of wil je andere gebruikers van dit product iets vragen? Stel een vraag
Pagina 1/2
QUICK SETUP GUIDE
RF-BTR319,Bluetooth AudioReceiver
DC 5V
OFF / ON
OPTICAL
AUDIO OUT
LED indicator
NFC logo
Wirelessly stream music from your smartphone, tablet, or other Bluetooth-enabled device to
your home stereo or other audio device.
PACKAGE CONTENTS
• Bluetooth Receiver • Power supply with 6 ft. cable
• 6 ft. 3.5 mm cable • Quick Setup Guide
• 3.5 mm to dual RCA adapter
FEATURES
•Bluetooth (BT) 5.0
• Qualcomm®aptX™HD, aptX® Low Latency, aptX® codec audio decoding provide the best
audio quality
• Supports Near-Field Communication (NFC) for easy connection with compatible Bluetooth
devices
• Optical digital audio output: The highest quality audio connection to your home stereo
• Analog stereo audio output: Easily connect to amplied speakers or any device with an
audio input jack
• Wireless range of up to 100 feet (30m) L.O.S. no obstruction
• Wall mount feature
• Remembers up to eight Bluetooth devices
Note: Music can be played from only one device at a time.
SETTING UP YOUR BLUETOOTH AUDIORECEIVER
Connecting to an output device
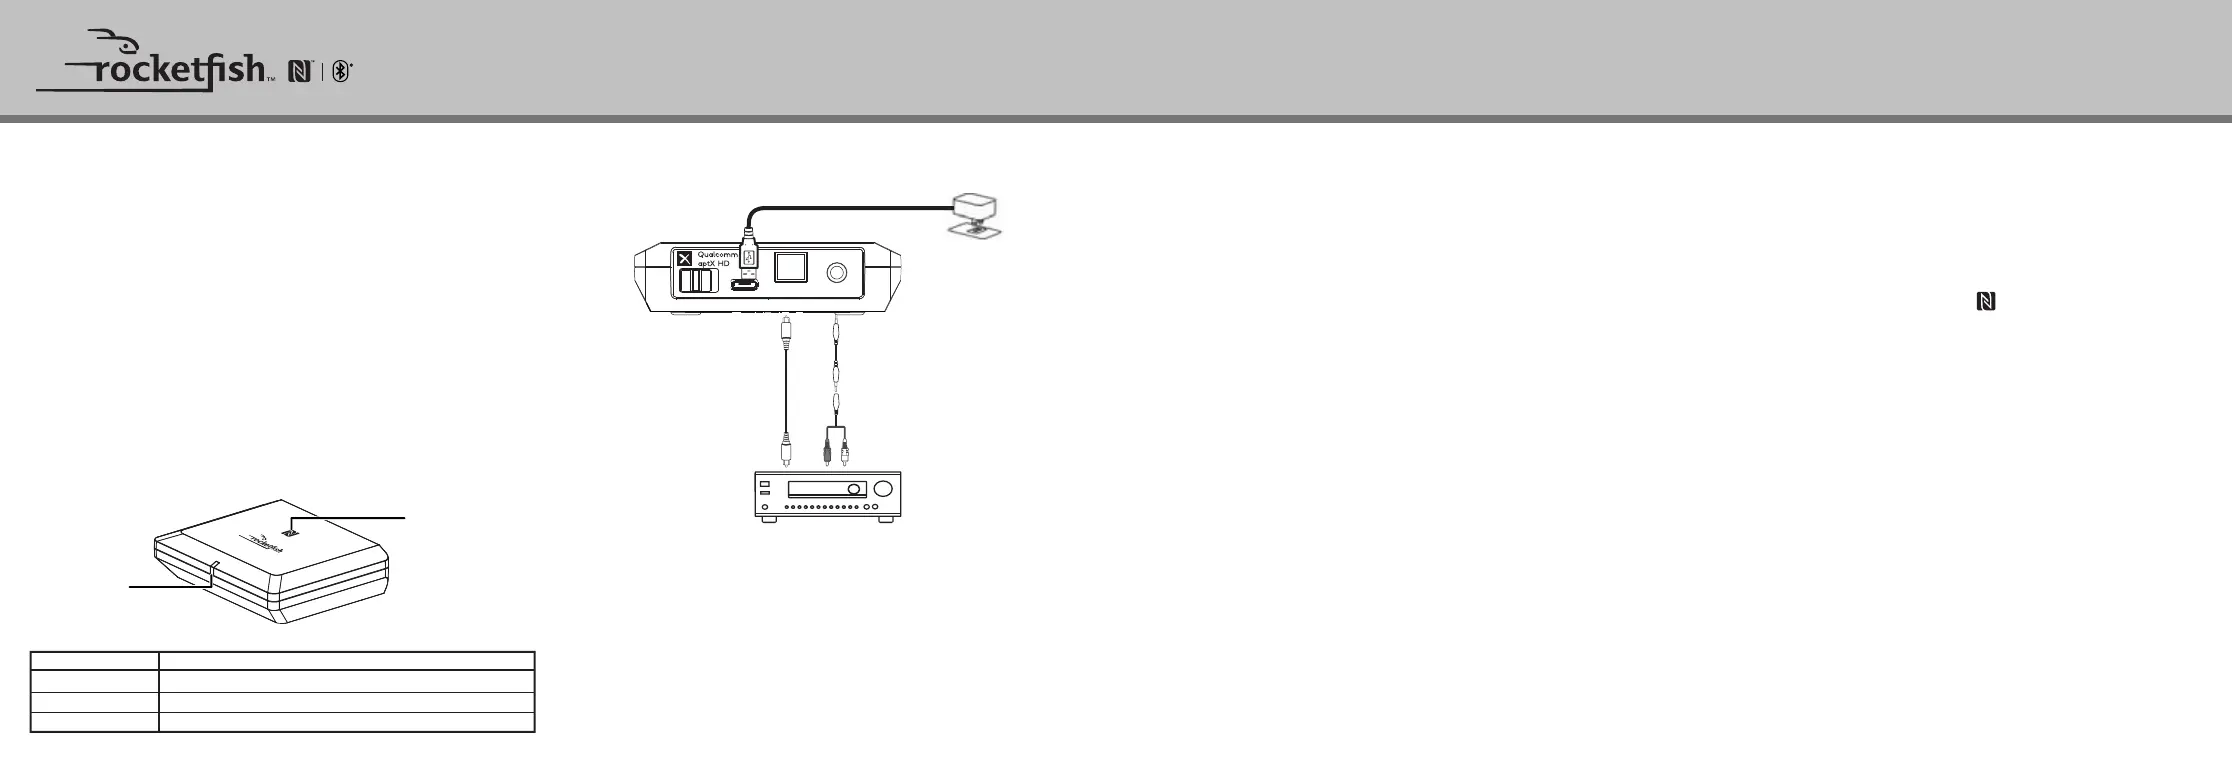
CONNECTING YOUR RECEIVER
You can choose either digital (best) or analog (good) cables to connect your Bluetooth audio
receiver, depending on the connections available on your home stereo system.
Digital connection
Connect a digital optical cable (not included) to the OPTICAL jack on your Bluetooth audio
receiver and to your home stereo system or other device.
OR
To pair your devices using NFC Fast connection:
Note: Check your Bluetooth device to see if it is compatible with NFC. If it is not, use the steps for pairing
your device using Bluetooth settings.
1Turn on your Bluetooth audio receiver. Your receiver enters pairing mode and the LED
indicator blinks blue.
2Turn on Bluetooth on your Bluetooth device.
3Turn on the NFC function (see the documentation that came with your NFC-enabled device).
4Touch your smartphone or tablet to the NFC logo ( ) on the top of your Bluetooth audio
receiver to pair your devices. The LED indicator on the Bluetooth audioreceiver lights blue.
5When your smartphone or tablet tells you that the Bluetooth audio receiver is connected,
you can begin playback.
6To disconnect, touch your smartphone or tablet to your Bluetooth audio receiver again
(see documentation that came with your NFC-enabled device).
General Pairing Notes:
• Some devices, such as an iPhone, connect immediately after pairing so the LED on the
Bluetooth audio receiver remains on. Other devices, such as notebook computers, may ask
you if you wish to connect. In this instance, the LED continues to blink until a connection is
established.
• Your Bluetooth audio receiver saves pairing information for up to eight devices. However, it
can only be connected to and play content from one device at a time.
• When you turn on your Bluetooth audio receiver, it automatically connects to the last
connected device if that device is in range. To connect to a dierent paired device, you have
to turn o Bluetooth or unpair from the currently paired device and manually connect to
the other paired one.
• The auto-connect feature may not work with some Bluetooth devices. If this occurs, use
your Bluetooth device settings menu to manually select RF-BTR319from the list of found
Bluetooth devices.
INDICATION
Solid blue
Blinks blue
O
DESCRIPTION
Paired and connected to your Bluetooth device.
Not connected to your Bluetooth device or in pairing mode.
The receiver is turned o.
Analog connection
Connect the included 3.5 mm audio cable to your home stereo system or other device to the
AUDIO OUT jack on your Bluetooth audio receiver.
Note: If your home stereo system does not have a 3.5 mm Audio In connector, use the included 3.5 mm
to RCA adapter cable.
Connecting power:
1Plug the AC/DC adapter into the DC 5V jack on your Bluetooth audio receiver.
2Plug the AC/DC adapter into a wall power outlet and slide the power switch to ON. The LED
indicator begins to blink blue to indicate that the unit is on and ready to be paired to your
Bluetooth devices.
PAIRING YOUR DEVICES
Before you can use your Bluetooth audio receiver with a Bluetooth device, you need to pair the
two. Your Bluetooth audio receiver can connect to a Bluetooth-enabled device using the
Bluetooth settings on your device or by touching your Bluetooth device to the Bluetooth audio
receiver using NFC.
To pair your devices using Bluetooth settings:
1Make sure that a compatible Bluetooth device (like a music player or phone) is turned on
and within 33 feet (10 meters) of your Bluetooth audio receiver.
2Turn on your Bluetooth audioreceiver. Your receiver enters pairing mode and the LED
indicator blinks blue.
3Turn on Bluetooth on your Bluetooth device, then set it to pairing mode. For more
information, see the documentation that came with your Bluetooth device.
4On the Bluetooth device, select RF-BTR319 in the list of found devices.
5On the Bluetooth device, enter 0000 as the PIN, if prompted. The LED indicator lights blue
on the Bluetooth audio receiver.
6If you are pairing with a computer, make sure that your Bluetooth audio receiver is selected
as the computer’s default playback device. See the computer’s documentation for
instructions.
Before using your new product, please read these instructions to prevent any damage.
Optical digital audio cable
(not included)
OR
6 ft. 3.5 mm audio cable
3.5 mm to RCA adapter cable
Audio device (such as an audio receiver)
LED indicator status
Product specificaties
| Merk: | Rocketfish |
| Categorie: | Mediaspeler |
| Model: | RF-BTR319 |
Heb je hulp nodig?
Als je hulp nodig hebt met Rocketfish RF-BTR319 stel dan hieronder een vraag en andere gebruikers zullen je antwoorden
Handleiding Mediaspeler Rocketfish

18 Februari 2024
Handleiding Mediaspeler
Nieuwste handleidingen voor Mediaspeler
12 Mei 2026
11 Mei 2026
30 April 2026
28 Maart 2026
13 Maart 2026
27 Februari 2026
20 Januari 2026
14 Januari 2026
27 December 2025
22 December 2025