Reolink Keen Handleiding
Reolink
Bewakingscamera
Keen
Bekijk gratis de handleiding van Reolink Keen (14 pagina’s), behorend tot de categorie Bewakingscamera. Deze gids werd als nuttig beoordeeld door 144 mensen en kreeg gemiddeld 4.4 sterren uit 72.5 reviews. Heb je een vraag over Reolink Keen of wil je andere gebruikers van dit product iets vragen? Stel een vraag
Pagina 1/14

Reolink Solar Panel
Operational Instruction
EN/DE/FR/IT/ES
Aug 2021
QSG5_D
58.03.005.0001
Technical Support
If you need help, please contact Reolink before returning your product. Most questions can be
answered through our online support center at https://support.reolink.com
Technische Unterstützung
Wenn Sie Hilfe brauchen, kontaktieren Sie bitte Reolink Support Team zuerst, bevor Sie Ihre
Bestellung zurücksenden. Meiste Fragen oder Probleme können von unserem Online Support
Center beantwortet und gelöst werden https://support.reolink.com
Support technique
Si vous avez besoin d’aide, veuillez contacter Reolink avant de retourner votre produit. La
plupart des questions peuvent être répondues via notre centre de support en ligne à l'adresse
https://support.reolink.com
Supporto Tecnico
Se avete bisogno di aiuto, le chiediamo gentilmente di contattare Reolink prima di restituire il
prodotto. La maggior parte delle domande può essere risolta tramite il nostro centro di
assistenza online all'indirizzo https://support.reolink.com
Soporte técnico
Si necesita ayuda, comuníquese con Reolink antes de devolver su producto. La mayoría de las
preguntas se pueden responder a través de nuestro centro de soporte en línea en
https://support.reolink.com
REOLINK INNOVATION LIMITED
FLAT/RM 705 7/F FA YUEN COMMERCIAL BUILDING 75-77 FA YUEN STREET MONG KOK KL
HONG KONG
@ReolinkTech https://reolink.com
Hoferstasse 9B, 71636 Ludwigsburg, Germany
prodsg@libelleconsulting.com
Product Ident GmbH
89 Princess Street, Manchester, M1 4HT, UK
info@apex-ce.com
APEX CE SPECIALISTS LIMITED
REPEU
REPUK

Contents
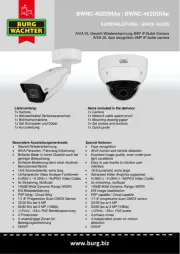
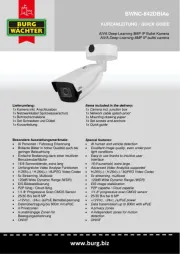
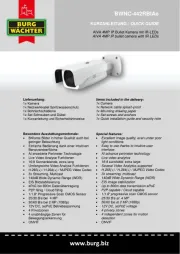
What’s in the Box
What’s in the Box
How to Install
Troubleshooting
Specifications
Notification of Compliance
1
2
4
4
5
Solar Panel ×1
Bracket ×1
Screws (in pack) ×1
Mounting Template ×1
EN
2English1 English
How to Install
1. Please choose a location for your
solar panel that gets the most sunlight
throughout the year. The Reolink solar
panel needs only a few hours of direct
sunlight to suciently power up your
camera daily. The amount of energy
that the solar panel can produce is
aected by weather conditions,
seasonal changes, geographic
locations, etc.
Ideal Angle = Local Latitude + 5°
4. Loosen the adjustment knob
on the bracket, and adjust the
angle of the solar panel to
receive the most direct sunlight.
Then re-tighten the adjustment
knob to secure the panel.
3. Slot the solar panel into
the bracket and make sure
it's secure.
2. Mount the bracket with
the mounting template and
the screws provided in the
package.
2
1

If your solar panel can’t charge the camera
anymore, try the following solutions:
• Unplug and re-insert the charging cable.
Please ensure the connection between the
solar panel and camera is stable.
• Make sure that your Reolink solar panel
points toward the sun and is not shaded by
trees, buildings, or other objects.
• Make sure that your camera is not charged
at temperatures below 0°C (32°F) or above
45°C (113°F).
If these don't work, contact Reolink
https://support.reolink.com
Troubleshooting
Specifications
Notification of
Compliance
FCC Compliance Statement
This device complies with Part 15 of FCC Rules.
Operation is subject to the following two
conditions: (1) this device may not cause
harmful interference, and (2) this device must
accept any interference received, including
interference that may cause undesired
operation. For more information, visit:
https://reolink.com/fcc-compliance-notice/.
Charging Temperature:
0°C to 45°C (32°F to 113°F)
Operating Temperature:
-10°C to 55°C (14°F to 131°F)
Weather Resistance:
IP65 certified weatherproof
Size: 185.4 x 120.4 x 6.5mm
Cable Length: 4 Meters
Weight: 280g
Physical Parameters
General:
Stop Charging the
Battery-powered Cameras
4English3 English
5. Connect the solar panel to the Reolink
battery-powered camera with the micro USB cable.
IMPORTANT NOTICE:
• Make sure the solar panel is not blocked. The energy
harvesting eciency drops drastically even when a
small portion of the solar panel is blocked.
• Please don’t install the solar panel completely
horizontally. Otherwise your solar panel might
accumulate dust and other debris easily. It’s advised
to install the solar panel angularly to receive the most
direct sunlight.
• Wipe the solar panel regularly to remove dust or
debris.
• Please charge the batteries in temperature between
0°C and 45°C (32-113°F). The solar panel won't charge
the camera at temperatures below 0°C (32°F).
Make sure the camera is
plugged in all the way and that
the waterproof wire cover
protects the interface between
the camera and the solar panel.
Waterproof
Wire Cover
!
Product specificaties
| Merk: | Reolink |
| Categorie: | Bewakingscamera |
| Model: | Keen |
Heb je hulp nodig?
Als je hulp nodig hebt met Reolink Keen stel dan hieronder een vraag en andere gebruikers zullen je antwoorden
Handleiding Bewakingscamera Reolink

6 Juni 2025

4 Juni 2025
3 Juni 2025
31 Maart 2025

27 Maart 2025

27 Maart 2025

27 Maart 2025
27 Maart 2025

16 November 2024

16 November 2024
Handleiding Bewakingscamera
- Pelco
- Genius
- CRUX
- Ebode
- Wisenet
- Interlogix
- Elmo
- IDIS
- Gewiss
- Uniden
- Lorex
- DVDO
- Busch-Jaeger
- AVerMedia
- Moen
Nieuwste handleidingen voor Bewakingscamera
2 Augustus 2025
2 Augustus 2025
2 Augustus 2025
2 Augustus 2025
2 Augustus 2025
2 Augustus 2025

2 Augustus 2025
2 Augustus 2025
2 Augustus 2025
29 Juli 2025