Ram Audio SB 6K Handleiding
Bekijk gratis de handleiding van Ram Audio SB 6K (4 pagina’s), behorend tot de categorie Niet gecategoriseerd. Deze gids werd als nuttig beoordeeld door 2 mensen en kreeg gemiddeld 4.3 sterren uit 1.5 reviews. Heb je een vraag over Ram Audio SB 6K of wil je andere gebruikers van dit product iets vragen? Stel een vraag
Pagina 1/4
OPERATION MANUAL
BEDIENUNGSANLEITUNG
MANUAL DE USUARIO
P-8654970
QXPDQXDoc
5/18
© 2018 by C.E. Studio-2 s.l.
http://ramaudio.com
e-mail: contact@ramaudio.com
DSP_PowerPack
™
•SUB Series
SB 6K SB 3K
For the installation of the SUB module
you need an internal chamber inside the
acoustic enclosure, separate from the
chamber where the speaker is mounted.
If preferred, the SUB module can be
supplied with a rear metal case for this
purpose, avoiding having to make this
space airtight.
The module is fixed to the enclosure
with M5 screws, foam should be placed
in the joint between the module and the
box to avoid vibrations (it is not advisa-
ble to put foam in the joint between the
module and the optional rear metal
case).
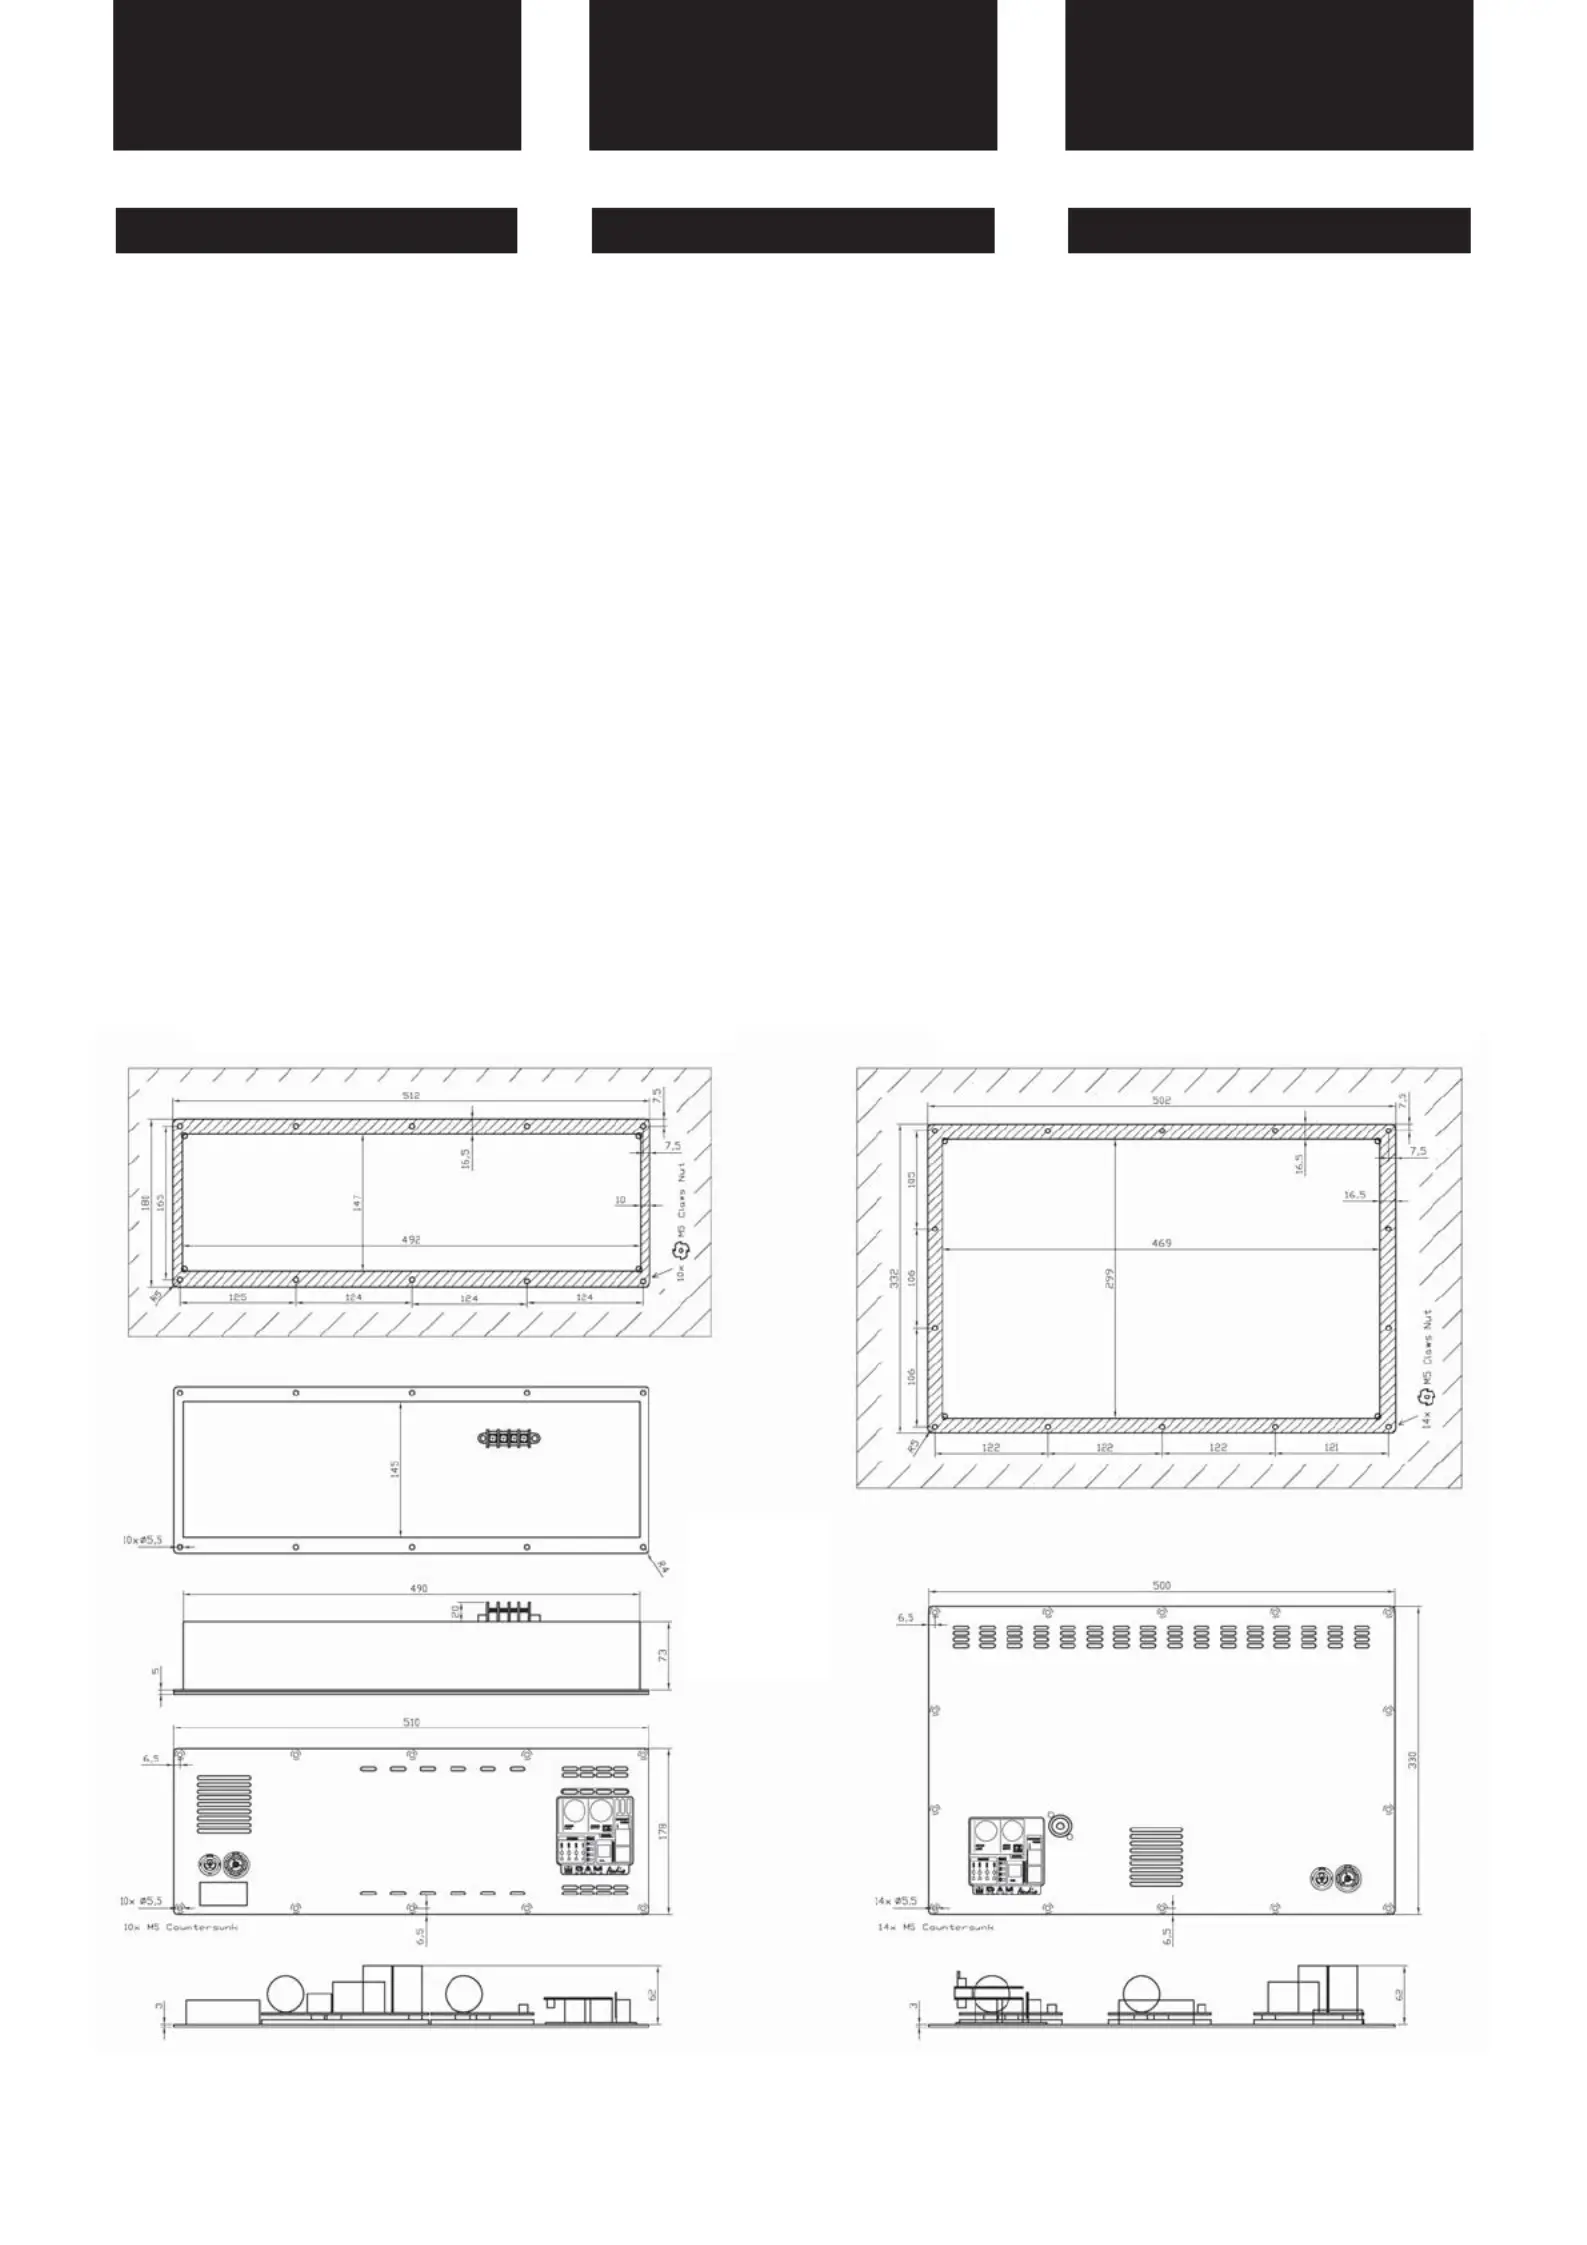
In the drawings below you can see: (1)
the external dimensions of the module
(front/profile), (2) the optional rear metal
case, and also (3) the recommended
machining of the acoustic enclosure.
Installation Requirements
Für die Installation des SUB Moduls
wird ein eigenes Volumen im
Lautsprechergehäuse benötigt, welches
separat von dem des Lautsprechers ist.
Wenn gewünscht kann das SUB Modul
mit einer metallenen Schale versehen
werden, um diesen Bereich nicht extra
luftdicht machen zu müssen.
Das Modul wird mit M5 Schrauben am
Gehäuse befestigt, in den Spalt zwis-
chen Modul und Gehäuse sollte
Dichtschaum gegeben werden, um
Vibrationen zu vermeiden (Es ist nicht
ratsam zwischen dem Modul und dem
optionalen metallenen rückwärtigen
Gehäuse ebenfalls Dichtschaum zu
geben).
In den Zeichnungen weiter unten kann
man folgendes sehen: (1) Die äußeren
Abmessungen des Moduls (von Vorne,
von der Seite), (2) das optionale
rückwärtige Gehäuse und (3) auch die
benötigte Aussparung des
Lautsprechergehäuses.
Installationsvoraussetzungen
Module
Assembly
Para la instalación del modulo SUB es
necesario tener una cámara interna en
el recinto acústico, separada de la
cámara donde está montado el altavoz.
Opcionalmente, el módulo SUB pude
ser suministrado con un cajón metálico
trasero para este propósito, y así evitar
tener que hacer este alojamiento
hermético en el recinto.
La sujeción del módulo al recinto se
realiza mediante tornillos M5, y debe
colocarse una junta de espuma entre el
módulo y la caja para evitar vibraciones
(no es recomendable poner esta junta
entre el modulo y el cajón metálico
opcional).
En los planos de debajo de estas líneas
se muestran: (1) las dimensiones exter-
nas del módulo (frontal/perfil), (2) las
del cajón opcional, así como (3) el
mecanizado recomendado a realizar en
el recinto acústico.
Requisitos de Instalación
Montaje
del Modulo
Modul
Zusammenbau
(3) SB 3K Cabinet Mechanization
(2) SB 3K
Optional
Aluminium
Case
(1) SB 3K Profile-Front Dimensions (1) SB 6K Profile-Front Dimensions
(3) SB 6K Cabinet Mechanization
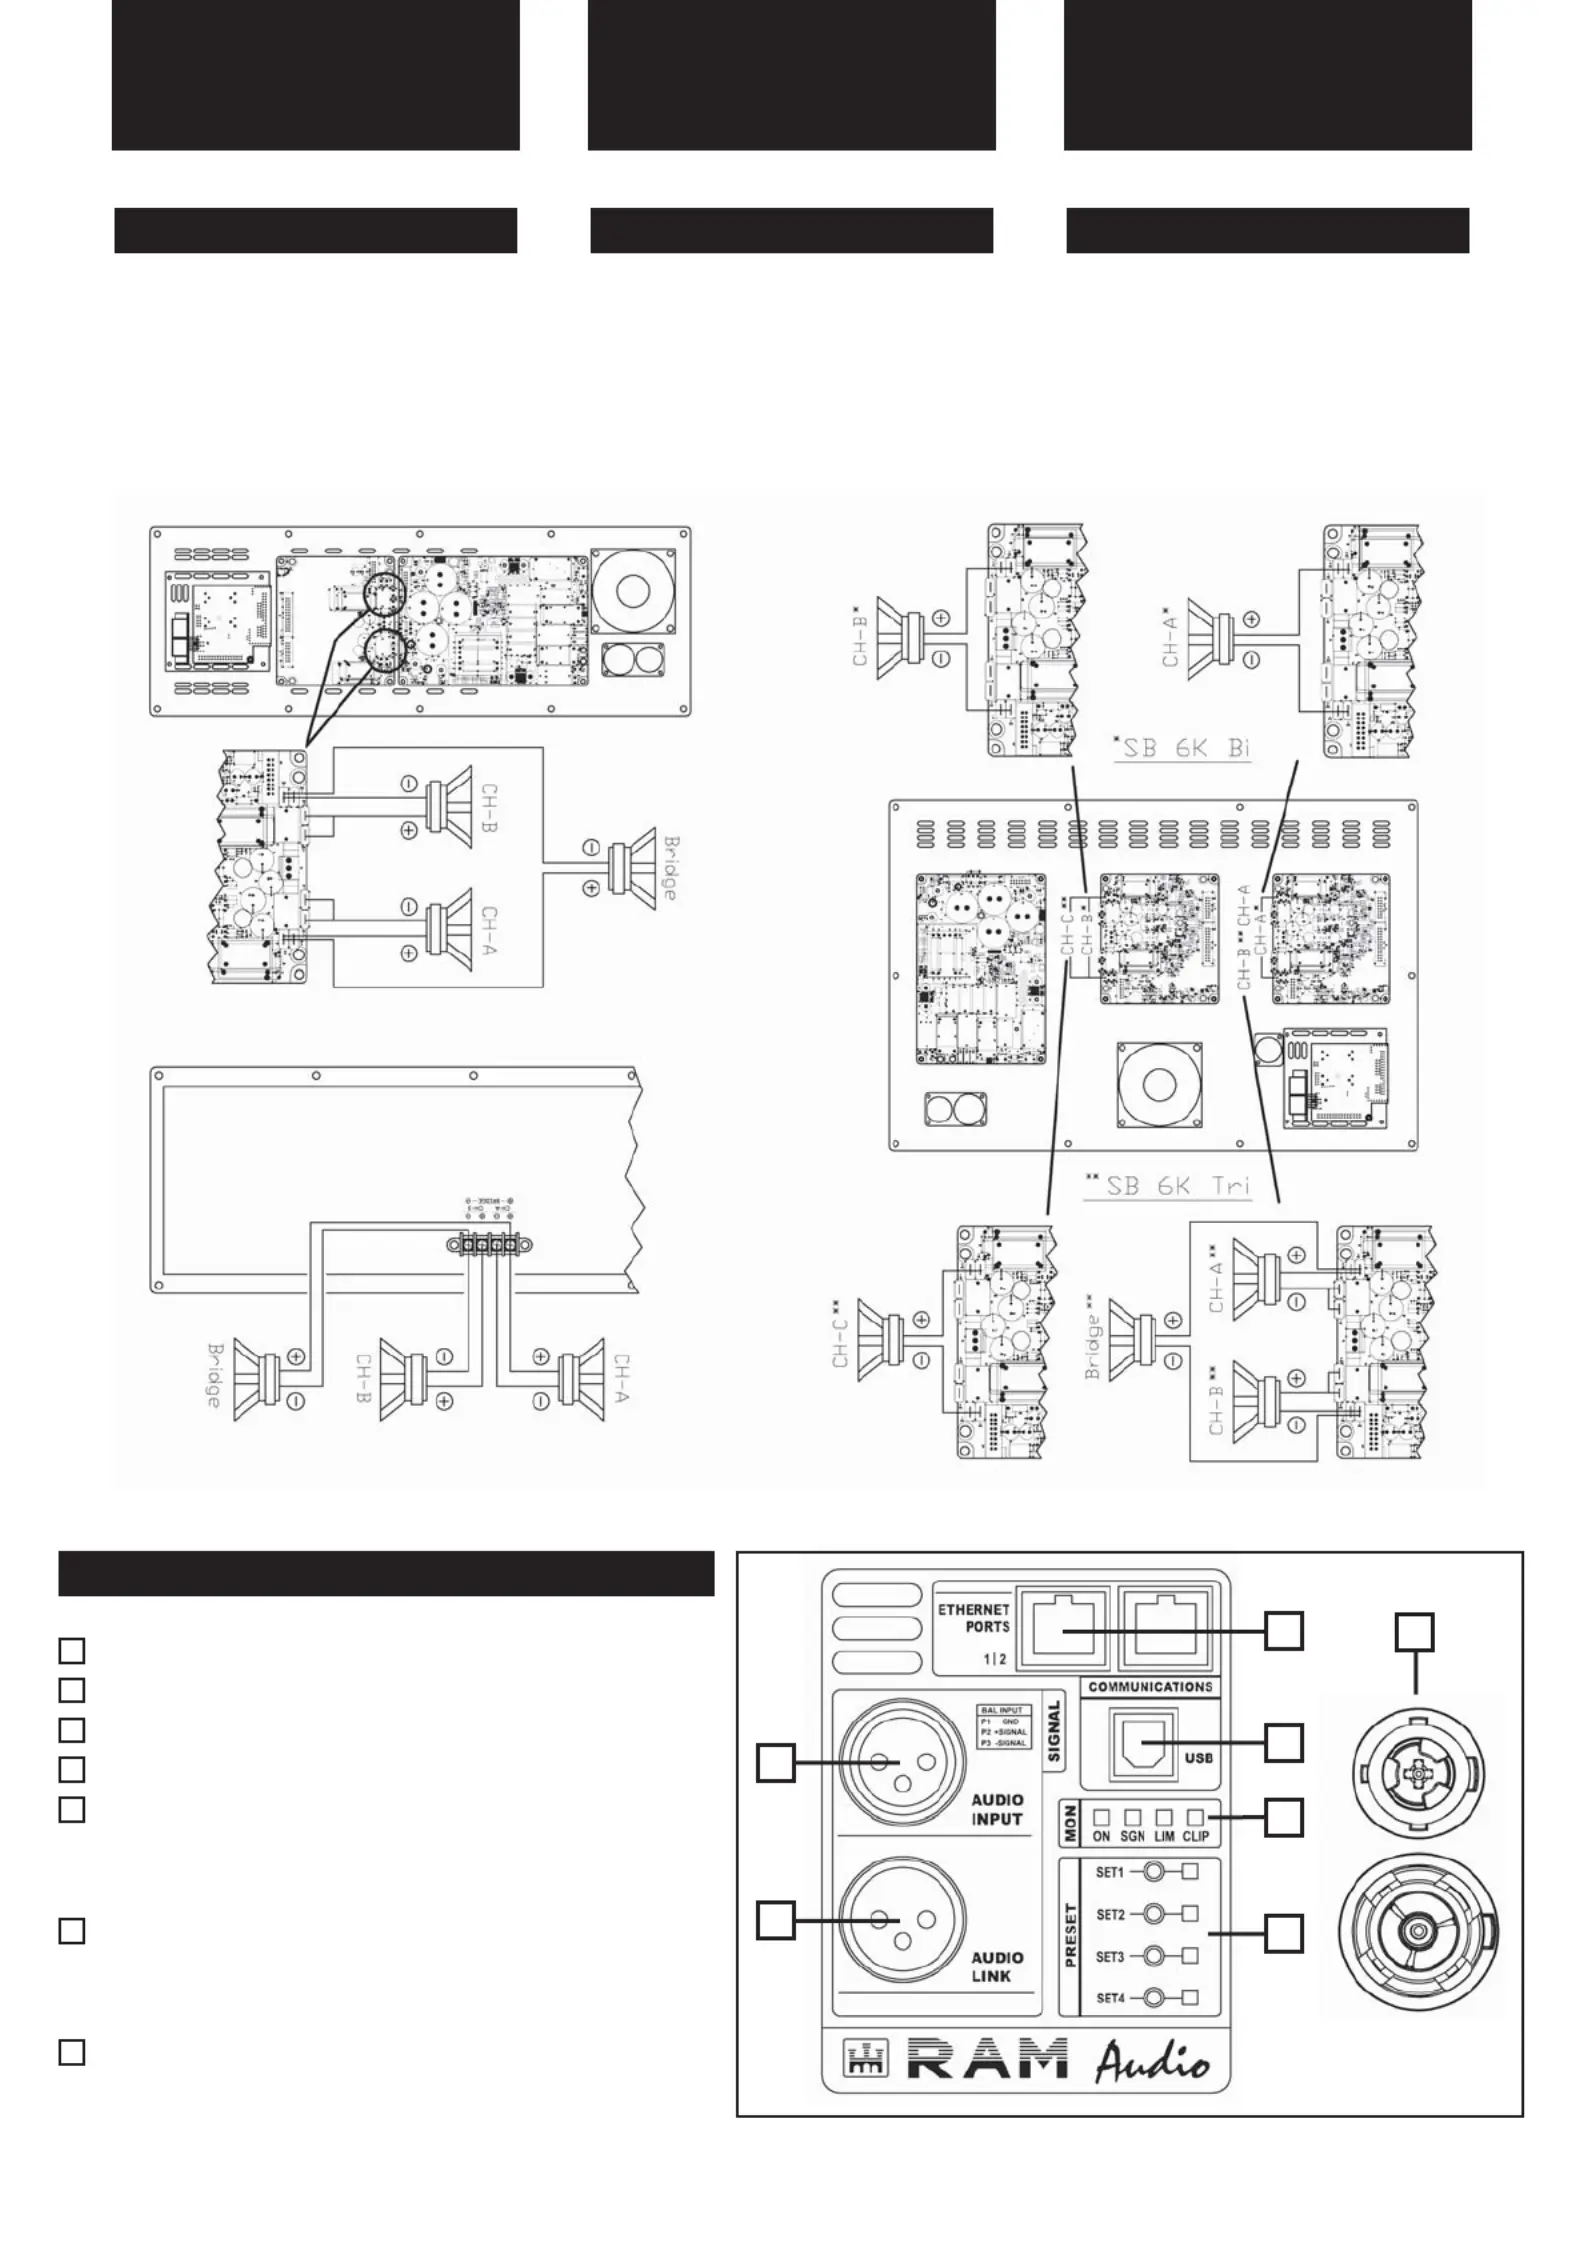
The connection of the speakers to the
module is done using Faston connec-
tors. The PCB male Faston connectors
are duplicated, to facilitate the connec-
tion of 2 speakers in parallel.
The connection is as follows:
Speakers Connection
Die Verbindung der Lautsprecher zum
Modul erfolgt mittels Faston Stecker.
Die männlichen Leiterplatten Faston
Stecker sind doppelt ausgeführt, um
eine Parallelschaltung von zwei
Lautsprecher zu ermöglichen.
Der Anschluss erfolgt wie folgt:
Installationsvoraussetzungen
Connection
and Description
La conexión de los altavoces al modulo
se realiza a través de conectores
Faston. Los conectores Faston macho
del circuito impreso están duplicados,
para facilitar el conexionado de 2 alta-
voces en paralelo.
El conexionado es el siguiente:
Conexión de Altavoces
Conexión y
Descripción
Modul
Zusammenbau
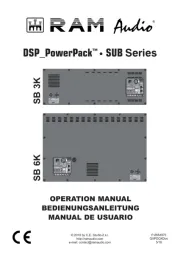
Signal Input: Female XLR Connector for signal input.
Signal Link: Male XLR Connector for signal link.
Ethernet Connectors: RJ45, two ports Ethernet switch.
USB Connector: B type USB connection.
LED ON:power supply ON.
LED SIGNAL: input signal presence indication.
LED LIMIT: lights when the DSP limiters are working.
LED CLIP: the maximum input or output has been reached.
Quick Preset: press the button for 3 seconds to change the
desired output preset.
LEVEL: push SET 3-4 buttons simultaneously to enter LEVEL
mode (both LEDs light up). Then use 3 and 4 to change level.
Mains connection: inlet and outlet powerCON True1
connection. It works also as a main switch, as it is a connec-
tor with breaking capacity.
Front Panel Description
1
2
3
4
5
6
7
3
4
5
6
2
1
7
SB 3K
SB 6K
(Optional case suggested connection)
Product specificaties
| Merk: | Ram Audio |
| Categorie: | Niet gecategoriseerd |
| Model: | SB 6K |
Heb je hulp nodig?
Als je hulp nodig hebt met Ram Audio SB 6K stel dan hieronder een vraag en andere gebruikers zullen je antwoorden
Handleiding Niet gecategoriseerd Ram Audio
14 Augustus 2025

14 Augustus 2025
14 Augustus 2025
Handleiding Niet gecategoriseerd
- GEV
- Huslog
- Postium
- Ugears
- Dawn House
- Cabasse
- Baccarat
- Danfoss
- Nitek
- Nuki
- Aida
- DPM
- VICSEED
- Bikemate
- Sightron
Nieuwste handleidingen voor Niet gecategoriseerd

14 Augustus 2025
14 Augustus 2025

14 Augustus 2025

14 Augustus 2025
14 Augustus 2025

14 Augustus 2025
14 Augustus 2025

14 Augustus 2025

14 Augustus 2025
14 Augustus 2025