Prestigio Roadrunner 310i Handleiding

Prestigio Dashcam Roadrunner 310i

Lees hieronder de đź“– handleiding in het Nederlandse voor Prestigio Roadrunner 310i (96 pagina's) in de categorie Dashcam. Deze handleiding was nuttig voor 18 personen en werd door 2 gebruikers gemiddeld met 4.5 sterren beoordeeld

Pagina 1/96
Quick Start Guide
Prestigio RoadRunner
EN
1. Packing List
Prestigio car DVR, Suction mount, Quick start guide, Car charger, Warranty card
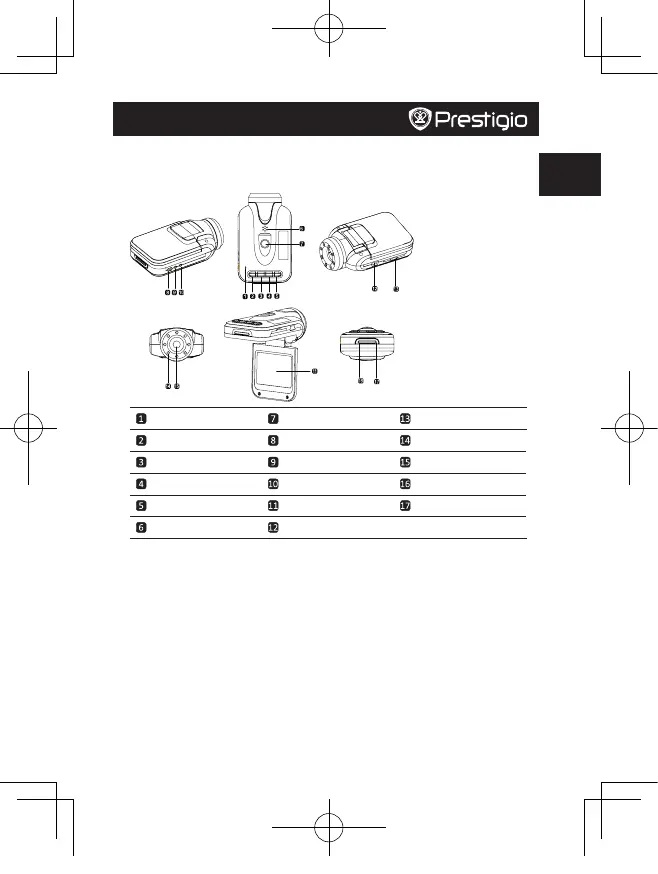
2. Device Overview
Mic Mount hole SD card slot
Menu button Reset button White LED light
Photo button Working LED light Lens
Up /Mic button Charging LED light Power Button
Down/SOS button LCD display Video/playback /ok button
Speaker Mini 5pin USB
Getting started
3. Power on/Power off
• Position the device in the vehicle using the suction mount and press the Power button to turn
it on. To power off the device press the button again.
• You can also connect the device to the car charger. It will automatically turn on and start
recording when the car engine starts. When the engine stops, the device will automatically
save the last file and turn off.
4. Charging
• Using the USB cable: connect the device to the USB port of a computer/Laptop
• Using the car changer: Connect the device to the car charger. The device will start charging
after the car engine is turned on. The device will automatically turn on and start recording.
When the engine stops, the device will automatically save the last file and turn off.
• Normally it takes approximately 2-3 hours to fully charge the device. Operating the device
while charging with the AC adapter may extend the time of full charge.
Note:
Before using the device for the first time, please, connect it to the PC or notebook using the USB
cable provided to fully charge the Li-ion battery. The battery is completely charged in 2-3 hours.
PCDVRR310I QSG v1.2.indb 1 2014/8/1 19:29:26
Quick Start Guide
Prestigio RoadRunner
EN
5. Inserting the Micro SD-card
• Before starting video recording, please, insert an Micro SD card (not included) into the Micro
SD card slot in the device
• To extract the SD card slightly push it inside the device, and remove.
Note:
After inserting the SD card the device will automatically recognize it as default storage and all the
data will be saved on this card.
6. Recording
• Connect the device to car charger, when the car engine launched after 5 seconds, the device
will start loop video recording. When shut off the car engine, the device will save file and
switch off after 15 seconds
Notice:
»Press button on loop video recording, it mean saved current file and enter to standby OK
mode
»When the SD card is full, the device will delete the first unlocked video file automatically
7. Taking pictures
• Press the Mode button to choose the photo mode
• Press it again to take photos, Taken photos are saved on SD Card.
• Press the MENU button in the photo mode, then press DOWN/UP button to setting of the size
,time stamp and shutter sound.
Home screen
8. Main menu
The following symbols may be displayed on the screen:
Video recording mode Storage card
Picture mode Sound recording mode
Settings
9. Video Menu settings
Turn on the device and make sure the Video mode is selected.
Note:
The appropriate symbol will be displayed in the top left corner of the screen.
• Press button to enter Settings. Press up/down to select the option and press ok to set Menu
the value.
The following options list is available in the Video menu:
• : Select the video image size from 1280 x 720(30fps), 848 x 480, 640 x 360.Resolution
• : Select to turn the time stamp on or offTime Stamp
• : in the preview, press Menu button to setting, the device will start video Motion Detect
recording automatically while there is an object moving.
Notice: When the device turned off or mode switches, please reset it.
• : in the preview, press Menu and ok button to setting, it can choose off, 1 Min. ,2 Video time
Min. ,3 min. ,4 Min. ,5 min.
• : select to turn the LED Auto set, off or on.Night Mode
• : Select to turn the microphone on or off.Mic
PCDVRR310I QSG v1.2.indb 2 2014/8/1 19:29:27
Quick Start Guide
Prestigio RoadRunner
EN
10. Picture Menu settings
Turn on the device and make sure the Picture mode is selected.
Note:
The appropriate symbol will be displayed in the top left corner of the screen.
• Press button to enter Settings. Press up/down button select the optionMenu
• The following options list is available in the Picture menu:
• : Select the image size from VGA,1.3M,2M,3MSize
• : Select to turn on or off.Time Stamp
• : Select to turn on or off.Shutter Sound
11. General settings
Double Press button to enter Settings. Press up,down,ok button to select Settings. The Menu
following settings are available:
• : Select to format the SD card. Format
• : Select to turn the Rotate 180 on or off.Rotate 180
• : Select to off, level 3, level 2, level 1.G-sensor
• : Select the desired language from the list.Language
• : Select automatic power off when the device is not in use.Auto Off
• :. select LCD Auto off turn on or off LCD Auto Off
• : Select to restore default system settings. System reset
• : Change frequency to remove the blinking effect when recording under Light frequency
artificial lighting.
• : in the preview, double press Menu button, use up , down and ok button to select Date Input
Date Input and setting the time
• Date Format: in the preview, double press Menu button, use up , down and ok button to select
Date Format, you can choose YYYY/MM/DD,MM/DD/YYYY,DD/MM/YYYY
• : in the preview, double press Menu button, use up , down and ok button to select Key Tone
Key Tone, Select to turn on or off.
• : Displays the current system version.Firmware Ver
12. Playback mode
Press the OK button to enter playback mode.The last recorded file will be displayed.Press up/
down button to view the file.
Press the OK button to playback the files. Press OK button again to playback the current file.
Meantime, on auto play mode, press DOWN/UP to enter to FORWARD/BACKWARD(1/2,
1/4),then press OK button to pause. Press the MENU button back to the playback menu.To enter
Manu options press Menu button,the following settings are available:
• : Select the file/files you want to delete.Delete Files
• : Lock one/LocK All, unlock one/unlock All. Lock/Unlock
• : Select to enter the file thumbnail mode.Thumbnail
• : Select the playback volume.Volume
13. USB connection
To download registered files on your PC/notebook, please, connect the device to the PC or
notebook via USB-cable provided. After connecting the device to the PC the USB menu will be
displayed, containing , and . Select Disk Driver, and the device will appear DV PC Cam Disk Driver
in “My computer” as the removable disk. All registered files are stored in DCIM folder, videos are
stored in MOV format, and the pictures are stored in JPG format. You can now download the files
from the device.
14. PC Camera Mode
Connect the device to a computer via USB. It will show DV/PC Cam/Disk drive tarting up the
device, Press up/down to select and then press OK to entering, then you can use the device as a
PC Camera
PCDVRR310I QSG v1.2.indb 3 2014/8/1 19:29:27


Product specificaties

Merk: Prestigio
Categorie: Dashcam
Model: Roadrunner 310i

Heb je hulp nodig?

Als je hulp nodig hebt met Prestigio Roadrunner 310i stel dan hieronder een vraag en andere gebruikers zullen je antwoorden


Handleiding Dashcam Prestigio

Handleiding Dashcam

Nieuwste handleidingen voor Dashcam