Pioneer TS-ME770TSB Handleiding
Bekijk gratis de handleiding van Pioneer TS-ME770TSB (7 pagina’s), behorend tot de categorie Speaker. Deze gids werd als nuttig beoordeeld door 93 mensen en kreeg gemiddeld 4.9 sterren uit 47 reviews. Heb je een vraag over Pioneer TS-ME770TSB of wil je andere gebruikers van dit product iets vragen? Stel een vraag
Pagina 1/7

Pioneer
TS-ME770TC TS-ME770TSW
Thank
you
for
purch
asing
thi
s r Pionee product.
Be s
ur
e s i ma sta s er. to read thi nstruction nual before in lling this peak
Vielen k, Dan
<la
ss Sie si fch
ii
r e u n di ses Prod kt vo
Pi
oneer entschei
den
haben
.
Vor dem E
inb
au d Laes
ut
spr
ec
h
er
, ve e e n Sie nrf hl
ic
ht diese
Vo
rsch zu l n. rift ese
BEFORE YOU BEGIN INSTALLING
Check with your local waterway authority for
any
regu
lations the use of accent I speaker lighting vessel. on your boat and
BEVOR S
IE
MI
T DER I TANS
LL
ATION
BEG
I EN NN
Erkundigen
Sic sich bci
lhrer
:i:ustiindigen Wasser-b:i:w. SchifffahrtsbchOrde,
ob
gesctzliche Ei
nschrankungen
in Bewg
auf
die
Verwendung
von
Aki('Tlt· /
Lautsp~herbcleuchtung
an
lhrcm
Boot
oder
Schiff
b<:.-sti:!h<.'11.
.&
WARNING
The marine-grade speakers are capable
ot
reproducing music at extremely loud levels.
caution
should
be
exercised to prevent
permanent hearing loss. Additionally. tlistening music with
he
audio s:,·stem at high volume levels could impair your ability to
hear
a
warni sing gnal.
Due to the speaker weight, always have two
or
more i i ll nstallation professionals nsta the speakers
&. WARNUNG
Die
marilimcn
Fcuchlraumlautsprcchcr kOnncn
Musik
mil
cxtrcm
hohcn L.aulsl1irken
wicdcrgcbcn.
Vcrwcndcn
Sic sic
dahcr
mil
Vorsicht,
um
daucrhaftcn
HOrvcrlust
zu
ve
rmcidcn.
Au8crdcm
kO
nnen Sic
unter
Umstandcn
Wamsignalc
uberhOrcn,
wcnn
Sic bci
hoherLautstiirkeMusikhOrcn
.
Wegen des
Gewichtcs
bitte
den Einbau
von
zwei
oder
mch
r
Profi-M onteurcn
vornehmen
I assen.
~ C A
UTION
Topreven1darnagetoyourspeakerspleaseobservethefollowingcaution
Be sure to a install at place having
no
possib1e problem with the boat's an:! vessel's safety
Consultyourdealeronmethodofinstallation.
Since this speaker is conti i . nuously used be ng turned on full blast temperature
of
the magnetic circuit rises, id d avo touching directly by
hand and placing something near
it.
If
it
is heated.
~
may
cause a . bum deformation
of
or
damage to peripheral things
Do not install on submersib~s
or
any any boat and vessel likely to be under water at ti . me
Donothiltoth
i
sspeakerh
i
gh-pressurew atersprayinlor,gtime
PIONEER recommends that this speaker be used
in
conjunction with amplifiers whose continuous {RMS) output is lower than the nominal
i
npvtpoweroflhisspeaker
.
Donottouchthespeakerfle~iblewire
®.
Donotbendthetemtinal
$ . wlthforce
~
Make sure speaker temiinals and/
or
flexible wires
do
not come into contact with metal surfaces.
~1::ec~~S:
::1!~s~:2
;
,::::~
1
:::~:i~r::u:~nhs~::;1;n
.
,.
When making connections, irefer also to the instruct on manual
of
t
he
martte-grade
audio unit
or
amplifier.
TS-ME770TSB CEm MARINE ENCLOSED TOWER
SYSTEM/
HAUT-PARLEUR BATEAU FIXATION SUR TOUR
DE
TRACTION
SISTEMA TORRE MARINA CERRADA /
KOPnYCHAA
AKYCTl1'-IECKAA CIIICTEMA
AllA
AXT
Ill
KATEPOB
e
FE
A S TURE
1.
Pioneer ME-series marine speakers are protected from the effects
of
sun and and water exposure, meeting both IPX7 ASTM D4J2g to •
CHARACTERI
S
TIC
• CMER E • KMAL
ARA
CTE
R
IS
T
IQUE
•
CARATTERISTICHE
achieve all-weather reliability
2. Mica reinforced IMPP monocoque cone with rubber surround constructed usir,g an advanced in-mold bonding superior technique for water
resistance while maintaining hi , gh quality powerlul sound
3. Symmetrical motor design
wi1h
high strength suspension optimized to provide stability. . linearity and clear low distortiOfl sound
reproduction
4. Lightweight polyimide (Pl) tweeter diaphragm and and uniquely shaped wave guide provides natural clear voca ls with wide dispersion
5. , a , Pioneer's proprietary eccentrically located driver system produces smooth frequency response and its uniquely shaped horn delivers
the loud sound experience to wakeboarders and those in tow
6. -Built in RGB color illumination
of
the woofer cone iprovides enhanced personalization and cosmetic integrat on
7.
Vortex generator (aerodynamics device) attached on the canister's bod
y.
suppresses wind ncise when underway, for conLinued
enjoyment
of
your music
• MER LE KMA
l.
Die
Feuchtraurnlautspre<:her
der
ME-Serie
von
Pioneer sind
vor
den
Einwirkungcn
von
Sonne
und
Wasser gcschiltzt
und
crfu!lcn
sowohl IPX7 a\s auch
ASTM
04329,
um
die
Zuverlassigkei t bei jedem
Wetter
zu
gewiihrleisten
2.
Dank
de
r bei
der
Herstellung
angewendelen hoch
enlwickelten
Gusstechnik bietet
der
MlCA-versllirkte
IM P
P-Monocoque-Konus
cine
iibcrlcgcnc
Wasscrbcstiindigkcil.
Da
s Ergcbnis s
ind
glcichblcibcnd hohc
Qualiliil
und
kraftvollcr
Klang
3. Symmt>lrische
Treihcrkonslruktion
mil
hochfestcr
Aufhiing
ung, die
fur
Stabilittil,
Li
nearitiil
und
klare, ver,ll:rrungsarme
Klangwie
-
dcrg;,bc
optimicrt
i~t
4.
Leichle
Polyimid-
H
ochtonmembran
(PI)
und
einzigarlig
geformte
"
Wave
Guides
" sorgen
fur
naturliche
und
klare
Stimmwieder-
gabes
mil
breilem
Abslrahlwinkel
5.
Der
Pioneer-exklusive, exzenlrisch platzierte Treiber garantiert eine weiche Klangcharaklt>ristik, das speziell
geformte
Hom
sorgt
fur
ausrcichendSchalldrucksclhslfurWakeboarder
6.
Die
integricrte
RGB-Farbbeleuchtung des
Tieftonkonus
ennoglicht
verbcssem:
Jndividualisienmg
und
optische
Integration
7. Der aus
der
Aerodynamic
stammen
de
Wirbelgenerator am GehliuSt'
unterdriickt
Windgeriiusche
und
sorgl
so
fiir
mehr
Musikgenu8
e
SPECIFICATIONS
• · Reproduction system Enclosed tower system
· Speaker specifications
Woofer
rt,
195 mm (7-5/8" dia.)
Tweeter·····
· ····
··················
···
········
rb28mm(1-1
/8"dia.)
• Cootinuous power hand
li
ng (RMS) · · · ·· ···
····
100 W
• Frequency response
• iNominal mpedance
·W aterproof
performance
250W
e TECH NISCHE EINZELHEIT
EN
· Tonwicdcrgabesystcm Geschlosscnes Lautsprechersystem
BechreibungderLauls
p hrec
er
TidtOner
<bl95mm
HochtOner
························
·
·····
· ···
·············
·
···<ft28mm
·
Ncnnleislung
(RMS) ···· ···
.......
··•·· ·· ··
·····
··· ··
·····
··· 100 W
·M usikbclastb.lrkcitmax
.
250W
·
Em pfindlichkeil
· Frequenzgang
·
Ncnnimpedanz
· Wasserfesl
·····················
·····
································
IPX7
Ou t Fput Sound Pressure requency Characteristic Input Voltage 2 V
Ausgan
gs-
SchalldruckFrcqucnzcigcnschaftm
Eingangsspannung2V
Caractcr
i
stiquedefreq
u dence
epressionsonoredesortie
Tensi
ond·entree2V
Carat10ristica F U r 2 V requenza Pressiooe Audio scita Voltaggio lng esso
Caracteristica
de
Frecuencia
de
Presi6o Sonora
de
Salida Voltaje
de
entrada
de
2 V
Carac1cris1icadcFrcqutnciadcPress3oSonoradcSalda Tens~odccntrada: 2 V
'-laCTOTHaR
xapaKTepl'1CTl'1Ka
BbtXQ,QHOro
3BYKOBoro
11aeneHl'1R
Bxo11Hoe
HanpR)l(8Hl'1e
2 B
u1.,H J;...,11~.,;
[µ1..::.
,....1
1..1
•.
, .....
JJJ'~

•
HOW
TO
INSTALL
eEINBAU
e MODE D'INSTALLATION •
MODO
DI INSTALLAZIONE e 1NSTALACION • COMO INST ALAR
We
strongly
recommend
that
y
ou
have
enclosed
speaker
system
installed
by
your
authorized
dealer.
The
installation professionals
employed
by
your
dealer
have
the
necessary
tools
and
experience
to
install
this
product
properly.
After installation, check
and
retighten
the
mounting
hardware
regularly.
Loose
mounting
hardware
may
cause
the
speaker
to
fall
or
break
free.
Failure
to
follow
these
precautions
could
result
in
serious injury,
including
death
,
and
/or
damage
to
property.
Wir e en empfehl dring
nd
di
e Installation <lurch einen s en eautori iert Fachhiindl
r.
Di
e eEinbausp zialisten des e en Fachhiindl rs hab das Werkzeug
und
die notigen Kenntnisse fur eine
saub
ere
und
sichere Installation.
Bille nach
dem
Einbau
den
f
es
ten Sitz e en iib rpriH
und
die Schrauben rege . ere r erelmiiBig nachziehen Lock Befestigung kann in Beschiidigung des Lautsprechers esulti n.
Nichbeachtung
der
Vorsichtsmii8nahmen kann emsthafte Verle en tzung bis
zum
Tod
oder
Beschiidigung anderer Telle fiihren.
Nous vous recommandons de faire
installer
le
sys
teme
de
haut-parleurs
par
un
revendeur
agree
.
Les professionnels de
!'installation
disposent
des outils
et
de !'experience nece
ssaires
pour
installer
ce
corr
e
ctem
e
nt
ce
produit
.
Apres , l'installation verifiez
et
resserrez reguliereme
nt
les
system
es de . fixation Le materiel desserre de montage
peut
faire tomber ou
cass
er . l'enceinte
Si
ces
precautions
ne
sont
pas
respectees, cela
peut
entrainer des
blessur
es
graves, voire
la
mort,
et
/
ou
des
deg.its materie
ls
.
Si
raccomanda vivamente
di
far installare
ii
sistema
di
diffusori
in
dotazione
dal
rivenditore autorizzato.
II
personale addetto all'installazione presso
ii
vostro rivenditore dispone degli strumenti e . dell'esperienza necessaria per installare correttamente questo prodotto
Dopo l'installazione, e controllare serrare regolarmente
la
bulloneria
di
montaggio.
Una
bulloneria
di
montaggio allentata pub causare
la
caduta o
la
rottura del diffusore.
La mancata osservanza
di
queste precauzioni
pub
causare lesioni gravi, anche mortali, . e/o danni materiali
Recomendamos encarecidamente que
su
distribuidor autorizado sea quien instale este sistema de altavoces.
Los
profesionales
de
instalaci6n empleados por
el
distribuidor tienen las herramientas y
la
experiencia necesarias para instalar este producto correctamente.
Despues de
la
instalaci6n, verifique y a vuelva apretar
el
soporte
de
montaje regularmente.
Un
soporte
de
montaje flojo puede hacer que
el
altavoz
se
caiga o
se
rompa.
El
incumplimiento
de
estas precauciones podrfa provocar lesiones graves, incluso la muerte, y / o a daiios
la
propiedad.
E
altament
e
rcc
ome
ndado
que
te
nha
um
s eist
ma
de altifalantes o pe u revc r fcchado instalad lo se ndedo
autori
z
ado.
Os instaladores profissionais
do
seu em revendedor possu
as
ferramentas
e a e
xperiCncia
necessarias
para
instalar
e
ste
produto
corr
e
tamente.
Ap6s a , e instala~iio verifique
aperte
o
hardware
the
fixa1riio
com regularidade.
Hardware
de
fixa~iio solto podef3
fazer
com
que
a coluna caia
ou
se liberte. 0
niio
cumprimento destas
precau1r0es
poder
a
resultar
em
les0es graves , i inclu
ndo
morte
, e/
ou
dano
a
propriedade.
HacTOAT8/lbH0
p8K0M8HAY8M
06pa111aTbCA
K
cnet.11'1a/ll'ICTaM
npl'I
YCTaHOBK8
K0pnycHblX
aKyCTl'l48CKl'IX
Cl'ICT8M
.
TO/lbK0
cnet.11'1a/ll'ICTbl
0611at1atoT
H806X0Al'IMblM
onblT0M
l'I
Ha6opoM
l'IHCTPYM8HT0B
A/lA
npaBl'l/lbHQj;j
YCTaH0BKl'I
TaKl'IX
Cl'ICT8M.
nocne
YCTaH0BKl'I
perynApH0
nposepAj;jTe
Kpenelt<Hbl8
3/18M8HTbl
.
Oc11a6J18Hl'l8
Kpenelt<a
MOlK8T
npl'IB8CTl'I
K
nat1aHl'IIO
Al'IHaMl'!Ka
l'I
ero
no/lOMK8
.
He
C06/ltoA8Hl'l8
AaHHblM
Mep
npeA0CT0p0lKHOCTl'I
M0lK8T
npl'IB8CTl'I
K
TpasMaM
,
BK/lto4aA
CM8pTb
,
l'lil'l/11'1
nosp8JKA8Hl'l8
l'IMYUl8CTBa
.
_,....J
I
JaS.,JI
:u...1_,,
~
u~I....
,u.,
~
iJ§.,
ul
,..:.,
.,.._,.
.~
~
~1
llA
~
'--j::lll
s~IJ
.:.1_,.,
',/
1..._.
J.WS
<,<lll
JaS.,Jl
iJ.J"-!lll
l
ypyll
_,;.,.,... "1t..,
.ulSl:i...11
uJ:;
,
1/
,
,u
.,i1
,u.;,}
t..,
··~
'-,t...1
._,.._,-,JI
..,l!
.:J..bt;.,.
'i
l .lA
ts'!~.,
,:,,
,; .<ll...:,.. .:a:;;11 ,1 u_,...JI
fa.b_,i..,}
~I
ut.._jl....
,WJI
-
.>ii
_,
u.,,i.,
4.1.,J
,.s..1
,
~I
ul.._jl.....:,..
~,~I,-,
• KAK nO,QKJ1IO'-ll1Tb

...
~
~
&.
Sin v o irutas
rebabas.
&.
Sem
aparas
de
madeira
ou
arestas.
£ 683
OCTpblX
Kpaee
.
_
....:.;.
u1_,..
,1
o_µ;
:.+Y
'l
&.
Minimum4)15 mm (9/16"
Dia.)
Minimum
$15
mm
Minimum
4>
15
mm
Mfnimo4115mm
Mlnimot/)15
mm
Mfnimo
4,
15
mm
MHHHMMbHbl~Hb15
MM
r--10),.i.,JJ'°il~\
§
;Ji?,,
Tighten
2
screws
.
Fix
screws
firmly
.
2 Schrauben
anziehen.
Schrauben
fest
anziehen.
Serrer
!es 2 vis.
Fixer
les
vis correctement.
Serrare
le
2
viti.
Fissare
saldamente
le
viii.
Apretar
los
2
tomlllos
.
Flje
los
tomillos
flrmemente
.
Aperte
2 parafusos.
Fue
os parafusos firmemente.
3aTAHHTe
2
8HHTa.
Tyro
3aTAHHTe
BHHTbl.
,,JS,:,,)i.,,t-\.)lll~.,_.i:.J!1'.l.iJ!ei
~
t
SPEAKER
ALTAVOZ
LAlITSPRECHER ALTO-FALANTE
HAUT-PARLEUR
rPOMKOrQBOPITTE/16
DIFFUSORE
~t.....JI
LED
LED
LED LED
LED
LED
LED
~..,...:,Jl<!a:.
t.,,~~
(><4)
Connect
each
cable.
Alie Kabel verbinden.
Connecter
chaque
cAble.
Collegare
ciascun
cavo.
Conecta
cad
a
cable.
Ligue
cada cabo.
nOACOBAHHHTe
ace
t<a6enH
.
.
J!.5~J;-Ji!tl
Red$-
---~
~
Rot
Rouge
Rosso
Rojo
Vermelho
l<pac:Hb1'1
_,..1
Black
Schwarz
Noir
Ne,o
Neg,o
Pre<o
4epHb1'1
,.,..I
Use
a
fuse
of
1 A
sold
separately.
Verwenden Sie
eine
Sicherung mit 1 A {separat erhaltlich).
Utiliser
un
fusible
de
1 A vendu Wparement.
Utilizzare
un
fusibile
di
1 A
venduto
separatamente.
Usar
el
fusible
de 1 A
vendido
por
separado.
Utilize o 1 A fusivcl vcmlido
em
separado
.
li1CnOllb3yiiiTe
npeAQxpaHHT8/lb
H8
1 A
(npQA88TCA
OTABObH0).
.
J-il.~t4.i•~l
,
j_,J,~1
Fuse1A
Sicherung 1 A
Fusible 1 A
Fusibile1
A
Fusible1
A
Fusfvel I A
npe.QoxpaHMT811b
1 A
.».""1,
j_,,i
+
12
V
2
Ti
ghten
2
screws.
Fix
screws
finnly.
2
Schrauben
anziehen.
Schrauben
f
es
t
anziehen.
Serrer
J
es
2 vis.
Fixer
Je
s
vis
correctement.
Serrare
le
2
viti.
Fissare
saldamente
le
viti.
Apretar
los
2 tornillos.
Fije
los
tomillos
firmemente.
Aperte
2
parafusos
.
Fixe
os
parafusos
firmemente
.
3an:iHMT8
2
eHI-ITa.
Tyro
38TAHHTe
8MHTbl.
-
~,_.i:.I~I~
-<rJ!~.l.iJ!ri
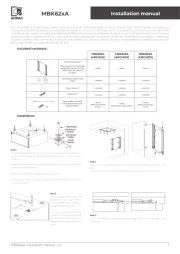
3
/
Ta
ke
6
screws
of
grille
out
and
adjust
a
mounting
angle
.
6 Schrauben
der
Abdcckung hcrausnchm.cn und Montagewinkel justieren.
Retirer
les
6 vis
de
la
grille
et
ajuster
!
'ang
le
de
montage.
Estrarre
le
6
viti
della
grigl
ia
e
regolare
l'angolo
di
montaggio.
Saque
los
6 tomlllos
de
las
rejllla
y
aJuste
un
angulo
de
monta
je
.
Retire 6 parafusos
da
grade e ajuste o Angulo de
montagem.
BblKpyTHTe
6
eHHT08
H3
rpwiA
l'I
orperynMpy.,Te
yron
ycraH08KH.
.~!'ffj.J.,..:.1_,~!,;i,,~,,4'
Attac
he
d
by
double
side
ta
pe
.
Mit
doppelseitigem
KJebeband befestigt.
AttacM
par
du
ruban
adh6sif
double face.
Attaccato
con
nastro
biadesivo.
Unido
por
una
cinta
doble
lateral.
Colado
com
fita
-co
la
de
dupla face.
3aKpenHTe
npM
nOMOll.11'1
AeyxcTOpoHHeiii
KJ1eiiiKoiii
081-ITbl.
-~IU",!_,>.)6,j--'i.l.i_A~
+e
n
\><7)
(><6)
4 5 6
&CAUTION
(*1)
Tower speaker mounting hardware (UD-ME30CP) is sold sepa-
rately.
(*2)
The
use
of LOCTITE®
brand
thread
lock
(sold
separately) during
installation is recommended
to
maintain fastener tightness during
heavy vibration, shock.
and
temperature
changes.
(*3)
Be
careful not
to
twist, pinch or break
the
cable.
(*4)
Do
not connect the
LED
wires to speaker
signal.
Take
caut wion
hen
connecting the
+12V
and
R.G
.B. wires to a
power supply.
Do
not cross or short
the
wires during installat
io
n.
(*5)
Alternately tight
en
the
mounting hardware screws.
Regularty check
and
retighten as needed.
(*6)
Use
silicone sealant or adhesive (sold separately).
(*7)
Carefully check the rotation of
the
end
cap prior
to
installation.
&VORSICHT
(Ji!:
1)
Befestigungsmaterial
(UD-ME30CP)
separat
erhaltlich.
(li<2)
Wir empfehlen die Nutzwtg von
~
Schraubensicher-
ung
(separat
erha.ltlich.) bei
der
Installation,
um
cine
sichere
Befestigung cine und hohere Wiederstandskraft bei
Vibrationen,
ErschU.tterungen und. Temperaturanderungen
zu
erreich.en.
(li<3)
Darauf
ach.ten, dass Kabel nich.t gebrochen oder
verdreht
weroen.
(li<4)
Verbinden
Sie die
LED-Kabel
nich.t
mit
dem
Lautsprech.ersignal.
SchlieBen
Sie beim Anschluss an eine Stromversorgung
nicht
die +
12
V-l.citung
mit
den
RGB--Anschlilssen
kun.
(*5)
Bitte
Schrauben
abwechselnd
anziehen.
Bitte die Stabilitat der Befestigung
rege1mafilg
priifen.
(*6)
Bitte gleichzeitig Silikonkleber verwenden.
(*7)
Bcfustigungswmkcl nicht vc,wcchscln.
P1c:,neer
&ATI'ENTION
(l>lEl)
Systeme de fixation (UD-ME30CP) vendu separement.
(lil:2)
II
est
recommand
C
d'utiliser
le frein-filet
de
marque
LOCTITE® {vendu sCpal'ement) lors
de
l'installation
pour
maintenir
l'Ctanch
Cite
des fixations lors
de
fortes
vibrations,
de
chocs
et
de changements
de
temperature.
(li<:3)
Ne pas
tordre
et
casser
le
cAble.
(liE4)
Ne
pas
connecter
le systCme
LED
directement
sur
le
haut-parleur
.
Ne court-circuitez
pas
]es fils +12
Vet
R.G.B.
quand
une
fois
connecte a l'alimcntation.
(3i€5)
Serrer
les vis en
alternance.
Verifier l'CguliCrcment
si
tout
est
bien ajust.c.
(*6)
Utiliser
simultanCment
de
la
colle
silicone
{vendue
sCparcmcnt).
(*7) Attention
i\
ne
pas
inverser
Jes
angles de montage.
&PRECAUZIONE
(*1)
La parte di fissaggio della torre (UD-ME30CP) 8 venduta
separatamente.
(*2)
l...'.uso
de
Ila
LOCTIT~
frenafiletti (venduto separatamente),
durante l'installazione, 8 raccomandato per mantenere la
tenuta fissaggio dei dispositivi di
in
caso di forti vibrazioni,
urti e variazioni
di
temperatura.
(*3)
Fare attenzione a non intrecciare e rompere
ii
cavo.
(lM)
Non collegare i fill
LED
al
segnate dei diffusori.
Non cortocircuitare i fili +
12
V e i fili
R.G
.
B.
con co!legato un
alimentatore.
(*5)
Si
prega
di
serrare attemativamente le
viti.
Si prega di controllare regolarmente se c'8 un montaggio
allentato.
(*6)
Si
prega
di
utilizzare contemporaneamente colla siliconica
(venduta separatamente).
(*7)
Fare attenzione a non sbag!iare l'angoto
di
montaggio.
&PRECAUCION
(*1)
Pieza
de
montaje
de
la torre (UD-ME30CP) se vende por
separado.
(*2)
Se recomienda el uso de LOCTITE® (se vende por sepa-
rado) para el bloqueo de la la Rosca durante instalaci6n,
manteniendo
la
presion, sujeci6n y la estanqueidad, prevei-
endo ademas fuertes vibraciones, golpes y cambios
de
temperatura.
(*3)
Tenga
cu
id
ado de no torcer y romper
el
cable.
(*4)
No LED conectarl los cables del a
la
senar
de attavoces.
No cortocircuite loscablede
+12
Vy
R.G.B.
cuando estos
se
conecten a una
fuente
de alimentaci6n.
(*5)
Apriete los tomillos altemativamente.
Compruebe regularmente
si
hay algun ajuste flojo.
(*6)
Utiliza simultaneamente pegamento de silicona (se vende
par separado).
(*
7)
Tenga cuidado
de
no confundir un Sngulo
de
montaje.
&PRECAU(AO
(*I)
Acess6rios
de
montagem (UD-ME30CP) vendidos
em
separado.
(*2)
E recomendada a
utili~!o
de super cola
da
marca LOCTITE®
{vendido
em
separado) durante a
instalar_:30
para assegurar
uma
maior
fixar_:!o
durantc
vibrar_:iio
intensa, choque. e altcra9iks
de
temperatura.
(*3)
Cuidadopara niiotorcerc
partirocabo.
(lM)
N1io
ligue os fios
do
kit LED ao terminal speaker.
Nlio provoque
curto
circuito
do
fio +12 V c
dos
fios R.G.B.
ao
Ii
gar os mesmos ao fornecimento eneTgetico.
(*5)
Apcrteos parafusos altcmadamcntc.
Verifique regularmente se
ha
folga.
(*6)
Utilize s e e ilicon cola em simultinco (vendido
cm
separado).
(lif.7)
Tonha
ate~
ao
ingulo
de montagem.
&OCTOPOlKHO
(*1)
Kpenn8HH8
AllA
KOpnycHOiii
81<yCTI,1KH
(UD-ME30CP)
npoAaerCA
or.o.enbHo.
(*2)
PeKOM81-1,D,Y8M
M010Jb30Balb
CllEIUH80b1-b1M
cocrae
Mapt<M
LOCTTTE®
,QflA
OOBblWeHHA
npo'-IHOCTI1
pe3b6o8blX
C08,D.HH8HHM
B
ycJl0BHAX
CWlbHOM
BH6pauHM
l'I
p&3KIIIX
T8Mnep8T)'l)HblX
1113M8H8HHM
.
(*3)
6y,o.bTe
OCTOpo>KHbl•He
nepeKpyl.4HB8'1Te
H
He
c11116aMre
Ka6enb
BO
M36e>KBHl-18
ero
noepe>K,D.&HHA.
(*4)
He
l10,IJ,K/1~Te
K86enH
nHTaHHA
LED·no.o.ceeTKM
K
aKycTvr-+ecKHM
Ka6eJ1AM.
He
C08,QHHAMTe
eM8CT8
Ka6enb
m•1T8H~
+12
8 H
t<a6enH
RGB
npH
nOAKnl0"4eHMl'I
K
HCTO'-IHl-1KY
nHTaHHA.
(*5)
rlc»Ka.nyi!CTa,
noo-+epe.QH03aTAHHTe
8411HTbl
.
nc»tca.nyMcra,
perynApHo
npoeel)AHTe,
1-10
ocna6no
nM
tcpenneH1-1e.
(*6)
no>KanyMcra,
OAHOBpeM8HHO
Hcnonb3yi!Te
CH.11HKOH08b1M
KneM
(npop,aeTCA
OTA8JlbHO).
(*7)
6y,O.bTe
OCTOpc»KHbl
H
He
OWH6MT8Cbnp(II
Bo16opeyrna
ycraH08KM
.
~LI',
.J..il.~
(UD-ME30CP)t:y,!IYP,.J,d...jl:i--t~
(\*)
LOCTITE
®
¼..J.+:,!1t..:WIJ.-.ii;~1.J..,
_
_,ll~J~rw.:u.i,,_.-"
('Bi'<)
,
..:..ljlfa'.:i!(..1-dyull
o11il~.)1
~!
d-t,~.l;\.b..11~\
oltil
(J..il.
~tl.Y)
.iJly..114.),l..:..1.JJi.:i.J~!~l.1
.J!-Sil,.,t,.J i_,J~_,k.U"'".?-1
(1"*)
_;....l-J\ifa),,LED.!tL.lJ...,,..t1~")'
(Bi'<)
,.,l!
Jr-jill
,-:iJ
~
.R.G.B
.!tL.1
~.J.l.l_,i,
1'..:,...
_;ii•~.&..
y,.,aii
~
")'
_Ul.l.l!J_,j.o
_.__,,,~..,t-1y,ll~J,J5:-.J,_,,._,w
(o*)
~Jll~JF~l.j,5.GJL-~~1~_,w
.(J.-il,.~t~).:.i.,Slu-i,i~~\
0
1.Ja-rl~l,_,,._,w
('\*)
. ...,.i,iS_;lll~lj~ll...ll~_,k...,_.__,..1
(vl:i:!:)
Product specificaties
| Merk: | Pioneer |
| Categorie: | Speaker |
| Model: | TS-ME770TSB |
Heb je hulp nodig?
Als je hulp nodig hebt met Pioneer TS-ME770TSB stel dan hieronder een vraag en andere gebruikers zullen je antwoorden
Handleiding Speaker Pioneer

5 Juni 2025

25 April 2025

13 December 2024

13 December 2024

13 December 2024

13 December 2024

13 December 2024

13 December 2024

13 December 2024

13 December 2024
Handleiding Speaker
- WyreStorm
- Audio Pro
- Sencor
- BSS Audio
- Marshall Electronics
- Martin Audio
- GoldenEar
- SpeakerCraft
- ABRAMTEK
- Eos
- JAZ Audio
- Aiwa
- Ices Electronics
- Peaq
- Atlas Sound
Nieuwste handleidingen voor Speaker
30 Juli 2025

30 Juli 2025

30 Juli 2025

30 Juli 2025
30 Juli 2025
29 Juli 2025

29 Juli 2025
29 Juli 2025
29 Juli 2025

29 Juli 2025