Panasonic Lumix DMW-LVF2E Handleiding
Panasonic
Niet gecategoriseerd
Lumix DMW-LVF2E
Bekijk gratis de handleiding van Panasonic Lumix DMW-LVF2E (2 pagina’s), behorend tot de categorie Niet gecategoriseerd. Deze gids werd als nuttig beoordeeld door 431 mensen en kreeg gemiddeld 3.7 sterren uit 216 reviews. Heb je een vraag over Panasonic Lumix DMW-LVF2E of wil je andere gebruikers van dit product iets vragen? Stel een vraag
Pagina 1/2

Operating Instructions
Manuel d’utilisation
Instrucciones de
funcionamiento
使用说明书
LIVE VIEW FINDER
VISEUR À VISION DIRECTE
VISOR LIVE VIEW
实时取景器
For Europe Only/Pour l’Europe seulement
CPanasonic Corporation 2011
Panasonic Corporation
Web Site: http://panasonic.net
EU
Pursuant to at the directive 2004/108/EC,
article 9(2)
Panasonic Testing Centre
Panasonic Marketing Europe GmbH
Winsbergring 15, 22525 Hamburg,
Germany
VQT3T47
F1011SM0
Model No. DMW-LVF2PP/
Model No. DMW-LVF2E/
Model No. DMW-LVF2GK
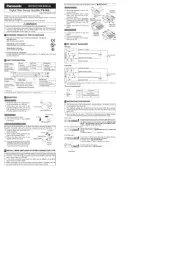
∫Attaching the Live Viewfinder A
This Live Viewfinder is designed only for the
Panasonic digital camera DMC-GX1.
(As of October 2011)
Preparation:
•Turn off the camera.
•Remove the Live Viewfinder connector
protective cover.
•Remove the hot shoe cover that is attached to
the camera.
•Place the hot shoe cover you have removed in
its storage bag and store in a safe location.
•When attaching and detaching the Live
Viewfinder, be sure to do so slowly and
carefully.
∫Slide the Live Viewfinder into the
hot shoe of the digital camera,
ensuring that it is fully inserted.
1Hot shoe
2Finder
3[LVF/LCD] button
4Dedicated connector for external
viewfinder
•Press the lower part of the Live Viewfinder with
your finger, and securely insert the connector
as well. (Do not press on the viewfinder part or
the [LVF/LCD] button.)
∫To remove the Live Viewfinder B
1 Turn off the camera.
2 Return the angle of the Live
Viewfinder to its original position if it
has changed.
3 Pull in the direction of the arrow while
pressing the lock button.
•Reattach the hot shoe cover in its original
position.
•Using the Live Viewfinder with dirt on the
connectors may cause damage, so
attach the connector protective cover and
place it in the storage bag.
1Lock button
∫How to use C
1 Switch [ON] the camera.
2 Press the Live Viewfinder [LVF/LCD]
button to switch the display.
•Switching via the [LVF/LCD] button will be
maintained even when the power of the
digital camera is turned [OFF].
1[LVF/LCD] button
∫About the settings for recording
with a low camera angle C
Based on the camera angle, set the angle
of the Live Viewfinder for easy viewing.
•Do not open beyond 90o. Doing so may cause
damage.
∫Diopter adjustment D
Look at the display on the Viewfinder and
rotate the diopter adjustment dial to
where the screen is clearest.
1Diopter adjustment dial
Note
•Static electricity, electromagnetic waves or
other factors depending on the photographic
environment may cause the screen to turn
black temporarily; however this does not affect
the saved image.
•If the finder is not displayed when using the
camera, it may be becoming loose. Re-attach
the finder.
•The Live Viewfinder cannot be used with an
external flash.
•Take care not to drop the Live Viewfinder or
subject it to strong impact.
•Be particularly careful in the following places
as they may cause this unit to malfunction.
–Places with a lot of sand or dust.
–Places where water can come into contact
with this unit such as when using it on a rainy
day or on a beach.
•Take care not to touch or dirty the finder
surface.
•When the Live Viewfinder is fitted, do not use it
to hold the camera. The camera may drop out
of the Live Viewfinder and be damaged.
•Before cleaning the Live Viewfinder, wipe
the Live Viewfinder with a dry soft cloth.
– When the Live Viewfinder is soiled badly, it
can be cleaned by wiping the dirt off with a
wrung wet cloth, and then with a dry cloth.
– Do not use solvents such as benzine,
thinner, alcohol, kitchen detergents, etc., to
clean the Live Viewfinder, since it may cause
the external case to deteriorate or the
coating to peel off.
– When using a chemical cloth, be sure to
follow the accompanying instructions.
•As the eye cup cannot be removed, gently
wipe it with a dry and soft cloth, and be careful
not to remove it.
•If you wipe the eye cup too hard and it is
removed, consult the dealer or your nearest
Service Centre.
•Be sure to read the operating instructions of
your digital camera.
•Condensation occurs when the ambient
temperature or humidity changes. Such
condensation could result in oxidation and or
corrosion of internal components leading to
service issues or the formation of mold in
extreme cases. Condition it to the ambient
temperature inside a bag etc. before use.
•When not using the Live Viewfinder, be sure to
keep it in its storage bag. Store in a dry place,
taking care to avoid heat and humidity.
•Do not spray the camera with insecticides or
volatile chemicals.
If the camera is sprayed with such chemicals,
the body of the camera may be damaged and
the surface finish may peel off.
•Do not keep rubber or plastic products in
contact with the camera for a long period of
time.
•Do not disassemble or modify this unit.
•If nothing is displayed on the Live Viewfinder,
or if the display is not normal, it may be due to
the digital camera. Please have your digital
camera serviced together with this unit.
∫Cautions for Use
Keep the unit as far away as possible
from electromagnetic equipment (such as
microwave ovens, TVs, video games,
radio transmitters, high-voltage lines
etc.).
•Do not use the camera near cell phones
because doing so may result in noise
adversely affecting the pictures and sound.
•If the camera is adversely affected by
electromagnetic equipment and stops
functioning properly, turn the camera off and
remove the battery and/or the connected AC
adaptor. Then reinsert the battery and/or
reconnect the AC adaptor and turn the camera
on.
∫Specifications
Display: Field sequential color
LCD viewfinder
(1,440,000 dots
equivalent)
Viewfinder Coverage:
Approx. 100%
Diopter value: j i4 to 4diopter
Magnification
(35 mm film camera
equivalent): Approx. 1.4k
(Approx. 0.7k)
-1 m-1 50 mm infinity
Eye Point: Approx. 17.5 mm
(Approx.
0.689
q
) (-1 m
-1
)
Dimensions:
Approx. 29.4 mm (W)
k
47.7 mm (H)
k
48.9 mm (D)
[1.16 1.88q (W)k q (H)k
1.93q (D)]
Mass (Weight): Approx. 36 g
(0.07937 lb)
Standard
Accessories:
Connector protective cover
Storage Bag
-If you see this symbol-
THE FOLLOWING APPLIES ONLY IN
CANADA.
THE FOLLOWING APPLIES ONLY IN THE
U.S.A.
N° de modèle DMW-LVF2PP/
N° de modèle DMW-LVF2E/
N° de modèle DMW-LVF2GK
∫
Fixation du viseur à vision directe
A
Ce viseur à vision directe est conçu
uniquement pour l’appareil photo numérique
DMC-GX1 de Panasonic.
(En date d’octobre 2011)
Préparatifs:
•Mettez l’appareil photo hors marche.
•Retirez le couvercle protecteur du connecteur
du viseur à vision directe.
•Retirez le couvercle de la griffe
porte-accessoires fixé à l’appareil.
•Placez le couvercle de la griffe
porte-accessoires dans son sac de rangement
et rangez-le dans un endroit sûr.
•Lorsque vous fixez ou désinstallez le viseur à
vision directe, veuillez procéder lentement et
avec soin.
∫Glissez le viseur externe sur la
griffe porte-accessoires de
l’appareil en vous assurant qu’il
est complètement inséré.
1Griffe porte-accessoires
2Viseur
3Touche écran ACL/viseur [LVF/LCD]
4Connecteur dédié pour viseur externe.
•Avec un doigt, appuyez sur la partie inférieure
du viseur; insérez également le connecteur à
fond. (N’appuyez pas sur le viseur ni sur la
touche écran ACL/viseur [LVF/LCD].)
∫
Retrait du viseur à vision directe
B
1 Mettez l’appareil photo hors marche.
2 Au besoin, remettez le viseur en sa
position initiale.
3 Tout en appuyant sur la touche de
verrouillage, tirez dans la direction de
la flèche.
•Remettez le couvercle de la griffe
porte-accessoires en sa position initiale.
•Utiliser le viseur à vision directe alors que
les connecteurs sont sales peut
l’endommager; aussi, est-il important de
mettre le couvercle protecteur du
connecteur en place et de ranger le tout
dans le sac de rangement.
1Touche de verrouillage
∫Utilisation C
1 Mettez l’appareil photo en marche.
2 Appuyez sur la touche écran ACL/
viseur [LVF/LCD] pour commuter
l’affichage.
•Le réglage effectué avec la touche [LVF/
LCD] est conservé même si l’appareil est
hors marche.
1Touche écran ACL/viseur [LVF/LCD]
∫Réglages pour des prises de vues
en contre-plongée C
Selon l’inclinaison de l’appareil photo,
réglez l’angle du viseur de manière à
mieux voir.
•Évitez de l’ouvrir à plus de 90o; cela pourrait
l’endommager.
∫Ajustement dioptrique D
Observez l’image affichée au viseur et
tournez la bague d’ajustement dioptrique
jusqu’à la position offrant l’image la plus
claire.
1Bague de réglage dioptrique
Nota
•De l’électricité statique, des ondes
électromagnétiques ou d’autres facteurs liés
aux conditions de prise de vue peuvent faire
virer l’écran au noir; toutefois, cela n’a aucun
effet sur l’image enregistrée.
•Si aucune image n’est affichée au viseur
pendant l’utilisation de l’appareil, il se pourrait
qu’il y ait un problème de connexion.
Reconnectez le viseur.
•Le viseur à vision directe ne peut être utilisé de
concert avec un flash externe.
•N’échappez pas le viseur externe ni ne le
soumettez pas à de violents chocs.
•Afin de prévenir les problèmes de
fonctionnement, faites particulièrement
attention dans les endroits suivants.
–Endroits poussiéreux et où il y a du sable.
–Endroits où l’appareil pourrait être mouillé
(pluie, éclaboussures, etc.).
•Assurez-vous de ne pas toucher ou salir la
surface du viseur.
•Lorsque le viseur est installé, ne l’utilisez pas
pour tenir l’appareil. L’appareil peut se
détacher du viseur et être endommagé.
•Avant de nettoyer le viseur, essuyez-le
avec un chiffon doux et sec.
– Si le viseur externe devient très sale, il peut
être nettoyé à l’aide d’un chiffon doux
mouillé et essoré puis avec un chiffon sec.
– N’utilisez pas de solvants comme le
benzène, diluant, alcool, détergents de
cuisine, etc., pour nettoyer le viseur puisque
cela pourrait causer une détérioration de
son boîtier et son fini pourrait se décoller.
– Lorsque vous utilisez un tissu chimique,
assurez-vous de suivre les instructions qui
l’accompagnent.
•
Du fait que l’œilleton ne peut être enlevé,
essuyez-le délicatement avec un chiffon doux et
sec et prenez soin de ne pas tenter de l’enlever.
•Si l’œilleton venait à se dégager,
communiquez avec le détaillant auprès de qui
vous avez acheté l’appareil ou avec un centre
de service à la clientèle.
•Lisez attentivement le manuel d’utilisation de
votre appareil photo numérique.
•De la condensation peut se former en cas de
changement brusque de la température
ambiante ou du taux d’humidité. La
condensation peut entraîner une oxydation ou
une corrosion des composants internes, d’où
un risque de problèmes de fonctionnement ou
la formation de moisissure dans des cas
exceptionnels. Avant d’utiliser l’appareil,
conditionnez-le aux conditions ambiantes en le
plaçant dans un sac de pastique, etc.
•Après usage, remettez toujours le viseur à
vision directe dans son sac de rangement.
Gardez-le dans un endroit sec en prenant soin
d’éviter la chaleur et l’humidité.
•Ne vaporisez pas l’appareil avec des
insecticides ou des substances chimiques
volatiles, cela pourrait causer une détérioration
de son boîtier et son fini pourrait se décoller.
•Évitez de laisser des produits en caoutchouc
ou en plastique en contact avec l’appareil
pendant une longue période.
•Ne démontez ni ne modifiez pas cet appareil.
•S’il n’y a pas d’affichage sur le viseur à vision
directe ou si l’affichage semble anormal,
l’appareil photo numérique pourrait être en
cause. Faites vérifier le viseur et l’appareil
photo numérique par un technicien.
∫Précautions à prendre
Évitez d’approcher l’appareil de tout
équipement magnétisé (four à
micro-ondes, téléviseur, équipement de
jeux vidéo, émetteur radio, ligne à haute
tension, etc.).
•N’utilisez pas l’appareil photo à proximité d’un
téléphone cellulaire : cela pourrait entraîner un
bruit nuisible à l’image et au son.
•Advenant le cas où le fonctionnement de
l’appareil serait dérangé par un champ
magnétique, coupez le contact, retirez la
batterie ou débranchez l’adaptateur secteur
pour ensuite soit remettre la batterie en place,
soit rebrancher l’adaptateur. Remettez
l’appareil en marche.
∫Spécifications
Affichage : Viseur couleur ACL à
séquence de trames
(équivalent de
1 440 000 points)
Couverture du
viseur : Environ 100 %
Valeur dioptrique : j4 à i4
WARNING:
TO REDUCE THE RISK OF FIRE, ELECTRIC
SHOCK OR PRODUCT DAMAGE,
•
DO NOT EXPOSE THIS APPARATUS TO
RAIN, MOISTURE, DRIPPING OR
SPLASHING AND THAT NO OBJECTS
FILLED WITH LIQUIDS, SUCH AS VASES,
SHALL BE PLACED ON THE APPARATUS.
•USE ONLY THE RECOMMENDED
ACCESSORIES.
•
DO NOT REMOVE THE COVER (OR BACK);
THERE ARE NO USER SERVICEABLE
PARTS INSIDE. REFER SERVICING TO
QUALIFIED SERVICE PERSONNEL.
Information on Disposal for Users of
Waste Electrical & Electronic Equipment
(private households)
This symbol on the
products and/or
accompanying
documents means that
used electrical and
electronic products
should not be mixed with
general household waste.
For proper treatment,
recovery and recycling,
please take these products to designated
collection points, where they will be accepted
on a free of charge basis. Alternatively, in
some countries you may be able to return
your products to your local retailer upon the
purchase of an equivalent new product.
Disposing of this product correctly will help
to save valuable resources and prevent
any potential negative effects on human
health and the environment which could
otherwise arise from inappropriate waste
handling. Please contact your local
authority for further details of your nearest
designated collection point.
Penalties may be applicable for incorrect
disposal of this waste, in accordance with
national legislation.
For business users in the European Union
If you wish to discard electrical and
electronic equipment, please contact your
dealer or supplier for further information.
Information on Disposal in other
Countries outside the European Union
This symbol is only valid in the European Union.
If you wish to discard this product, please
contact your local authorities or dealer and
ask for the correct method of disposal.
This Class B digital apparatus complies
with Canadian ICES-003.
FCC Note:
This equipment has been tested and
found to comply with the limits for a Class
B digital device, pursuant to Part 15 of the
FCC Rules.
These limits are designed to provide
reasonable protection against harmful
interference in a residential installation.
This equipment generates, uses and can
radiate radio frequency energy and, if not
installed and used in accordance with the
instructions, may cause harmful
interference to radio communications.
However, there is no guarantee that
interference will not occur in a particular
installation. If this equipment does cause
harmful interference to radio or television
reception, which can be determined by
turning the equipment off and on, the user
is encouraged to try to correct the
interference by one or more of the
following measures:
•Reorient or relocate the receiving antenna.
•Increase the separation between the
equipment and receiver.
•Connect the equipment into an outlet on a
circuit different from that to which the
receiver is connected.
•Consult the dealer or an experienced radio/
TV technician for help.
Any unauthorized changes or
modifications to this equipment would void
the user’s authority to operate this device.
This device complies with Part 15 of the
FCC Rules. Operation is subject to the
following two conditions: (1) This device
may not cause harmful interference, and
(2) this device must accept any
interference received, including
interference that may cause undesired
operation.
Responsible Party:
Panasonic Corporation of North America
One Panasonic Way
Secaucus, NJ 07094
Support Contact:
Panasonic Consumer Electronics
Company
Telephone No.: 1-800-211-PANA (7262)
ENGLISH
FRANÇAIS

Taux d’agrandissement
(équivalent 35 mm) :
Environ 1,4k
(environ 0,7k)
-1 m-1 50 mm infinité
Anneau oculaire : Environ 17,5 mm
(Environ 0,689 po) (-1 m
-1
)
Dimensions : Environ 29,4 mm (L)k
47,7 mm (H)k
48,9 mm (P)
[1,16 po (L)k1,88 po
(H)k1,93 po (P)]
Poids : Environ 36 g
(0,07937 lb)
Accessoires : Couvercle protecteur
du connecteur
Sac de rangement
-Si vous voyez ce symbole-
CE QUI SUIT NE S’APPLIQUE QU’AU
CANADA.
Modelo N. DMW-LVF2PP/
Modelo N. DMW-LVF2E/
Modelo N. DMW-LVF2GK
∫Acoplar el visor Live View A
Este visor Live View está diseñado
únicamente para la cámara digital Panasonic
DMC-GX1.
(A partir de octubre de 2011)
Preparación:
•Apague la cámara.
•Retire la cubierta protectora del conector del
visor vivo.
•Retire la tapa de la zapata de contacto unida a
la cámara.
•Coloque la cubierta de la zapata caliente que
retiró en su bolsa de almacenamiento y
guárdela en una ubicación segura.
•Cuando quite y ponga el visor Live View,
asegúrese de hacerlo lenta y cuidadosamente.
∫Deslice el visor Live View en la
zapata de contacto de la cámara
digital, asegurándose de que está
totalmente introducido.
1Zapata de contacto
2Visor
3Botón [LVF/LCD]
4Conector dedicado para el visor externo
•Apriete la parte inferior del visor Live View con
el dedo, e introduzca de forma segura también
el conector. (No presione parte del visor ni el
botón [LVF/LCD].)
∫Para quitar el visor Live View B
1 Apague la cámara.
2 Devuelva el ángulo del visor Live
View a su posición original si p2-ha
cambiado.
3 Tire en la dirección de la flecha
mientras presiona el botón de
bloqueo.
•Volver a colocar la tapa de la zapata de
contacto en su posición original.
•Usar el visor vivo con suciedad en los
conectores puede causar daño, entonces
sujete la cubierta protectora del protector
y colóquelo en la bolsa de
almacenamiento.
1Botón de bloqueo
∫Cómo usarlo C
1 Encienda la cámara.
2 Presione el botón del visor vivo
[LVF/LCD] para cambiar la
visualización.
•El cambio realizado a través del botón
[LVF/LCD] se mantendrá incluso al
apagar la cámara digital.
1Botón [LVF/LCD]
∫Acerca de los ajustes para grabar
con un ángulo de cámara bajo C
Según el ángulo de cámara, ajuste el
ángulo del visor Live View para ver mejor.
•No abra más allá de 90o. Si lo hace puede
causar daños.
∫Ajuste del dióptrico D
Mire la visualización en el visor y gire el
disco del ajuste del dióptrico hasta donde
la pantalla resulta más clara.
1Disco de ajuste del dióptrico
Nota
•La electricidad estática, las ondas
electromagnéticas u otros factores según el
entorno fotográfico pueden causar que la
pantalla se ponga en negro temporalmente,
sin embargo esto no afecta la imagen
guardada.
•Si el localizador no se visualiza cuando se usa
la cámara, se puede aflojar. Vuelva a colocar
el localizador.
•El visor Live View no puede usarse con un
flash externo.
•Tenga cuidado de no golpear el visor Live
View ni lo someta a fuertes impactos.
•Ponga especial cuidado en los lugares
siguientes p2-ya que pueden originar un
funcionamiento defectuoso a esta unidad.
–Lugares con mucha arena o polvo.
–Lugares donde el agua puede tocar esta
unidad como cuando la usa durante un día
lluvioso o en una playa.
•No toque ni ensucie la superficie del visor.
•Cuando está puesto el visor Live View, no lo
use para sujetar la cámara. La cámara puede
soltarse del visor Live View y puede dañarse.
•Antes de limpiar el visor Live View, pase un
paño suave y seco por el mismo.
– Cuando el visor Live View está demasiado
sucio, puede limpiarse quitando la suciedad
con un trapo mojado y escurrido y luego
pasando un trapo seco.
– No utilice disolventes como gasolina,
diluyente, alcohol, detergentes para cocina,
etc., para limpiar el visor Live View p2-ya que
de hacerlo podría deteriorarlo y podría
pelarse su revestimiento.
–
Al usar un trapo químico, tenga cuidado de
seguir las respectivas instrucciones adjuntas.
•Puesto que la caja del visor no se puede
quitar, límpiela delicadamente con un paño
seco y suave, y tenga cuidado en no quitarla.
•Si limpia la caja del visor con demasiada
fuerza y se quita, consulte con su vendedor o
con el centro de asistencia más cercano.
•Lea el manual de instrucciones de su cámara
digital.
•
Se produce condensación cuando la temperatura
ambiente o humedad varían. Esta condensación
puede provocar oxidación y/o corrosión de
componentes internos causando problemas de
funcionamiento o formación de moho en casos
extremos. Adáptela a la temperatura ambiente
dentro de una bolsa, etc., antes de usarla.
•Cuando no se usa el visor vivo, asegúrese de
guardarlo en su bolsa de almacenamiento.
Guárdelo en un lugar seco, evitando el calor y
la humedad.
•No rocíe la cámara con insecticida o productos
químicos volátiles.
Si la cámara se rocía con estos productos
químicos, podría dañarse el cuerpo de la
cámara y quitarse la capa superficial.
•No deje la cámara en contacto directo con
productos de caucho o plástico durante un
largo período.
•No desmonte ni modifique la unidad.
•
Si no se visualiza nada en el visor en vivo, o
bien si la visualización no es normal, eso puede
ser debido a la cámara digital. Haga reparar su
cámara digital junto con esta unidad.
∫Precauciones para el uso
Mantenga la unidad lo más lejos que sea
posible de equipos electromagnéticos
(como hornos de microondas,
televisores, vídeo juegos, trasmisores
radio, líneas de alto voltaje, etc.).
•No utilice la cámara cerca de teléfonos
móviles, p2-ya que lo de hacerlo puede producir
ruido que afectará negativamente a las
imágenes y el sonido.
•Si la cámara queda afectada negativamente
por un equipo electromagnético y deja de
funcionar correctamente, apague la cámara y
quite la batería y/o el adaptador de CA
conectado. Luego vuelva a insertar la batería
y/o vuelva a conectar el adaptador de CA y
encienda la cámara.
∫Especificaciones
Visualización: Campo secuencial del
visor LCD en color
(equivalente a
1.440.000 puntos)
Cobertura del visor:
Aprox. 100%
Valor del dióptrico: j4 a i4dióptrico
Ampliación
(equivalente a una
cámara de película
de 35 mm): Aprox. 1,4k
(Aprox. 0,7k)
-1 m-1 50 mm infinito
Punto visual: Aprox. 17,5 mm
(Aprox. 0,689q) (-1 m-1)
Dimensiones: Aprox. 29,4 mm (W)k
47,7 mm (H)k
48,9 mm (D)
[1,16 1,88q (W)k q (H)k
1,93q (D)]
Masa: Aprox. 36 g
(0,07937 lb)
Accesorios de serie:
Cubierta protectora del
conector
Bolsa de almacenamiento
-Si ve este símbolo-
型号
型号
型号
型号型号 DMW-LVF2PP/
型号
型号
型号
型号型号 DMW-LVF2E/
型号
型号
型号
型号型号 DMW-LVF2GK
∫安装实时取景器
安装实时取景器
安装实时取景器
安装实时取景器安装实时取景器 A
本实时取景器是专门为 数码Panasonic
相机 设计的。DMC-GX1
(截至 2011 10年 月)
准备
准备
准备
准备准备 :
•关闭相机。
关闭相机。
关闭相机。
关闭相机。关闭相机。
•取下实时取景器连接部保护盖。
•取下安装在相机上的热靴盖。
•将取下的热靴盖放入其存放袋内,存放
在安全的地方。
•在安装和取下实时取景器时,请务必慢
慢地小心地进行操作。
∫将实时取景器滑动到数码相机的热靴
将实时取景器滑动到数码相机的热靴
将实时取景器滑动到数码相机的热靴
将实时取景器滑动到数码相机的热靴将实时取景器滑动到数码相机的热靴
中,
中,
中,
中,中,
确保它被完全插入。
确保它被完全插入。
确保它被完全插入。
确保它被完全插入。确保它被完全插入。
1热靴
2取景器
3[LVF/LCD] 按钮
4外置取景器的专用连接器
•请用手指按实时取景器的下部,牢牢地
插入连接部。(请勿按取景器部分或
[LVF/LCD] 按钮。)
∫要取下实时取景器
要取下实时取景器
要取下实时取景器
要取下实时取景器要取下实时取景器 B
1关闭相机。
关闭相机。
关闭相机。
关闭相机。关闭相机。
2如果改变了实时取景器的角度,
如果改变了实时取景器的角度,
如果改变了实时取景器的角度,
如果改变了实时取景器的角度,如果改变了实时取景器的角度,
请将
请将
请将
请将请将
其返回到其初始位置。
其返回到其初始位置。
其返回到其初始位置。
其返回到其初始位置。其返回到其初始位置。
3一边按锁定按钮一边朝箭头指示的
一边按锁定按钮一边朝箭头指示的
一边按锁定按钮一边朝箭头指示的
一边按锁定按钮一边朝箭头指示的一边按锁定按钮一边朝箭头指示的
方向拉动。
方向拉动。
方向拉动。
方向拉动。方向拉动。
•将热靴盖重新安装到其初始位置。
•在连接部上有污垢的情况下使用实
时取景器,可能会导致损坏。因此,
请安装连接部保护盖,将其放入存
放袋内。
1锁定按钮
∫使用方法
使用方法
使用方法
使用方法使用方法 C
1将相机的电源切换到
将相机的电源切换到
将相机的电源切换到
将相机的电源切换到将相机的电源切换到 [ON]。
。
。
。。
2按实时取景器的
按实时取景器的
按实时取景器的
按实时取景器的按实时取景器的 [LVF/LCD] 按钮切
按钮切
按钮切
按钮切按钮切
换显示。
换显示。
换显示。
换显示。换显示。
•即使将数码相机的电源设置到
[OFF],通过 [LVF/LCD] 按钮进行
的切换也会保持。
1[LVF/LCD] 按钮
∫关于低角度拍摄的设置
关于低角度拍摄的设置
关于低角度拍摄的设置
关于低角度拍摄的设置关于低角度拍摄的设置 C
请基于相机的角度设置实时取景器的角
请基于相机的角度设置实时取景器的角
请基于相机的角度设置实时取景器的角
请基于相机的角度设置实时取景器的角请基于相机的角度设置实时取景器的角
度以便于查看。
度以便于查看。
度以便于查看。
度以便于查看。度以便于查看。
•请勿打开超过 。90o 否则,可能会造成
损坏。
∫屈光度调节
屈光度调节
屈光度调节
屈光度调节屈光度调节 D
看着取景器上的显示,
看着取景器上的显示,
看着取景器上的显示,
看着取景器上的显示,看着取景器上的显示,
并将屈光度调节
并将屈光度调节
并将屈光度调节
并将屈光度调节并将屈光度调节
旋钮转动到屏幕最清晰的地方。
旋钮转动到屏幕最清晰的地方。
旋钮转动到屏幕最清晰的地方。
旋钮转动到屏幕最清晰的地方。旋钮转动到屏幕最清晰的地方。
1屈光度调节旋钮
注意
注意
注意
注意注意
•根据拍摄环境,静电、电磁波或其他因
素可能会导致画面瞬间变黑;但这不会
影响到保存的影像。
•使用相机时,如果取景器不显示,可能
是它松动了。 请重新安装取景器。
•实时取景器无法与外置闪光灯同时使
用。
•请注意不要使实时取景器跌落或受到强
烈撞击。
•在以下场所时,要特别小心,以免导致
本装置发生故障。
–有很多沙子或灰尘的场所。
–水会接触到本装置的场所,如在雨天
或在海滩上使用时。
•请注意不要触摸或弄脏取景器面。
•安装了实时取景器时,请勿用实时取景
器持拿相机。 相机可能会从实时取景器
上掉落而被损坏。
•清洁实时取景器之前,
清洁实时取景器之前,
清洁实时取景器之前,
清洁实时取景器之前,清洁实时取景器之前,
请先用软的干布
请先用软的干布
请先用软的干布
请先用软的干布请先用软的干布
擦拭实时取景器。
擦拭实时取景器。
擦拭实时取景器。
擦拭实时取景器。擦拭实时取景器。
–当实时取景器被弄得非常脏时,可以
先用拧干的湿布擦去污垢,然后再用
干布擦拭。
–请勿使用汽油、稀释剂、酒精、厨房清
洁剂等溶剂清洁实时取景器,否则可
能会造成外壳损坏或涂层剥落。
–使用化学除尘布时,请务必按照附带
的说明书进行操作。
•由于不能取下眼罩,因此请用软的干布
轻轻擦拭,并小心不要使其脱落。
•如果过于用力擦拭眼罩而使其脱落,请
向经销商或离您最近的服务中心咨询。
•请务必阅读您的数码相机的使用说明
书。
•周围环境温度或湿度变化大时,会发生
水汽凝结。产生的水汽凝结可能会造成
内部元件的氧化和 或生锈,从而导致/
故障或发霉。请放入包等中使其适应了
周围环境温度后再使用。
•不使用实时取景器时,请务必将其存放
在存放袋中。请存放在干燥的地方,注
意避免受热和受潮。
•请勿用杀虫剂或挥发性化学药品喷洒相
机。
如果用此类化学药品喷洒相机,可能会
损坏相机机身,表面漆可能会脱落。
•请勿让橡胶或塑料制品与相机长期接
触。
•请勿拆卸或改装本装置。
•如果实时取景器上什么都不显示,或者
如果显示异常,可能是数码相机的原
因。 请将您的数码相机连同本装置一起
维修。
∫使用时的注意事项
使用时的注意事项
使用时的注意事项
使用时的注意事项使用时的注意事项
使本机远离电磁设备
使本机远离电磁设备
使本机远离电磁设备
使本机远离电磁设备使本机远离电磁设备
(如微波炉、
(如微波炉、
(如微波炉、
(如微波炉、(如微波炉、
电视
电视
电视
电视电视
机、
机、
机、
机、机、
视频游戏设备、
视频游戏设备、
视频游戏设备、
视频游戏设备、视频游戏设备、
无线电发射机、
无线电发射机、
无线电发射机、
无线电发射机、无线电发射机、
高压
高压
高压
高压高压
线等)
线等)
线等)
线等)线等)
。
。
。
。。
•不要在移动电话附近使用相机,否则会
影响图像与声音的品质。
•如果相机由于受电磁设备影响而停止正
常工作,请关闭相机,并取出电池和 /
或断开连接的 适配器。AC 然后,重新
插入电池和 或重新连接 适配器,/ AC
打开相机。
∫规格
规格
规格
规格规格
显示屏
显示屏
显示屏
显示屏显示屏 :
场序彩色
LCD
取景器
(相当于
1,440,000
点
)
取景器视野率
取景器视野率
取景器视野率
取景器视野率取景器视野率 :约100%
屈光度值
屈光度值
屈光度值
屈光度值屈光度值 :j i4 至4屈光度
倍率
倍率
倍率
倍率倍率
(相当于
(相当于
(相当于
(相当于(相当于 35 mm
胶片相机)
胶片相机)
胶片相机)
胶片相机)胶片相机) :约 (约 )1.4k k0.7
-1 m
-1
50 mm
至无限远
目点
目点
目点
目点目点 :
约
17.5 mm
(
-1 m
-1
)
尺寸
尺寸
尺寸
尺寸尺寸 :
约
29.4 mm
(宽)
k
47.7 mm (高) k
48.9 mm (深)
重量
重量
重量
重量重量 :约36 g
标准附件
标准附件
标准附件
标准附件标准附件 :连接部保护盖
存放袋
工作温度
工作温度
工作温度
工作温度工作温度 :0 C Co至40 o
工作湿度
工作湿度
工作湿度
工作湿度工作湿度 :10% 至80%
- -
如果看到此符号的话
如果看到此符号的话
如果看到此符号的话
如果看到此符号的话如果看到此符号的话
AVERTISSEMENT:
POUR RÉDUIRE LES RISQUES
D’INCENDIE, DE CHOC ÉLECTRIQUE
OU DE DOMMAGES À L’APPAREIL,
•N’EXPOSEZ PAS CET APPAREIL À LA
PLUIE, À L’HUMIDITÉ, À
L’ÉGOUTTEMENT OU AUX
ÉCLABOUSSEMENTS, ET NE PLACEZ
SUR L’APPAREIL AUCUN OBJET
REMPLI DE LIQUIDE, COMME PAR
EXEMPLE DES VASES.
•UTILISEZ EXCLUSIVEMENT LES
ACCESSOIRES RECOMMANDÉS.
•NE RETIREZ PAS LE COUVERCLE (OU
LE PANNEAU ARRIÈRE); IL N’Y A
AUCUNE PIÈCE RÉPARABLE PAR
L’UTILISATEUR À L’INTÉRIEUR.
CONFIEZ TOUTE RÉPARATION À UN
TECHNICIEN DE SERVICE QUALIFIÉ.
Informations relatives à l’évacuation des
déchets, destinées aux utilisateurs
d’appareils électriques et électroniques
(appareils ménagers domestiques)
Lorsque ce symbole
figure sur les produits et/
ou les documents qui les
accompagnent, cela
signifie que les appareils
électriques et
électroniques ne doivent
pas être jetés avec les
ordures ménagères.
Pour que ces produits
subissent un traitement,
une récupération et un recyclage appropriés,
envoyez-les dans les points de collecte
désignés, où ils peuvent être déposés
gratuitement. Dans certains pays, il est
possible de renvoyer les produits au revendeur
local en cas d’achat d’un produit équivalent.
En éliminant correctement ce produit, vous
contribuerez à la conservation des
ressources vitales et à la prévention des
éventuels effets négatifs sur l’environnement
et la santé humaine qui pourraient survenir
dans le cas contraire.
Afin de connaître le point de collecte le plus
proche, veuillez contacter vos autorités
locales.
Des sanctions peuvent être appliquées en cas
d’élimination incorrecte de ces déchets,
conformément à la législation nationale.
Utilisateurs professionnels de l’Union
européenne
Pour en savoir plus sur l’élimination des
appareils électriques et électroniques,
contactez votre revendeur ou fournisseur.
Informations sur l’évacuation des
déchets dans les pays ne faisant pas
partie de l’Union européenne
Ce symbole n’est reconnu que dans l’Union
européenne.
Pour vous débarrasser de ce produit,
veuillez contacter les autorités locales ou
votre revendeur afin de connaître la
procédure d’élimination à suivre.
Cet appareil numérique de la classe B est
conforme à la norme NMB-003 du Canada.
ADVERTENCIA:
PARA REDUCIR EL RIESGO DE
INCENDIOS, DESCARGAS ELÉCTRICAS O
DAÑOS EN EL PRODUCTO,
•
NO EXPONGA ESTE APARATO A LA LLUVIA,
HUMEDAD, GOTEO O SALPICADURAS, Y NO
COLOQUE ENCIMA DEL MISMO OBJETOS
CON LÍQUIDOS COMO, POR EJEMPLO,
FLOREROS.
•
UTILICE SOLAMENTE LOS ACCESORIOS
RECOMENDADOS.
•
NO QUITE LA CARCASA (O TAPA
TRASERA); EN EL INTERIOR NO HAY
PIEZAS QUE PUEDA REPARAR EL
USUARIO. SOLICITE LAS REPARACIONES
AL PERSONAL DE SERVICIO CUALIFICADO.
Información sobre la eliminación para
los usuarios de equipos eléctricos y
electrónicos usados (particulares)
La aparición de este
símbolo en un producto y/o
en la documentación
adjunta indica que los
productos eléctricos y
electrónicos usados no
deben mezclarse con la
basura doméstica general.
Para que estos productos
se sometan a un proceso
adecuado de tratamiento, recuperación y
reciclaje, llévelos a los puntos de recogida
designados, donde los admitirán sin coste
alguno. En algunos países existe también la
posibilidad de devolver los productos a su
minorista local al comprar un producto nuevo
equivalente.
Si desecha el producto correctamente, estará
contribuyendo a preservar valiosos recursos y a
evitar cualquier posible efecto negativo en la
salud de las personas y en el medio ambiente
que pudiera producirse debido al tratamiento
inadecuado de desechos. Póngase en contacto
con su autoridad local para que le informen
detalladamente sobre el punto de recogida
designado más cercano.
De acuerdo con la legislación nacional, podrían
aplicarse multas por la eliminación incorrecta de
estos desechos.
Para empresas de la Unión Europea
Si desea desechar equipos eléctricos y
electrónicos, póngase en contacto con su
distribuidor o proveedor para que le informe
detalladamente.
Información sobre la eliminación en
otros países no pertenecientes a la
Unión Europea
Este símbolo sólo es válido en la Unión Europea.
Si desea desechar este producto, póngase en
contacto con las autoridades locales o con su
distribuidor para que le informen sobre el
método correcto de eliminación.
警告
警告
警告
警告警告 :
为了减少火灾、
为了减少火灾、
为了减少火灾、
为了减少火灾、为了减少火灾、
触
触
触
触触电或产品损坏的危险,
电或产品损坏的危险,
电或产品损坏的危险,
电或产品损坏的危险,电或产品损坏的危险,
•请勿让本机遭受雨淋、
请勿让本机遭受雨淋、
请勿让本机遭受雨淋、
请勿让本机遭受雨淋、请勿让本机遭受雨淋、
受潮、
受潮、
受潮、
受潮、受潮、
滴上或
滴上或
滴上或
滴上或滴上或
溅上水,
溅上水,
溅上水,
溅上水,溅上水,
也不要将诸如花瓶等盛满液
也不要将诸如花瓶等盛满液
也不要将诸如花瓶等盛满液
也不要将诸如花瓶等盛满液也不要将诸如花瓶等盛满液
体的物品置于本机上。
体的物品置于本机上。
体的物品置于本机上。
体的物品置于本机上。体的物品置于本机上。
•请仅使用推荐的附件。
请仅使用推荐的附件。
请仅使用推荐的附件。
请仅使用推荐的附件。请仅使用推荐的附件。
•请勿卸下机身的前盖
请勿卸下机身的前盖
请勿卸下机身的前盖
请勿卸下机身的前盖请勿卸下机身的前盖
(或后盖)
(或后盖)
(或后盖)
(或后盖)(或后盖)
;机
;机
;机
;机;机
身内没有用户可维修的部件。
身内没有用户可维修的部件。
身内没有用户可维修的部件。
身内没有用户可维修的部件。身内没有用户可维修的部件。 需要
需要
需要
需要需要
维修时,
维修时,
维修时,
维修时,维修时,
请联系授权的维修人员。
请联系授权的维修人员。
请联系授权的维修人员。
请联系授权的维修人员。请联系授权的维修人员。
在欧盟以外其它国家的废物处
在欧盟以外其它国家的废物处
在欧盟以外其它国家的废物处
在欧盟以外其它国家的废物处在欧盟以外其它国家的废物处置信息
置信息
置信息
置信息置信息
此符号仅在欧盟有
效。
如果要废弃此产品,
请与当地机构或经销
商联系,获取正确的
废弃方法。
化学物质含有表
化学物质含有表
化学物质含有表
化学物质含有表化学物质含有表
部件名称
有毒有害物质或元素
铅
( )Pb
汞
( )Hg
镉
( )Cd
六价铬
(
Cr
(Ⅵ))
多溴联苯
( )PBB
多溴二苯醚
( )PBDE
外壳、构造 ○ ○ ○ ○ ○ ○
镜头 ○ ○ ○ ○ ○ ○
印刷基板组件 × ○ ○ ○ ○ ○
液晶面板 × ○ ○ ○ ○ ○
存放袋 ○ ○ ○ ○ ○ ○
连接部保护盖 ○ ○ ○ ○ ○ ○
○ :表示该有毒有害物质在该部件所有均质材料中的含量均在
《SJ/T 11363 ―2006》规定的限量要求以下。
× :表示该有毒有害物质至少在该部件的某一均质材料中的含量超出
《SJ/T 11363 ―2006》规定的限量要求。
对于表示“×”的情况,属于欧盟 指令的豁免项目。RoHS
Web Site: http://panasonic.net
在
在
在
在在 印刷
印刷
印刷
印刷印刷
中国
中国
中国
中国中国
2011 10
年
年
年
年年 月
月
月
月月 发行
发行
发行
发行发行
FRANÇAIS ESPAÑOL 简体中文
简体中文
简体中文
简体中文简体中文
Product specificaties
| Merk: | Panasonic |
| Categorie: | Niet gecategoriseerd |
| Model: | Lumix DMW-LVF2E |
Heb je hulp nodig?
Als je hulp nodig hebt met Panasonic Lumix DMW-LVF2E stel dan hieronder een vraag en andere gebruikers zullen je antwoorden
Handleiding Niet gecategoriseerd Panasonic
2 September 2025

1 September 2025
19 Augustus 2025
18 Augustus 2025

29 Juli 2025
5 Juli 2025
23 Mei 2025
16 Mei 2025
2 Mei 2025
28 April 2025
Handleiding Niet gecategoriseerd
- Ausclimate
- Daikin
- Austrian Audio
- Maruyama
- Telefunken
- Britax
- TVS
- Victor
- Bar Fly
- Elmo
- Vocas
- PowerWalker
- Projecta
- Cudy
- Satco
Nieuwste handleidingen voor Niet gecategoriseerd

13 September 2025

13 September 2025

13 September 2025

13 September 2025

13 September 2025

13 September 2025

13 September 2025

13 September 2025
13 September 2025
13 September 2025