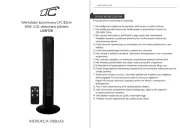
Panasonic F-407Y Handleiding
Panasonic
Ventilator
F-407Y
Bekijk gratis de handleiding van Panasonic F-407Y (4 pagina’s), behorend tot de categorie Ventilator. Deze gids werd als nuttig beoordeeld door 96 mensen en kreeg gemiddeld 5.0 sterren uit 48.5 reviews. Heb je een vraag over Panasonic F-407Y of wil je andere gebruikers van dit product iets vragen? Stel een vraag
Pagina 1/4

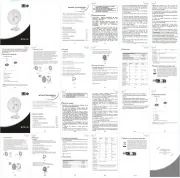
2 Set the hole to the pin.
Ajuste el agujero con la clavija.
Blade Boss Projection
Proyección Del Perno
Del Aspa
Pin
Clavija Hole
Agujero
Shaft Pin
Clavija Del Eje
407YZ9022ZM
MODEL NO. /
MODELO NO. /
F-407Y, F407YS
VOLTAGE (V) / TENSIÓN (V) / FREQ. (Hz) / FREC. (Hz) / POWER (W) / POTENCIA (W) /
220-240 50 47.5-54.5
110-120 50/60 50.2-56.8/ 58.7-66.2
Operating Instructions
Manual De Instrucciones
Model No. / Modelo No. /
Electric Fan (Stand Fan)
Ventilador Eléctrico (Ventilador De Pie)
MODEL NO. /
MODELO NO.
F-407Y
Rating / Tensión nominal
Frequency /
Frecuencia
(Hz)
60
60
Blade Rotation at
Each Speed
Rotación del aspa
de cada velocidad
(rev./min.)
880, 1070, 1220
751, 1007, 1295
Power Factor
(Note : Motor Only) /
Factor de potencia
(Nota: Motor solamente)
0.99
0.99
Rated Air
Delivery /
Entrega de
aire nominal
(m³/min.)
28
30
Type of
Insulation /
Tipo de
aislamiento
Functional Insulation /
Aislamiento funcional
Fan Size /
Dimensiones
del ventilador
(cm)
40
Number
of Speed /
Número de
la velocidad
3
Input /
Entrada
(W)
61
59
Voltage /
Voltaje
(V~)
127
220
HOW TO ASSEMBLE
CÓMO ENSAMBLAR
Inner Pipe
Tubo Interior Switch Box
Caja Del
Interruptor
Set Screw G
Tornillo De
Ajuste G
Motor Rotation Axis
Eje De Rotación Del Motor
Rear Guard
Rejilla Posterior
Blade Boss
Perno Del Aspa
Guard Set Nut
Tuerca De Ajuste
De La Rejilla Blade
Aspa
Spinner
Rotador
Front Guard
Rejilla Frontal
Projection
Proyección
Hole
Agujero
Motor
Motor
F Cord Clamp
F Abrazadera Del Cable
OUTER PIPE ASSEMBLY
ENSAMBLE DE TUBO EXTERIOR
Outer Pipe
Tubo Exterior
Projection B
Proyección B
Hole A
Agujero A
Hole A
Agujero A
Notch E
Muesca E
Outer Pipe
Tubo Exterior
Base
Base
Projection B
Proyección B
1 C Unscrew the Pan Screw
to remove Round Washer .D
Destornille El Tornillo C para
quitar la Arandela Redonda . D
4 G Remove the Set Screw .
Retire el Tornillo De Ajuste . G
1 Set the Blade Boss projection on to the Shaft Pin.
Coloque la Proyección Del Perno del aspa en la
Clavija Del Eje.
6 F Fix the Cord Clamp .
Fijar la Abrazadera Del Cable .F
7 Completely tighten the Set
Screw G.
Apriete completamente Tornillo
De Ajuste G.
8 Hook the Power Cord to Cord
Clamp F.
Enganche el Cable a la
Abrazadera De Cable .F
* Cord Clamp attached at F
Power Cord.
Abrazadera De Cable F
conectada al Cable.
5 Connect the
Switch Box to the
Inner Pipe.
Conecte la Caja
Del Interruptor al
Tubo Interior.
2 B Set the Projection to the
Notch E and insert Outer
Pipe into Base until Hole A
fully inserted.
Establezca la Proyección E
a la Muesca e inserte el E
Tubo Externo en la Base
hasta que el Agujero esté A
introducido a fondo.
3 D Fix the Round Washer to
Bottom Plate and tighten the
Pan Screws firmly.C
Fije la Arandela Redonda D
en la placa inferior y apriete
los Tornillos C con firmeza.
Pan Screw C
Tornillo De Cabeza
Plana C
Projection B
Proyección B
Round Washer D
Arandela Redonda D
Round Washer D
Arandela Redonda D
Bottom Plate
Placa Inferior
Notch E
Muesca E
Pan Screw C
Tornillo C
Round
Washer D
Arandela Redonda D
Base
Base
F-407YS, F-407Y
* If the Guard Clip drops out of the Front Guard, follow the instructions below to assemble it back.
Si el Gancho De La Rejilla se cae de la Rejilla Frontal, siga las siguientes instrucciones para volver a
ensamblarlo.
Insert the Guard Clip into the Guard Ring hole follow the
arrow as shown in the picture.
Inserte el Gancho De La Rejilla en el orificio del Anillo De La
Rejilla siga la flecha como se muestra en la imagen.
After fully insert the Guard Clip to the Guard Ring hole,
make sure the Guard Clip is at the right position and
press the back portion of the Guard Clip until hear
"click" sound.
Después de insertar completamente el Gancho De La
Rejilla en el orificio del Anillo De La Rejilla, asegúrese
de que la Guardia Clip se encuentra en la posición.
Guard Ring
Anillo De La Rejilla
Hold
Sostener
Push
Empujar
1 2
Guard Clip
Clip De La Rejilla
ﺪﺁﺄﺗ ،ﻚﺒﺸﻤﻟﺍ ﺔﻘﻠﺣ ﺔﺤﺘﻓ ﻲﻓ ﻞﻣﺎﻜﻟﺎﺑ ﻲﻗﺍﻮﻟﺍ ﻚﺒﺸﻤﻟﺍ ﻝﺎﺧﺩﺇ ﺪﻌﺑ
ﻲﻔﻠﺨﻟﺍ ءﺰﺠﻟﺍ ﻂﻐﺿﺍﻭ ﺢﻴﺤﺼﻟﺍ ﻊﺿﻮﻟﺍ ﻲﻓ ﻲﻗﺍﻮﻟﺍ ﻚﺒﺸﻣ ﻥﺃ
."ﺔﻘﻄﻘﻃ" ﺕﻮﺻ ﻉﺎﻤﺳ ﻦﻴﺤﻟ ﻲﻗﺍﻮﻟﺍ ﻚﺒﺸﻤﻟﺍ ﻦﻣ
ﻚﺴﻣﺃ
ﻊﻓﺩﺇ
ﺔﻴﻗﺍﻭ ﺔﻘﻠﺣ
ﻲﻗﺍﻭ ﻚﺒﺸﻣ
.ﺍﺩﺪﺠﻣ ﺎﻬﺒﻴﺁﺮﺘﻟ ﻪﻠﻔﺳﺃ ﺕﺎﻤﻴﻠﻌﺘﻟﺍﻊﺒﺗﺍ ،ﺔﻴﻣﺎﻣﻷﺍ ﺔﻬﺟﺍﻮﻟﺍ ﻦﻣ ﻲﻗﺍﻮﻟﺍ ﻚﺒﺸﻤﻟﺍ ﻂﻘﺳ ﺍﺫﺇ
ﻊﺒﺗﺍ ،ﻲﻗﺍﻮﻟﺍ ﺔﻘﻠﺣ ﺔﺤﺘﻓ ﻞﺧﺍﺩ ﻲﻗﺍﻮﻟﺍ ﻚﺒﺸﻤﻟﺍ ﻞﺧﺩﺃ
.ﺓﺭﻮﺼﻟﺎﺑ ﺢﺿﻮﻣ ﻮﻩ ﺎﻤﺁ ﻢﻬﺴﻟﺍ
Align the Guard Ring’s hook with the alignment mark of the
Rear Guard. Press the Guard so that the Guard Ring fits to
the Rear Guard all around. Then be sure that the clips
securely hold the Front Guard and Rear Guard together.
Alinee el gancho del Anillo De La Rejilla con la marca de
alineación de la Rejilla Posterior. Presione la rejilla para que
el Anillo De La Rejilla se ajuste a la Rejilla. A continuación,
asegúrese de que los clips sostengan firmemente las Rejillas
Frontal y Posterior.
1 1
2 2
3
• Snap together the Front and Rear Guards according to
the sequence , & .1 2 3
Una las Rejillas Delantera y Posterior de acuerdo con la
secuencia 1 2 3, y .
• Press the clip upwards to lock Guard.
Asegure el clip hacia arriba para sujetar la Rejilla.
• Alignment mark (On the top of the Rear Guard).
Marca de alineación (en la parte superior de la Rejilla
Posterior).
Hook (On the top of the Front Guard.)
Gancho (en la parte superior de la
Rejilla Frontal.)
Guard Ring
Anillo De La Rejilla Clip
Clip
Before you start assembling the Blade and Guard
Antes de comenzar a ensamblar el Aspa y la Rejilla
1 Pull out
1 Tire hacia fuera
2 Unscrew
2 Destornille
Shaft Tube
Eje Del Tubo
3 Wipe off any grease
3 Limpie cualquier grasa
- Do not discard the packing
case and Shaft Tube
(prevents rusting in the
motor during storage).
- No tire la caja de embalaje
y El Tubo (evita la oxidación
en el motor durante el
almacenamiento).
Panasonic Corporation
Web Site: http://panasonic.net
© Panasonic Ecology Systems Co., Ltd 2011
This appliance is not intended for use by persons (including children) with reduced physical, sensory or mental capabilities, or lack of experience and
knowledge, unless they have been given supervision or instruction concerning use of the appliance by a person responsible for their safety.
Este aparato no está diseñado para ser utilizado por personas (incluidos niños) con capacidades físicas, sensoriales o mentales reducidas, o sin
experiencia y conocimiento, a menos que una persona responsable de su seguridad les haya dado supervisión o instrucción acerca del uso del aparato.
Before operating this set, please read these instructions completely.
Antes de utilizar este aparato, lea todas las instrucciones.
Ensure that the Fan is switched off before cleaning or maintenance.
Asegúrese de que el Ventilador esté desconectado de la alimentación principal antes de la limpieza o mantenimiento.
If the Power Cord is damaged, it must be replaced by the manufacturer, its service agent or similarly qualified persons in order to avoid a hazard.
Si el Cable De Alimentación está dañado, debe ser reemplazado por el fabricante, su agente de servicio o personas cualificadas con el fin de evitar
situaciones de peligro.
Use only with rated voltage.
Use sólo con tensión nominal.
To avoid the possibility of causing injury to users or damage properties, please follow all the explanation written below.
The manufacturer is not responsible for accidents and injuries caused by defective or deficient installation.
Para evitar la posibilidad de causar lesiones a los usuarios o daños en propiedades, siga todas las explicaciones escritas a continuación.
El fabricante no es responsable de los accidentes y las lesiones causadas por una instalación defectuosa o deficiente.
Children should be supervised to ensure that they do not play with the appliance.
Los niños deben ser supervisados para asegurarse de que no jueguen con el aparato.
Thank you for purchasing this product.
Gracias por comprar este producto.


Do not operate the set before the pole is firmly tighten by one
Round Washer and 2 pieces of Pan Screw.
No haga funcionar el sistema antes de que el poste esté
firmemente sujeto por una Arandela Redonda y 2 piezas de
Tornillo de Cabeza Plana.
SAFETY PRECAUTIONS
MEDIDAS DE SEGURIDAD
NAME OF PARTS/HOW TO OPERATE
NOMBRE DE LAS PIEZAS/CÓMO FUNCIONA
OSCILLATION KNOB
PERILLA DE OSCILACIÓN
ADJUSTMENT OF WIND DIRECTION
AJUSTE DE LA DIRECCIÓN DEL VIENTO
HEIGHT ADJUSTMENT CONTROL
CONTROL DE AJUSTE DE LA ALTURA
SPEED CONTROL
CONTROL DE VELOCIDAD
Oscillate
Oscilar
Oscillation Knob
Perilla de
oscilación
(Oscillator
angle 90º)
(Ángulo de
oscilador a
90º)
Oscillate the set as illustrated
and adjust the wind speed for
better cool breeze effect.
Oscile el conjunto como se
muestra y ajuste la velocidad
del viento para un mejor efecto
de brisa fresca.
Press the desired
speed button.
Pulse el botón de la
velocidad deseada.
Stop
Detener
Front Guard
Rejilla Frontal Side View
Vertical Adjustment (35º)
Vista Lateral
Ajuste Vertical (35 º)
Adjust vertically.
Ajuste verticalmente
Switch Box
Caja Del
Interruptor
To adjust height, loosen the Free Stop
Cap. Adjust the Fan height by moving the
Switch Box to the desired height and
retighten the Free Stop Cap.
Para ajustar la altura, afloje la Tapa De
Protección Libre. Para ajustar la altura
del Ventilador mueva la caja del
interruptor a la altura deseada y vuelva
a apretar la capa de Protección Libre.
Do not hold the neck of the Free Stop Cap as this may
hurt your hand if the Switch Box falls.
No sostenga el cuello de la Tapa De Tope Libre p2-ya que
se puede lastimar la mano si se cae la Caja Del Interruptor.
Do not hold the Knee Joint as this may hurt your hand if the
Guard oscillates to the Knee Joint.
No sostenga la Junta de la rótula p2-ya que se puede lastimar la
mano si la Protección oscila hacia la Junta De La Rótula.
Do not oil the Pipe.
No ponga aceite en el Tubo.
Loosen
Suelto
Tighten
Ajustado
Adjust horizontally.
Ajuste horizontalmente
Top View
Horizontal Adjustment (72º)
Vista Desde Arriba
Ajuste Horizontal (72º)
Motor
Motor
Rear Guard
Rejilla Posterior
Blade
Aspa
Switch Box
Caja Del Interruptor
Inner Pipe
Tubo Interior
Cord Clamp
Abrazadera Del Cable
Power Cord
Cable De Alimentación
Base
Base
Outer Pipe
Tubo Exterior
Free Stop Cap
Tapa De Protección
Libre
Be sure to read and follow these
safety directions
Asegúrese de leer y seguir estas
instrucciones de seguridad
Be sure to observe the following safety precautions in order to avoid possible injury to yourself or others and damage to your belongings.
Asegúrese de observar las siguientes precauciones para evitar posibles lesiones a usted o a otras personas y daños a sus pertenencias.
The following symbols indicate the degree of possible danger if the relevant precautions are ignored.
Los siguientes símbolos indican el grado de peligro posible si se ignoran las precauciones pertinentes.
Precautions are classified using the following symbols.
Las precauciones se clasifican utilizando los símbolos siguientes.
Symbol with white background denotes a PROHIBITED action.
El símbolo con fondo blanco indica una acción PROHIBIDA.
Do not attempt to dismantle, repair or modify this product.
Nunca intente desmontar, reparar o modificar este producto.
Wipe off dust on the Plug and socket periodically.
Limpie el polvo en el Enchufe y el toma periódicamente.
Disconnect the Plug from the power supply before cleaning.
Desconecte el suministro eléctrico antes de limpiarlo.
Do not overturn the Fan. If need to turn over, please switch off the
power supply immediately.
Turn off and unplug the Power Cord before relocating the Fan.
No de vuelta el aparato. Si lo hace, desconecte de la fuente de
alimentación de inmediato.
Apague y desenchufe el Cable De Energía antes de transportar el aparato.
Hold the Plug when disconnecting from power supply, never
pull the Power Cord.
Sostenga el Enchufe cuando lo desconecte del suministro
principal, nunca tire del Cable.
Do not put your fingers into the Guard or any moving parts of the Fan.
No ponga los dedos en la Rejilla o en cualquier parte en
movimiento del Ventilador.
Avoid continuous exposure of direct wind from the Fan.
Evite la exposición continua al viento directo del Ventilador.
Do not place the Fan on unstable surface or near obstacles.
No coloque el Ventilador sobre una superficie inestable o
cerca de obstáculos.
Do not use under the following situations;
• Near to gaseous fuel cooker • Place full of inflammable gas
• Place expose to rain or water pour • Near insecticide • Oil corrosive solvent
• High temperature • High humidity • Near chemicals, oil, dust area.
No usar en las siguientes situaciones:
• Cerca de una cocina de combustible gaseoso • Lugar lleno de gas inflamable
• Lugar expuesto a la lluvia o a la caída de agua • Cerca de insecticida
• Aceite corrosivo disolvente • Alta temperatura • Alto nivel de humedad
• Cerca de productos químicos, área de aceite o de polvo.
Never touch the Plug if your hands are wet.
Nunca toque el Enchufe con las manos mojadas.
Follow strictly to all the instructions given in this Operating
Instruction for installation.
Siga estrictamente todas las instrucciones dadas en este
Manual para la instalación.
Do not damage the Power Cord and Plug.
No dañe el cable o el Enchufe principal.
Make sure the Plug is fully inserted into the socket.
Asegúrese de que el Enchufe principal esté bien insertado
en el toma.
Do not connect the Power Cord to the power supply until
the Fan has been completely assembled.
No conecte el Cable De La Línea en la toma hasta que el
Ventilador haya sido ensamblado completamente.
Do not connect this unit to power supply other than destinated
country rated voltage.
No conecte esta unidad a una fuente de alimentación de
tensión que difiera del voltaje nominal de los países destinados.
Do not contact with water.
No haga contacto con el agua.
• Contact the dealer for repairing this product.
Póngase en contacto con el distribuidor para la reparación de
este producto.
• Do not use damaged Plug or loosen socket.
• No utilice un Enchufe dañado o un toma de corriente flojo.
Accumulation of dust on the Plug during humid season
can cause poor insulation and may result in fire.
La acumulación de polvo en el Enchufe en la
estación húmeda puede causar un aislamiento
deficiente y puede provocar un incendio.
Can cause electric shock.
De lo contrario, podría producirse una descarga
eléctrica.
Can cause bad effect to the Fan quality and
dangerous condition.
Puede afectar la calidad y causar una situación
peligrosa.
Can cause Fan to drop.
Riesgo de lesiones por la caída del Ventilador.
Can cause discomfort.
Puede causar malestar.
Can cause injury.
Puede causar una lesión.
Can cause short circuit or damage to the Power Cord
and leading to fire or electric shock.
Puede causar un corto circuito o daño al Cable De
Alimentación y ocasionar un incendio o una
descarga eléctrica.
Can cause injury.
Puede causar lesiones.
Can cause electric shock.
Puede causar una descarga eléctrica.
• Installation must be done by a competent personnel.
La instalación debe ser realizada por personal
competente.
• Disconnect the Plug from the power supply and use a piece
of dry cloth to clean the Plug.
Desconecte la fuente de alimentación y utilice un paño seco
para limpiar el Enchufe.
• Unplug the Fan if it will not be used for a long period.
Desconecte el Ventilador si no se utiliza durante un largo período.
Can cause fire or electric shock.
Puede causar un incendio o una
descarga eléctrica.
e.g. modify, put near heat generating appliance, abnormally twist or
bend, forcefully elongate, pull heavy weight, bundle up Power Cord.
Ej. No lo modifique, ponga cerca de dispositivos generadores de
electricidad, doble o tuerza en forma anormal, alargue con fuerza,
tire de peso pesado, ni enrede el Cable De Alimentación.
Can cause injury, electric shock or even fire due to
short circuit.
Puede causar una lesión, descarga eléctrica o incluso
un incendio debido a un corto circuito.
If the Power Cord is damaged, it must be replaced by
the manufacturer or its service agent or a similarly
qualified person in order to avoid a hazard.
Si se daña el Cable De Alimentación debe ser
reemplazado por el fabricante o su agente de servicio
o por personal cualificado con el fin de evitar
situaciones de peligro.
Loose engagement of Plug and socket can cause
electric shock or fire due to overheat of the Plug.
La conexión floja del Enchufe y el toma puede causar
una descarga eléctrica o un incendio debido al
sobrecalentamiento de Enchufe.
Can cause fire and injury.
De lo contrario, puede causar incendios
y lesiones.
Can cause fire or electric shock.
Puede causar un incendio o una descarga
eléctrica.
Do not take apart
No desmonte
Prohibited
Prohibido
Prohibited
Prohibido
Outer pipe
Tubo externo
Base
Base
Being unstable, may cause the Fan to fall.
Si está inestable, el Ventilador puede caerse.
Prohibited
Prohibido
Prohibited
Prohibido
Unplug
Desenchufe
No wet hand
No manipular con
las manos mojadas
Avoid water
Evite el agua
This symbol denotes action that is COMPULSORY.
Este símbolo denota una acción que es OBLIGATORIA.
This term warns you that death or serious injury may result by incorrect operation of the product.
Este término le advierte que el uso inapropiado del producto puede producir la muerte o lesiones graves.
This term cautions you that injury or physical damage to property may result by incorrect operation of the product.
Este término advierte que un uso incorrecto del producto. puede causar lesiones o daños físicos a la propiedad.
WARNING
ADVERTENCIA
CAUTION
PRECAUCIÓN
Prohibited
Prohibido
Prohibited
Prohibido
Prohibited
Prohibido
Prohibited
Prohibido
WARNING
ADVERTENCIA
WARNING
ADVERTENCIA
CAUTION
PRECAUCIÓN
•
Product specificaties
| Merk: | Panasonic |
| Categorie: | Ventilator |
| Model: | F-407Y |
Heb je hulp nodig?
Als je hulp nodig hebt met Panasonic F-407Y stel dan hieronder een vraag en andere gebruikers zullen je antwoorden
Handleiding Ventilator Panasonic
24 Maart 2025

25 November 2024

25 November 2024

25 November 2024

25 November 2024

25 November 2024

25 November 2024

23 November 2024

11 Maart 2024

20 December 2023
Handleiding Ventilator
- Princess
- Stadler Form
- Qlima
- Thermex
- Afk
- Falmec
- Wallair
- Proline
- Windmill
- Dyson
- Bestherm
- Duracraft
- Trisa
- Beem
- Be Quiet!
Nieuwste handleidingen voor Ventilator
13 September 2025
12 September 2025
12 September 2025

12 September 2025
12 September 2025
12 September 2025

8 September 2025
8 September 2025
2 September 2025
2 September 2025