Panamax MB850 Handleiding
Panamax Niet gecategoriseerd MB850
Bekijk gratis de handleiding van Panamax MB850 (4 pagina’s), behorend tot de categorie Niet gecategoriseerd. Deze gids werd als nuttig beoordeeld door 29 mensen en kreeg gemiddeld 4.6 sterren uit 5 reviews. Heb je een vraag over Panamax MB850 of wil je andere gebruikers van dit product iets vragen? Stel een vraag
Pagina 1/4
1690 Corporate Circle, Petaluma, CA 94954 • 707-283-5900 • www.panamax.com
IMPORTANT SAFTEY WARNINGS
This manual contains important safety instructions. Please read and follow
all instructions carefully during installation and operation of the unit. Read
this manual thoroughly before attempting to unpack, install, or operate your
UPS.
CAUTION! To prevent the risk of fire or electric shock, install in a tempera-
ture and humidity controlled indoor area free of conductive contaminants.
(Please see specifications for acceptable temperature and humidity range).
CAUTION! To reduce the risk of electric shock, do not remove the cover
except to service the battery. No user serviceable parts are inside except the
battery.
CAUTION! Some components can be energized by the battery when unit is
unplugged.
CAUTION! UPS must be connected to an AC power outlet with fuse or circuit
breaker protection. Do not plug into an outlet that is not grounded. If you
need to de-energize this equipment, turn off and unplug the unit.
CAUTION! To avoid electrical shock, turn off the unit and unplug it from the
AC power source before servicing the battery or installing a computer
component.
DO NOT USE FOR MEDICAL OR LIFE SUPPORT EQUIPMENT! Panamax does
not sell products for life support or medical applications. DO NOT use in any
circumstance that would affect operation or safety of any life support
equipment or with any medical applications or patient care.
DO NOT USE WITH OR NEAR AQUARIUMS! To reduce the risk of fire or
electric shock, do not use with or near an aquarium. Condensation from the
aquarium can cause the unit to short out.
DO NOT USE WITH AMPLIFIERS OR POWERED SUBWOOFERS! The power
demands of these devices will overload and possibly damage the unit.
MB850 INSTRUCTIONS
INSTALLING YOUR UPS SYSTEM
UNPACKING
Inspect the UPS upon receipt. The box should contain the following:
(1) UPS unit; (1) User’s manual; (1) Software CD; (1) USB device cable;
(1) Telephone cable; (1) Coaxial Cable
OVERVIEW
The MB850 provides automatic voltage regulation for inconsistent utility
power. The MB850 features 890 Joules of surge protection, and provides
battery backup during power outages. The MB850 ensures consistent
power to your computer system and its included software will automati-
cally save your open files and shutdown your computer system during a
utility power loss.
HARDWARE INSTALLATION GUIDE
1. Your new UPS may be used immediately upon receipt. However,
recharging the batteries for at least 16 hours is recommended to ensure
that the battery’s maximum charge capacity is achieved. A loss of charge
may occur during shipping and storage. To recharge the batteries, simply
leave the unit plugged into an AC outlet. The unit will charge in both the
ON as well as the OFF position.
2. With the UPS unit off and unplugged, connect equipment that would
benefit from battery back-up such as DVR, cable box, satellite receiver,
DLP TV or gaming console into the battery power supplied outlets. Plug
other equipment into the full-time surge protection outlets.
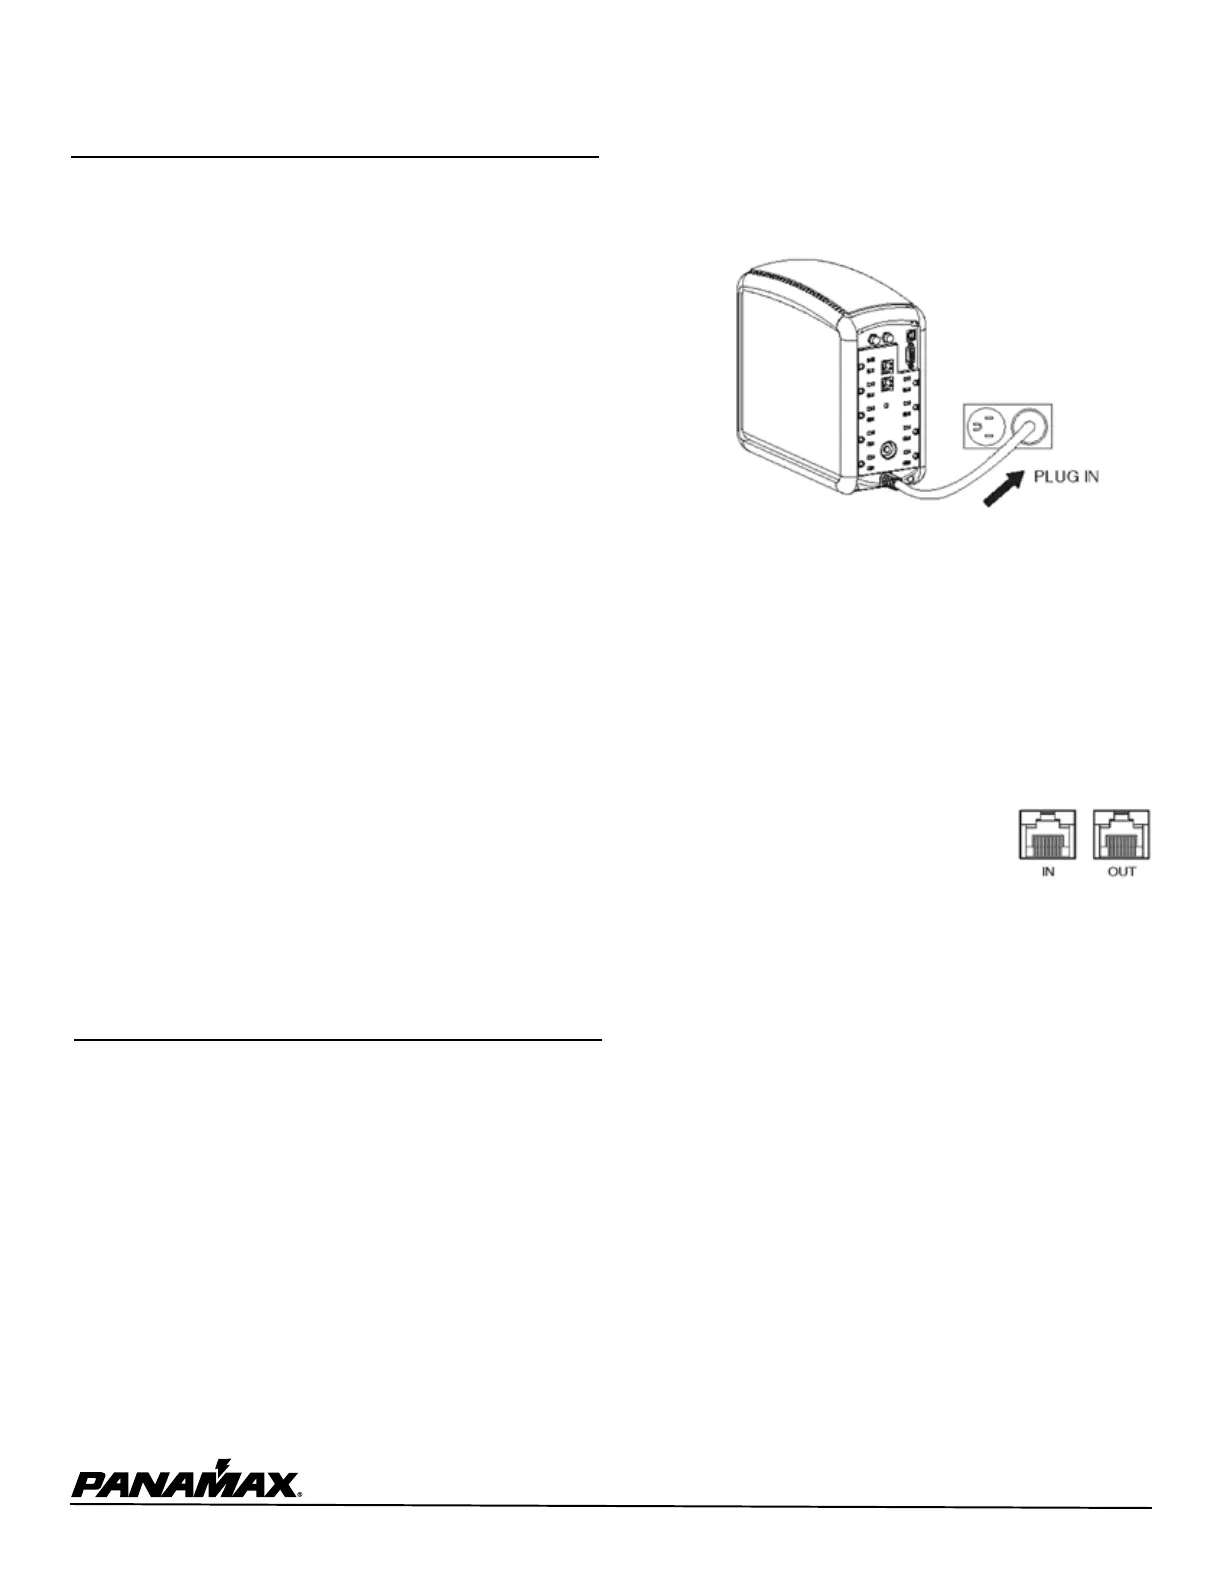
3. To surge protect a network connection, connect
a network cable from the wall jack outlet to the
IN jack of the UPS. Then connect a network cable
from the OUT jack on the UPS to the network device.
4. Plug the UPS into a 2 pole, 3 wire grounding receptacle (wall outlet).
Make sure the wall branch outlet is protected by a fuse or circuit breaker
and does not service equipment with large electrical demands (e.g.
refrigerator, copier, etc…).
5. Press the power switch to turn on the unit. The unit will beep twice
and the power on indicator will illuminate.
6. If an overload is detected, an audible alarm will sound and the unit will
emit one long beep. To correct this, turn the UPS off and unplug at least
one piece of equipment from the battery power supplied outlets. Wait 10
seconds. Make sure the circuit breaker is depressed and then turn the
UPS on.
7. To maintain optimal battery charge, leave the UPS plugged into an AC
outlet at all times.
8. To store your UPS for an extended period, cover it and store with the
battery fully charged. While in storage recharge the battery every three
months to ensure battery life.
AUTOMATIC VOLTAGE REGULATOR
The MB850 stabilizes inconsistent utility power. The incoming utility
power may be damaging to important data files, but with Automatic
Voltage Regulation, the computer will not experience damaging voltage
levels. An Automatic Voltage Regulator automatically increases low or
decreases high voltage to a consistent, computer safe 110v/120v. The
unit’s powerful sealed lead-acid batteries will provide power only if the
incoming voltage drops below 90v or increases above 140v
1.
INS00853 REV. A 10-08
Product specificaties
| Merk: | Panamax |
| Categorie: | Niet gecategoriseerd |
| Model: | MB850 |
Heb je hulp nodig?
Als je hulp nodig hebt met Panamax MB850 stel dan hieronder een vraag en andere gebruikers zullen je antwoorden
Handleiding Niet gecategoriseerd Panamax

9 Mei 2025
10 December 2024
10 December 2024
10 December 2024
10 December 2024
10 December 2024
10 December 2024
10 December 2024
19 November 2024
21 Juni 2024
Handleiding Niet gecategoriseerd
Nieuwste handleidingen voor Niet gecategoriseerd
10 Maart 2026
10 Maart 2026
10 Maart 2026
10 Maart 2026
10 Maart 2026
10 Maart 2026
10 Maart 2026
10 Maart 2026
10 Maart 2026
10 Maart 2026