NuTone 682NT Handleiding
NuTone
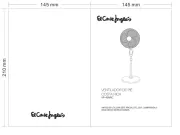
Ventilator
682NT
Bekijk gratis de handleiding van NuTone 682NT (8 pagina’s), behorend tot de categorie Ventilator. Deze gids werd als nuttig beoordeeld door 5 mensen en kreeg gemiddeld 4.2 sterren uit 3 reviews. Heb je een vraag over NuTone 682NT of wil je andere gebruikers van dit product iets vragen? Stel een vraag
Pagina 1/8

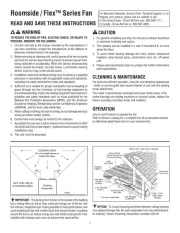
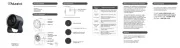
IMPORTANT SAFETY INSTRUCTIONS
TO REDUCE THE RISK OF FIRE, ELECTRIC SHOCK, OR INJURY
TO PERSONS, OBSERVE THE FOLLOWING:
1. Use this unit only in the manner intended by the manufacturer.
If you have questions, contact the manufacturer at the address
or telephone number listed in the warranty.
2. Before servicing or cleaning unit, switch power off at service
panel and lock the service disconnecting means to prevent
power from being switched on accidentally. When the service
disconnecting means cannot be locked, securely fasten a
prominent warning device, such as a tag, to the service panel.
3. Installation work and electrical wiring must be done by a qualified
person(s) in accordance with all applicable codes and stan-
dards, including fire-rated construction codes and standards.
4. Sufficient air is needed for proper combustion and exhausting
of gases through the flue (chimney) of fuel burning equipment
to prevent backdrafting. Follow the heating equipment manufac-
turer’s guidelines and safety standards such as those published
by the National Fire Protection Association (NFPA), and the
American Society for Heating, Refrigeration and Air Condition-
ing Engineers (ASHRAE), and the local code authorities.
5. When cutting or drilling into wall or ceiling, do not damage
electrical wiring and other hidden utilities.
6. Ducted fans must always be vented to the outdoors.
7. If this unit is to be installed over a tub or shower, it
must be marked as appropriate for the application.
8. Never place a switch where it can be reached from a tub or
shower.
9. This unit must be grounded.
CAUTION
1. For general ventilating use only. use to exhaust hazardDo not -
ous or explosive materials and vapors.
2. To avoid motor bearing damage and noisy and/or unbalanced
impellers, keep drywall spray, construction dust, etc., off power
unit.
3. Please read specification label on product for further information
and requirements.
INSTALLATION INSTRUCTIONS
READ & SAVE THESE INSTRUCTIONS!
Ductless Fan
MODEL: 682NT
PLAN THE INSTALLATION
Refer to FIGURE 1
Determine where fan will be located and plan to supply fan with
proper line voltage and appropriate power cable.
Follow these basic steps when installing this fan:
Attach mounting bracket to joist or stud.
Snap fan housing onto bracket.
Wire fan.
Attach grille (after ceiling or wall is finished).
FIGURE 1
1”
ROUGH-IN OPENING SIZE IS 7-1/4” x 7-1/4”
7-1/8”
3-3/4”
8-1/2”
7-1/8”
8-1/2”

2
FIGURE 7 FIGURE 8
FIGURE 6
BLACK
WHITE
TOGGLE
SWITCH
WHITE
BLACK
BLACKGROUND
SWITCH
BOX
HOUSING
120 VAC LINE IN
FIGURE 2
FIGURE 3
FIGURE 4
INSTALLATION
Refer to FIGURE 2
1. Nail mounting bracket to joist or stud. Use gauge on bracket to
locate it for 1/2” or 3/4” drywall.
Refer to FIGURE 3
2. Snap fan housing onto bracket.
Refer to FIGURE 4
3. Remove the knockout plate from fan. Break out either top or rear
electrical access hole. Insert a screwdriver into slot in knockout
and bend back and forth to break tabs.
NOTE: Turn off power and lock out service panel before installing
electrical wiring.
Refer to FIGURE 5
4. Secure power cable to knockout plate with proper connector for
type of cable being used. Allow 6” of cable to extend beyond
knockout plate. Connect ground wire to green ground screw on
knockout plate.
Refer to FIGURE 6
5. Make electrical connections. Wire white to white and black to
black.
Refer to FIGURE 7
6. Carefully tuck wiring inside wiring compartment and reattach
knockout plate.
Refer to FIGURE 8
7. Attach grille. Squeeze grille springs and insert them into slots in
motor plate. Push grille against ceiling. Grille may be papered
or painted.
USE AND CARE
CAUTION – DISCONNECT POWER AT SERVICE ENTRANCE
AND LOCK OUT PANEL BEFORE CLEANING OR SERVICING
UNIT.
Grille
Clean grille with mild soap or detergent and dry with a soft cloth.
Do not use abrasive cloth, steel wool pads, or scouring powders.
Filter
Charcoal filter is long-lasting. Each filter will last 60 to 90 days when
operated continuously, or longer depending on frequency of use.
Order replacement charcoal filter from list below.
Fan Assembly
To clean: Remove grille and filter. Gently vacuum impeller, motor
and interior of housing.
CAUTION – METAL AND ELECTRICAL PARTS SHOULD NEVER
BE IMMERSED IN WATER.
FIGURE 5
< >

PART
REF. NUMBER PART DESCRIPTION
1 98010540 Mounting Bracket
2 98010542 Knockout Plate
3 99270982 Receptacle
4 98010541 Wiring Cover
5 99260578 Keps Nut (2 Req.)
6 98010543 Motor Bracket
7 02200-41 Motor
8 99020187 Fan Blade
9 99150576 Screw, #8 Hex Washer Captive Hd.
(3 Req.)
10 99140187 Grille Spring
11 97009648 Grille Assembly
(Includes Key Nos. 10 & 11)
12 97009563 Charcoal Filter
13 99150611 Ground Screw
PARTS LIST
1
2
3
4
5
6
7
8
9
10
11
12
13
Product specificaties
| Merk: | NuTone |
| Categorie: | Ventilator |
| Model: | 682NT |
Heb je hulp nodig?
Als je hulp nodig hebt met NuTone 682NT stel dan hieronder een vraag en andere gebruikers zullen je antwoorden
Handleiding Ventilator NuTone
17 April 2025
16 April 2025
16 April 2025
16 April 2025

16 April 2025
16 April 2025

16 April 2025

16 April 2025

16 April 2025

16 April 2025
Handleiding Ventilator
- CSL
- Sharkoon
- Zelmer
- Frigidaire
- Listo
- Martin
- Zehnder
- Tomado
- Maico
- Vonroc
- Wentronic
- Grunkel
- Sôlt
- Homedics
- Omega Altise
Nieuwste handleidingen voor Ventilator
16 September 2025

15 September 2025
15 September 2025

15 September 2025
15 September 2025

15 September 2025
15 September 2025
15 September 2025
13 September 2025
12 September 2025