Noctua NH-L9X65 Handleiding
Noctua Processorkoeler NH-L9X65
Bekijk gratis de handleiding van Noctua NH-L9X65 (6 pagina’s), behorend tot de categorie Processorkoeler. Deze gids werd als nuttig beoordeeld door 45 mensen en kreeg gemiddeld 4.1 sterren uit 5 reviews. Heb je een vraag over Noctua NH-L9X65 of wil je andere gebruikers van dit product iets vragen? Stel een vraag
Pagina 1/6
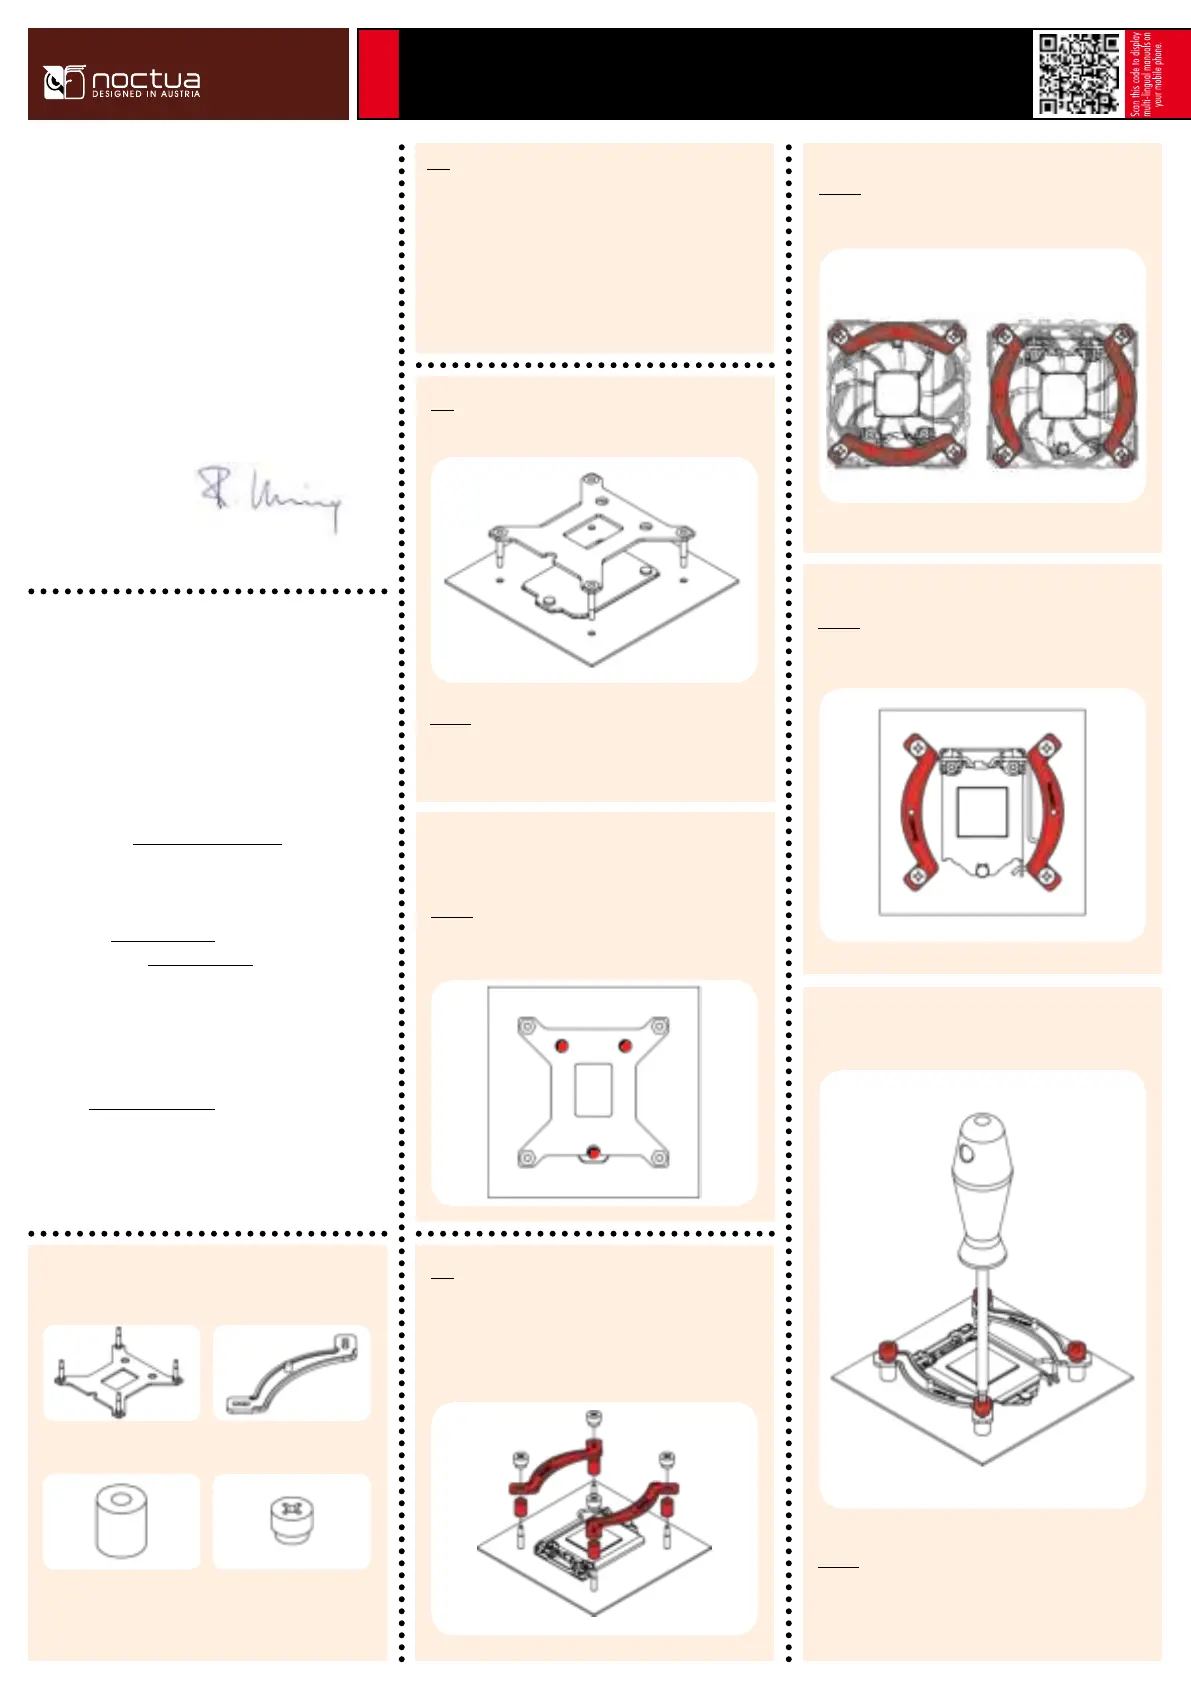
Required mounting parts:
Dear customer,
Congratulations on choosing the Noctua NH-L9x65. The NH-
L9x65 is a taller, performance-enhanced version of our award-
winning NH-L9 low-profile coolers. It fuses everything users
have come to expect from our larger coolers into a compact
premium package for space restricted systems.
Enjoy your NH-L9x65!
Yours sincerely,
Roland Mossig, Noctua CEO
This manual will guide you through the installation process of the
SecuFirm2™ mounting system step by step.
Prior to installing the cooler, please consult the compatibility list
on our website (www.noctua.at/compatibility) and verify that
the cooler is fully compatible with your motherboard.
Should you encounter any difficulties, please check the FAQs on
our website (www.noctua.at/faqs) and don’t hesitate to contact
our support team at support@noctua.at.
Noctua cannot be held responsible for any damage or losses
caused by compatibility issues.
Multilingual versions of this manual are available on our
website: www.noctua.at/manuals
Removing the mainboard
In case you want to use the cooler on an assembled system and
your case doesn’t have a cut-out at the rear side of the mainboard
tray, you first have to remove the mainboard from the case in
order to be able to install the supplied backplate.
Step 1
2x NM-IMB2 Mounting Bars1x NM-IBP2 Backplate
4x NM-ITS1 Thumbscrews4x NM-IPS1 Spacers
Place the backplate on the rear side of the mainboard so that the
bolts stick through the mounting holes.
Caution: Please make sure that the three cut-outs in the
supplied backplate align with the screws of the mainboard’s stock
backplate.
Installing the mounting bars
Caution: Choose the alignment of the mounting bars according to
the desired final orientation of the cooler:
Step 3
First put the plastic spacers onto the bolts of the backplate, then
add the mounting bars.
Attaching the backplate
Caution: The supplied backplate will install over the mainboard’s
stock backplate, so the mainboard’s stock backplate must not be
taken off.
Step 2
Noctua NH-L9x65 | Installation Manual | LGA115x
LGA115x
Orientation AOrientation B
Caution: Make sure that the curved sides of the mounting bars are
pointing outwards.
Fix the mounting bars using the 4 thumb screws.
Caution: Gently tighten the screws until they stop, but don’t use
excessive force.
Product specificaties
| Merk: | Noctua |
| Categorie: | Processorkoeler |
| Model: | NH-L9X65 |
| Gewicht: | 413 g |
| Breedte: | 95 mm |
| Diepte: | 65 mm |
| Hoogte: | 95 mm |
| Soort: | Koeler |
| Geluidsniveau (lage snelheid): | 14.8 dB |
| Geluidsniveau (hoge snelheid: | 23.6 dB |
| Luchtstroom: | 57.5 m³/uur |
| Spanning: | 12 V |
| Rotatiesnelheid ( max): | 2500 RPM |
| Mean time between failures (MTBF): | 150000 uur |
| Rotatiesnelheid ( min): | 600 RPM |
| Geschikte locatie: | Processor |
| Code geharmoniseerd systeem (HS): | 84733080 |
| Ventilator diameter: | 92 mm |
| Supported processor sockets: | Socket AM2, Socket AM2+, Socket AM3, Socket AM3+, Socket FM1, Socket FM2, Socket FM2+ |
| Maximum luchtdruk: | 2.11 mmH2O |
| Maten ventilator (b x d x h): | 92 x 14 x 92 mm |
| Heatsink afmetingen (B x D x H): | 95 x 51 x 95 mm |
| Koellichaam gewicht: | 340 g |
| Minimum luchtdruk: | 1.06 mmH2O |
Heb je hulp nodig?
Als je hulp nodig hebt met Noctua NH-L9X65 stel dan hieronder een vraag en andere gebruikers zullen je antwoorden
Handleiding Processorkoeler Noctua

21 Februari 2024
21 Februari 2024
21 Februari 2024
21 Februari 2024
21 Februari 2024
21 Februari 2024
21 Februari 2024
20 Februari 2024
20 Februari 2024
20 Februari 2024
Handleiding Processorkoeler
Nieuwste handleidingen voor Processorkoeler
26 Juni 2026
5 Mei 2026
5 April 2026
5 April 2026
5 April 2026
21 Maart 2026
20 Maart 2026
20 Maart 2026
20 Februari 2026
19 Februari 2026