Muse M-928 BTY Handleiding
Bekijk gratis de handleiding van Muse M-928 BTY (2 pagina’s), behorend tot de categorie Radio. Deze gids werd als nuttig beoordeeld door 150 mensen en kreeg gemiddeld 4.1 sterren uit 7 reviews. Heb je een vraag over Muse M-928 BTY of wil je andere gebruikers van dit product iets vragen? Stel een vraag
Pagina 1/2
IMPORTANT SAFETY INSTRUCTIONS
INSTRUCTIONS IMPORTANTES SUR LA SECURITE
INSTRUÇÕES DE SEGURANÇA
CAUTION: To reduce the risk of electric shock, do not
open the device, there is no party inside for the user. Refer
all servicing to qualied personnel.
ATTENTION: Pour réduire le risque de choc électrique,
ne pas ouvrir l'appareil, il n'y a aucune partie à l'intérieur
destinée à l'utilisateur. Conez toutes les réparations à un
personnel qualié.
ATENÇÃO: Para reduzir o risco de choque eléctrico, não
desmonte o aparelho. O aparelho não contém qualquer
peça passível de ser reparada pelo utilizador. Cone todas
as operações de manutenção a um técnico qualicado.
The lightning with the arrow symbol in the triangle is a warning sign alerting
the user to "dangerous voltage" inside the unit.
L'éclair avec le symbole de la èche dans le triangle est un signe d'alerte
avertissant l'utilisateur de "tension dangereuse" à l'intérieur de l'unité.
O símbolo do relâmpago com uma seta e situado no interior de um triângulo
destina-se a alertar o utilizador para a presença de uma “tensão perigosa”
no aparelho.
The exclamation point in the triangle is a warning sign alerting the user of
important instructions accompanying the product.
Le point d'exclamation dans le triangle est un signe d'alerte avertissant
l'utilisateur d'instructions importantes accompagnant le produit.
O ponto de exclamação no interior de um triângulo destina-se a alertar
o utilizador para a presença de instruções importantes no manual que
acompanha o aparelho.
WARNING: TO PREVENT FIRE OR SHOCK HAZARD, DO NOT EXPOSE THIS
APPLIANCE TO RAIN OR MOISTURE.
IMPORTANT
- The use of apparatus in moderate climates.
- The Marking plate is located at the back of the device.
- Make sure to have a minimum distance of 5 cm around the unit for sucient
ventilation.
- Ensure that the ventilation openings is not covered with items such as newspapers,
tablecloths, curtains, etc.
- Do not place naked ame sources, such as lighted candles on the apparatus.
- Do not expose this appliance to dripping or splashing water.
- Do not place objects lled with liquids, such as glass, vase on the device.
- Do not throw batteries into re! Respect the environment when disposing of used
batteries.
- Batteries should not be exposed to excessive heat such as sunshine, re or other
similar heat source.
- The power plug is used as a disconnect device and must be easily accessible. To
be completely disconnected from the power, the plug of the appliance should be
disconnected completely. The socket must not be obstructed and should be easily
accessible during intended use.
- Under the inuence of fast transient and / or electrostatic electric phenomenon,
the product may malfunction and the user must perform a power reset of the
device.
- The normal function of the product may be disturbed by strong Electro-Magnetic
Interference. If so, simply reset the product to resume normal operation by
following the instruction manual. In case the function could not resume, please
use the product in other location.
AVERTISSEMENT: POUR PRÉVENIR TOUT RISQUE D’INCENDIE OU DE
CHOC ÉLECTRIQUE, N’EXPOSEZ PAS CET APPAREIL À LA PLUIE OU À
L’HUMIDITÉ.
IMPORTANT
- Utilisez cet appareil sous un climat tempéré.
- La plaque signalétique se trouve à l’arrière de cet appareil.
- Veiller à avoir une distance minimale de 5 cm autour de l'appareil pour une
aération susante et que la ventilation ne soit pas gênée en recouvrant les orices
d'aération de l'appareil avec des objets tels que journaux, nappes, rideaux…..
- Ne placez pas de sources de ammes nues, telles que des bougies allumées
sur l'appareil.
- Ne pas exposer l'appareil à des gouttes d'eau ou éclaboussures.
- Ne placez pas d'objets remplis de liquides, tels que verre, vase ou objets
similaires sur l'appareil.
- Ne jetez pas les piles / batteries au feu! Respectez l'environnement lors de la
disposition des piles usagées.
- Les piles ne doivent pas être exposées à une chaleur excessive comme le soleil,
le feu ou autre source de chaleur similaire.
- La che du cordon d'alimentation est utilisée comme dispositif de débranchement
et doit rester facilement accessible. Pour être totalement déconnecté, cette che
doit être débranchée du réseau complètement. La prise de courant ne doit pas
être obstruée et doit être facilement accessible lors de son utilisation.
- Sous l'inuence du phénomène transitoire rapide et / ou phénomène
électrostatique électrique, le produit pourrait présenter des dysfonctionnements
et l'utilisateur devra faire une réinitialisation de l'appareil.
- Le fonctionnement normal du produit peut être perturbé par de fortes interférences
électromagnétiques. Si tel est le cas, il sut de réinitialiser le produit pour qu'il
reprenne son fonctionnement normal en suivant le manuel d'instructions. Si le
fonctionnement ne revient toujours pas à la normale, veuillez déplacer et utiliser
le produit dans un endroit orant une meilleure réception.
ADVERTÊNCIA: PARA PREVENIR O RISCO DE INCÊNDIO OU DE CHOQUE
ELÉCTRICO, NÃO EXPONHA ESTE APARELHO A CHUVA OU HUMIDADE.
ATENÇÃO
- Utilize este aparelho num clima temperado.
- A placa de características situa-se na parte de trás deste aparelho.
- Certique-se de que respeita uma distância mínima de 5 cm à volta do aparelho
de modo a permitir uma ventilação suciente.
- Certique-se de que garante uma ventilação correcta do aparelho e que não
tapa os orifícios de ventilação com objectos como jornais, toalhas, cortinas, etc.
- Não coloque qualquer fonte de calor, como uma vela acesa, sobre ou na
proximidade do aparelho.
- Não exponha o aparelho a salpicos ou a humidade.
- Não coloque objectos que contenham líquido, como uma jarra, sobre ou na
proximidade do aparelho.
- A cha de alimentação de rede permite desligar o aparelho e deve car facilmente
acessível. Para cortar a alimentação do aparelho, desligue de vez a cha de
alimentação de rede da tomada de rede. A cha de alimentação de rede não pode
estar tapada e deve ser facilmente acessível durante a utilização.
- Sob o efeito de fenómenos electrostáticos e/ou eléctricos transitórios, o produto
pode apresentar anomalias e pode acabar por ser necessário proceder-se a uma
reinicialização.
- A função normal do produto pode ser interrompida por fortes interferências
eletromagnéticas. Nesse caso, basta reiniciar o produto para retomar a operação
normal seguindo o manual de instruções. Caso a função não possa ser retomada,
utilize o produto noutro local.
If in the future, you need to get rid of this product, please note that Waste
electrical products should not be disposed of with household waste.
Recycling facilities exist. Check with your municipality or ask your dealer
for advice. (Directive for Waste Electrical and Electronic Equipment)
Si à l'avenir, vous deviez vous débarrasser de ce produit, sachez que les
produits électriques usagés ne doivent pas être jetés avec les ordures
ménagères. Des installations destinées au recyclage existent. Vériez
auprès de votre municipalité ou demandez à votre revendeur des
conseils. (Directive Déchets d'Equipements Electriques et Electroniques)
Caso pretenda descartar-se deste aparelho, proceda à sua reciclagem
num centro de recolha para electrodomésticos. Procure obter informações
sobre o centro de reciclagem mais próximo. Informe-se junto das
autoridades locais ou do seu revendedor local para a obtenção de
pormenores adicionais (Directiva sobre os Resíduos dos Equipamentos
Eléctricos e Electrónicos).
Nos emballages peuvent faire l’objet d’une consigne de tri, pour en
savoir plus: www.quefairedemesdechets.fr
POWER SUPPLY
ALIMENTATION
ALIMENTAÇÃO
STROMVERSORGUNG
TURNING UNIT ON/OFF
ALLUMER / ÉTEINDRE L’UNITÉ
LIGANDO/DESLIGANDO O APARELHO
EIN- UND AUSSCHALTEN DES GERÄTES
SELECTING FUNCTION
CHOIX DE LA FONCTION
SELECIONANDO A FUNÇÃO
FUNKTION AUSWÄHLEN
CONNECTING AUXILIARY SOURCE
CONNEXION D'UNE SOURCE AUXILIAIRE
UTILIZAÇÃO DA ENTRADA AUXILIAR
SLEEP FUNCTION
FONCTION SOMMEIL
FUNÇÃO DE SUSPENÇÃO
USB CHARGING
CHARGEMENT USB
RECARGA POR USB
TROUBLE SHOOTING GUIDE
RÉSOLUTION DES PROBLÈMES
GUIA DE RESOLUÇÃO DE PROBLEMAS
TECHNICAL SPECIFICATION
FICHE TECHNIQUE
ESPECIFICAÇÕES
SETTING THE TIME
RÉGLAGE DE L'HEURE
AJUSTANDO A HORA
EINSTELLEN DER UHRZEIT
SETTING THE ALARM
REGLAGE DE L'ALARME
CONFIGURANDO O ALARME
LISTENING TO THE RADIO
ECOUTER LA RADIO
ESCUTANDO RÁDIO FM
BLUETOOTH FUNCTION
FONCTION BLUETOOTH
FUNÇÃO DE BLUETOOTH
NEW ONE S.A.S
10, Rue de la Mission, 25480 Ecole Valentin, France
NEW ONE S.A.S
10, Rue de la Mission, 25480 Ecole Valentin, France
NEW ONE S.A.S
10, Rue de la Mission, 25480 Ecole Valentin, France
LOCATION OF CONTROLS
EMPLACEMENT ET DESCRIPTION DES COMMANDES
DESCRIÇÃO DO APARELHO
BESCHREIBUNG DES GERÄTES
JOBSITE RADIO WITH BLUETOOTH
RADIO DE CHANTIER AVEC BLUETOOTH
RÁDIO DO LOCAL DE TRABALHO COM BLUETOOTH
BAUSTELLENRADIO MIT BLUETOOTH
GB
FR
PT
DE
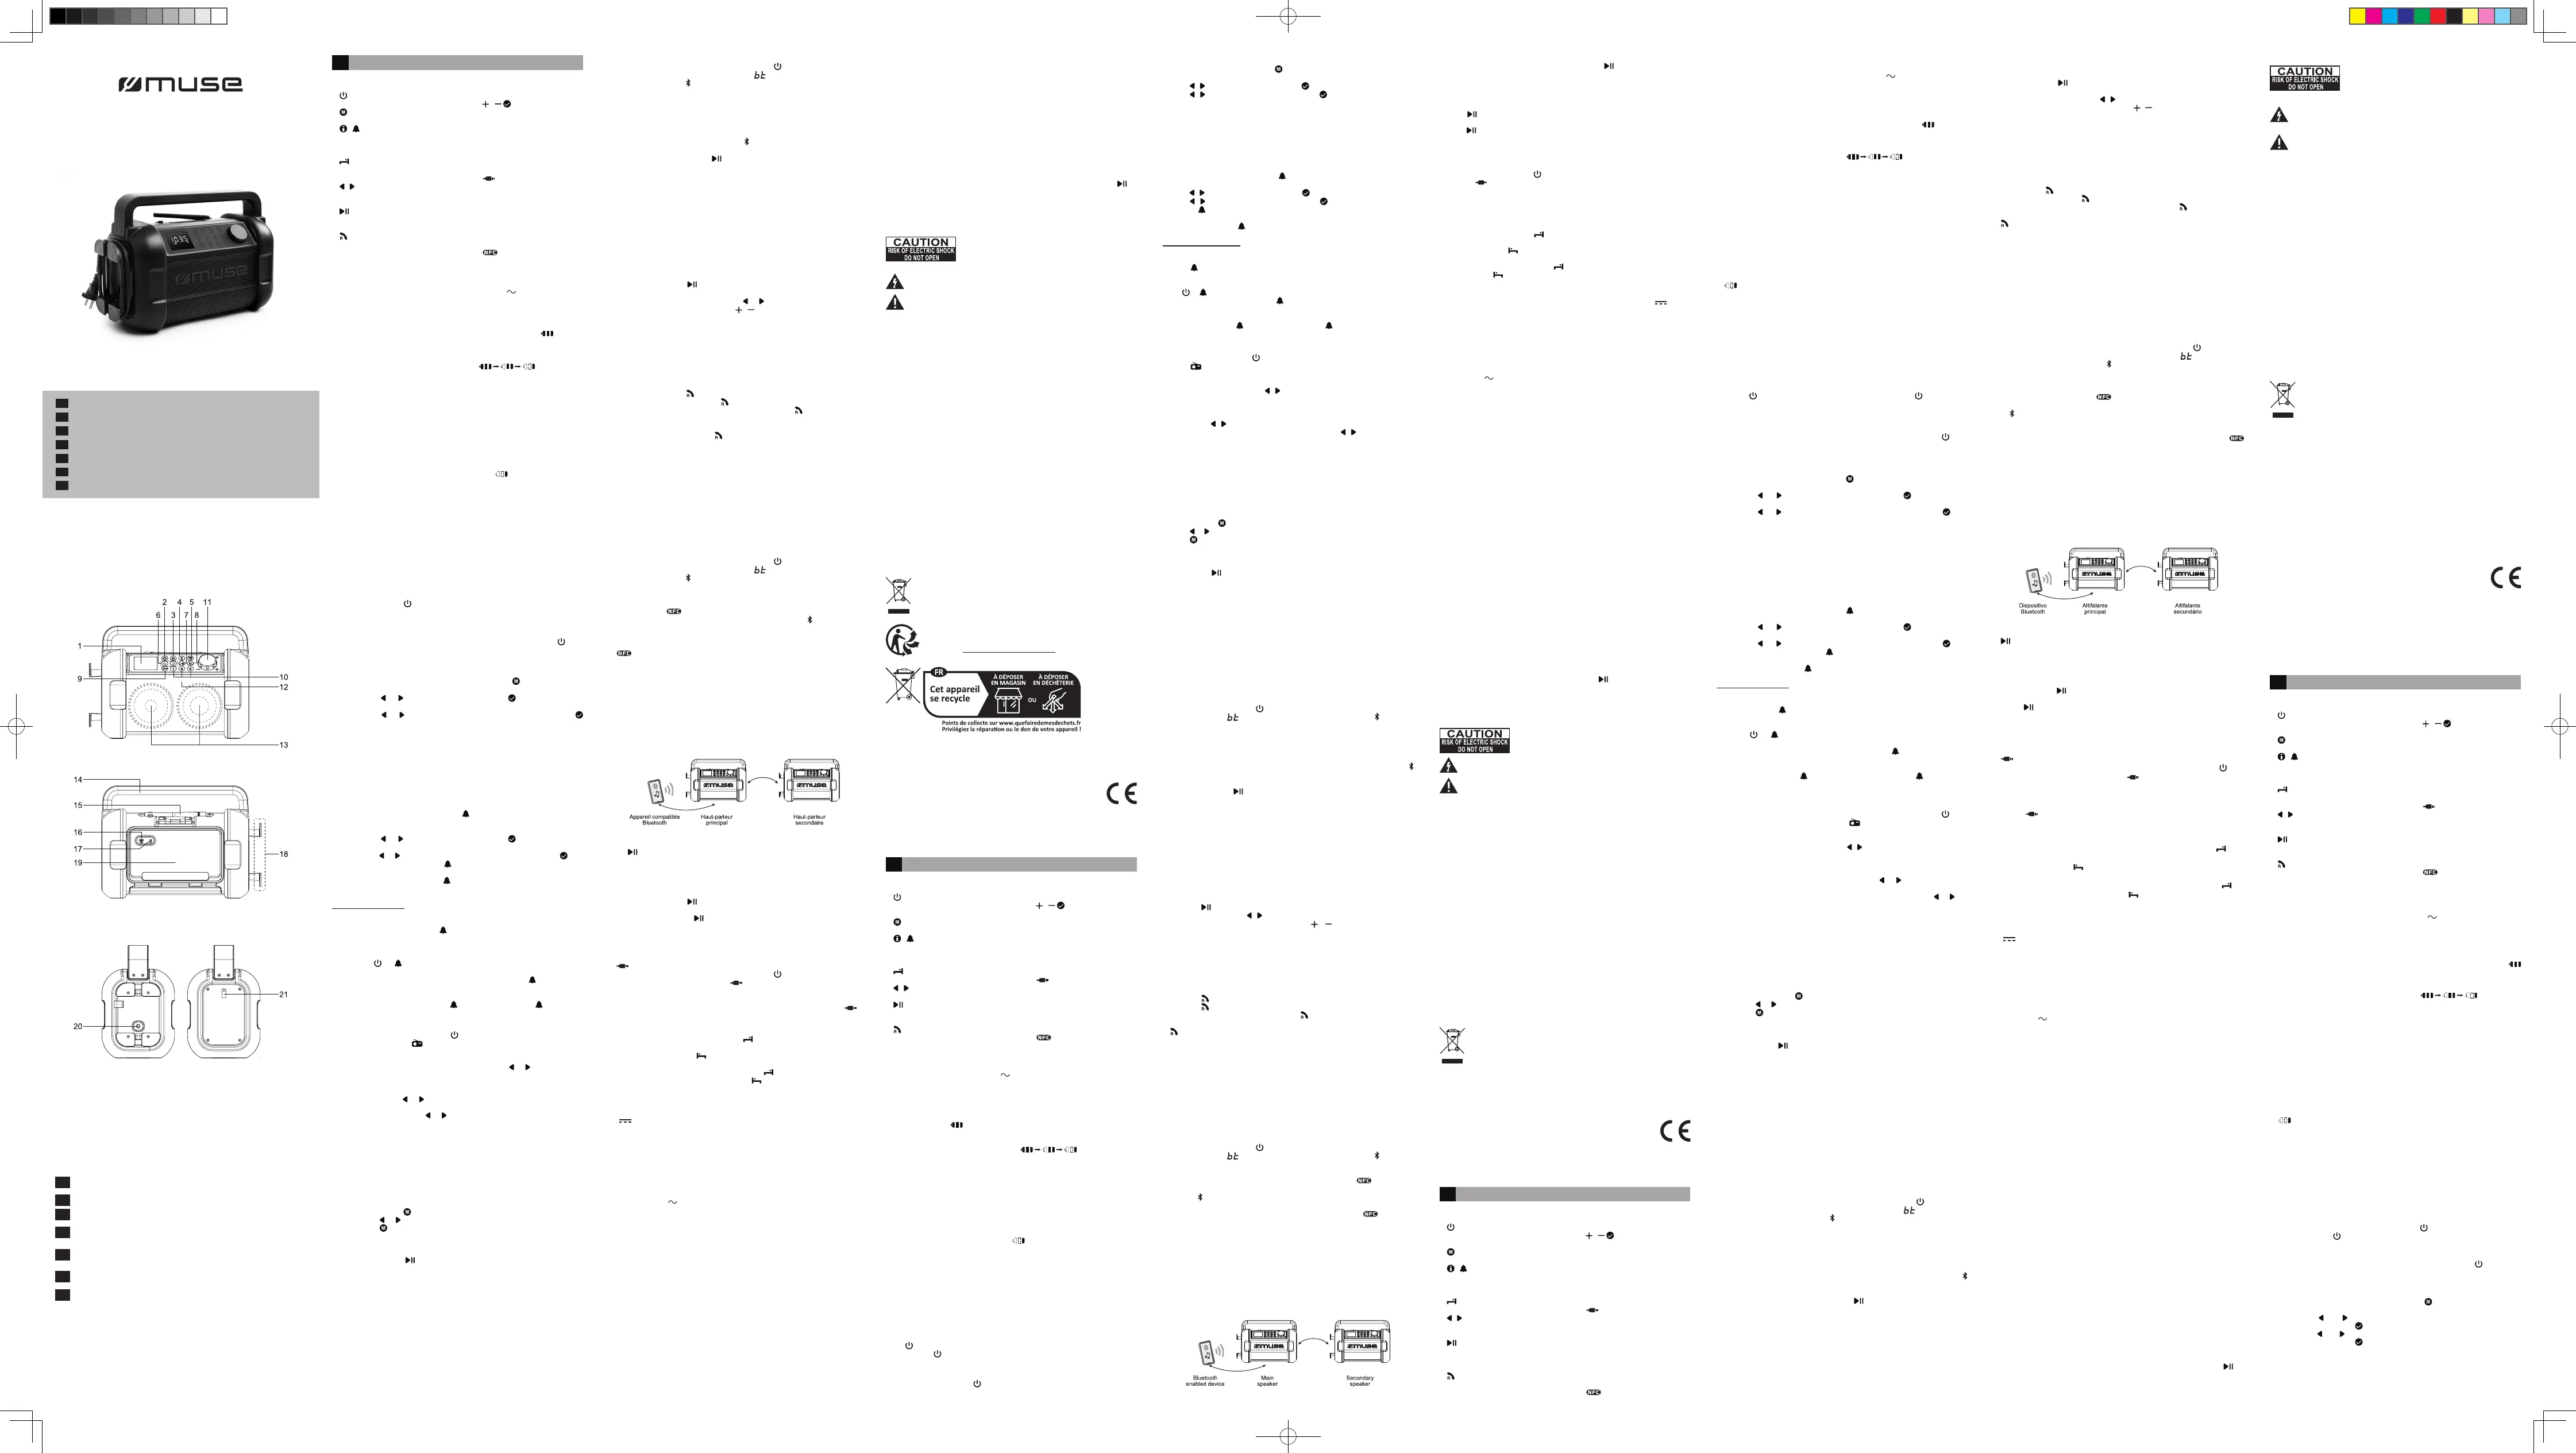
1. LED display
2. : To turn unit on/o; To select
between FM, Bluetooth and AUX
mode.
3. (Memory): To set time; To preset
radio stations.
4. / : To switch between radio
frequency and clock time; To set the
alarm
5. SNZ (snooze): Interval alarm repetition
To fall asleep to radio, Bluetooth
or Aux
6. / : Tuning; setting up / down; To
select desired track (Bluetooth mode)
7. : Play/pause; Disconnect the paired
Bluetooth device; Stereo pairing; Auto
preset radio station;
8. Receive call/ Redial call/ End call
9. P+ : Recall preset stations
1. Achage LED
2. : Veille / Marche; Sélection du mode
de fonctionnement: FM, Bluetooth, AUX.
3. : Pour régler l'heure; Stations
préréglées
4. / : Pour basculer entre la fréquence
radio et l'heure de l'horloge; Pour régler
l'alarme
5. SNZ: Répétition de l'alarme
Pour s'endormir en écoutant la radio,
ou les médias diusés via Bluetooth ou
la prise Aux
6. / : Syntonisation; réglage haut/ bas;
Pour sélectionner la piste souhaitée
(mode Bluetooth)
7. : Lecture/Pause; Déconnectez le
périphérique Bluetooth couplé; couplage
stereo; Mémorisation automatique;
8. Accepter un appel/ rappeler un
numéro/ terminer un appel
9. P+ : Pour rappeler les stations préréglées
1. Tela
2. : Para ligar e desligar o aparelho;
Para selecionar o modo de
funcionamento: FM, Bluetooth, AUX.
3. : Dena a hora; Memória de
estações
4. / : Para alternar entre a frequência
de rádio e a hora do relógio; Para
ajustar o alarme
5. SNZ: Intervalo de repetição do alarme
Para suspender o rádio, Bluetooth
ou o Aux
6. / : Sintonia/ congurações cima/
baixo; Para selecionar a faixa desejada
(modo Bluetooth)
7. : Leitura/Pausa; Desconecte o
dispositivo Bluetooth emparelhad;
emparelhamento estéreo; Automática
Preset;
8. Receber chamadas / Rediscar
chamadas / Terminar chamadas
9. P+ : Recuperar estações memorizadas
1. LED Anzeige
2. : Gerät ein-/ ausschalten;
Funktionsmodus auswählen: FM,
Bluetooth, AUX.
3. : Zeit einstellen; Gespeicherte
Radiosender
4. / : Umschalten zwischen
Radiofrequenz und Uhrzeit; Imposta la
sveglia
5. SNZ: Alarmwiederholung mit Intervall
: Einschlafen während der
Wiedergabe im Radio-, Bluetooth- oder
Aux-Modus
6. / : Senderauswahl; Einstellung hoch/
runter; Gewünschten Titel auswählen
(Bluetooth-Modus)
7. : Wiedergabe/ pause; Gekoppeltes
Bluetooth-Gerät trennen; stereo-
kopplung; Automatische Vorauswahl;
8. Anruf annehmen/ Wahlwiederholung/
Anruf beenden
9. P+ : Gespeicherte Radiosender aufrufen
10. 1,2,3: To recall preset station
1,2,3
11. / : Adjust the volume;
To conrm the time and alarm
setting
12. Mic
13. Speaker
14. Carrying handle
15. Swivel antenna
16. USB-C port for charging the
external device
17. AUX IN jack
18. Power cord bracket for rolling up
the power cord
19. Storage compartment (Tips: lift
up the antenna before open the
door of storage compartment)
20. AC power cord
21. NFC tag
10. 1,2,3: Pour rappeler la station
préréglée 1,2,3
11. / : Réglage du volume;
pour conrmer le réglage de
l'heure et de l'alarme
12. Microphone
13. Haut-parleur
14. Poignée
15. Antenne pivotante
16. Port de chargement USB-C pour
charger un appareil externe
17. Entrée auxiliaire
18. Support de cordon
d'alimentation (pour enrouler le
cordon d'alimentation)
19. Compartiment de rangement
(Conseils : soulevez l'antenne
avant d'ouvrir la porte du
compartiment de rangement)
20. Cordon d'alimentation secteur
21. Marquage NFC
10. 1,2,3: Para recuperar estação
memorizada 1,2,3
11. / : Regulação do volume;
Para conrmar a hora e a
denição do alarme
12. Microfone
13. Altifalante
14. Pega
15. Antena giratória
16. Porta USB-C para carregar o
dispositivo externo
17. Tomada de entrada Aux
18. Suporte para o cabo de
alimentação (para enrolar o cabo
de alimentação)
19. Compartimento de
armazenamento (Dicas:
Levantar a antena antes de abrir
a porta do compartimento de
armazenamento)
20. Cabo de alimentação de rede
21. Símbolo do NFC
10. 1,2,3: Radiosender auf den
Speicherplätzen 1, 2, 3 aufrufen
11. / : Einstellen
der Lautstärke; Zeit- und
Weckrufeinstellungen
bestätigen
12. Mikrofon
13. Lautsprecher
14. Traggri
15. Drehbare Antenne
16. USB-C-Port zum Auaden des
externen Geräts
17. AUX-Eingang
18. Netzkabelhalterung (zum
Aufbewahren des Netzkabels)
19. Aufbewahrungsfach (Tipp:
Heben Sie die Antenne an,
bevor Sie die Abdeckung des
Aufbewahrungsfachs önen.)
20. Netzstromkabel
21. NFC-Symbol
Lire attentivement les instructions avant de faire fonctionner
l’appareil.
Please read the instruction carefully before operating the unit.
Leia este manual com atenção antes de qualquer utilização.
Bitte lesen sie dieses handbuch vor dem gebrauch des gerätes
sorgfältig durch.
Antes de utilizar este aparato, lea atentamente las siguientes
instrucciones.
Leggere attentamente questo manuale prima di utilizzare
l’apparecchio.
Lees deze handleiding aandachtig voor u het toestel gebruikt.
FR
GB
PT
DE
ES
IT
NL
FR
Manuel de l’utilisateur
GB
User Manual
PT
Manual do Utilizador
Benutzerhandbuch
DE
ES
Manual de instrucciones
Manuale di istruzioni
IT
NL
Handleiding
M-928 BTY / M-928 FB
AC operated
This set operates on AC 100-240V 50/60Hz. Connect the power cord to a
convenient AC wall outlet.
Using the Built- in battery
The unit has a built-in rechargeable battery (lithium-ion). Charge the built-in battery
before using it for the rst time.
The battery indicator will stop blinking when it becomes fully charged.
Warnings:
• The battery level will be shown on display: .
• Recharge the built-in battery when you are ready to use it again.
• While using the built-in battery, the environmental temperature should be 5°C
(41°F) to 35°C (95°F).
• To get the longest service life of the built-in battery, charge at indoor-temperature.
• The built-in battery in this device may present a risk of re or chemical burn if
mistreated. Do not disassemble, heat above 100°C (212°F), or incinerate.
• The unit should not be exposed to excessive heat such as sunshine, re or the
like.
• When discarding the unit, environmental problems must be considered and local
rules or laws governing the disposal of such products must be strictly followed.
• When the built-in battery power is low, “ ” will show on display.
Notes:
- The unit is supplied from limited power sources.
- The unit is designed with a thermal protection system. When the unit’s operation
temperature exceeds 45°C, it will stop charging the built-in battery automatically
for protection. In this case, await the unit to cool down to resume normal.
- In a concern of saving energy, when playback has reached to the end or listening
volume is set at a very low level and no control is operated on the device for a
period of 10 minutes, the unit will automatically switch to Standby mode.
Alimentation secteur
Cet appareil fonctionne sur courant alternatif 100-240V AC 50/60Hz. Branchez le
cordon d'alimentation CA à une prise de courant CA standard.
Utilisation de la batterie intégrée
Cet appareil est équipé d’une batterie au lithium-ion rechargeable intégrée Chargez
la batterie intégrée avant la première utilisation. L'indicateur de batterie s’arrêtera
de clignoter lorsqu’elle est complètement chargée.
Avertissements:
• Le niveau de la batterie sera aché sur l'écran: .
• Rechargez la batterie intégrée lorsque vous avez l’intention de l’utiliser juste après.
• Lors de l’utilisation de la batterie intégrée, la température ambiante doit être
comprise entre 5°C et 35°C.
• An d’allonger la durée de vie de la batterie intégrée, veuillez la recharger à une
température d’intérieur.
• La batterie intégrée de cet appareil peut présenter un risque d’incendie ou de
brûlure chimique en cas d’utilisation incorrecte. Ne démontez pas la batterie, ne la
chauez pas à plus de 100°C et ne la jetez pas au feu.
• N’exposez pas la batterie à une chaleur excessive, comme les rayons du soleil, le
feu ou d’autres sources de chaleur similaires.
• Lorsque vous vous débarrassez de la batterie, veillez au respect de l’environnement
et conformez-vous à la législation en vigueur.
• Lorsque la charge de la batterie intégrée est faible, « » s'achera à l'écran.
REMARQUE:
- L'unité est alimentée par des sources d'énergie limitées.
- L'appareil est conçu avec un système de protection thermique. Lorsque la
température de fonctionnement de l'appareil dépasse 45°C, l'appareil arrête
automatiquement de charger la batterie intégrée pour assurer sa protection. Dans
ce cas, attendez que l'appareil se refroidisse pour reprendre son fonctionnement
normal.
- Dans un soucis d'économie d'énergie, à la n de la lecture ou bien encore si
le volume d'écoute est réglé à un niveau très bas et qu’aucune opération n'est
eectuée sur l'appareil pendant une période de 10 minutes celui-ci se mettra
automatiquement en mode veille.
Operado por CA
Conecte o o de energia em uma fonte de 100-240V AC 50/60Hz.
Conecte o o de energia em uma tomada convencional de parede de corrente
alternada.
Utilizar a bateria integrada
A unidade tem uma bateria recarregável integrada (íões de lítio). Carregue a bateria
integrada antes de a utilizar pela primeira vez. O indicador de bateria deixará de
piscar quando car completamente carregada.
Avisos:
• O nível da bateria será mostrado no ecrã: .
• Para carregar a bateria basta ligar o transformador CA.
• Recarregue a bateria integrada quando estiver pronto para a utilizar novamente.
• Enquanto utiliza a bateria integrada, a temperatura ambiental deverá ser entre 5°C
(41°F) e 35°C (95°F).
• Para obter a maior duração possível da bateria integrada, carregue a temperaturas
de interior.
• A bateria integrada deste dispositivo pode apresentar risco de fogo ou queimaduras
químicas se não for devidamente manuseada. Não a desmonte, não a exponha a
temperaturas superiores a 100°C (212°F) e não a incinere.
• A unidade não deverá ser exposta a calor excessivo como luz solar, fogo ou
semelhantes.
• Quando eliminar a unidade devem ser consideradas as questões ambientais
e as regras ou leis locais que regem a eliminação de tais produtos devem ser
rigorosamente respeitadas.
• Quando a bateria incorporada estiver baixa, irá aparecer no ecrã o seguinte ícone
“ ”.
Notas:
- A unidade é fornecida por fontes de alimentação limitadas.
- A unidade foi desenhada com um sistema de proteção térmica. Quando a
temperatura de funcionamento da unidade exceder os 45°C, esta para de carregar
a bateria embutida automaticamente para proteção. Nesse caso, aguarde que a
unidade arrefeça para voltar ao normal.
- No interesse de economizar energia, quando uma reprodução terminar ou o nível
de volume for denido como muito baixo e nenhuma operação for realizada por um
período de 10 minutos, o aparelho entrará automaticamente no modo de Espera.
AC-Betrieb
Schließen Sie das Netzkabel an eine AC 100-240V 50/60Hz Stromversorgung.
Schließen Sie das Netzkabel in eine Standardsteckdose an.
Verwendung des eingebauten Akkus
Das Gerät verfügt über eine integrierte wiederauadbare Batterie (Lithium-Ion).
Laden Sie den eingebauten Akku auf, bevor Sie das Gerät zum ersten Mal in
Gebrauch nehmen. Nach dem vollständigen Auaden hört die Batterieanzeige
auf zu blinken.
Warnungen:
• Im Display wird die Batteriekapazität angezeigt: .
• Laden Sie am besten die Batterie erst kurz vor ihrem nächsten Gebrauch wieder
auf.
• Bei Verwendung des eingebauten Akkus sollte die Umgebungstemperatur
zwischen 5°C (41°F) und 35°C (95°F) betragen.
• Um eine maximale Lebensdauer des eingebauten Akkus zu erzielen, laden Sie
ihn möglichst bei Zimmertemperatur auf.
• Der in diesem Gerät eingebaute Akku kann bei falscher Verwendung eine
Gefahrenquelle von Feuer oder chemischer Verbrennung darstellen. Nicht
zerlegen, über 100°C (212°F) erhitzen oder verbrennen.
• Das Gerät darf keiner übermäßig großen Hitze, wie etwa Sonnenlicht, einem
Feuer oder ähnlichem ausgesetzt werden.
• Beim Entsorgen des Gerätes müssen Umweltprobleme und regionale Regeln
oder Gesetze beachtet werden, die beim Entsorgen solcher Produkte streng
befolgt werden müssen.
• Bei niedriger Kapazität der integrierten Batterie erscheint im Display die Anzeige
„ “.
Hinweise:
- Das Gerät wird über eine eingeschränkte Stromzufuhr betrieben.
- Das Gerät verfügt über ein Thermoschutzsystem. Wenn die Betriebstemperatur
des Geräts auf über 45°C steigt, wird der Ladevorgang der internen Batterie
automatisch unterbrochen. Lassen Sie das Gerät in solch einem Fall abkühlen,
um dann den normalen Betrieb fortsetzen zu können.
- Aus Energiespargründen aktiviert das Gerät automatisch den Standby-Modus,
wenn das Ende der Wiedergabe erreicht oder eine sehr geringe Lautstärke
eingestellt ist und 10 Minuten lang keine Eingabe am Gerät erfolgt.
Press button once to turn on the unit.
Press and hold button again to turn o the unit.
Appuyez sur le bouton pour mettre l’unité en marche. Appuyez longuement de
nouveau pour éteindre l’unité.
Pressione uma vez para ligar o aparelho. Mantenha o botão uma vez para
desligar o aparelho.
Drücken Sie im Standby-Modus einmal die Taste , um das Gerät einzuschalten.
Halten Sie die Taste 2 Sekunden lang gedrückt, um das Gerät auszuschalten.
1. Turn on the two Bluetooth speakers M-928 BTY.
2. When both speakers are in pairing mode, press twice on one Bluetooth
speaker which will become the main speaker (L channel), then it will search and
connect to the secondary speaker (R channel). They will recognize the left and
right channel automatically.
3. Connect your main speaker to Bluetooth enabled device (e.g. smart phone).
4. Play your song and listen to the sound in stereo.
5. Press button on either speaker to pause playback. Press again to resume
playback.
6. Press twice on either speaker to disconnect the stereo pairing.
1. Allumez les deux haut-parleurs Bluetooth M-928 BTY.
2. Lorsque les deux haut-parleurs sont en mode de couplage, appuyez deux fois
sur sur un des haut-parleurs Bluetooth qui deviendra le haut-parleur principal
(canal L), puis elle recherchera et se connectera au haut-parleur secondaire
(canal R). Ils reconnaitront automatiquement les canaux gauche et droit
3. Connectez votre haut-parleur principal à un appareil compatible Bluetooth (par
exemple un smartphone).
4. Jouez votre chanson et écoutez le son rendu en stéréo.
5. Appuyez sur le bouton de l'un des deux haut-parleurs pour mettre en pause
la lecture. Appuyez à nouveau pour reprendre la lecture.
6. Appuyez deux fois sur sur l'un des haut-parleurs pour déconnecter le
couplage stéréo.
1. Ligue os dois altifalantes Bluetooth M-928 BTY.
2. Quando ambas as colunas estiverem em modo de emparelhamento, prima
duas vezes numa coluna Bluetooth que se tornará a principal (canal L),
depois esta irá procurar e ligar-se á segunda coluna (canal R). Estes irão
automaticamente reconhecer o canal esquerdo e direito.
3. Conecte o seu altifalante principal ao dispositivo Bluetooth (por exemplo,
smartphone).
4. Toque a sua música e ouça o som em estéreo.
5. Pressione o botão em qualquer um dos altifalantes para pausar a reprodução.
Pressione novamente para retomar a reprodução.
6. Prima duas vezes em qualquer uma das colunas para desligar o
emparelhamento estéreo.
When the unit is ON, press button repeatedly to select FM, Bluetooth or AUX
mode.
Lorsque l'appareil est allumé, appuyez plusieurs fois sur le bouton pour
sélectionner le mode: FM, Bluetooth ou AUX
Quando a unidade estiver ligada, pressione repetidamente o botão para
selecionar o modo FM, Bluetooth ou AUX.
Drücken Sie, wenn das Gerät eingeschaltet ist, wiederholt die Taste zur Auswahl
von FM (UKW), Bluetooth oder AUX.
1. Connect your auxiliary source (e.g. mp3 player) to the AUX IN jack on the unit
(cable not included).
2. When the unit is ON, press button repeatedly to select AUX mode. The aux
indicator lights up.
3. Start playback from your auxiliary source.
4. Adjust the volume to desired level.
5. To stop playback, disconnect your auxiliary source from the AUX IN jack.
1. Connectez votre source auxiliaire (par exemple lecteur MP3) sur la prise AUX IN
sur l’unité (câble non inclus).
2. Lorsque l’unité est allumée, appuyez sur la touche à plusieurs reprises pour
choisir le mode AUX. L'indicateur Aux s'allumera.
3. Commencez la lecture de votre source auxiliaire.
4. Réglez le volume au niveau souhaité.
5. Pour arrêter la lecture, débranchez votre source auxiliaire de la prise AUX IN .
1. Conecte a origem auxiliar (por exemplo um tocador mp3) ao conector AUX IN
no lado direito do aparelho (o não acompanha).
2. Quando a unidade estiver ligada, pressione repetidamente o botão para
selecionar o modo AUX. O indicador aux acende.
3. Arranque a reprodução na sua fonte auxiliar.
4. Ajuste o volume sonoro para o nível pretendido.
5. Para parar a reprodução, desligue a fonte áudio externa com ligação à tomada
AUX IN .
1. When the unit is ON, press button repeatedly to select 90-80-70-60-50-40-
30-20 or 10 minutes of listening.
2. The sleep indicator will light on. The unit will automatically turn o after the
specied time.
3. To cancel the sleep function, press button repeatedly until OFF appears. The
sleep indicator lights o.
1. Lorsque l’unité est allumée, appuyez sur pour sélectionner 90-80-70-60-50-
40-30-20 ou 10 minutes d'écoute.
2. L'indicateur de Sommeil s'allume. L'appareil s'éteindra automatiquement
après le délai spécié .
3. Pour annuler la fonction Sommeil, appuyez sur à plusieurs reprises jusqu'à
ce qu’ « OFF » s’ache. Le voyant de veille s'éteindra.
1. Quando a unidade estiver ligada, prima repetidamente o botão para
seleccionar 90-80-70-60-50-40-30-20 ou 10 minutos de escuta.
2. O ícone de suspensão e o tempo de suspensão serão exibidos no ecrã. A
unidade será desligada automaticamente após o tempo especicado.
3. Para cancelar a função de suspensão, prima repetidamente o botão até
aparecer OFF. O indicador de suspensão apaga-se.
This unit is equipped with a built-in USB-C charging port (Output: 5V 1A) for
recharging your mobile device (e.g. Smartphone, tablet, etc.)
Simply plug the USB-C charging cable (not included) into the USB-C charging port
and connect it to your mobile device.
Note: Your mobile device can only be charged when the unit is ON.
Cette unité est équipée d'un port de chargement USB-C intégré (puissance:
5V 1A) pour recharger votre appareil mobile (ex: Smartphone, tablette, etc.).
Branchez simplement le câble de chargement USB-C (non fourni) dans le port de
cargement USB et connectez-le sur votre appareil mobile.
Remarque: Votre appareil mobile ne peut être chargé que lorsque l'appareil est
allumé.
Esse aparelho vem equipado com uma conexão USB-C para recarga (Potência:
5V 1A) para recarregar o seu dispositivo móvel (ex: smartphones, tablets, etc.)
Simplemente conecte o cabo de recarga USB-C (não incluso) na conexão USB-C
para recarga e conecte-o no seu dispositivo móvel.
Nota: O seu dispositivo móvel só pode ser carregado quando a unidade está ligada.
Should this unit exhibit a problem, check the following before seeking service:
No Power
• Make sure unit is connected to AC power.
• Make sure the battery is recharged.
No Sound – General
• External device’s volume is set to minimum; raise volume.
• The unit’s volume is set to minimum; raise volume.
The Bluetooth device cannot pair or connect with the unit.
• You have not activated the Bluetooth function of your device. Refer to the user
manual of your device to activate Bluetooth function.
• The unit is not in pairing mode. Press and hold button until the Bluetooth
indicator blinks.
• The unit is already connected with another Bluetooth device; disconnect that
device and then try again.
En cas de problème avec cette unité, vériez ce qui suit avant de demander une
réparation:
Pas de courant
• Assurez-vous que l’unité est connectée sur une alimentation secteur.
• Assurez-vous que l'unité soit chargée.
Pas de son - général
• Le volume de l'appareil externe est réglé au minimum, augmentez le volume.
• Le volume de l'appareil est réglé au minimum; augmentez le volume.
L'appareil Bluetooth ne peut pas se coupler ou se connecter à l'unité.
• Vous n'avez pas activé la fonction Bluetooth de votre appareil. Consultez le
manuel d'utilisation de votre appareil pour activer la fonction Bluetooth.
• L'appareil n'est pas en mode de couplage. Appuyez sur le bouton et
maintenez-le enfoncé jusqu'à ce que l’indicateur Bluetooth clignote.
• L'unité est déjà connectée à un autre appareil Bluetooth; déconnectez cet appareil
et réessayez.
Caso este aparelho apresente um problema, verique as seguintes soluções antes
de contactar um técnico:
Não funciona
• Certique-se de que o aparelho esteja conectado à uma tomada.
• Certique-se de que a bateria está recarregada.
Sem som - Geral
• O nível de volume do dispositivo externo está no mínimo; aumente o volume.
• O volume da unidade é denido para o mínimo; aumente o volume.
O dispositivo Bluetooth não consegue parear ou conectar ao aparelho.
• Você não ativou a função de Bluetooth do seu dispositivo. Consulte o manual de
instruções do seu dispositivo para ativar a função de Bluetooth.
• A unidade não está em modo de emparelhamento. Prima e segure o botão até
o indicador Bluetooth piscar.
• O aparelho já está conectado a outro dispositivo com Bluetooth; desconecte esse
dispositivo e tente novamente.
POWER SUPPLY:
AC: 100-240V 50/60Hz, 20W consumption
RECHARGEABLE BATTERY
Battery Type: 7.4V 1500mAh Lithium Ion Battery
Operating Time: Approx. 8 hours at 50% volume after fully charged
Charging Time: Approx. 4 hours
RADIO: FM: 87.5-108MHz
BLUETOOTH
Bluetooth Version: V5.0
Bluetooth: 2.402-2.48GHz
RF Output Power: -4.321 dBm
Working Distance: Up to 10 meters measured in open space (wall and structures
may aect range of device)
Specications are subject to change without notice.
Hereby, NEW ONE S.A.S, declares that this MUSE M-928 BTY / M-928 FB is
in compliance with the essential requirements and other relevant provisions
of Directive 2014/53/EU. The declaration of conformity may be consulted at
www.muse-europe.com
ALIMENTATION:
Secteur: 100-240V 50/60Hz, consommation 20W
RADIO: FM: 87.5-108MHz
BATTERIE RECHARGEABLE
Type de batterie: Batterie au lithium-ion de 7.4V de 1500 mAh
Durée de fonctionnement: Environ 8 heures à 50% du volume après chargement
complet
Temps de chargement: Environ 4 heures
BLUETOOTH
Version Bluetooth: V5.0
Bluetooth: 2.402-2.48GHz
Puissance de sortie des RF (fréquences radios): -4.321 dBm
Distance de fonctionnement: Jusqu'à 10 mètres mesurés en espace ouvert (les
murs et les structures peuvent aecter la portée de l'appareil)
Les caractéristiques et les spécications sont sujettes à modication sans préavis.
Par la présente, NEW ONE S.A.S déclare que l'appareil « MUSE M-928 BTY /
M-928 FB» est conforme aux exigences essentielles et autres dispositions
pertinentes de la directive 2014/53/EU. La déclaration de conformité peut être
consultée sur le site www.muse-europe.com
Alimentação:
AC: 100-240V 50/60Hz, consumo 20W
BATERIA RECARREGÁVEL
Tipo de bateria: 7.4V 1500mAh Bateria de ião de lítio
Tempo de Funcionamento: Aprox. 8 horas com o volume em 50% depois de uma
recarga completa.
Tempo de recarga: Aprox. 4 horas
Rádio: FM: 87.5-108MHz
BLUETOOTH
Versão do Bluetooth: V5.0
Bluetooth: 2.402-2.48GHz
Potência de saíde de RF (Rádio Frequência): -4.321 dBm
Distância de Funcionamento: Até 10 metros, medido em espaço aberto (paredes e
estruturas poderão afetar a distância de funcionamento do dispositivo).
O desenho e as especicações estão sujeitas a mudanças sem aviso prévio.
A NEW ONE S.A.S aqui declara que este produto « MUSE M-928 BTY /
M-928 FB » cumpre os requisitos essenciais e outras disposições relevantes
da Norma 2014/53/EU. A declaração de conformidade pode ser consultada em
www.muse-europe.com
1. In standby mode, press and hold button to enter time setting mode and the
hour digits ash.
2. Press / to adjust the hour value. Press to conrm and minute digits ash.
3. Press / to adjust the minute value and press again to conrm.
NOTE:
- If during the adjustment time no key is activated in 10 seconds, the current display
will be automatically stored.
- In standby mode, the display will turn o if no key is activated in 10 seconds. If you
need to check the clock time, press any key on unit.
1. En mode veille, appuyez et maintenez enfoncé le bouton pour entrer en mode
de réglage de l'heure et les chires des heures s'éclaireront.
2. Appuyez sur ou pour régler l'heure. Appuyez sur pour conrmer et les
chires des minutes clignotent.
3. Appuyez sur ou pour régler les minutes puis appuyez à nouveau sur
pour conrmer.
REMARQUE:
- Si Pendant le temps de réglage aucune touche n'est activée dans les 10
secondes, l'achage présent à l'écran sera mis automatiquement en mémoire.
- En mode veille, l'écran s'éteindra si aucune touche n'est activée dans les 10
secondes. Si vous avez besoin de vérier l'heure de l'horloge, appuyez sur
n'importe quelle touche de l'appareil.
1. No modo de espera, mantenha o botão pressionado para entrar no modo de
conguração de hora, onde os dígitos da hora começarão a piscar.
2. Pressione ou para denir as horas. Pressione em para conrmar e
piscam os dígitos dos minutos.
3. Pressione ou para denir os minutos e pressione de novo em para
conrmar.
OBSERVAÇÃO:
- Caso durante o ajuste da hora, nenhum botão seja utilizado por 10 segundos, o
que estiver sendo exibido na tela será automaticamente armazenado.
- No modo de espera, o ecrã irá desligar-se se nenhuma tecla for ativada em 10
segundos. Se precisar de vericar a hora do relógio, prima qualquer tecla na
unidade.
1. Drücken und halten Sie im Standby-Modus die Taste um die Zeiteinstellung
zu önen. Die Stundenzier beginnt zu blinken.
2. Drücken Sie oder , um die genaue Stunde einzustellen. Drücken Sie zur
Bestätigung noch einmal , und die Minutenzahlen blinken auf.
3. Drücken Sie oder , um die genaue Minute einzustellen und drücken Sie zur
Bestätigung noch einmal .
HINWEIS:
- Wenn während der Einstellung innerhalb von 10 Sekunden keine Taste gedrückt
wird, wird automatisch die aktuelle Anzeige gespeichert.
- Nach 10 Sekunden ohne Tastendruck im Standby-Modus schaltet sich das Display
aus. Um die Uhrzeit anzuzeigen, drücken Sie eine beliebige Taste am Gerät.
1. In standby mode, press and hold button to enter alarm setting mode and
hour digits ash.
2. Press / to adjust the hour value. Press to conrm and minute digits ash.
3. Press / to adjust the minute value and press again to conrm. The alarm
indicator will remain on.
Note: Th alarm indicator will blink when the alarm function is activated.
STOPPING THE ALARM
1 - Alarm repetition
Press SNZ. The alarm stops and will sound again 9 minutes later. The alarm
indicator keeps blinking during the snooze time.
2 - Alarm stop
Press or . The alarm will sound again the next day at the same time.
Note: To check the alarm time, press once in standby mode.
3 - Alarm Cancellation
In standby mode, press twice. The alarm indicator will light o.
1. En mode veille, appuyez sur le bouton et maintenez-le enfoncé pour entrer
dans le mode de réglage de l'heure de l'alarme et les chires des heures
clignoteront.
2. Appuyez sur ou pour régler l'heure. Appuyez sur pour conrmer et les
chires des minutes clignotent.
3. Appuyez sur ou pour régler les minutes puis appuyez à nouveau sur pour
conrmer. L'indicateur de l’alarme restera allumé.
Remarque: L'indicateur de l’alarme clignotera lorsque la fonction d'alarme est
activée.
ARRET DE L'ALARME
1 - Répétition de l'alarme
Appuyez sur SNZ. L'alarme s'arrête et se déclenchera à nouveau 9 minutes
plus tard. L'indicateur de l’alarme continue de clignoter pendant le temps de
répétition de la fonction Snooze.
2 - Arrêt de l'alarme
Appuyez sur ou . L'alarme se déclenchera à nouveau le jour suivant à la
même heure.
Remarque: Pour vérier l'heure de l'alarme, appuyez une fois sur en mode veille.
3 - Annuler l'alarme
En mode veille, appuyez deux fois sur . L'indicateur de l’alarme s'éteindra.
1. No modo de espera, mantenha o botão pressionado para entrar no modo de
conguração da hora de alarme e os dígitos das horas piscam.
2. Pressione ou para denir as horas. Pressione em para conrmar e
piscam os dígitos dos minutos.
3. Pressione ou para denir os minutos e pressione de novo em para
conrmar. O indicador de alarme irá permanecer ligado.
Nota: O indicador de alarme irá piscar quando a função de alarme for ativada.
PARANDO O ALARME
1 - Repetindo o alarme
Pressione SNZ. O alarme irá parar e irá começar novamente 9 minutos depois. O
indicador de alarme continua a piscar durante o tempo de suspensão.
2 - Parar o alarme
Pressione ou . O alarme irá soar novamente no dia seguinte no mesmo
horário.
Nota: Para vericar a hora do alarme, prima uma vez em no modo de espera.
3 - Cancelando o alarme
Em modo de espera, prima duas vezes. O indicador de alarme acender-se-á.
When the unit is ON, press button repeatedly to select FM mode. The radio
indicator will light up.
MANUAL SEARCH
1. Choose your radio station with / .
2. Adjust the volume to desired level.
AUTOMATIC SEARCH
Press and hold / . The automatic search locates strong stations. A station with
a weak signal can be set manually by repeatedly pressing / .
Note: During the search operation, the sound level is automatically muted.
To enhance radio reception ability:
Adjust the position of the antenna.
PRESET STATIONS
This unit can store 30 FM stations.
Manual storage:
1. Select a radio station manually or in automatic search.
2. Press and hold button until “P 01” blinks on the screen.
3. Press or to select a channel.
4. Press button to save it.
5. Repeat steps 1-4 to store other stations.
Auto preset
Press and hold to start automatic preset programming. Radio frequencies will
be browsed and radio stations stored automatically. When all the available radio
stations are stored or all memory locations are full, the auto preset programming
function will stop.
Listen to station presets
Press P+ and repeat the operation as many times as necessary to select your
station.
Note: To recall the stations in preset channel 1/2/3, simply press 1/2/3 respectively.
L'unité allumée, appuyez sur la touche à plusieurs reprises pour choisir le mode
FM. Le voyant de la radio s'allumera.
RECHERCHE MANUELLE
1. Choisissez votre station souhaitée à l’aide des touches ou .
2. Réglez le volume au niveau souhaité.
RECHERCHE AUTOMATIQUE
Appuyez et maintenez ou . La recherche automatique localise les stations les
plus puissantes. Une station avec un signal faible peut être réglée manuellement
en appuyant plusieurs fois sur ou .
Remarque: Au cours de l'opération de recherche le niveau sonore est
automatiquement mis en sourdine.
Pour améliorer la réception radio:
Réglez la position de l'antenne.
STATIONS PREREGLEES
Cette unité peut enregistrer 30 stations FM.
Mémorisation manuelle:
1. Sélectionnez une station radio manuellement ou en recherche automatique.
2. Maintenez la touche enfoncée jusqu'à ce que « P 01 » clignote sur l'écran.
3. Appuyez sur ou pour sélectionner un canal.
4. Appuyez sur pour mémoriser.
5. Répétez les étapes 1-4 pour mémoriser d'autres stations.
Mémorisation automatique
Appuyez et maintenez pour commencer la programmation automatique des
présélections. Les fréquences radio seront parcourues et les stations radio seront
automatiquement mémorisées. Quand toutes les stations radio disponibles sont
mémorisées ou que les emplacements de présélection sont pleins, la fonction de
programmation automatique des présélections s’arrêtera.
Écoute des stations préréglées
Appuyez sur P+ et recommencer l'opération autant de fois que nécessaire pour
sélectionner votre station.
Remarque: Pour rappeler les stations du canal présélectionné 1/2/3, appuyez
simplement sur respectivement 1/2/3.
Quando a unidade estiver ligada, pressione repetidamente o botão para
selecionar o modo FM. O indicador de rádio irá acender.
Sintonização manual
1. Sintonize a estação desejada através de / .
2. Ajuste o volume sonoro para o nível pretendido.
Busca automática
Mantenha pressionado por alguns segundos o botão ou . A busca automática
encontrará as estações de sinal mais forte. Uma estação com sinal fraco poderá ser
congurada manualmente através do pressionamento repetido do botão ou .
OBSERVAÇÃO: Durante a operação de busca, o nível de volume será colocado
automaticamente em mudo.
Para melhorar a qualidade de recepção rádio:
Estique a antena.
Memória de estações
Este aparelho pode guardar até 30 estações FM.
Armazengem manual:
1. Selecione uma estação de rádio manualmente ou pela busca automática.
2. Pressione e segure em até que “P 01” pisque no ecrã.
3. Pressione ou para selecionar uma estação.
4. Pressione para armazená-la.
5. Repita os passos 1-4 para memorizar todas as outras estações.
Memorização automática:
Mantenha o botão para inciar a programação de memória automática. As
frequências de rádio serão analisadas e as estações de rádio serão armazenadas
automaticamente. Quando todas as estações disponíveis forem armazenadas ou
todas as posições de memória estiverem cheias, a função de programação de
memória automática irá parar.
Escutando estações memorizadas
Pressione P+e repita essa ação quantas vezes for necessário para chegar na
estação desejada.
Nota: Para selecionar a estação no canal predenido 1/2/3, basta premir o botão
1/2/3 respetivamente.
The Bluetooth
®
word mark and logos are registered trademarks owned by Bluetooth
SIG, Inc. and any use of such marks by New One S.A.S is under license. Other
trademarks and trade names are those of their respective owners.
Pairing a Bluetooth Device
1. When the unit is ON, press button repeatedly to select Bluetooth mode. The
display will show “ ” for a few seconds. The Bluetooth indicator will start to
blink slowly, indicating it is in pairing mode.
2. On the Bluetooth device, enable Bluetooth and select “MUSE M-928 BT” from
the Device List. (Refer to the user manual of the device to be connected for
detailed operations.) If the Bluetooth device prompts for a pass code, use “0000”.
Some Bluetooth devices will ask you to accept the connection. If the units are
paired properly, you will hear the indication sound. The Bluetooth indicator
will remain on.
Tip: If you want to connect your Bluetooth speaker to another Bluetooth audio
device, press and hold button to disconnect the current device, and then follow
the steps above to make a new connection.
• On some devices such as computers, once paired you must select the unit from
the Bluetooth menu and choose “Use as Audio Device (stereo)” or similar.
• Pairing remains intact when the unit and/or your Bluetooth device is taken out
of communication range. An active connection will be re-established when your
Bluetooth device returns within range.
• When the unit is turned on again, it will automatically try to reconnect with the most
recently paired Bluetooth device.
Using a Bluetooth Device
With a unit paired (see previous section), operate your Bluetooth device and its
sound will be heard through the M-928 BTY’s speaker.
1. Press the button to pause playback. Press again to resume playback.
2. Select desired track with / .
3. Adjust the volume level by the volume knob / . You can also adjust the
volume on the device to which you are paired.
Receiving / Ending a Phone Call
This unit is equipped with a built-in microphone, which allows you to make or end
calls of a connected mobile phone through this unit. Make sure your Bluetooth-
enabled mobile phone is paired with the unit. When there is an incoming call to the
connected mobile phone, you will hear an incoming call alert tone from the unit.
1. Press the button to answer the incoming call.
2. Press the button again to end call.
3. To reject the incoming call, press and hold button.
4. To redial the last number retained in the memory of the mobile phone, press the
button twice.
Notes:
• Re-dialing function is unavailable if there is no dial record feature in your mobile
phone.
• This unit will not operate or may operate improperly with some Bluetooth mobile
phones/ audio players.
• If the conversation is not clear, try to move closer to the microphone (located at
front behind the speaker grill).
Using a NFC Device
NFC (Near Field Communication) is a technology that enables short-range wireless
communication between NFC-enabled devices, such as mobile phones.
1. When the unit is ON, press button repeatedly to select Bluetooth mode. The
display will show “ ” for a few seconds. The Bluetooth indicator will start to
blink slowly, indicating it is in pairing mode.
2. Enable NFC and Bluetooth on your Bluetooth device (see the user manual of
your device for details), tap the NFC device on the NFC tag of this unit. If
the units are paired properly, you will hear the indication sound. The Bluetooth
indicator will remain on. The NFC device is connected to this unit via Bluetooth.
3. Select and play audio les or music on your NFC device.
4. To break the connection, tap the NFC device with the NFC tag on this unit
again.
Note: The operational range between the main unit and a NFC device is
approximately 10 meters.
STEREO PAIRING
This function makes it possible for you to get stereo surround sound quality. It
requires two Bluetooth speakers M-928 BTY to realize the real Bluetooth radio
channel wireless separation, therefore, you’ve got to purchase two M-928 BTY.
Tips: It is suggested that the distance between the main speaker and secondary
speaker is within 4 meters.
Coupler un appareil Bluetooth
1. Lorsque l’unité est allumée, appuyez sur la touche à plusieurs reprises pour
choisir le mode Bluetooth. L'écran achera " " pendant quelques secondes.
L'indicateur Bluetooth commencera à clignoter lentement, indiquant qu'il est
en mode de couplage.
2. Sur l'appareil Bluetooth, activez le Bluetooth et sélectionnez «MUSE M-928 BT»
dans la liste des appareils. (consultez le manuel d'instruction de l'appareil pour
les détails de connexion). Si l'appareil Bluetooth vous demande un mot de passe,
utilisez «0000». Certains appareils Bluetooth vous demanderont d'accepter
la connexion. Si les unités sont couplées correctement, vous entendrez une
notication sonore. L'indicateur Bluetooth restera allumé.
Astuce: Si vous souhaitez connecter votre enceinte Bluetooth à un autre appareil
Bluetooth, appuyez sur le bouton et maintenez-le enfoncé pour déconnecter le
périphérique, puis suivez les étapes ci-dessus pour établir une nouvelle connexion.
• Sur certains appareils, comme les ordinateurs, une fois couplé, vous devrez
sélectionner l'unité dans le menu Bluetooth et choisir « utiliser comme un dispositif
audio (Stéréo) » ou une phrase similaire.
• Le couplage reste intact lorsque l’unité et/ou l’appareil Bluetooth sont amenés
hors de la portée de liaison. Une connexion active sera rétablie lorsque votre
appareil Bluetooth reviendra dans la portée.
• Lorsque vous rallumez l'unité, elle essayera automatiquement de se reconnecter
avec le dernier appareil Bluetooth connecté.
Utiliser un appareil Bluetooth
Avec une unité couplée, (voir la section précédente), faites fonctionner votre
appareil Bluetooth et il diusera du son par le biais de l'enceinte M-928 BTY.
1. Appuyez sur la touche pour mettre la lecture en pause. Touchez à nouveau
pour reprendre la lecture.
2. Sélectionnez la piste de votre choix avec ou .
3. Réglez le volume au moyen du bouton / . Vous pouvez également régler le
volume sur l'appareil avec lequel vous êtes couplé.
Recevoir / Terminer un appel téléphonique
Cette unité est équipée d'un microphone intégré, qui vous permet de passer ou
terminer des appels d'un téléphone portable connecté sur cette unité. Assurez-
vous que votre téléphone avec le Bluetooth activé soit connecté sur l'unité. Lorsque
vous recevez un appel sur le téléphone portable, vous entendrez une tonalité
d'appel d'appel entrant sur l'unité.
1. Appuyez sur la touche pour répondre à l'appel entrant.
2. Appuyez à nouveau sur le bouton pour mettre n à l'appel.
3. Pour rejeter l'appel entrant, maintenez enfoncé le bouton pendant quelques
secondes.
4. Pour recomposer le dernier numéro conservé dans la mémoire du téléphone
portable, appuyez sur la touche .
Remarque:
• La fonction rappel n’est pas disponible s’il n’y a pas de fonction d'enregistrement
des appels sur votre téléphone portable.
• Ce système ne fonctionnera pas ou risque de mal fonctionner avec certains
téléphones portables / lecteurs audio Bluetooth.
• Si la conversation n'est pas claire, essayez de vous rapprocher du microphone
(situé derrière la grille du haut parleur).
Utiliser un appareil NFC
NFC (Near Field Communication) est une technologie qui permet la communication
sans l de courte portée entre des appareils compatibles NFC, comme les
téléphones portables.
1. Lorsque l’unité est allumée, appuyez sur la touche à plusieurs reprises pour
choisir le mode Bluetooth. L'écran achera " " pendant quelques secondes.
L'indicateur Bluetooth commencera à clignoter lentement, indiquant qu'il est
en mode de couplage.
2. Activez le NFC et le Bluetooth sur vos appareils Bluetooth (consulter le manuel
d'utilisation de votre appareil pour plus de détails), touchez l'appareil NFC sur le
marquage NFC de cette unité. Si les unités sont couplées correctement,
vous entendrez une notication sonore. L'indicateur Bluetooth restera allumé.
L'appareil NFC est connecté à cette unité via Bluetooth.
3. Choisissez et lisez un chier audio ou musical sur votre appareil NFC.
4. Pour interrompre la connexion, touchez l'appareil NFC sur le marquage NFC
de cette unité à nouveau.
Remarque: La portée opérationnelle entre l'unité principale et un appareil NFC est
environ de 10 mètres.
COUPLAGE STÉRÉO
Cette fonction vous permet d'obtenir une qualité de son surround stéréo. Il vous
faudra alors deux haut-parleurs Bluetooth M-928 BTY an obtenir une séparation
sans l en deux canaux radio Bluetooth (canaux droit et gauche), par conséquent,
vous devez donc acheter deux M-928 BTY.
Astuces: La distance recommandée entre le haut-parleur principale et le haut-
parleur secondaire doit être inférieure à 4 mètres.
Le mot Bluetooth
®
ainsi que les marques et logo sont des marques commerciales
déposées détenues par Bluetooth SIG, Inc. et l'utilisation de ces marques par New
One S.A.S se fait dans le cadre d'une autorisation. Les autres marques et noms
commerciaux sont les propriétés de leurs titulaires respectifs.
Utilizando um dispositivo com Bluetooth
Com uma unidade emparelhada (ver secção anterior), opere o seu dispositivo
Bluetooth e o seu som será audível através da coluna M-928 BTY.
1. Pressione o botão para pausar uma reprodução. Pressione novamente para
continuar uma reprodução.
2. Selecione a faixa desejada com / .
3. Regule o volume por meio do botão rotativo / . Você também poderá ajustar
o volume através do dispositivo com o qual você estiver pareado.
Recebendo/ Terminar uma chamada
Este aparelho vem equipado com um microfone interno, o que lhe permite realizar
ou terminar chamadas de um dispositivo móvel conectado por este aparelho.
Certique-se de que o seu telefone com Bluetooth esteja pareado com este
aparelho. Quando uma chamada estiver sendo recebida no telefone conectado,
você escutará o tom de alerta através das caixas de som.
1. Prima o botão para atender a chamada que estiver sendo recebida.
2. Prima novamente o botão para terminar a chamada.
3. Para rejeitar a chamada recebida, prima e segure o botão .
4. Para remarcar o último número retido na memória do telemóvel, prima o botão
duas vezes.
Observação:
• A função de re-discagem não estará disponível caso não exista a função de
registro de chamadas no seu telefone móvel.
• Este aparelho não funcionará ou funcionará de forma incorreta em alguns
telefones móveis e aparelhos de áudio equipados com Bluetooth.
• Caso a qualidade de conversa não esteja clara, tente se aproximar do microfone
(localizado na frente, logo atrás da grade do alto falante).
Utilizando um dispositivo com NFC
NFC (Comunicação em campo curto) é uma tecnologia que permite comunicações
sem-o em curta distância entre dispositivos que portem NFC, como telefones
móveis.
1. Quando esse aparelho estiver LIGADO, pressione o botão várias vezes
para selecionar o modo de Bluetooth. O ecrã irá mostrar " " durante alguns
segundos. O indicador Bluetooth começará a piscar lentamente, indicando
que está em modo de emparelhamento.
2. Ative o NFC e o Bluetooth em seu dispositivo com Bluetooth (consulte o
manual de instruções do dispositivo para mais detalhes), encoste o NFC do
dispositivo no símbolo do NFC desse aparelho. Se as unidades estiverem
emparelhadas corretamente, irá ouvir o som de indicação. O indicador Bluetooth
irá permanecer ligado. O dispositivo com NFC será conectado a esse aparelho
através do Bluetooth.
3. Selecione e reproduza arquivos de áudio e música no seu dispositivo com NFC.
4. Para desfazer a conexão, toque o dispositivo com NFC no símbolo NFC
nesse aparelho novamente.
Observação: A distância de utilização entre o aparelho principal e um dispositivo
com NFC é de aproximadamente 10 metros.
EMPARELHAMENTO ESTÉREO
Esta função permite obter uma qualidade de som surround estéreo. São
necessários dois altifalantes Bluetooth M-928 BTY para realizar a separação do
som sem o do canal de rádio Bluetooth, portanto, vai precisar de comprar dois
M-928 BTY.
Dicas: Sugerimos que a distância entre o altifalante principal e o altifalante
secundário seja menor que 4 metros.
O nome Bluetooth
®
e logotipos são marcas registradas de propriedade da Bluetooth
SIG, Inc. e quaisquer usos destas marcas pela New One S.A.S estão licenciados.
Outras marcas e nomes registrados pertencem aos seus respectivos proprietários.
Pareando um dispositivo com Bluetooth
1. Quando esse aparelho estiver LIGADO, pressione o botão várias vezes
para selecionar o modo de Bluetooth. O ecrã irá mostrar " " durante alguns
segundos. O indicador Bluetooth começará a piscar lentamente, indicando
que está em modo de emparelhamento.
2. No dispositivo com Bluetooth, ative o Bluetooth e selecione "MUSE M-928 BT"
na Lista de Dispositivos. (Consulte o manual de instruções do dispositivo
que estiver sendo conectado para mais detalhes). Caso o dispositivo com
bluetooth solicite uma senha, utilize "0000". Alguns dispositivos com Bluetooth
solicitarão que você aceite a conexão.Se as unidades estiverem emparelhadas
corretamente, irá ouvir o som de indicação. O indicador Bluetooth irá
permanecer ligado.
Dica: Caso você queira conectar a sua caixa de som Bluetooth a outro dispositivo
com Bluetooth, pressione e segure o botão para desconectar o dispositivo e
siga os passos acima para fazer uma nova conexão.
• Em alguns dispositivos, como computadores, uma vez pareado, você precisará
selecionar o aparelho em um Menu Bluetooth e escolher "Utilizar como Dispositivo
de Áudio (estéreo)" ou semelhante.
• O pareamento permanecerá intacto quando o aparelho ou o seu dispositivo
com Bluetooth for retirado da área de comunicação. Uma conexão ativa será
restabelecida quando o dispositivo com Bluetooth voltar à área de alcance.
• Quando o aparelho for ligado novamente, ele tentará automaticamente
se reconectar ao dispositivo de Bluetooth com o qual ele tenha sido mais
recentemente pareado.
R-5131 IB MUSE 001 REV0.indd 1R-5131 IB MUSE 001 REV0.indd 12023/4/11 11:07:482023/4/11 11:07:48
Product specificaties
| Merk: | Muse |
| Categorie: | Radio |
| Model: | M-928 BTY |
Heb je hulp nodig?
Als je hulp nodig hebt met Muse M-928 BTY stel dan hieronder een vraag en andere gebruikers zullen je antwoorden
Handleiding Radio Muse

2 Juli 2026
1 Juli 2026
30 Juni 2026
30 Juni 2026
30 Juni 2026
25 Februari 2026
30 Augustus 2025
1 April 2025
1 April 2025
1 April 2025
Handleiding Radio
Nieuwste handleidingen voor Radio
26 Juli 2026
25 Juli 2026
25 Juli 2026
23 Juli 2026
22 Juli 2026
13 Juli 2026
12 Juli 2026
10 Juli 2026
9 Juli 2026
9 Juli 2026