Mpman FRA212PLL Handleiding

Mpman Wekkerradio FRA212PLL

Lees hieronder de 📖 handleiding in het Nederlandse voor Mpman FRA212PLL (2 pagina's) in de categorie Wekkerradio. Deze handleiding was nuttig voor 25 personen en werd door 2 gebruikers gemiddeld met 4.5 sterren beoordeeld

Pagina 1/2
PLL ALARM CLOCK RADIO
Model : FRA212PLL
INSTRUCTION MANUAL
WARNING:
TO REDUCE THE RISK OF FIRE OR ELECTRIC SHOCK, DO NOT EXPOSE THIS APPARATUS
TO RAIN OR MOISTURE.
The lighting flash with
arrowhead symbol, with an
equilateral triangle is
intended to alert the user to
the presence of uninsulated
dangerous voltage within the
products enclosure that may
be of sufficient magnitude to
constitute a risk of electric
shock to persons.
CAUTION
The exclamation point within
an equilateral triangle is
intended to alert the user to
the presence of important
operating and maintenance
(servicing) instruction in the
literature accompanying the
appliance.
RISK OF ELECTRIC SHOCK
DO NOT OPEN
CAUTION: TO REDUCE THE RISK OF
ELECTRIC SHOCK, DO NOT REMOVE
COVER (OR BACK). NO USER
SERVICEABLE PARTS INSIDE REFER
SERVICING TO QUALIFIED SERVICE
PERSONNEL.
WARNING
The ventilation should not be impeded by covering the ventilation openings with items, such
as newspapers, table-cloths, curtains, etc.
No naked flame sources, such as lighted candles, should be placed on the apparatus.
It shall not be exposed to dripping or splashing and that no objects filled with liquids, such as
vases, shall be placed on the apparatus.
Do not place the product in closed bookcases or racks without proper ventilation.
The batteries (Battery pack or batteries installed) shall not be exposed to excessive heat such
as sunshine, fire or the like.
Excessive sound pressure from earphones and headphones can cause hearing loss.
Where the mains plug or an appliance coupler is used as the disconnect device, the
disconnect device shall remain readily operable.
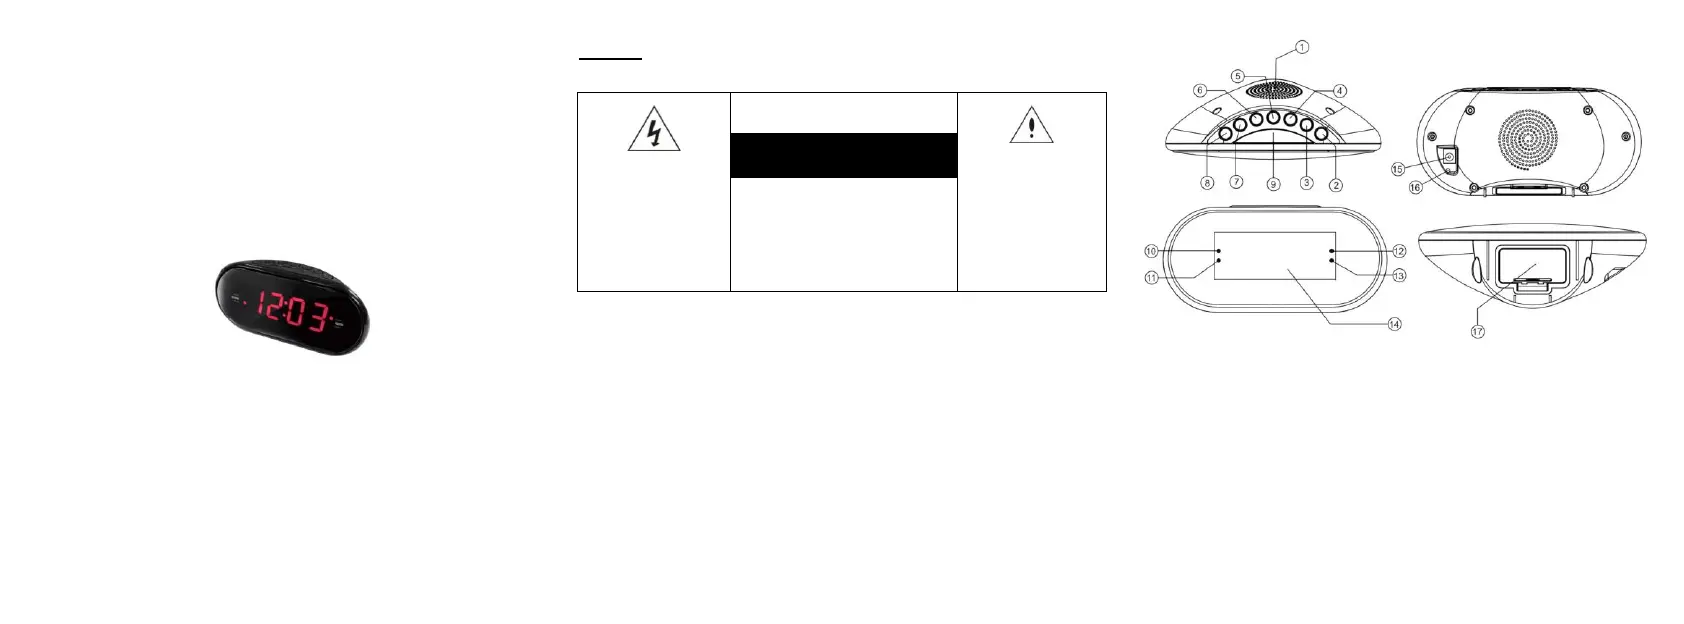
1
Speaker
11
AL1 radio indicator
2
SOURCE/AL OFF button
12
AL:2 buzzer indicator
3
AL1/ button +
13
A radio indicat L2 or
4
AL2/ button
14
LED display
5
DIMMER button
15
DC jack
6
HOUR/ button
16
FM wire antenna
7
MIN/ button
17
Battery compartment
8
CLK/MEM button
9
SNOOZE/SLEEP button
10
AL1 buzzer indicator
CONNECTING THE UNIT TO POWER
Before plug in the AC power cord to the AC wall outlet, please make sure that the voltage of your
electricity supply is same as that indicated on the rating plate.
BATTERY BACKUP
Insert two pieces UM-4 batteries (not supplied) into the battery compartment. Be sure to observe
the proper polarity (the "+" and "-" signs) as indicated inside the battery compartment.
In case of power failure or interrupted AC power, the current time and alarm time settings, the stored
radio stations are preserved in the memory of the unit by means of battery back-up function.
SETTING THE CLOCK
1. With the unit in CLOCK mode, press and hold the CLK/MEM button for about 1 second, the
time will begin to flash on the display.
2. Press the HOUR/ button to adjust the hour.
3. Press the MIN/ button to adjust the minute.
4. When the correct time is selected, press the CLK/MEM button again to confirm.
SETTING THE ALARMS
1. With the unit in CLOCK mode, press the AL1/ or AL2/ button. The ALARM time will begin to +
flash on the display.
2. Press the HOUR/ button to adjust the alarm hour.
3. Press the MIN/ button to adjust the alarm minute.
4. When the desired alarm time is selected, press the AL1/ or AL2/ button to confirm. +
5. Press the AL1/+ or AL2/ button to select the ALARM sound mode - buzzer or currently set
radio station. The alarm buzzer or radio indicator will light up.
SNOOZE FUNCTION
1. Whenever the alarm (radio or buzzer) activates, it can be temporarily suspended for a short
period of 9 minutes by pressing the SNOOZE button once.
2. The buzzer or radio will then automatically activate again after the 9 minutes SNOOZE period
has ended.
3. This procedure can be repeated for up to approximately one hour.
TURN OFF THE ALARM
When the Alarm activate, press the SOURCE/AL.OFF button to turn off the Alarm.
LISTENING TO THE AM/FM RADIO
1. Press the SOURCE/AL.OFF button to select AM or FM band
2. Press the HOUR/ or MIN/ button step by step to tune to the desired radio stations.  
3. Press and hold the or MIN/ button for approx. 1 second, it will start to search the HOUR/ 
next radio station in the direction of the search. The search operation simply finds stations with
strong signals. Stations with weak reception can only be tuned in manually.
4. To turn off the radio, press and hold the SOURCE/AL.OFF button for approx.. 1 second.
SAVING A RADIO STATION TO THE MEMORY
1. Tune the radio to the desired station.
2. Press and hold the CLK/MEM button to store this radio station in the next memory station
number. The display will show (XX is the memory station number from 01 to 10) PXX
3. Up to 10 AM and 10 FM radio stations can be stored in the memory.
TO LISTEN TO A SAVED RADIO STATION
1. Press the SOURCE/AL.OFF button to select AM or FM band.
2. Press the CLK/MEM button to skip to the next stored radio station.
SLEEP TO MUSIC FUNCTION
1. This function allows you to listen to the radio while you fall asleep.
2. but 90 Press the SNOOZE ton, the display will show the default sleep time of minutes.
3. Press the SNOOZE button repeatedly to set the desired sleep time.
(90- - - - - - - -10 min. or OFF) 80 70 60 50 40 30 20
4. After the pre-set time has elapsed, the radio will turn off automatically.
TURN OFF THE RADIO
Press and hold the SOURCE/AL OFF button for approximate 1 second, the radio will turn off.
DIMMER CONTROL
Press the DIMMER button to select the brightness of the display
SPECIFICATIONS
Frequency Range: AM 5 - 1 KHz 22 620
FM 87.5 108 MHz
Power Supply: AC V ~ 50 Hz 230
AC/DC Adaptor DC6V 200mA
Back-Up Battery: 2 pc. UM4
Specifications are subject to change without prior notice.


Product specificaties

Merk: Mpman
Categorie: Wekkerradio
Model: FRA212PLL

Heb je hulp nodig?

Als je hulp nodig hebt met Mpman FRA212PLL stel dan hieronder een vraag en andere gebruikers zullen je antwoorden


Handleiding Wekkerradio Mpman

Mpman

Mpman FRAL501 Handleiding

4 Februari 2023
Mpman

Mpman FRA300 Handleiding

4 Februari 2023
Mpman

Mpman FRA252 Handleiding

4 Februari 2023
Mpman

Mpman FRA202 Handleiding

4 Februari 2023
Mpman

Mpman FRA400 Handleiding

4 Februari 2023
Mpman

Mpman FRA102 Handleiding

4 Februari 2023
Mpman

Mpman FRA115 Handleiding

4 Februari 2023
Mpman

Mpman FRA105 Handleiding

4 Februari 2023
Mpman

Mpman FRA200 Handleiding

4 Februari 2023

Handleiding Wekkerradio

Nieuwste handleidingen voor Wekkerradio