Metra AXDSPL-HN3 Handleiding
Metra Audio/video-converter AXDSPL-HN3
Bekijk gratis de handleiding van Metra AXDSPL-HN3 (16 pagina’s), behorend tot de categorie Audio/video-converter. Deze gids werd als nuttig beoordeeld door 110 mensen en kreeg gemiddeld 4.2 sterren uit 5 reviews. Heb je een vraag over Metra AXDSPL-HN3 of wil je andere gebruikers van dit product iets vragen? Stel een vraag
Pagina 1/16
AXDSPL-HN3
INSTALLATION INSTRUCTIONS
AxxessInterfaces.com © COPYRIGHT 2020 METRA ELECTRONICS CORPORATION REV. 11/3/20 INSTAXDSPL-HN3
Google Play Store
Apple App Store
iOS 12.1 or higher
INTERFACE FEATURES
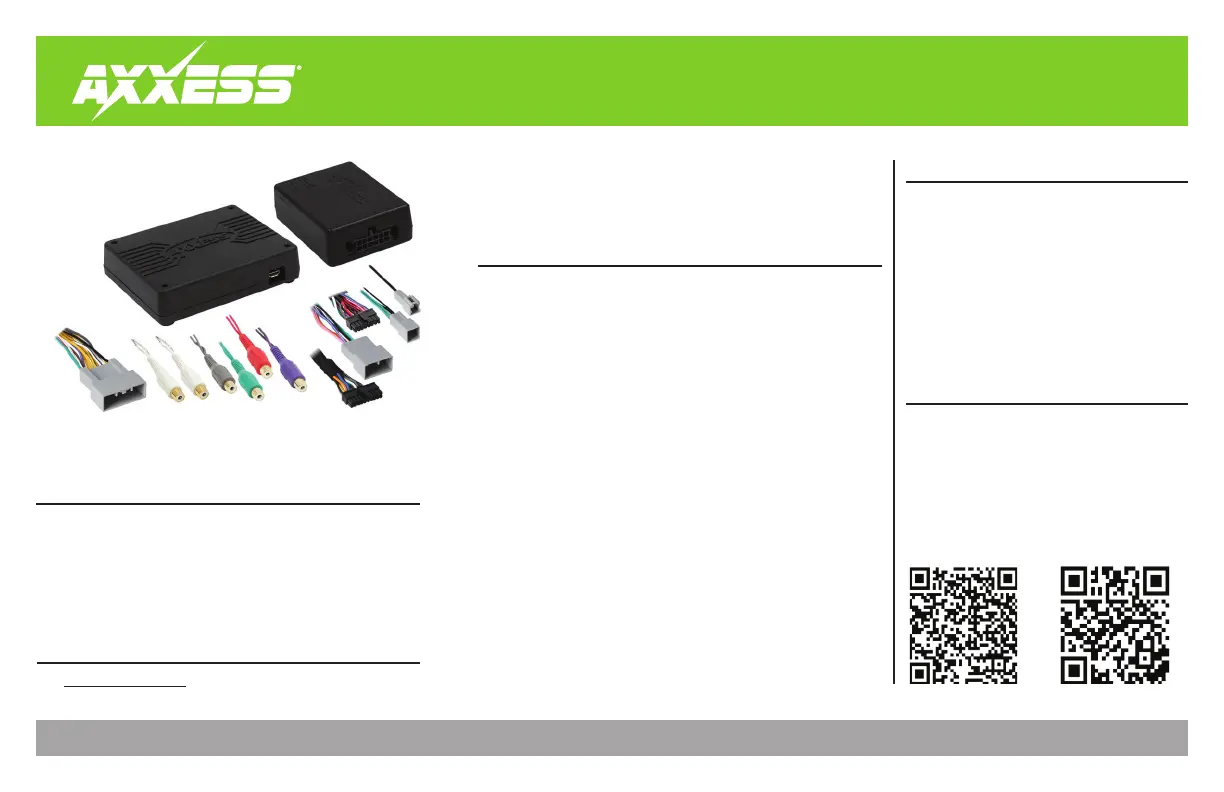
INTERFACE COMPONENTS
TOOLS & INSTALLATION ACCESSORIES REQUIRED
• Crimping tool and connectors, or solder gun,
solder, and heat shrink • Tape • Wire cutter
• Zip ties • Multimeter
TABLE OF CONTENTS
Connections ............................................................2
Installation .............................................................3
AXDSPL-BT Installation...........................................4
AXDSPL-SP Installation...........................................5
Mobile App ........................................................6-14
Specifications ........................................................15
Honda DSP Interface With Amp Bypass Harness
2016-Up
• Includes a DSP (Digital Signal Processor)
• 15 Band graphic EQ
• 4 inputs and 6 individually assignable outputs
• Independent equalization for front, rear, and sub
• Selectable low pass, band pass, and high pass filters
• Selectable crossover slopes; 12db, 24db, 36db, 48db
• Each channel can be delayed independently up to 10ms
• Clipping detection and limiting circuits
• Designed for amplified models
• Includes an amp bypass harness
• Internal header port for adding interface modules
• Retains level control of subwoofer through the factory radio
• Settings adjusted via Bluetooth
®
in a smart device application (tablet
or mobile phone), compatible with both Android and Apple devices
• Read, write, and store configurations for future recall
• Password protect feature available in the mobile app
• Micro-B USB updatable
• AXDSPL-HN3 interface
• AXDSPL-HN3 interface harness
• AXDSPL-HN3 amp bypass harness
APPLICATIONS
Visit axxessinterfaces.com for current application list
Product specificaties
| Merk: | Metra |
| Categorie: | Audio/video-converter |
| Model: | AXDSPL-HN3 |
Heb je hulp nodig?
Als je hulp nodig hebt met Metra AXDSPL-HN3 stel dan hieronder een vraag en andere gebruikers zullen je antwoorden
Handleiding Audio/video-converter Metra

27 Juni 2023
26 Juni 2023
23 Juni 2023
23 Juni 2023
22 Juni 2023
Handleiding Audio/video-converter
Nieuwste handleidingen voor Audio/video-converter
11 Mei 2026
30 April 2026
24 April 2026
23 April 2026
23 April 2026
23 April 2026
21 April 2026
20 April 2026
17 April 2026
16 April 2026