Maxfield Max Movie Handleiding

Maxfield Mp3 speler Max Movie

Lees hieronder de 📖 handleiding in het Nederlandse voor Maxfield Max Movie (2 pagina's) in de categorie Mp3 speler. Deze handleiding was nuttig voor 42 personen en werd door 2 gebruikers gemiddeld met 4.5 sterren beoordeeld

Pagina 1/2
6
4
1
5
2
3
CONNECTING TO THE PC
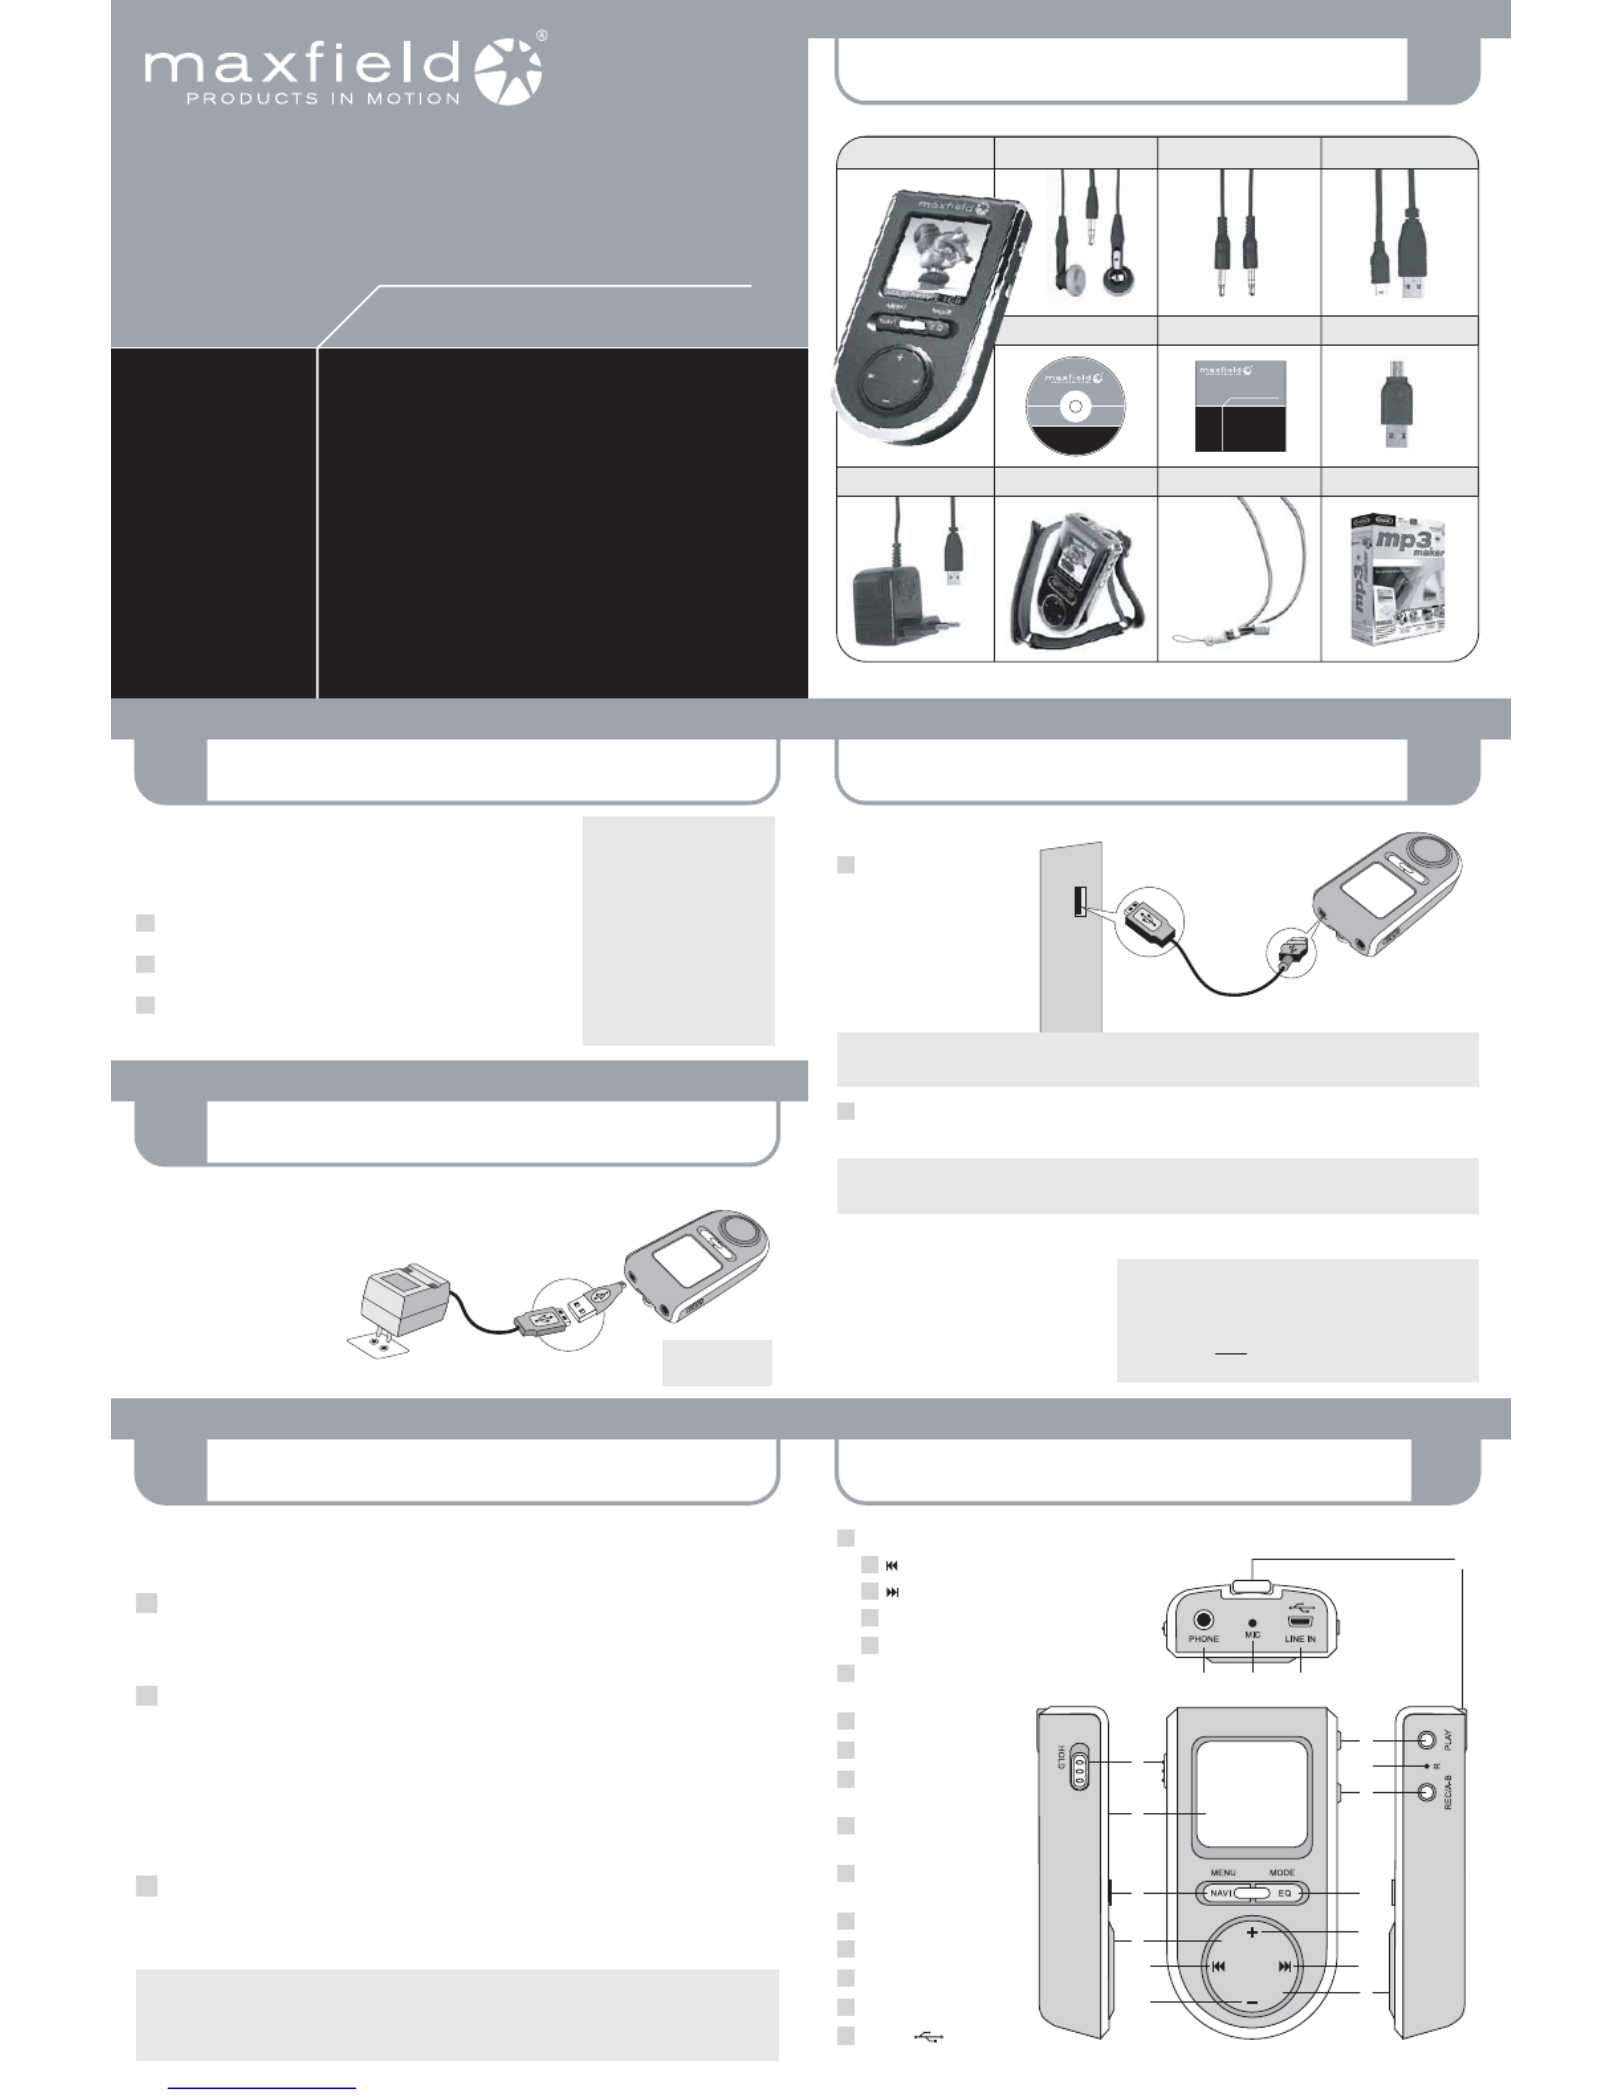
PACKAGE CONTENT
PLAYER OVERVIEWLOADING MUSIC
INSTALLING SOFTWARE
CHARGING THE BATTERY
1GB
MUSIC PLAYER
MAX-MOVIE
® Maxfield GmbH · Kaistraße 2 · 40221 Düsseldorf · Germany
www.maxfield.de
For detailed
instructions and
descriptions
please refer to the
User's Manual
on CD-ROM
Q u i c k St a r t G u i d e
Additonally: Warranty Card
1GB
MUSIC PLAYER
MAX-MOVIE
Q ui c k S t a r t G ui d e
MAX-MOVIE
MUSIC PLAYER 1GB
DRIVER/TRE IBER
USER' S MANUAL
BEDIENUNGSANLE ITUNG
QUICK START GUIDECD-ROM: DRIVER/MANUAL
SPORTS ARMBAND CASE NECK STRAP
MINI USB CONNECTOR
MAGIX mp3 maker SE
MAX-MOVIE 1GB LINE-IN CABLESTEREO EARPHONES USB CABLE
AC/DC POWER ADAPTOR
System requirements
– Intel Pentium (or above)
based with USB port support
– Memory: 64 MB RAM or above
– Operating Systems:
Windows 98/98SE/ME/2000/XP
and Mac OS X
– Hard Disk: minimum 100 MB
free space
– USB port
1
2
3
– Users of have to install the adequate driver provided on Windows 98/98SE
the bundled MAX-MOVIE CD-ROM onto the PC before connecting the player
to the PC.
– Users of or do not need to install a driver, as Windows 2000/XP Mac OS X
the operating system automatically recognizes the player as "Removable Disk".
Inserting the MAX-MOVIE installation CD-ROM to the CD-ROM drive will display
an installation screen.
Follow the on-screen instructions.
Choose the options that match the operating system of your PC.
In case the instructions do not pop up after a few moments, run the
Windows Explorer and double click the CD-ROM drive icon to manually start
the menu program.
The internal Li-Polymer rechargeable battery can be automatically charged by either connecting the MAX-MOVIE via Mini USB connector
and to the mains supply to the PC AC/DC power adaptor (see fig.) or via USB connection cable (see No. 4).
The battery charging status is displayed on the top right corner of the display.
When charging for the first time the battery
should remain connected to the power
supply for 12 hours.
In further charging processes, 60 minutes
will do for charging 80 % of the battery,
and 90 minutes for a full battery charge,
in case the player is switched off.
Using the PC connection via USB, it takes between 90 minutes and 3 hours for a complete charging process.
Make sure that the
battery is fully charged
before first use.
Mains supply
Mini
USB
connector
USB port
AC/DC
power adaptor
USB port
USB
port
USB
connection cable
1
2
Connection to the PC
Turn the MAX-MOVIE on
and connect it via USB cabel
with the USB port of the PC
(see figure). Automatically,
a new Removable Disk
"MAX-MOVIE" will be
created in "My Computer".
Please note: Users of Windows 98/98SE have to install an adequate driver (provided on the bundled
MAX-MOVIE CD-ROM) onto the computer before connecting the MAX-MOVIE Music Player to the PC.
Now, you can copy and load files or even complete folders from the hard drive, and paste them into the
Removable Disk. (For further information see No. 5 "LOADING MUSIC TO THE PLAYER".)
Please make sure, that the player is in Play Mode before connecting it to the PC.
Being, for example, in Record Mode the player would not be recognized by the computer system.
Disconnection from the PC
To disconnect the MAX-MOVIE from your
computer in case you are using Windows
ME, 2000, or XP, click "Unplug or Remove
Hardware" on the bottom right of the monitor,
and stop the device before removing it.
CAUTION !
Disconnecting the MAX-MOVIE from the PC
during file transfer would damage the player.
Please do n o t disconnect the player before
data transfer is complete.
First connect the MAX-MOVIE Music Player to the PC by using the included USB cable and switch it on.
The LCD screen will display the connection status. –
There are three methods to transfer your songs onto your player depending on your preferences and the kind of music codec.
Loading DRM protected WMA audio tracks with Windowsâ„¢ MediaPlayer
® 9
Start Windows™ MediaPlayer ®
, and click on "Media Library" to manage your songs.
Im Windows™ MediaPlayer ® 9 select "Copy to CD or Device". For further information please refer to the Windows™
Media Player ® FAQs under Microsofts DRM (Digital Rights Management).
Loading files with Windows Explorer via Drag and Drop
The player can be used as a mobile data storage device. Just use the Copy, Paste, Delete etc. commands of your
operating system such as Windows or Macintosh OS.
Step 1 Select the music you want to download to the player by clicking on the file/folder icon.
(If you want to choose more than one music file/folder, press and hold the Ctrl or Shift key when clicking.)
Step 2 Right-click on the file(s)/folder(s) – a menu appears. Click Copy.
Step 3 Double-click on the Removable Disk to open the drive. The Removable Disk window appears.
Step 4 Right-click on the Removable Disk window and click Paste in the menu.
Step 5 The files/folders are now copied into the player memory.
Loading audio files with MAGIX mp3 maker SE
You can also use the bundled MAGIX mp3 maker SE music software to copy songs to your player and additionally,
edit your contents. For detailed information, please refer to the MAGIX mp3 maker SE CD-ROM or to the MAX-MOVIE
User's Manual provided on the bundled CD and on our website www.maxfield.de – Support – Downloads.
CAUTION! – Disconnecting the MAX-MOVIE from the PC during data transfer will damage the player!
Before disconnecting the player, please make sure that the transfer is complete!
If you are using Windows ME, 2000 or XP, please follow the "Safely Remove" instructions to disconnect
the player. – Use the "Unplug or Eject hardware" icon located in the toolbar.
1
2
3
4
7
1
b
6
5
8
1
3
2
1
a
1d
1
c
1
0
11
12
1 Multifunction key (MF key)
1a Backward
1b Forward
1c + Volume / Navigation up
1d – Volume / Navigation down
2 MENU/NAVI
Menu/Navigation
3 Display
Key lock4 HOLD
5 PLAY
Play/Pause/On/Off
6 REC/A-B
Record/A-B Loop/Back
7 MODE/EQ
Mode/Equalizer
Reset8 R
9 Neck strap hole
Earphone jack10 PHONE
Microphone11 MIC
/ 12 LINE-IN
Line-In/USB port
top
rightfrontleft
Downloaded from manuals search enginewww.Manualslib.com
TAKING PRECAUTIONS !
LISTENING TO FM-RADIO 10
OLED COLOR DISPLAY 8
MENU SETTINGS
11
RECORDING
9
PLAYING MUSIC
7
Switching the player on/off
To switch the MAX-MOVIE on or off, press and hold down the PLAY button.
Selecting the player mode
Select one of the 4 player modes from the menu:
– Play Mode – FM Radio Mode – Line Rec Mode – Voice Rec Mode –
Press and hold the MODE/EQ button in order to call up the mode selector.
Select the desired mode by pressing the MULTIFUNCTION key to the right/left / and confirm by pressing the
MODE/EQ button again.
Navigation
In Play Mode, press the NAVI button to access the MAX-MOVIE directory.
Press the MULTIFUNCTION key up/down / or backward/forward / to select the relevant tracks or folders.+ –
Play/Pause
You can start/stop playing a selected track by pressing the PLAY/PAUSE button.
Search and skip during playback (Forward/Rewind)
By briefly pressing the forward/backward parts / of the MULTIFUNCTION key you can skip to the
previous or next song.
By pressing and holding / down, you can forward and rewind within the track being played.
Volume
You can increase or decrease the playback volume by pressing / on the MULTIFUNCTION key.+ –
Sound/EQ
By pressing the EQ button briefly during playback you can select 9 different equalizer modes.
The respective setting will be indicated on the display.
Hold /key lock
By activating the HOLD switch, you can lock all player keys to prevent unintentional operation.
1
2
3
4
5
6
7
8
Battery level indicator
Equalizer mode
Playback mode
Playing time indicator
Time Key lock indicator
Track number/
Total number of tracks
Album
Title
Remaining playing time
Volume
Depending on the kind of recording you wish to do, you have to select the adequate recording mode:
For voice recordings select "Voice", for recordings from external audio sources select "Line-In".
In case you want to record a tuned FM station, just press the REC key while listening.
Recording FM-Radio
Select FM Radio mode and select your desired station.a.
While you are tuned into an FM radio station, press the REC button to start recording.b.
Pressing the PLAY button while recording will pause recording, and pressing the button again will make it go on.
The recorded file will be created in the "FMRec" folder.
Pressing the REC button while recording will stop recording. c.
Pressing the REC button again will start recording as a new file.d.
Recording Voice
Select Voice Rec mode and face the built-in microphone towards the sound source before you start recording.a.
Press the REC button to start recording. b.
Pressing the PLAY button while recording will pause recording, and pressing the button again will make it go on.
The recorded file will be created in the "Voice" folder.
Before recording, please make sure to select "Voice Recording" in the settings menu.
Pressing the REC button while recording will stop recording. c.
Pressing the REC button again will start recording as a new file.d.
Recording from an external device
Connect the Line-In cable to the Line-In terminals of both the external device and the player.a.
Start playing the external device and press the REC button to start recording.b.
Pressing the PLAY button while recording will pause recording, and pressing the button again will make it go on.
The recorded file will be created in the "LineInRec" folder.
Before recording, please make sure to select "Line-In Recording" in the settings menu.
Pressing the REC button while recording will stop recording. c.
Pressing the REC button again will start recording as a new file.d.
1
2
3
To switch on radio reception, press and hold down the MODE/EQ button until the mode selection appears.
Then select "FM Radio Mode".
Briefly press the MODE/EQ button to confirm.
Manual tuning
To set a station, briefly press the MULTIFUNCTION key to the left or right .
(In case of manual station selection the preset station numbers will not be indicated.)
Automatic tuning
To search for a radio station, briefly press the MULTIFUNCTION key to the left or right .
The player will automatically tune into a station.
Select preset station
a. To select a preset station, briefly press the MENU/NAVI button.
The display will indicate preset text and saving number.
b. To find the preset station number, press the MULTIFUNCTION key to the left or right .
Save preset station
a. Set the desired station and briefly press the REC/A-B button.
b. Then select the desired saving number by using or .
c. Confirm the selection by pressing the REC/A-B button.
1
2
3
4
FM RADIO
Stereo/Mono
Preset
Automatic
Preset
Save preset
station
Manual
Tuning
Automatic
Tuning
PLAY
Repeat Mode
All / AB
EQ
User / SRS / Flat /
Pop / Rock / Live /
Vocal / Classic /
D-Bass
Navi
Song / Folder /
Voice / Line In /
FM Recording
LINE REC
Start / Stop /
Pause / Recording
VOICE REC
Start / Stop /
Pause / Recording
Settings
Format / Memory /
FW-Upgrade /
Load Default
Radio
FM Area /
Stereo Mode
Sound
EQ Mode / User defined
EQ / SRS Setting
Recording
Voice Recording / Line-
In-Recording / Volume
Playback
File Mode / Playback
Mode / Playback Speed
/ Search Speed
Timer
Time / Backlight /
Auto Off / Sleep /
Alarmclock / RadioTimer
Display
Info / Language
SETTINGSM A I N M E N U
Upgrading the Firmware
You can upgrade the built-in programs (firmware) if necessary.
Updates on: – Support – Downloads – Mobil Audio – MAX-MOVIEwww.maxfield.de
To download the firmware update provided on our website please do the following:
· Unpack the ZIP file into a folder. (In case you don't use the Windows specific program for unpacking, please
make sure that the directory structure in the ZIP file remains as it is.)
· Save the firmware upgrade file(s) in the "Config" folder of the player.
· Disconnect the player from the PC and turn it on.
· In the "Settings" menu, choose "FW-Upgrade" by using the MULTIFUNCTION key.
· After successful firmware upgrade, restart the player.
Please take special care when formatting
because all data will be erased
and cannot be restored.
Taking care of the player
· Keep the product and all its parts and accessories out of the reach of small children.
· Do not use or store the player in dusty or dirty environments as this may damage the components.
· This product is not waterproof or water resistant. Keep the player away from water.
· Keep the player away from heat, humidity, and magnetic interferences.
· Do not try to alter or remodel the product as all warranties will otherwise be void.
· Normal vibration will not affect the operation of this product, but dropping or excessive shock may cause damage.
· Do not leave the unit exposed to direct sunlight for long periods of time, and do not leave it close to a heat source.
· Do not clean the player with abrasive chemicals that may harm the surface such as thinners, benzene or alcohol.
· Do not apply heavy force to the OLED (Organic Light Emitting Diode), as it may cause breakage or abnormal display functions.
· Do not leave the unit exposed to direct sunlight for a long period of time.
· Avoid keeping the unit in places with high humidity, strong magnetic fields, or near high-heat sources.
Formatting your Player
You can format the MAX-MOVIE either with its
internal "Format Tool" provided with the menu settings,
or you can use the e.g. the Windows Explorer to FAT-format
the player via your PC.
Taking care of your sense of hearing
Please be aware of the fact that using earphones at a high volume for an extended time might cause hearing damage!
Please backup your files!
IMPORTANT! – Maxfield GmbH will not be liable for the loss of data caused by damaged products or
damaged respectivly unreadable memories or drives.
Downloaded from manuals search enginewww.Manualslib.com


Product specificaties

Merk: Maxfield
Categorie: Mp3 speler
Model: Max Movie

Heb je hulp nodig?

Als je hulp nodig hebt met Maxfield Max Movie stel dan hieronder een vraag en andere gebruikers zullen je antwoorden


Handleiding Mp3 speler Maxfield

Handleiding Mp3 speler

Nieuwste handleidingen voor Mp3 speler