Lorex LNB8963B Handleiding
Lorex Bewakingscamera LNB8963B
Bekijk gratis de handleiding van Lorex LNB8963B (2 pagina’s), behorend tot de categorie Bewakingscamera. Deze gids werd als nuttig beoordeeld door 41 mensen en kreeg gemiddeld 4.2 sterren uit 8 reviews. Heb je een vraag over Lorex LNB8963B of wil je andere gebruikers van dit product iets vragen? Stel een vraag
Pagina 1/2
Resources
• You can use a RJ45 coupler or switch (not included) to connect male
ends of Ethernet cable together.
• To extend the cable run beyond 300ft (92m), a switch will be required
(sold separately).
LNB8963_LNB8973_QSG_EN_R1
4K Motorized Varifocal HD IP Bullet
Security Camera
• 4K Motorized Varifocal HD IP Bullet Security Camera
• 4× Mounting Screws & Drywall Anchors*
• CAT5e Ethernet Extension Cable with Pre-attached RJ45
Cable Gland*
• Allen Key*
• Mounting Template*
• Read this guide carefully and keep it for future reference.
• Follow all instructions for safe use of the product and handle with care.
• Use the camera within given temperature, humidity and voltage levels
noted in the camera’s specifications.
• Do not disassemble the camera.
• Do not point the camera directly towards the sun or a source of
intense light.
• Use only the supplied regulated power supply provided with the
product. Use of a non-regulated, non-conforming power supply can
damage the product and void the warranty.
• Periodic cleaning may be required. Use a damp cloth only. Do not use
any harsh, chemical-based cleaners.
• The supplied cable is rated for surface mounting only. Cables for
in-wall and floor-to-floor installations are sold separately (CMR type).
These and other cables are available at lorex.com
• Point the camera where there is the least amount of obstructions
(i.e., tree branches).
• Install the camera where vandals cannot easily reach.
• Secure cabling so that it is not exposed or easily cut.
• This camera is rated for outdoor use. Installation in a sheltered
location is recommended.
* Per camera in multi-camera packs.
Copyright © 2018 Lorex Corporation
As our products are subject to continuous improvement, Lorex reserves
the right to modify product design, specifications and prices, without
notice and without incurring any obligation. E&OE. All rights reserved.
Quick Start Guide
English Version 1.0
LNB8963 / LNB8973 SERIES
Package Contents
ATTENTION:
It is recommended to connect the camera to the NVR or an external PoE
switch. If using a DC power adapter (not included) with the camera, a
REGULATED power supply is REQUIRED for use with this camera. Use of
a non-regulated, non-conforming power supply can damage this product
and voids the warranty.
Safety Precautions
Installation Tips
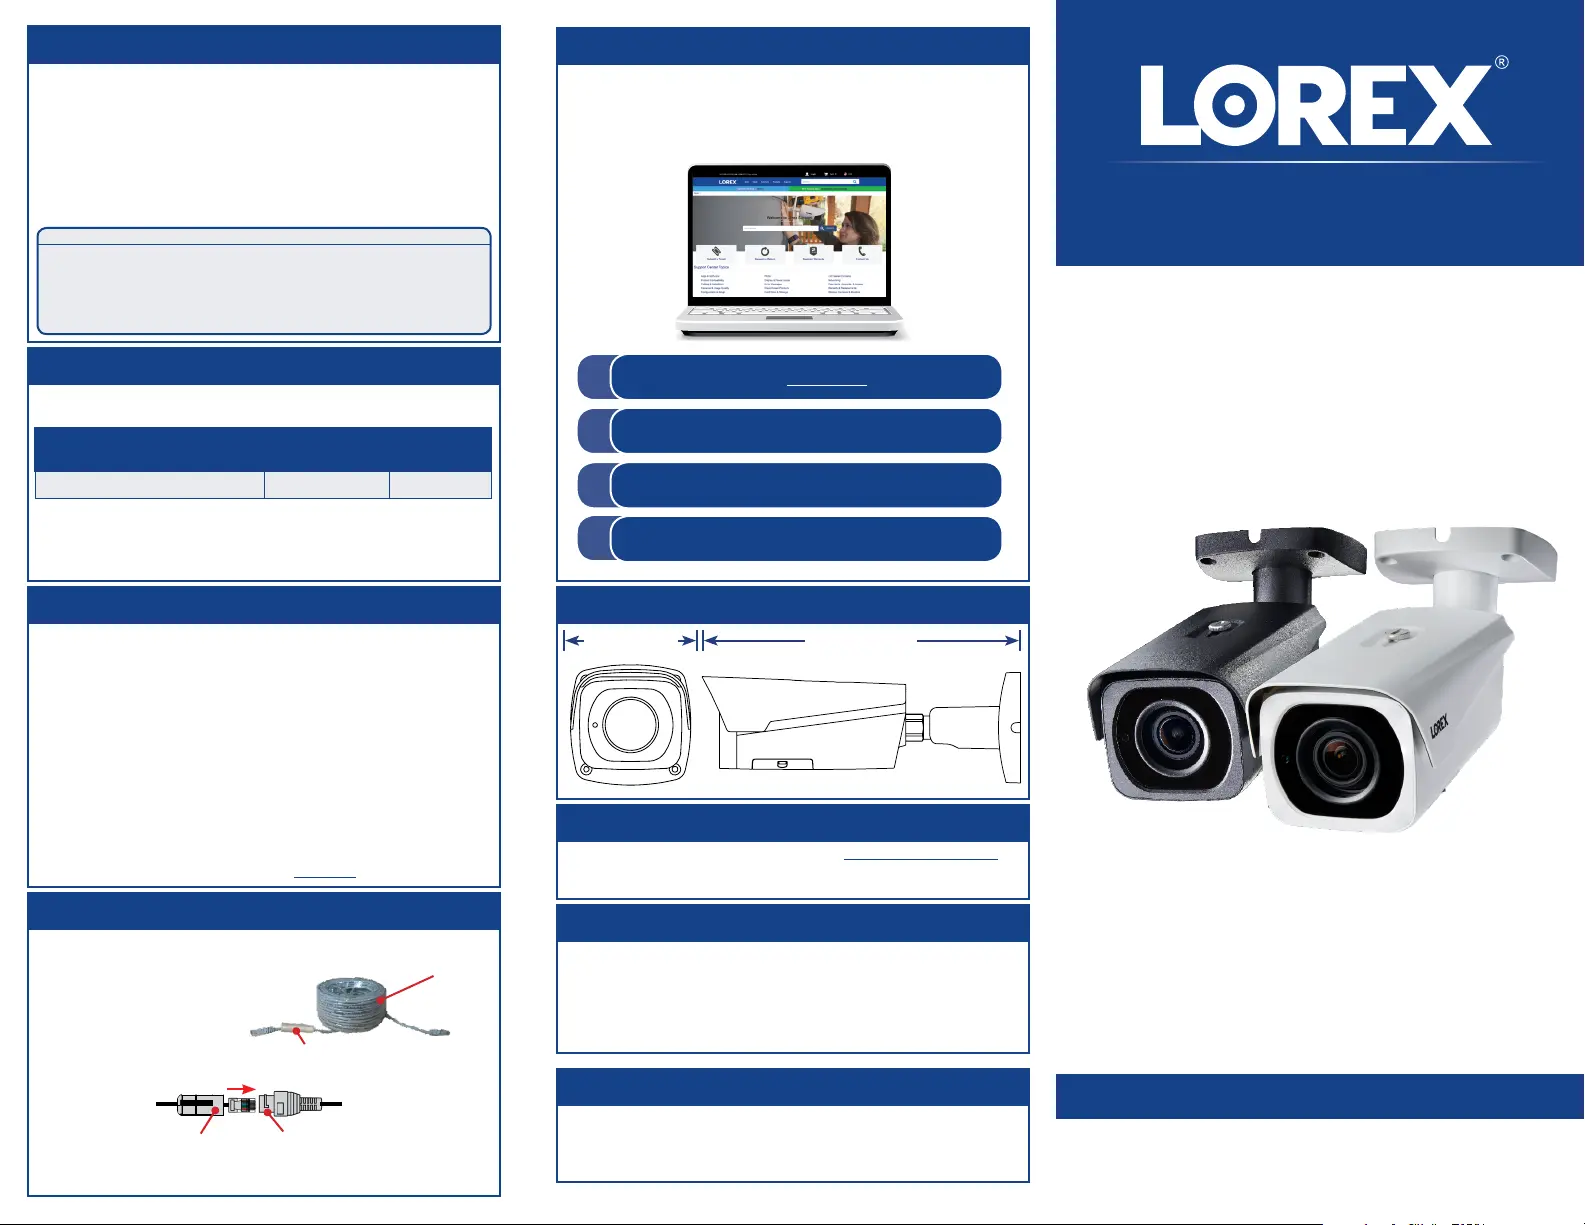
Dimensions
10.8” / 273mm
3.7” / 95mm
Need Help?
Visit us online for up-to-date software
and complete instruction manuals
Click on the Downloads tab
4
Visit lorex.com
Search for the model number
of your product
Click on your product in the
search results
3
2
1
www.lorex.com
Extend the cable run for your camera. Additional extension cables sold
separately. See table below:
Cable Extension Options
Cable Type
Max Cable Run
Distance
Max # of
Extensions
CAT5e (or higher) Ethernet cable300ft (92m)3
• For a full list of compatible recorders, visit lorex.com/compatibility
• Not intended for submersion in water. Installation in a sheltered
location recommended.
Disclaimers
CAT5e
Ethernet
Extension
Cable
RJ45 Cable Gland
Using the RJ45 Cable Gland(Optional)
The RJ45 cable gland is pre-attached to the
included CAT5e ethernet extension cable.
The RJ45 cable gland covers the camera’s Ethernet connector and the RJ45 plug to
provide weather-resistance and protection from dust, dirt and other environmental
contaminants.
To use the RJ45 cable gland:
RJ45 Cable
Gland Barrel
Camera Ethernet
Connector
NOTE: The RJ45 cable gland is weather-resistant. Seal the cap with silicone and/or
electrical tape for additional sealing if it will be exposed to precipitation regularly.
Twist the RJ45 cable gland barrel securely onto the camera Ethernet connector.
Product specificaties
| Merk: | Lorex |
| Categorie: | Bewakingscamera |
| Model: | LNB8963B |
Heb je hulp nodig?
Als je hulp nodig hebt met Lorex LNB8963B stel dan hieronder een vraag en andere gebruikers zullen je antwoorden
Handleiding Bewakingscamera Lorex

30 April 2026
29 April 2026
29 April 2026
29 April 2026
28 April 2026
28 April 2026
28 April 2026
28 April 2026
28 April 2026
1 April 2026
Handleiding Bewakingscamera
Nieuwste handleidingen voor Bewakingscamera
8 Juni 2026
8 Juni 2026
8 Juni 2026
8 Juni 2026
1 Juni 2026
27 Mei 2026
26 Mei 2026
25 Mei 2026
19 Mei 2026
19 Mei 2026