LevelOne KVM-9036 Handleiding
LevelOne Niet gecategoriseerd KVM-9036
Bekijk gratis de handleiding van LevelOne KVM-9036 (64 pagina’s), behorend tot de categorie Niet gecategoriseerd. Deze gids werd als nuttig beoordeeld door 117 mensen en kreeg gemiddeld 4.0 sterren uit 8 reviews. Heb je een vraag over LevelOne KVM-9036 of wil je andere gebruikers van dit product iets vragen? Stel een vraag
Pagina 1/64
KVM-9036 CAT5 USB KVM Extender
CAT5 USB KVM Extender
Transmitter (Tx) Unit x 1
Receiver (Rx) Unit x 1
USB KVM Cable x 2
Power Adapters (DC5V) x 2
This Quick Installation Guide x 1
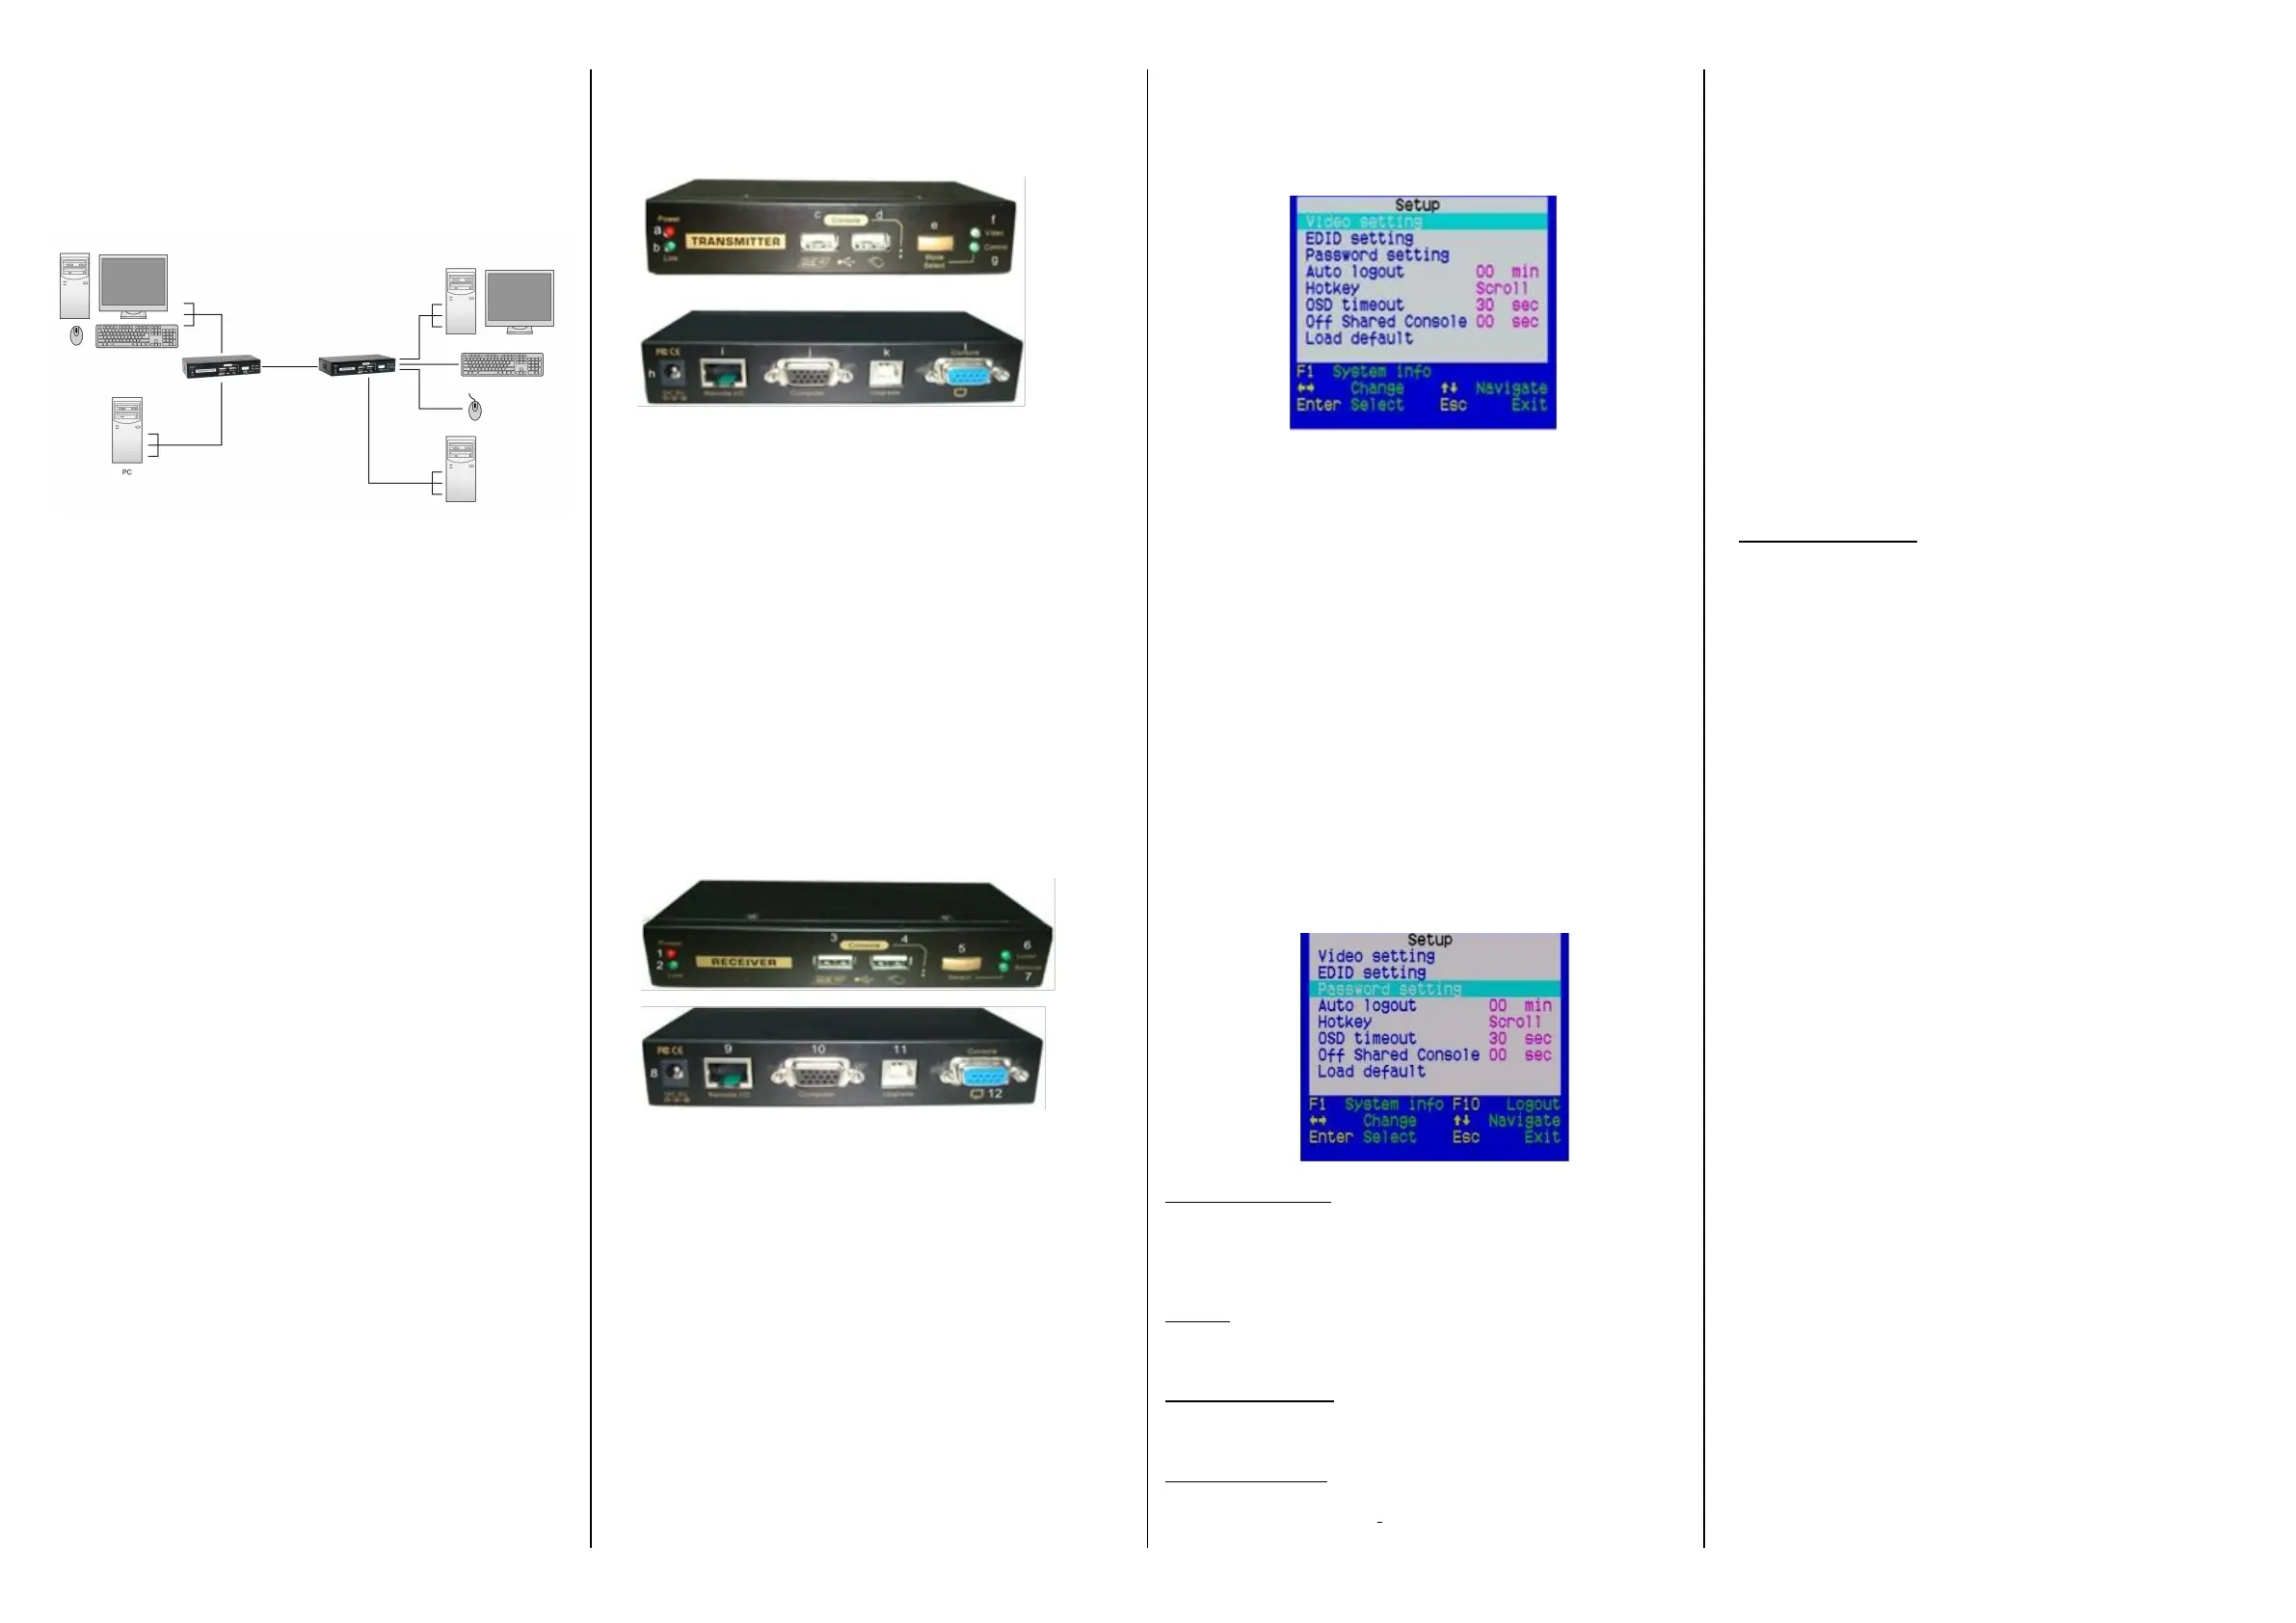
Transmitter Unit (Local )End Connection)
[Tx – Front-panel]
a.Power LED (Lights when power is on)
b.Link LED (Lights when link is on)
c.USB keyboard connector
d.USB mouse connector
e.Select Button for Receiver Mode (View Only/Full
Access/Access Deny)
f.Video LED (Lights when Remote Console monitor ison)
g.Control LED (Lights when Remote Console is on)
[Tx – Back panel]
h.Power jack (DC5V, center-positive)
i.
CAT5 Extension Port [RJ-45,connect tothe Receiver Unit
viaa CATx UTP cable, 100Metermax.]
j.Computer port [HDB-15(VGA), connect to the (Local)
computer using a special 3-in-1 KVMCombo-free cable]
Upgrade port (USB Type B, dedicated for firmware upgrade
use)
Receiver Unit (Remote End Connection)
[Rx-front panel]
1.Power LED (Lights when power is on)
2.Link LED (Lights when link is on)
3.USB keyboard connector
4.USB mouse connector
5.Toggle Button for Local / Remote Computers
6.Local Computer LED (Lights when Local computer active)
7.
Remote Computer LED (Lights when Remote computer active)
[RX-back-panel]
8.Power jack (DC5V, center-positive)
9.
CAT5 Extension Port [RJ-45,connect tothe (Remote)
computer via a CATx UTP cable, 100 Meter max
10.Computer port [HDB-15(VGA), connect to the (Local)
computer using a special 3-in-1 KVM Combo-free cable]
11.Upgrade Port (USB Type B, dedicated for firmware upgrade
use)
12.Console Video port [HDB-15(VGA), connect to monitor]
OSD Main Menu
OntheReceiverUnit,theOSD(on-screendisplay)Menu
control is available to facilitate more intuitive operations. Users
can configure various settings by the OSD Menu:
OSD Menu
To navigate the OSD Menu, just use the following keys
Esc: Exit,
→Left/Right cursor: change value in the menu option
Up/Down Cursor: Navigate.
F10: Logout the OSD Menu (However, if the password
protection is notenabled, the Logout feature will not be
available)
Hotkey sequence = [Scroll Lock]* + [Scroll Lock]* + H +(y)*
(y) = CAPS, F12 or NUM
⚫ Note that the hotkey preceding sequence setting on the
Receiver Console will not affect the hotkey preceding
sequence on the Transmitter Console, which will always
allow Scroll Lock + Scroll Lock as preceding hotkey. In
addition to using the hotkey command and can also use the
OSD menu to change the hotkey preceding sequence.
Please refer to the previous section.
Auto logout: [0 ~ 10]
Disable / Enable the Logout timeout (0~10min, 0 = Disable).
The Auto logout time can be configured from 0 (Disable), right up
to10 Min. If the password protection is not enabled, the Auto
logout will not be put into function.
Hotkey: [Scroll Lock (Default)]
To change
the preceding sequence hotkey by press, →toselect
the CAPS, F12 orNUM.
OSD Timeout: [0~60]
Configured the OSD timeout value, start at20 seconds, with an
increment of 5 upto 60 seconds (0~60 seconds, 0 = Disable).
Off Shared Console
Configured the Console Control [(Disable/Enable the timeout value
(0~30 seconds, 0= Disable)]
Note:Localand Remoteswitching engagedpriorityoffers
“Deadlock Functional”, the deadlock function to protect while one
us
er (either one) was using, the other user have to wait until the
first user released the process, then the other user can start touse.
When the deadlock is active, the Transmitter’s LED “Video” &
“Control”is flashing, until the user released the process control.
⚫ The blue component color is adjusted automatically as in
proportion to the red and green. Users do no need to adjust
⚫
themselves.
Inorder to achieve optimized video output onthe console
that may be100MMeters away from the computer, users
could adjust these various parameters conscientiously to
achieve anoptimized video output onthe console monitor.
For a general guideline ofhow toadjust your video display
parameters onthe remote console, please refer tonext
section, Optimize the Video Display onthe Remote Console.
Load Default Settings
Load the factory default settings.
FCC / CE Statements
FCC Statement: This equipment has been tested and found to
comply with the regulations for a Class B digital device, pursuant to
Part 15 of the FCC Rules. These limits are designed to provide
reasonableprotectionagainstharmfulinterferencewhenthe
equipmentis operatedinacommercialenvironment.This
equipmentgenerates,uses,andcanradiateradiofrequency
energy and, if notinstalled and used in accordance with this Quick
InstallationGuide,maycauseharmfulinterferenceto radio
communications. Operation of this equipment in a residential area
is likely to cause harmful interference in which case, the user will
be required to correct the interference at his/her own expense.
CE Statement: This is a Class B product in a domestic
environment, this product may cause radio interference, in which
case the user may be required to take adequate measures.
Deutsch
Installationsschema.
Français
Schéma d'installation.
Español
Diagrama de instalación.
Italiano
Diagramma di installazione.
Português
Diagrama de instalação
English
Installationdiagram
Product specificaties
| Merk: | LevelOne |
| Categorie: | Niet gecategoriseerd |
| Model: | KVM-9036 |
| Kleur van het product: | Zwart |
| Gewicht verpakking: | 1692.4 g |
| Breedte verpakking: | 204 mm |
| Diepte verpakking: | 176 mm |
| Hoogte verpakking: | 139 mm |
| Soort: | Zender en ontvanger |
| LED-indicatoren: | Ja |
| Connectiviteitstechnologie: | Bedraad |
| Meegeleverde kabels: | KVM |
| Inclusief AC-adapter: | Ja |
| Land van herkomst: | Taiwan |
| Aantal USB 2.0-poorten: | 2 |
| Resolutie (maximum analoog): | 1920 x 1200 Pixels |
| Materiaal: | Metaal |
| Duurzaamheidscertificaten: | CE, Federal Communications Commission (FCC), UKCA, WEEE |
| Plug and play: | Ja |
| On Screen Display (OSD): | Ja |
| Temperatuur bij opslag: | -5 - 65 °C |
| Upgraden van firmware mogelijk: | Ja |
| Luchtvochtigheid bij opslag: | 5 - 95 procent |
| Naleving van duurzaamheid: | Ja |
| Snelle installatiehandleiding: | Ja |
| (Buitenste) hoofdverpakking hoogte: | 430 mm |
| (Buitenste) hoofdverpakking breedte: | 440 mm |
| (Buitenste) hoofdverpakking brutogewicht: | 21300 g |
| (Buitenste) hoofdverpakking lengte: | 370 mm |
| Hoeveelheid per (buitenste) hoofdverpakking: | 12 stuk(s) |
| Maximaal bereik: | 100 m |
| Bedrijfstemperatuur (T-T): | 0 - 40 °C |
| Relatieve vochtigheid in bedrijf (V-V): | 5 - 95 procent |
| Pallet brutohoogte: | 115 mm |
| Pallet brutobreedte: | 1350 mm |
| Pallet brutolengte: | 940 mm |
| Zender breedte: | 131 mm |
| Zender diepte: | 65 mm |
| Zender hoogte: | 26 mm |
| Receiver gewicht: | 586 g |
| Transmitter gewicht: | 586 g |
| Ondersteundende kabel types: | Cat5, Cat5e |
| Receiver breedte: | 131 mm |
| Diepte van de receiver: | 65 mm |
| Receiver hoogte: | 26 mm |
| Poorttype zender video: | VGA |
| Poorttype zender lokaal toetsenbord/muis: | USB |
| USB-poorttype: | USB Type-B |
| Poorttype ontvanger lokale video: | VGA |
| Poorttype ontvanger lokaal toetsenbord/muis: | USB |
| Aantal RJ-45-poorten (ontvanger): | 1 |
| Aantal RJ-45-poorten (zender): | 1 |
| Zender lokale videopoort: | Ja |
| Poorttype zender lokale video: | VGA |
| KVM port selectie: | Hotkeys, Push-buttons |
Heb je hulp nodig?
Als je hulp nodig hebt met LevelOne KVM-9036 stel dan hieronder een vraag en andere gebruikers zullen je antwoorden
Handleiding Niet gecategoriseerd LevelOne

2 Mei 2026
26 Januari 2026
26 Januari 2026
27 December 2025
27 December 2025
23 December 2025
23 December 2025
23 December 2025
23 December 2025
22 December 2025
Handleiding Niet gecategoriseerd
Nieuwste handleidingen voor Niet gecategoriseerd
23 Juli 2026
23 Juli 2026
23 Juli 2026
23 Juli 2026
23 Juli 2026
23 Juli 2026
23 Juli 2026
23 Juli 2026
23 Juli 2026
22 Juli 2026