La Crosse Technology WS-9006U Handleiding
La Crosse Technology
Thermometer
WS-9006U
Bekijk gratis de handleiding van La Crosse Technology WS-9006U (6 pagina’s), behorend tot de categorie Thermometer. Deze gids werd als nuttig beoordeeld door 7 mensen en kreeg gemiddeld 4.6 sterren uit 4 reviews. Heb je een vraag over La Crosse Technology WS-9006U of wil je andere gebruikers van dit product iets vragen? Stel een vraag
Pagina 1/6

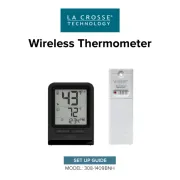
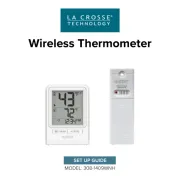
WS- 9006U
Wireless Temperature Station
Instruction Manual
FEATURES:
Four digit time display
12-hour or 24-hour selectable time
Indoor temperature (°F or °C)
Outdoor temperature (°F or °C)
Minimum and Maximum temperature
Four level RF strength indicator
Wall hanging or free standing
Low battery indicator for receiver and transmitter
100 foot wireless transmission range (open air)
RF reception
indicator
Indoor
Temperature
Outdoor
Temperature
Time
MIN/MAX/+ Button
CF / SET Button
Outdoor
Temperature
Sensor TX43U

INITIAL SET UP:
IMPORTANT Do Not Mix Old and New Batteries : -
- Do Not Mix Alkaline, Standard, or Rechargeable Batteries
NOTE: This temperature station can receive one transmitter only.
First, insert fresh 2 AA, IEC LR6, 1.5 alkaline batteries into the TX43U transmitter, observing the x V
correct polarity (see marking inside battery compartment). Keep transmitter 5-10 feet from the
temperature station.
Within 30 seconds of powering up the transmitter, insert 2 A, IEC LR3, 1.5V batteries into the x AA
Temperature Station, observing the correct polarity (see marking inside battery compartment Once ).
the batteries are in place, all segments of the LCD will light up briey. Following, the indoor
temperature will display. If the indoor temperature does not show in the LCD after 60 seconds,
remove the batteries and wait for at least 60 seconds before reinserting them. Once the indoor data is
displayed, proceed to the next step.
After the batteries are inserted, the Temperature Station will start receiving outdoor temp data from
the transmitter. The outdoor temperature should be displayed on the Temperature station. If this does
not happen after 2 minutes, remove the batteries from both units and start again from the beginning.
In order to ensure sufcient 433 MHz transmission, place the outdoor transmitter a distance of no
more than 100 feet (30 meters) from the Temperature Station and the transmitter.
INSTALL AND REPLACE BATTERIES IN THE TEMPERATURE TRANSMITTER
The Temperature transmitter uses AA, IEC LR6, 1.5V batteries. When batteries will 2 x
need to be replaced, the low battery icon will appear on the LCD in front of the outdoor
temperature. To install and replace the batteries, please follow the steps below:
1. Remove the battery compartment cover. (Slide to the bottom and then lift straight o).
2. Insert the batteries, observing the correct polarity (see marking).
3. Replace the battery cover the unit. to
NOTE: When changing batteries in any of the units, all units need to be reset by
following the set up procedures. The transmitter at start- , assigns a random security up
code and this code must be received and stored by the Temperature Station in the rst
few minutes of power supplied.
INSTALL AND REPLACE BATTERIES IN THE TEMPERATURE STATION
The Temperature Station uses 2 x AAA, IEC LR3 1.5V batteries. When batteries
need to be replaced, the low battery icon will appear in front of the indoor
temperature.
To install and replace the batteries, please follow the steps below:
1. Remove the battery compartment cover.
2. Insert batteries observing the correct polarity (see marking).
3. Replace battery compartment cover.
LOW BATTERY:
Replace the batteries in all units every 12 months to ensure optimum accuracy of these units. A low
battery icon will display next to the outdoor temperature when the transmitter batteries are low and next to
the indoor temperature then the batteries in the temperature station are low.

SET TIME:
12/24-HOUR TIME: Hold the CF/SET button until 12hr or 24hr ashes in the lower
right hand corner. Press and release the MIX/MAX/+ button to switch between -hour 12
and 24-hour time. Press the CF/SET button once to continue.
HOUR: The Hour will ash. Press and release the MIX/MAX/+ button to change the
hour. Press the CF/SET button once to continue.
MINUTES: The minutes will flash. Press and release the MIX/MAX/+ button to change
the minutes.
NOTE: Hold the MIX/MAX/+ button to move quickly through the numbers. Press
CF/SET once to confirm and exit.
TEMPERATURE SELECTION:
FAHRENHEIT/CELSIUS: Press and release the CF/SET button once to switch from Fahrenheit to
Celsius.
FOUR LEVEL RF INDICATORS: The temperature station will indicate strength of signal
reception from the outdoor transmitter by the number of bars on the RF indicator icon.
: Shows after initial set up and stays when reception is at full strength. 4-bars
: Indicates one reception failure from the outdoor transmitter. 3-bars
: Indicates two reception failures from the outdoor transmitter. 2-bars
: Indicates three reception failures from the outdoor transmitter.1-bar
: Indicates four reception failures from the outdoor transmitter. 0-bars
The antenna symbol will ash on initial set while searching for the signal. If it fails to receive a signal after
63 minutes the temperature station will display dashes (“ “). The temperature stati--.- on will search again
for a signal for 3 minutes every next hour.
MIN/MAX RECORDING:
VIEW MIN/MAX: Press the MIN/MAX/+ button view indoor and outdoor MAX, MIN and Current
temperature.
RESET MIN/MAX: Hold the MIN/MAX/+ button for 3 seconds to reset all MIN/MAX readings to current
temperatures.
OUTDOOR TRANSMITTER RESET BUTTON:
The Temperature Transmitter has a RESET button. Use a small pointed object to gently press and
release to send a signal. Follow the instructions for in SET UP regarding the display.
NOTE: Removing power from the transmitter and display negates the need for the RESET button.
POSITIONING THE TEMPERATURE STATION:
Stand the Temperature Station on a tabletop, counter or desk, or mount on a wall. Ensure that the
Temperature Station continuously receives the 433MHz signal from the Sensor before mounting it in the
desired location.
WALL MOUNT
Install a mounting screw (not included) into a wall leaving approximately 3/16 of an —
inch (5mm) extended from the wall.
Place the Temperature Station onto the screw, using the hanging hole on the
backside. Gently pull the Temperature Station down to lock into place.
NOTE: Always ensure that the Temperature Station locks onto the screw before
releasing the station.
TABLE STAND: The Temperature Station has a wide base to stand on a desk or table.
Product specificaties
| Merk: | La Crosse Technology |
| Categorie: | Thermometer |
| Model: | WS-9006U |
Heb je hulp nodig?
Als je hulp nodig hebt met La Crosse Technology WS-9006U stel dan hieronder een vraag en andere gebruikers zullen je antwoorden
Handleiding Thermometer La Crosse Technology

5 December 2024

3 September 2024

3 September 2024
3 September 2024
3 September 2024

3 September 2024

2 Juli 2024

2 Juli 2024

4 Juni 2023

4 Juni 2023
Handleiding Thermometer
- Fora
- Quigg
- TensCare
- Cuisinart
- Nedis
- Arya
- AnD
- PCE Instruments
- Mediblink
- Geratherm
- Steinberg
- Mabis
- Salter
- Waeco
- MyGuard
Nieuwste handleidingen voor Thermometer
8 September 2025
25 Augustus 2025
18 Augustus 2025
13 Augustus 2025

6 Augustus 2025
28 Juli 2025
21 Juli 2025
15 Juli 2025
14 Juli 2025

14 Juli 2025