Kidde CV3106 Handleiding
Kidde Niet gecategoriseerd CV3106
Bekijk gratis de handleiding van Kidde CV3106 (2 pagina’s), behorend tot de categorie Niet gecategoriseerd. Deze gids werd als nuttig beoordeeld door 19 mensen en kreeg gemiddeld 4.7 sterren uit 4 reviews. Heb je een vraag over Kidde CV3106 of wil je andere gebruikers van dit product iets vragen? Stel een vraag
Pagina 1/2
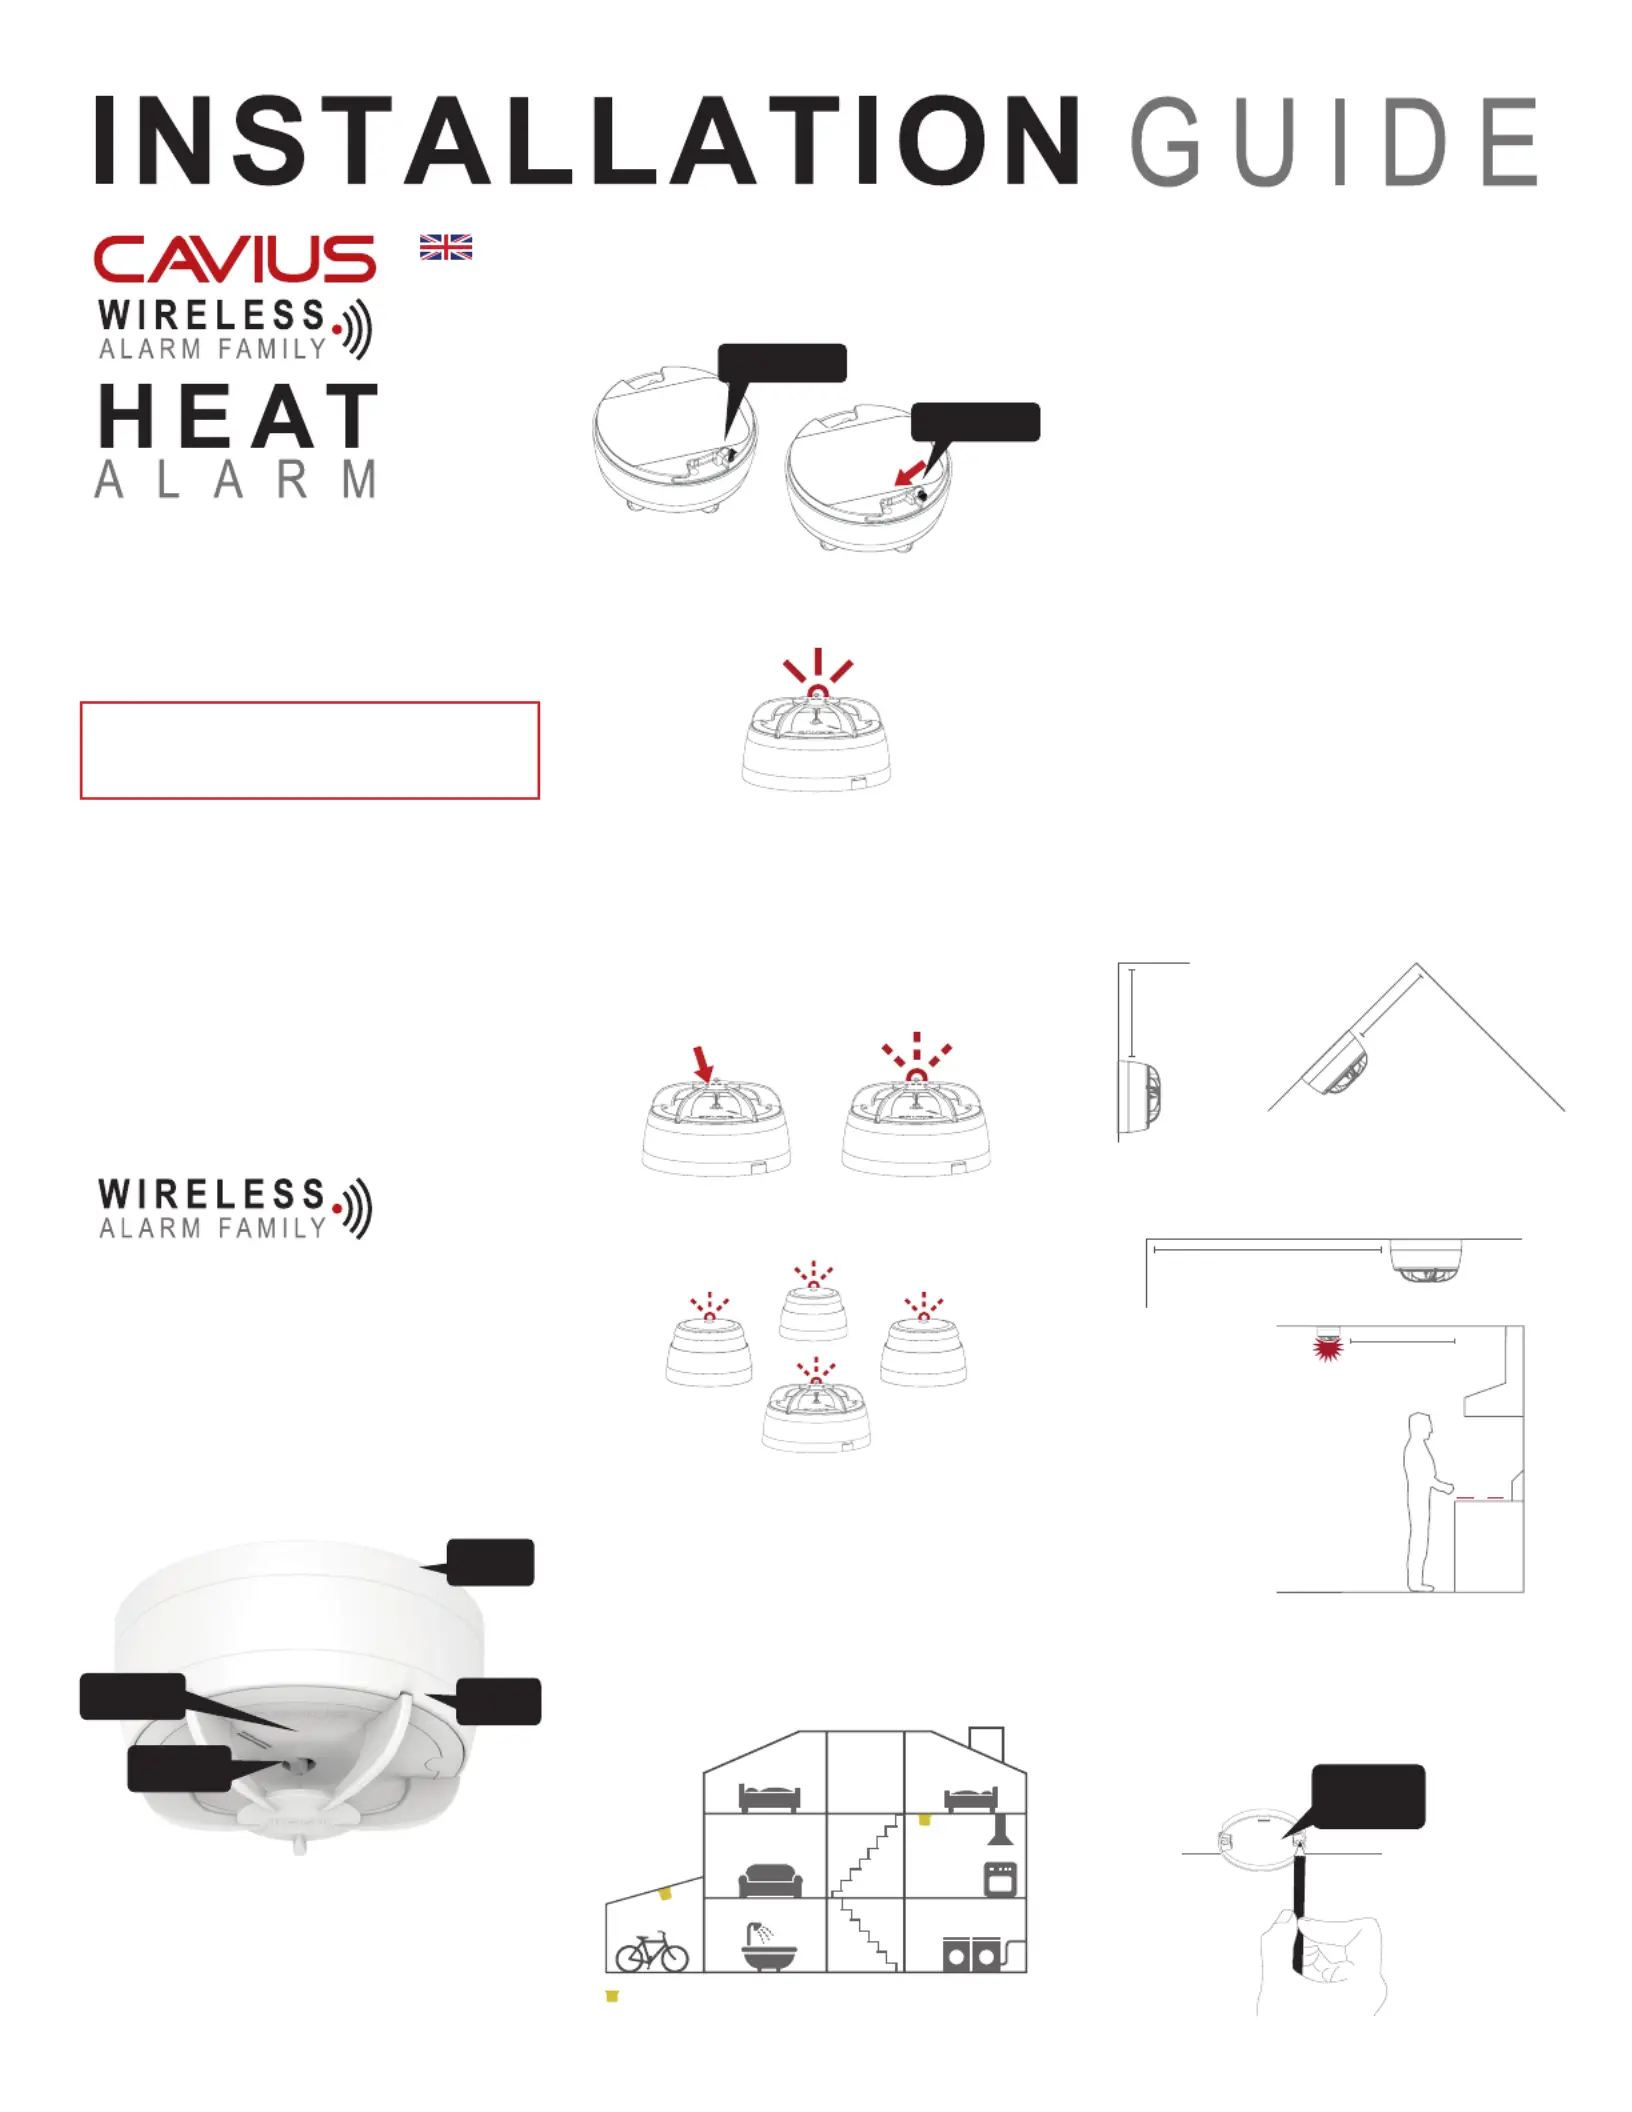
2.THE BEST AREAS TO INSTALL THE HEAT
ALARM:
• Kitchen area
• Garage or workshop
Additional alarms increase the security.
3.NOTAREAS WHERE TO INSTALL HEAT-
ALARMS:
• In rooms where the temperature goes outside
-10ºC to +50ºC.
• Bedrooms
• Lounge
• Dining room
• Hallway
• Family room
NOTE:In areas where smoldering res occur
over aming res, photoelectric smoke alarms
are still the best to be installed.
4. PLACEMENT:
The heat alarm is design to be installed on a ceiling
or wall. Do not install to close to the oven/hob/
stove (see drawing).
For wall installation:
For celling installation:
5. INSTALLING THE HEAT ALARM:
Detach the alarm from the mounting base by
twisting counter clockwise.
MARK UP
SCREW HOLES
WITH A PEN
All alarms that need to be connected in the
house should be put into ‘Learn Mode’by sliding
the switch on the back of the alarm to the ‘Learn
Mode’ position.
The red LED will light up to indicate that ‘Learn
Mode’ has been selected.
Please note that when the alarms are placed
in ‘Learn Mode’they can’t be inserted into the
mounting base.
Press and hold the test button at one alarm only,
until it beeps and the LED ashes. This alarm will
become the master and will start sending out a
specic house code to the other alarms.
As the other alarms receive the specic house
code, they will also ash the LED light.
When the red LED light flashes on all alarms,
they are connected and MUST BE SWITCHED
OUT OF ‘LEARN MODE’and installed.
Label the original “Learn” alarm in order to easily
add new CAVIUS Wireless Family alarms to the
system.
Thermal heat alarm device
Model no.: 3106
This Thermal Heat Alarm is designed for areas not
suitable for smoke alarms due to high risk of false
alarms such as; kitchens, garages or workshops.
PLEASE READ THE INSTALLATION GUIDE
CAREFULLY BEFORE INSTALLATION AND
RETAIN FOR FUTURE USE.
SAFETY INSTRUCTIONS:
The device comes with a 3V lithium battery. Bat-
teries are to be handled with care and battery pow-
ered devices should be kept out of reach of chil-
dren. Do not try to recharge or burn the batteries.
TECHNICAL INFORMATION:
Cavius heat alarm detects:
1) rapidly increased temperature level
2) absolute heat level of 58 degrees C.
The maximum number of alarms that can be inter-
linked within a house group are 32.
Please note:These must be alarms from the CAVIUS
The distance between interlinked alarms depends
on the house layout and they should always be
tested after installation. It is not advised to get
more than 10m distance between two alarms.
Diameter: 78mm. Height: 42mm.
The alarm is powered by a non-replaceable 3v
CR123A lithium battery.
1. HOW TO SET UP AND CONNECT ALARMS:
Please note:The product label must not be
removed as it contains important information
regarding the product.
UK
MOUNTING
BASE
TEST BUTTON
RED LED
THERMISTOR
Peak ceiling
Minimum 15cm
from peak
Minimum 15cm and
maximum 30cm from
ceiling
Wall
Ceiling
Minimum 30cm
and maximum 50cm
from stove
Ceiling
Minimum 30cm
from wall
Wall
Ceiling
LEARN MODE
NORMAL MODE
Heat
Siting of Heat alarms
Product specificaties
| Merk: | Kidde |
| Categorie: | Niet gecategoriseerd |
| Model: | CV3106 |
Heb je hulp nodig?
Als je hulp nodig hebt met Kidde CV3106 stel dan hieronder een vraag en andere gebruikers zullen je antwoorden
Handleiding Niet gecategoriseerd Kidde

2 Juli 2026
13 April 2026
6 April 2026
6 April 2026
3 December 2025
6 November 2025
6 November 2025
2 September 2025
1 September 2025
2 December 2024
Handleiding Niet gecategoriseerd
Nieuwste handleidingen voor Niet gecategoriseerd
23 Juli 2026
23 Juli 2026
23 Juli 2026
22 Juli 2026
22 Juli 2026
22 Juli 2026
22 Juli 2026
22 Juli 2026
22 Juli 2026
21 Juli 2026