JVC DT-V21G2Z Handleiding
Bekijk gratis de handleiding van JVC DT-V21G2Z (37 pagina’s), behorend tot de categorie Speaker. Deze gids werd als nuttig beoordeeld door 81 mensen en kreeg gemiddeld 5.0 sterren uit 41 reviews. Heb je een vraag over JVC DT-V21G2Z of wil je andere gebruikers van dit product iets vragen? Stel een vraag
Pagina 1/37

MULTI FORMAT LCD MONITOR
INSTRUCTIONS
DT-V24G2
DT-V21G2
DT-V17G2
DT-V17G25
®
B5A-1245-00
The illustration of the monitor is of DT-V21G2.
This is the English instruction manual. Instruction manuals in other languages (German, French, Italian,
Spanish, Russian) are included on the supplied CD-ROM as PDF files (for Europe only).
For Customer Use:
Enter below the Model No. and Serial No.
which is located on the body. Retain this
information for future reference.
Model No.
Serial No.
:
:
Please read the following before getting
started:
Thank you for purchasing this product.
Before operating this unit, please read the
instructions carefully to ensure the best
possible performance.

22
Safety Precautions (English)
Before use, read “Safety Precautions” carefully, and then operate the product correctly.
FCC NOTICE
CAUTION: Changes or modifications not approved by JVC could void the user’s authority to operate the equipment.
NOTE: This equipment has been tested and found to comply with the limits for a Class A digital device, pursuant to Part 15 of the
FCC Rules. These limits are designed to provide reasonable protection against harmful interference when the equipment is operated
in a commercial environment. This equipment generates, uses, and can radiate radio frequency energy and, if not installed and used
in accordance with the instruction manual, may cause harmful interference to radio communications. Operation of this equipment in a
residential area is likely to cause harmful interference in which case the user will be required to correct the interference at his own expense.
CAN ICES-3A / NMB-3 A
Warning: This is a class A product. In a domestic environment this product may cause radio interference in which case the user may be required
to take adequate measures.
Use only the power source specified on the unit.
• AC power: 120 V/220 V – 240 V, 50 Hz/60 Hz
• DC power: 12 V – 17 V (DT-V21G2/DT-V17G2 only)
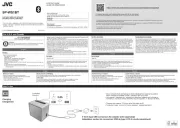
WARNING
To prevent injury by accidental fall
Fix the monitor to a wall by using strings.
Fixing the monitor
Attach the hook (not provided) to the VESA mounting holes on the
rear panel (use the two holes on the upper side) using M4 x 10
mm screws (not provided). Bind the hooks on the rear panel of the
monitor to a wall or a pillar using durable string.
Hook (not provided)
VESA mounting holes
The illustration of the monitor is of DT-V21G2.
Hook and screw (M4 x 10 mm)
(not provided)
EMC Supplement
This equipment is in conformity with the provisions and protection requirements of the corresponding European Directives. This equipment is
designed for professional video appliances and can be used in the following environments:
• Controlled EMC environment (for example purpose built broadcasting or recording studio), and rural outdoors environment (far away from
railways, transmitters, overhead power lines, etc.)
In order to keep the best performance and ensure electromagnetic compatibility, we recommend to use cables not exceeding the following length:
Cable Length
Power cord (attached cable (H05VV-F 3 x 0.75 mm
2)) 2.0 m
Video signal cable (coaxial cable) 2.0 m
Audio signal cable (shielded cable) 1.5 m
HDMI cable (shielded cable) 2.0 m
RS-232C cable (shielded cable) (A straight cable with a D-sub 9-pin connector) 2.0 m
RS-485 cable (twist pair cable) (A straight LAN cable) 2.0 m
REMOTE cable (twist pair cable) (A straight LAN cable) 2.0 m
CAUTION
In case where the strong electromagnetic waves or magnetism are near the audio cable or the signal cable, the sound or the picture will contain
noise. In such cases, please keep the cable away from the sources of the disturbance.
Product Fiche
Supplier
Model Name DT-V24G2 DT-V21G2 DT-V17G2 DT-V17G25
Energy Efficiency Class C C D D
Visible screen size 24 inch/61 cm 21.5 inch/55 cm 16.5 inch/42 cm 16.5 inch/42 cm
On-mode Power Consumption 38.9 W 38.8 W 29.0 W 29.7 W
Annual Energy Consumption*157 kWh 57 kWh 43 kWh 44 kWh
Stand-by mode Power Consumption 0.29 W 0.29 W 0.30 W 0.30 W
Resolution 1920 x 1200 pixels 1920 x 1080 pixels 1920 x 1080 pixels 1920 x 1080 pixels
*1 Energy consumption XYZ kWh per year, based on the power consumption of the television operating 4 hours per day for 365 days. The actual energy
consumption will depend on how the television is used.

33
Caution for use of the product for many hours
In the case that you use the monitor for many hours, we recommend that you set “No Sync Action” in “Sync Function” to “Power Save” in
Main Menu ( page 15). This will reduce power consumption and relieve strain on the monitor. To reduce damage to the LCD panel, +
using the LCD Saver function is recommended. ( page 16)+
Caution for use of the product in the high temperature
Do not use the product in places of high temperature; otherwise, parts of this product or the LCD panel may be damaged. This product is
equipped with a temperature sensor to give warning if the temperature becomes too high. If the temperature exceeds the range of normal
use, “Temp. Over” is displayed, and the power is turned off automatically if the temperature becomes any higher. In this case, move the
product to a place of low temperature to let it cool down.
Maintenance
Unplug this product from the wall outlet before cleaning.
LCD panel
To avoid irreparable change in appearance of the screen such
as uneven color, discoloration, scratches, be careful about the
following:
l Do not paste or stick anything using any glues or adhesive
tapes.
l Do not write anything on the screen.
l Do not strike the screen with a hard object.
l Avoid condensation on the screen.
l Do not wipe the screen with any liquid such as water. In
addition, wiping the screen with water-diluted neutral
detergent or solvent such as alcohol, thinner, or benzine may
affect the anti-reflection treatment of the screen.
l Do not wipe the screen forcefully.
Wipe stains off the LCD panel with a soft cloth. If the screen gets
heavily stained, wipe it with a soft cloth soaked in water-diluted
neutral detergent and wrung well, then wipe with a soft dry cloth.
Cabinet
To avoid the deterioration or damages of the cabinet such as its
paint’s peeling away, be careful about the following:
l Do not wipe the cabinet using solvent such as alcohol, thinner,
or benzine.
l Do not expose the cabinet to any volatile substance such as
insecticides.
l Do not allow any rubber or plastic in contact for a long time.
l Do not wipe the cabinet forcefully.
Wipe stains off the cabinet with a soft cloth. If the cabinet gets
heavily stained, wipe it with a soft cloth soaked in water-diluted
neutral detergent and wrung well, then wipe with a soft dry cloth.
Ventilation openings
Use a vacuum cleaner to get rid of the dust around the intakes (all
the openings). If a vacuum cleaner is not available, use a cloth and
wipe it off. Leaving the dust around the intakes may prevent proper
temperature control and cause damage to the product.
The LCD panel and backlight have life expectancy. Due to the basic characteristics of the LCD panel, an afterimage or uneven display
may occur. It is recommended that you change images occasionally, activate the power saving function, or often turn off the power to
reduce the load on the LCD panel. Continuous operations of the LCD panel may accelerate the deterioration.
Operating Precautions
Table of Contents
Safety Precautions (English) . . . . . . . . . . 2
Operating Precautions . . . . . . . . . . . . . . . 3
Caution for use of the product for many hours 3
Caution for use of the product in the high temperature 3
Maintenance 3
Installation ...........................4
Index of Parts and Functions . . . . . . . . . 5
Rear panel 5
Front panel 6
Showing Input Signals . . . . . . . . . . . . . . . 8
Audio Channel Selection 8
On the Information Display 8
On the Status Display 8
Menu Configuration . . . . . . . . . . . . . . . . . . 9
First Time Installation 9
The operation procedure 9
Menu Transition Diagram 10
Main Menu 11
Set-Up Menu 15
External Control . . . . . . . . . . . . . . . . . . . . .20
About the external control 20
Using the MAKE/TRIGGER system 20
Using the serial communication 21
Troubleshooting . . . . . . . . . . . . . . . . . . . .23
Self-check program 24
Specifications .......................25
General 25
LCD panel 25
Input/output terminals 25
Dimensions 26
Available signals 27
Sicherheitsmaßregeln (Deutsch) . . . . .28
Précautions de sécurité (Français). . . .29
Precauzioni di sicurezza (Italiano) . . . .30
Precauciones de seguridad (Español)
. . .31
Меры предосторожности (Русский)
. . .32
Указатель частей и функций . . . . . . .33
Product specificaties
| Merk: | JVC |
| Categorie: | Speaker |
| Model: | DT-V21G2Z |
Heb je hulp nodig?
Als je hulp nodig hebt met JVC DT-V21G2Z stel dan hieronder een vraag en andere gebruikers zullen je antwoorden
Handleiding Speaker JVC
30 Juni 2025
7 Juni 2025
19 Mei 2025
22 April 2025
22 April 2025

21 Oktober 2024

31 Augustus 2024

17 Juni 2024

1 Juni 2024

31 Maart 2024
Handleiding Speaker
- Nikkei
- Acoustic Energy
- Blackstar
- LaCie
- Energizer
- SoundCast
- Bowers Wilkins
- Thiel
- Silvercrest
- Rapoo
- Speed-Link
- Atlas Sound
- Audizio
- Vifa
- OneConcept
Nieuwste handleidingen voor Speaker
30 Juli 2025

30 Juli 2025
30 Juli 2025
30 Juli 2025
30 Juli 2025
29 Juli 2025
29 Juli 2025
29 Juli 2025
29 Juli 2025

29 Juli 2025