Indesit IGW 324 IX Handleiding
Bekijk gratis de handleiding van Indesit IGW 324 IX (8 pagina’s), behorend tot de categorie Oven. Deze gids werd als nuttig beoordeeld door 38 mensen en kreeg gemiddeld 4.5 sterren uit 19.5 reviews. Heb je een vraag over Indesit IGW 324 IX of wil je andere gebruikers van dit product iets vragen? Stel een vraag
Pagina 1/8

EN
1
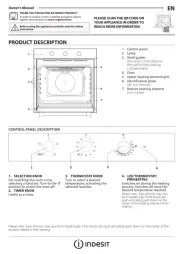
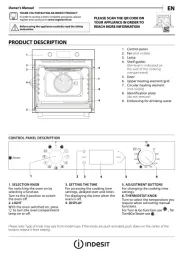
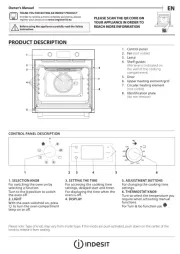
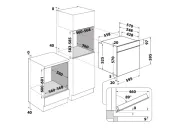
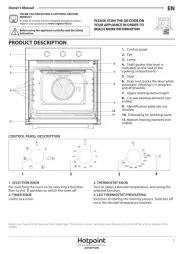
PRODUCT DESCRIPTION
DAILY REFERENCE
GUIDE
CONTROL PANEL
Before using the appliance carefully read the Health and Safety guide.
1. Control panel
2. Lamp
3. Accessories shelf runners
(the level is indicated on the wall of
the cooking compartment)
4. Door
5. Upper heating element/grill
6. Identification plate
(do not remove)
7. Burner
(not visible)
1. TIMER KNOB
Use to set the timer.
Does not start or stop cooking.
2. ADJUSTMENT KNOB
For switching the oven on,
adjusting the temperature and
selecting the “Grill” function.
Turn to the position to switch the
oven off.
3. GRILL LED
This lights up when the grill is in
use.
4. LIGHT BUTTON
Press to switch the light on (1) or
off (0).
THANK YOU FOR PURCHASING AN
INDESIT PRODUCT
To receive more comprehensive help and
support, please register your product at
www.indesit.com/register
WWW
You can download the Safety Instructions
and the Use and Care Guide by visiting our
website docs.indesit.eu and following the
instructions on the back of this booklet.
Min
Max
150
160
180 200 230
0
5
10
15
20
25
30
35
40
45
50
60
1 2 3 4
Min
Max
150
160
180 200
230
0
5
10
15
20
25
30
35
40
45
50
60
1
2
3
4
6
5
7

2
ACCESSORIES
WIRE SHELF DRIPPING PAN (IF PRESENT) BAKING TRAY
The number of accessories may vary depending on which model is purchased.
Other accessories can be purchased separately from the After-sales Service.
INSERTING THE WIRE SHELF AND OTHER
ACCESSORIES
• Insert the wire shelf onto the level you require by
holding it tilted slightly upwards and resting the
raised rear side (pointing upwards) down first. Then
slide it horizontally along the shelf runners as far as
possible.
• The other accessories, such as the baking tray, are
inserted horizontally by sliding them along the shelf
runners.
FITTING THE COVER ON THE BURNER
To fit the cover on the burner
correctly, place it on the
bottom of the cooking
compartment.
Position it so that the words
“AVANTI - FRONT” are facing
the outside and so that the
cover cannot move sideways
once lowered into position.

EN
3
HEAT THE OVEN
A new oven may release odours that have been left
behind during manufacturing: this is completely
normal.
Before starting to cook food, we therefore
recommend heating the oven with it empty in order
to remove any possible odours.
Remove any protective cardboard or transparent film
from the oven and remove any accessories from inside
it.
Heat the oven to 250° C for about one hour.
Follow the instructions for setting the function
correctly.
Notes: It is advisable to air the room after using the appliance
for the rst time.
USING THE APPLIANCE FOR THE FIRST TIME
. STARTING THE OVEN
Keeping the oven door closed, push and turn the
adjustment knob to the maximum temperature mark
Max
. Hold the adjustment knob down for a couple
of seconds to make sure that the oven switches on.
The electronic switch-on knob must not be pressed
and held for more than 15 seconds.
To change the temperature, turn the adjustment knob
to the temperature you require.
Min 150 160 180 200 230 Max
If you want to stop cooking at any point and switch
the oven off, turn the adjustment knob to the
position.
If the oven fails to switch on or it switches o
accidentally, turn the adjustment knob back to the
position, open the oven door and wait at least
one minute before attempting to switch the oven
on again.
GRILL FUNCTION
For grilling steaks, kebabs and sausages, cooking
vegetables au gratin or toasting bread.
We suggest placing food on the 5th shelf. When grilling
meat, we recommend using a dripping pan to collect
the cooking juices: Position it on the 4th shelf, adding
approx. 200 ml of drinking water.
Preheat the oven for 3-5 minutes. The oven door must
remain closed during cooking.
The roasting spit (if provided) can be used with this
function.
To select the “Grill” function, turn the adjustment knob to
symbol.
Once the function has started, the LED will light up to
indicate that the function has been activated.
. SETTING THE TIMER
This option does not interrupt or activate cooking
but allows you to use the minute minder both while a
function is active and when the oven is off.
To activate the timer, turn the timer knob right round
in an clockwise direction and then turn it back in
the opposite direction to the desired duration: An
acoustic signal will warn you when the countdown is
finished.
DAILY USE
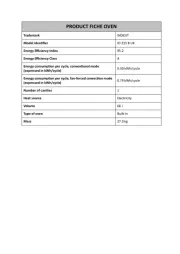
Product specificaties
| Merk: | Indesit |
| Categorie: | Oven |
| Model: | IGW 324 IX |
Heb je hulp nodig?
Als je hulp nodig hebt met Indesit IGW 324 IX stel dan hieronder een vraag en andere gebruikers zullen je antwoorden
Handleiding Oven Indesit

5 Juli 2025
5 Juli 2025
5 Juli 2025
4 Juli 2025
4 Juli 2025
4 Juli 2025
4 Juli 2025
4 Juli 2025
4 Juli 2025
11 Juni 2025
Handleiding Oven
- Beautiful
- Tepro
- Vollrath
- Hotpoint
- Mistral
- Apelson
- Domo
- Bimar
- Kleenmaid
- Zephir
- Galanz
- Samsung
- Dometic
- APW Wyott
- Char-Broil
Nieuwste handleidingen voor Oven

9 Augustus 2025
9 Augustus 2025

8 Augustus 2025
8 Augustus 2025
8 Augustus 2025

8 Augustus 2025
7 Augustus 2025
6 Augustus 2025

6 Augustus 2025
6 Augustus 2025